Bottle Gourd Curry (you can also make this with marrow or courgette)

Happy New Year everyone. What a strange old year it’s been already and we are only a couple of weeks in. Here in the UK we are on national lockdown so we are all hunkering down and mainly staying confined within the four walls of our homes, with fleeting escapes of freedom with exercising and grocery shopping. A 5km run has never been so thrilling! I was picking up some spices for my zoom classes this morning (I’m sending them to folks in the UK who join my zoom class) and saw some dudhi – also known as lauki, calabash or bottle gourds – for sale and thought it would be good to buy a couple so that I could (a) tell you more about them and (b) show you a fab recipe that you will love.


Whilst I realise that unless you live near an Asian grocer you are not going to be able to get hold of these vegetables, the good news is that you can replace them with marrow or courgette which will work equally well. They are not dissimilar to a small, thinner marrow, with a light green smooth skin and white flesh. When harvested young they are a perfect vegetable to eat. They are primarily grown however for their fruit, which when dried forms a woody hollow vessel that can be used as a container for food and water but also as fishing floats, musical instruments and even clothing. It is a native of Africa but recent DNA research suggests that it was “domesticated three times: in Asia, at least 10,000 years ago; in Central America, about 10,000 years ago; and in Africa, about 4,000 years ago”. A cool fact that might appeal to you, is that this vegetable grows on a plant that has large white flowers that only open up at night.


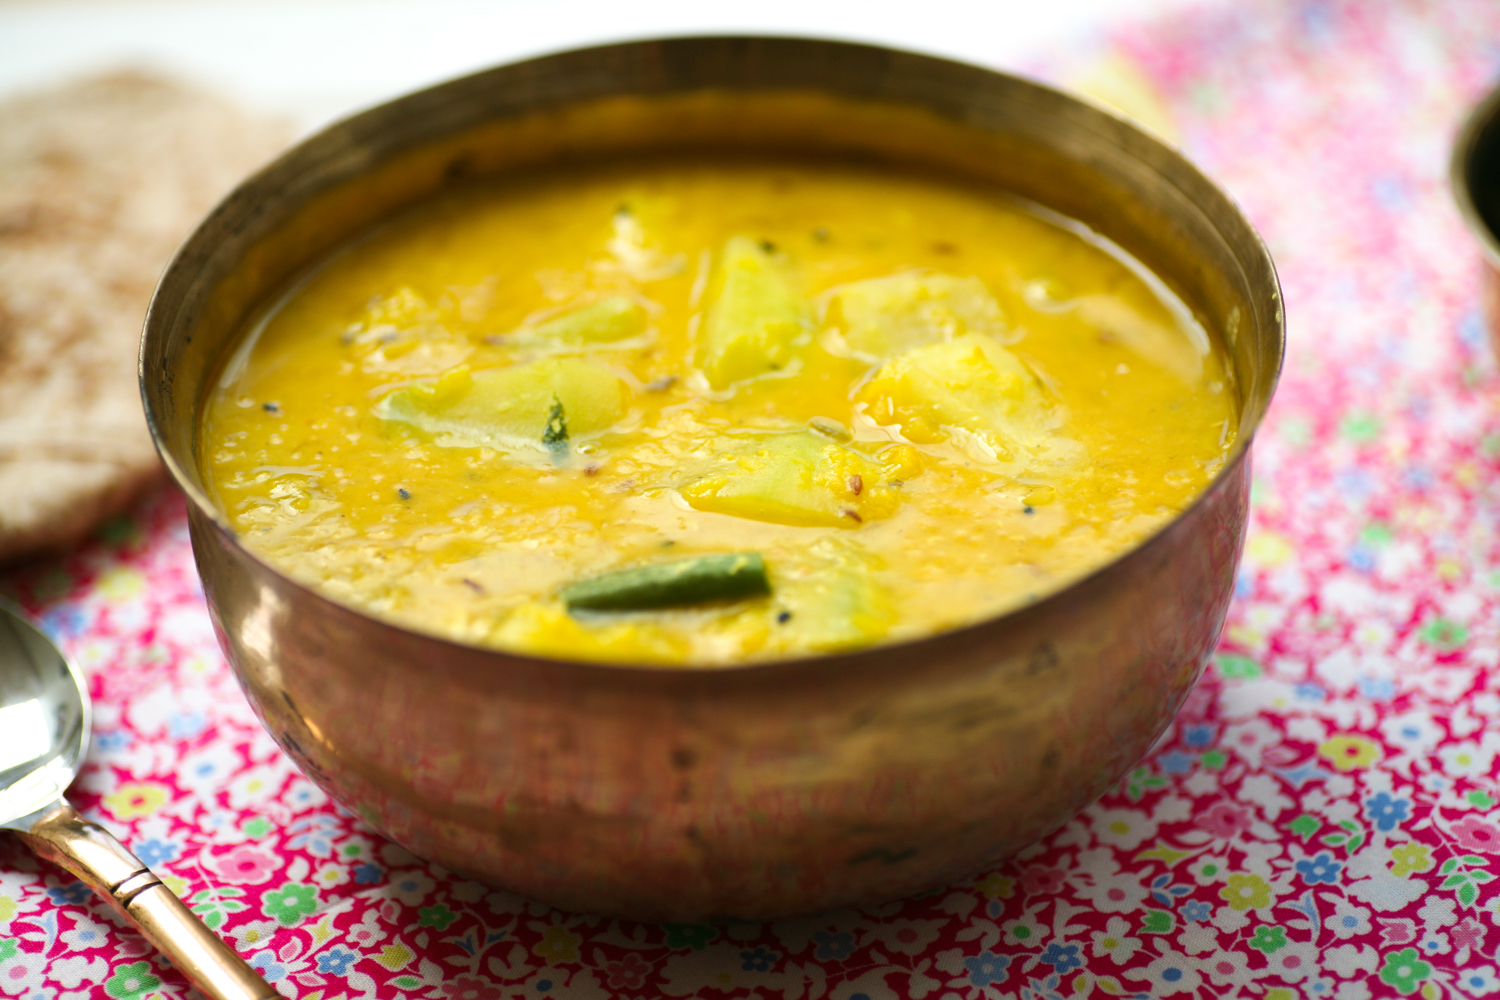
Similar to a marrow or courgette the bottle gourd works really well in dal.  In Bengal, where my husbands family are from, they sometimes serve it with prawns to make a fantastic curry. Today though, I thought I would show you a curry, which uses them as the star ingredient.

Bottle Gourd Curry (replace with marrow or courgette)

500g bottle gourd, skin removed and the flesh cut into bit sized cubes or use marrow or courgette (you can keep the skin on the courgette)

2 tbsp sunflower/rapeseed oil

2 dried red chillies

pinch of asafoetida

1 tsp cumin seeds

1 Indian bay leaf, broken in two (called tej patta)

1 red onion, finely chopped

 1 tsp salt

1 inch of ginger, finely grated (or 1 tsp ginger paste)

3 garlic cloves, grated (or 1 tsp garlic paste)

2 large tomatoes or 4 medium tomatoes, chopped

1/2 tsp ground turmeric

1/2 tsp ground coriander

1/2 tsp ground Kashmiri chilli

400ml water


  1. First prepare the bottle gourd (marrow or courgette) and place to one side.
  2. Heat a large deep pan and add the oil.
  3. When it is hot add the dried chillies, Indian bay leaf, asafoetida and cumin seeds which will begin to sizzle.
  4. After 20 seconds, add the onion and salt and let the onion soften completely and begin to bronze – between 6-8 minutes before adding the garlic and ginger.
  5. Stir in the garlic and ginger so that raw smell dissipates, which takes a few minutes.
  6. Next add the chopped tomatoes and stir into the onion. Add the ground spices and leave to simmer with a lid on for 5 minutes. The tomato should have softened considerably.
  7. Add the bottle gourd (marrow or courgette) and then add the water. Simmer on a medium heat for 20 minutes. A lot of the water will have soaked up leaving a thick spiced tomato coating over the gourd.

I ate mine on its own with a squeeze of lemon, but you could also have some rice on the side or a chapati, luchi or naan bread. It makes a delicious vegan lunch or supper.

Let me know how you get on if you make it.

Food is definitely a way to keep us all uplifted and glowing through these surreal times, I hope you agree.


Marrow Dal and Fried Marrow Skin (Khosha Bhaja)

IMG_6968

My husband once asked a fellow foodie friend, who used to write for the food section of one of the large weekend newspapers here in the UK, for suggestions of ways to cook with marrow, to which her response was ‘you can start by throwing it in the bin’.  Ever so harsh but she is not alone! Many people often overlook the humble marrow and regard it as tasteless. I can tell you however, that marrow completely comes into its own cooked in Indian dal and even the skin need not be discarded as you can cook a completely separate delicious dish using it.

IMG_6961

In the hot sweltering heat of an Indian summer, eating marrow is the perfect way to cool down as it’s made pretty much made of water. So by combining it with red split lentils to form a dal is a wonderfully satisfying way to eat marrow in all it’s glory. Gardens here in England are bursting with marrows at the moment and although I have none growing in my postage stamp garden both my mother and mother-in-law are supplying me with endless amounts of marrow.

So dive in and give this glorious dal a go. I bet you’ll even surprise yourself as to how good it tastes.

IMG_7031

Marrow Dal

Serves 2-3

125g red split lentils

500g marrow, skinned and cubed (remember to keep the skin)

600g boiling water

1 tsp salt

half tsp turmeric

1 tbsp vegetable/mustard oil

1tsp Panch Phoran (Bengali five spice – see below)

2 green chillies, chopped in two

Panch Phoran is a uniquely Bengali (East India and Bangladesh) five (panch) spice mix. It has a magnificent aroma so I often use it in my red split lentil dals. If you cannot find a packet in your local Asian grocers you can make it yourself by mixing the following seeds together in equal parts: fennel, cumin, nigella, fenugreek and mustard. Store in an airtight container and it will last months. 

1. Rinse the red split lentils under cold water so as to clean them thoroughly. Repeat the process a couple of times.

2. In a saucepan add the cleaned red split lentils and 500g of boiling water. Add the turmeric and leave to simmer for 7-10 minutes. If the lentils begin to dry out add a little more boiling water.

3. Add the marrow and stir into the dal. Add a further 100ml of boiling water and continue to simmer for another 5 minutes.

4. In a separate pan heat the oil and when it is hot gently add the panch phoran. They will begin to pop immediately so keep them moving around the pan. Add the chillies and mix in together. Now pour the marrow dal on top of the panch phoran and chillies and stir in together. Add the salt and then simmer for couple of minutes. Let it cool slightly before serving. You may need to add more salt if required.

In India many people often add a little ghee (clarified butter) on top just before serving to give it that extra delicious taste. If you are watching your waste line simply ignore this step!

***********************************************************

Fried Marrow Skin – Khosa Bhaja

Skin of a marrow

1 tbsp vegetable/mustard oil

1 tsp nigella seeds

1/2 tsp turmeric powder

pinch of chilli powder (optional)

1 green chilli, finely sliced

1 tsp salt

1. Peel the skin of a marrow and slice into fine, small strips. Place in a pan of boiling water and gently simmer for a couple of minutes.

2. Strain and place to one side. Heat a pan with oil and when it is hot add the nigella seeds. After a few seconds add the marrow skin followed by the turmeric, chilli powder, green chilli and salt. Cook on a low heat until the marrow skin begins to bronze.

Serve with the marrow dal above.


Save the English cauliflower from extinction by EATING it!

It was during a recent family conversation about how cauliflower consumption is in decline, that gave me the idea for this blog. I wanted to do my bit, so as to speak, to give the cauliflower some much needed positive PR and encourage people actually to buy and eat the vegetable.  The sad truth is that if we don’t consume them we will slowly see them disappearing from our farmers’ markets, grocers, supermarkets (delete as required) and they will join the list of other extinct vegetables. A really interesting article was published a couple of  years ago in “The Daily Telegraph” with the heading ‘Cauliflower to make a comeback with environmentally friendly rebranding’ – it’s worth a read so just click here.

I think a lot of people are not too sure what to do with cauliflower, other than the obvious cauliflower cheese, which don’t get me wrong is tasty, especially when you add crispy bacon bits to the topping, but there are so many other delicious things to do with cauliflowers.

So I thought I would share two completely different recipes with you to inspire you to love and eat cauliflower. Broccoli and other so called ‘superfoods’ seem to have taken centre stage due to their health benefits, but the fact is that cauliflower is also very nutritious, perhaps not quite as much as broccoli, but close, and if the truth be told cauliflower has less calories than broccoli. You can check out the facts here if you don’t believe me!

First up…………………………drum roll please……………………. is………………………………………………..

Sweet Piccalilli, which is a gloriously tangy and vibrant looking relish which includes cauliflower as the main ingredient, along with green beens, courgette/marrow, pickled onions and spices. It’s also been referred to as ‘Indian Pickle’, indicating that it’s origin stems from the Indian subcontinent. I recently made a huge batch and then gave a number away as gifts at christmas time. A dollop of this relish is the perfect accompaniment to hams and cheeses, in fact you are guaranteed always to see it on the plate when ordering a traditional ploughman’s lunch at any good English Pub.

This recipe is sourced from my favourite preserves and pickling book called The Complete Book of Preserves and Pickles by Catherine Atkinson and Maggie Mayhew. I have remained pretty loyal to the original recipe other than the fact that I do add a little more flour as I like the piccalilli to be slightly thicker. It’s personal choice, so see how you get on and don’t be afraid to add a little more flour if need be. It is also really important to note that steps 1 and 2 you need to do 24 hours before the next steps can be completed.

Sweet Piccalilli

Makes circa 1.8kg/4lb, which was precisely 7 jars  and I bought them from here.

1 large cauliflower

450g pickling (pearl) onions

900g mixed vegetables (marrow/courgette, cucumber, French green beans)

225g salt

2.4 litres/4 pints cold water

200g granulated sugar

2 garlic cloves, peeled and crushed

2 tsp of mustard powder

1 tsp of ground ginger

1 litre/1 and three quarters distilled (white) vinegar

25g plain flour

1 tbsp turmeric

1. Clean and cut the cauliflower into small edible florets and cut off the ends of the French green beans and cut them into 2.5cm/1inch in length. The pickling onions I use are small, but if you have bought the slightly larger ones you will need to quarter them.

2. In a large bowl place the vegetables in layers and add a sprinkling of salt over each layer. Pour the water over all the vegetables and then cover with cling film and leave to soak for 24 hours.

24 hours later

3. Drain the soaked vegetables and discard the brine. You will need to rinse them well several times in cold water so as to get rid of the salt. You may find it easier to do this in batches.

4. In a large pan (preserving pan if you have one) add the sugar, garlic, mustard, ginger and 900ml/1 and a half pints of the vinegar. Gently heat the pan stirring occasionally until the sugar has dissolved.

5. Add the vegetables to the pan and bring to the boil and then reduce the heat and simmer for 10-15 minutes or until they are almost tender.

6. In a separate bowl stir the turmeric into the flour and then add to the remaining vinegar. Stir this mixture into the vegetables. Bring to the boil and stir and then turn down the heat so that it simmers for another 5-10 minutes allowing the piccalilli to become thick. If it is not the consistency you want, simply add a little more flour and it should thicken up.

7. Into warmed sterilized jars, add the sweet piccalilli and cover and seal. Store in a cool dark place for at least 2 weeks. Use within the year.

——————————————————————————————

The second recipe I wanted to share with you is Cauliflower Curry, which is really straight forward and speedy to make and perfect to eat either on its own or with a bowl of dal on the side; I also like to have mine with a little natural yoghurt. This recipe comes from my mother-in-law who stores all her recipes in her head and never seems to have precise measurements. It’s always a little bit of this and a little bit of that, and the result is always divine.  I think you will be pleasantly surprised at how tasty and simple this dish is to make.

Cauliflower Curry

Serves 2-4 accompanied with another dish such as dal or speedy salmon curry

1 large cauliflower

2 tbsp of mustard oil (or sunflower oil if you do not have mustard oil)

1 tsp  nigella seeds

1 tsp turmeric

1tsp ground coriander (cilantro)

1tsp ground cumin

1tsp garam masala

1 tsp salt

half tsp chilli powder

3 inch cinnamon bark, broken into smaller parts

splash or two of water

1 heaped tsp of ghee or butter, optional

1. Wash and cut the cauliflower into small florets. Do not discard the outer green bits as these too can be used in the curry.

2. In a pan warm up the oil on a low heat and when it’s hot add the nigella seeds. After 10 seconds add the cauliflower and stir into the seeds and the oil. Add the turmeric and then let the cauliflower gently cook away. You want to begin to see the cauliflower bronzing before adding any more of the ingredients, this will take between 5-10 minutes. Keep the oil on a low heat or you will find that the cauliflower will burn, which is not the effect that you want to achieve.

3. Add all the rest of the ingredients, aside from the ghee/butter and water. Stir them all together and then add a small amount of water to help soften the cauliflower and help it cook. Cook for further 10 minutes and then add the ghee/butter and stir into the cauliflower to give it a more buttery taste. This is not essential so try it both ways and see which you prefer.

4. Serve with natural yoghurt.

Do you have any any cauliflower recipes that you cook at home and would recommend? I’d love to hear them.