‘Masala Mamas’ Dill Stew

I feel it’s been a while since I posted any Indian recipes. That is not to say I’ve not been cooking any Indian food at home. For those who have been following me for a while, or have read my bio, will know my husband is Indian so cooking Indian food is part of our regular diet – but some of the recipes I’ve been cooking are already on my blog. These are always family favourites that I have been cooking:

DalsBengali red split lentil dal, channa dal, toor dal

CurriesBengali chicken, speedy salmon, Bengali prawn, Laal Maas (when I want a seriously hot one!) or Chettinad Chicken, 

Sri Lankan tuna curry, mild cod curry

Vegetarian curries  – cauliflower with fenugreek, ginger and turmeric okra, chickpea curry, butternut squash and lemongrass (more Asian influenced than Indian, but a great recipe)

Not so long I was contacted by a Elana Sztokman, an anthropologist and award-winning writer specialising in women from traditional societies. She has written an Indian cookbook, which tells the inspiring story of a group of sixteen Indian women from the Kalwa slum in Mumbai, changing their communities through food and love. The slum is home to over 200,000 people where clean water and electricity are hard to find. These harsh conditions often prevent children going to school, with many being sent out to work to make a few rupees so that they will have something to eat.

These women are changing all this by making sure the children eat and learn, and consequently changing their otherwise inevitable destiny. Each morning the women rise early to prepare a host of delicious, nutritious vegetarian food for the children. In one year alone they cook 257,400 meals. They deliver the food to the Love2Learn school, run by the the NGO Gabriel Project Mumbai, where the children know that if they show up to learn, they will eat. It’s a win win. The children learn, have nutritious food and thus begin to end the cycle of poverty they are trapped in. The women feel inspired and thrive and thus the children and communities thrive around them.

The book that Elana has sent to me – ‘Masala Mamas’ incorporates recipes and stories from all these Indian women. It’s a joy to read, hearing about the rural villages the women have originally come from and how they came to the sprawling metropolis of Mumbai in the hope of giving their children an education, which most of them lacked. The group has provided kinship, connections and a purpose, which is motivating them every day. All the proceeds from the sale of the cookbook go directly to the women of the Masala Mamas cooperative. You can order a copy for yourself here.

I thought it would be interesting for you to see a typical menu for the children:

On Mondays the children eat poha – rice flakes with vegetables.
On Tuesdays –  dal khichdi – lentil and rice stew.
On Wednesdays – chana dal – black bean curry.
On Thursdays – veg pulav – a pilaf made with mixed vegetables.
On Fridays – soya pulav – a stew made from soya chunks, an affordable and simple source of protein.

And on Saturdays, as a special treat, the children eat sheet – a kind of sweet semolina pudding that they particularly love.
And for special occasions and holidays, the women prepare special holiday fare like shankarpali and modaks.

After a lot of pondering on which recipe to show you  I ended up gravitating towards the ‘Dill Stew’ or ‘Shepu Bhaju’ by Jayshree Chavdry. It’s basically a dal, and you know how much I adore dals and could quite happily eat a different one every day. I also liked the fact that it contained dill, a herb that I do not usually associate with Indian food. It’s also super straightforward, requires no unfamiliar ingredients and is perfect for a light meal on a summers day. The result – it tasted really really good and I will now be including it in my Indian culinary arsenal for sure. Give it a go and if you are on instagram, don’t forget to tag me #chilliandmint so that I can see how you got on.


Dill Stew

1 cup/240ml yellow moong dahl (lentils)

1 tbsp/15ml oil

1 tsp/5ml mustard seeds

1/2 (half) tsp/2.5ml cumin seeds

1 medium onion, finely chopped

3 small green chillies, finely chopped

1 tsp/5ml turmeric powder

2 cups/1/2 litre water

1 cup/240ml finely chopped dill

3 cloves garlic, crushed

salt to taste

  1. Soak the dahl in water for 20-30 minutes. Then rinse well.
  2. Heat the oil in a pan on a medium heat and add the mustard seeds. They will begin to crackle almost immediately. Add the cumin seeds followed by the onions. Mix well and let them cook for 2 minutes before adding the chillies and cooking for a further 2 minutes.
  3. Drain and rinse the presoaked moong dal and add to the pan along with the turmeric powder. Add the water and mix well together. Cover and allow the dal to cook for 10-15 minutes or until it is fully cooked and softened. Be careful not to burn the dal and add more water if necessary.
  4. Add the dill, garlic and salt to taste. Cook covered for another 5-10 minutes
  5. Serve hot with rice or puris/lunchi or simple in a bowl on its own. Divine.

If you are making it earlier in the day to eat later you may find you need to add a little water when reheating it. 


SaveSave

SaveSave

SaveSave

SaveSave

SaveSave

SaveSave

SaveSave

SaveSave

SaveSave

SaveSave


Indian Chana Dal – Sweet and Salty

As some of you may know I am a BIG dal fan. Huge in fact, I love the stuff, and I am always trying to convert the uninitiated. Dal is an Indian lentil soup, or porridge of sorts, that can vary in consistency depending on personal preference. There are so many varieties, using a wide range of lentils, that there is at least one to appeal to every palate. For the most part (some need soaking) they are quick and very easy to make. Once you have bought a few staple ingredients for your pantry, you will find that cooking dal is a very economical meal to cook and, for many in the Indian subcontinent, an essential source of inexpensive protein.

Chana dal, also known as cholar or yellow split lentil, is one of my personal favourites. It is absolutely delicious with delicate sweet undertones coming from the coconut and sultanas. I use desiccated coconut, however in India as coconuts are more readily available, they often use shavings of freshly fried coconut. I eat it for lunch or dinner, although out in India it is even served up for breakfast!

Unlike the red split lentil dal, which I spoke about in an earlier blog, you need to think a little ahead for this dal as the yellow split lentils need to soak for a number of hours. I always soak them over night, but if you check on the packet you will probably find that you can soak them in the morning and they will be ready to cook by the afternoon/evening.

Chana Dal

Serves 4-6

300g of chana dal, soak overnight

1 tbsp of oil

1 tsp panch phoron

3 bay leaves

1/2 tsp turmeric

1/2 tsp chilli powder (more if you prefer it hot)

sultanas, handful

1 tsp of ghee/butter (optional)

1 tsp of sugar

1 tsp salt

2 tsp of desiccated coconut

  1. Before cooking soak the lentils overnight ideally or at least for a few hours.
  2. After soaking, remove the water and refresh with more water. Boil on a low heat, until soft, approx. 20 mins (45mins + if not soaked). You will know they are soft when you are able to squeeze them easily between your fore finger and thumb. If they are still a little hard, leave them to boil for longer.
  3. In a new pan heat a tablespoon of oil on a low heat. Add the panch phoron, bay leaves, turmeric, chilli powder, sultanas, salt and sugar.
  4. Move around the pan for 20 seconds max, so that it does not burn, and add a couple of spoonfuls of chana dal and stir into the pan. Then transfer all of the contents of the pan into the original pan. Add more salt if necessary.
  5. Add the ghee/butter if using. Sprinkle the desiccated coconut over the top of the dal and let it simmer for a few minutes.

Other additions to this dal is to add fresh green or dried red chillies instead of chilli powder. If you have fresh coconut to hand then thinly slice it into pieces (no more than a handful) and bronze initially in a little ghee, remove and place to one side. Scatter on top at the end instead of the desiccated coconut.

SaveSave

SaveSave

SaveSave

SaveSave

SaveSave

SaveSave

SaveSave


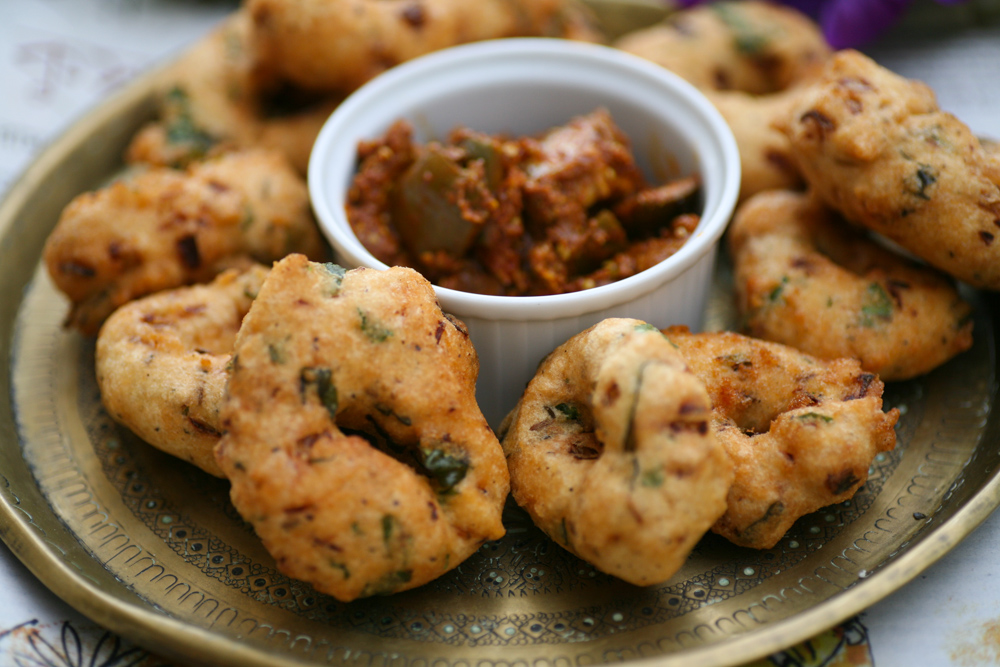
Crispy Savoury Donut known as Medu Vada

IMG_2627I want to introduce you to a new kid in town that will seriously impress you.

Step aside donut and cronut (croissant and donut pastry) and make way for the Indian savoury donut known as ‘medu vada’. These savoury delicacies look very similar to their saccharin cousins the donut, but are filled with lots of wonderful spices instead of sugar.

IMG_2620

They are really fun to make and you can add your own twists to make them your own. They are a little bit naughty in that they are fried, but hey a little bit of fried deliciousness now and again is absolutely fine in books. They are made of urad dal – the white dal you can easily find in any Asian grocers-  that is soaked for at least 3 hours and then blended to form a soft fluffy paste.

IMG_2635

My daughters find them equally irresistible so they really are a treat for the whole family. They are typically eaten in southern India and Sri Lanka either at breakfast time or as a snack with a coconut chutney or possibly a dal or sambal. I could quite happily eat them for my breakfast but more often then not I make them for an afternoon snack with a cup of warming tea.

They are crispy on the outside and have a soft texture on the interior.

IMG_2619

My recipe makes around 13 little donuts, but if you want to make more just double up on the ingredients. There are no set rules here other than not making the dough too wet.

Medu Vada – Indian Savoury Donuts

Makes 13

175g white urid dal

1/2 tsp salt

1 medium white onion, finely chopped

1/4 tsp asafoetida/hing

1 tsp cumin seeds

1 tsp fresh ground black pepper

1/4 tsp baking powder

1 handful of fresh coriander, roughly chopped

 12 fresh curry leaves, chopped (optional)

1 green/red fresh chilli finely chopped (optional)

  1. Soak the white urid dal in a bowl covered with water for at least 3 hours.
  2. Strain the dal and place into a blender. Blend and if needed add literally a tsp at a time of water to loosen it slightly. Do not over water. You want it to have the same consistency as a fluffy light dough.
  3. Place the lentil dough into a large bowl and with your hand lift the dough, folding it over so that it gets air into it about 15 times.
  4. Add all the ingredients and mix well with your hands or a spoon.
  5. Heat a pan with cooking oil and when it is hot wet one of your hands and create a small ball (a little larger than a golf ball) and then place your thumb in the centre to create a hole through the dough. Then gently loosen the dough off your hand and place into the hot oil. Be careful when doing this as the movement from placing the dough into the pan and removing your hand needs to be super quick.
  6. Place a few donuts in the pan at once and leave them to bronze on one side for a couple of minutes, before turning them over with a slotted spoon for another couple of minutes.
  7. You are looking to get a yellowy bronze hue as opposed to brown, so be careful to watch them closely.
  8. Remove them from the pan and place on kitchen paper to soak up any excess oil.
  9. Continue to make the rest.
  10. If you are planning to serve them as a snack when friends come over simply place them in a preheated oven that has subsequently been turned off. They should stay warm for a good hour.

They are perfect to eat with a chutney, dal or sambal (see links in the body of my post).

Note: 

  • I often don’t add chilli so that all my family can comfortably eat them. For those who like the chilli kick, you can serve them with a hotter chutney, which keeps all parties happy.


Spinach with Shallots, Green Raisins and Red Peanuts

IMG_2055

My latest addiction is spinach.

I know I know how crazy do I sound? I’ve always liked it mind you, but of late it’s gone up a notch or two. It’s probably my body screaming at me that ‘I NEED MORE IRON‘.

 I’m happy to eat it in all its incarnations for breakfast, lunch or dinner. It’s super versatile and is cooked quicker than the time it takes to get your bowl/plate and cutlery together.

IMG_2046

Recently I visit a local eatery called ‘The Little Taperia‘ in Tooting in the strip, which is fast becoming increasingly hip and cool. Sitting next to Soho House’s ‘Chicken Shop’ and virtually opposite the newly established the ‘Trafalgar Arms’, ‘The Little Taperia’ offers Spanish tapas at it’s best; I could literally eat the whole menu. It was packed on my visit with a wonderful buzz to the place. The decor (love the floor tiles) and general vibe was conducive to a relaxed, memorable evening, so if you have not yet been I urge you to get down there and experience it for yourself.

IMG_2046

Back to the spinach. You are probably wondering where spinach and ‘The Little Taperia’ fit together.  Well it was there that I ate a delicious spinach dish that inspired me to create my own version of the dish for you today. They used pine nuts and I can’t recall if they added raisins but I’m thinking they did as the dish had a subtle sweetness, which I don’t think was coming from the onions alone – but may well have been. Needless to say the dish was utterly delicious and I think the one that I have created for you equally hits the spot.

I’ve eaten it on a few occasions since and this time I accompanied it with my Indian dal with butternut squash. I don’t actually have that recipe up on my blog but a very similar one using marrow can be found here.

IMG_2049

I add a dollop of ghee – clarified butter – on the top but if you are off diary or watching your waist line then just omit that part.

Spinach with Shallots, Green Raisins and Red Peanuts

2 tbsp light olive oil

2 banana shallots, finely sliced

pinch of salt

35g red peanuts (works out to be a handful)

35g green raisins (works out to be a handful)

240g fresh spinach

1 tbsp ghee

  1. Heat a pan with the oil and when it is medium hot add the banana shallots and pinch of salt and leave to soften and begin to bronze, which will take around 5 minutes.
  2. Add the green raisins and red peanuts and move around the pan. After a minute add the spinach.
  3. Place a lid the pan so that the spinach wilts. After a minute give a stir and then add the ghee. Let it melt and then serve immediately.

It is perfect with meat or fish but in this instance I ate it with some of my butternut squash dal, which was hit the spot for a delicious vegetarian supper. My butternut squash dal is similar to my marrow dal but uses butternut squash instead of marrow. Check it out here.

IMG_2041


Tomato and Garlic Red Lentil Dal

IMG_0701


This recipe is for all of you lovely people out there who claim you don’t have time to cook. It is super quick, satisfying and great for cold winter nights. It literally takes no longer than 15 minutes to cook from beginning to end. To be fair it is very similar to this dal of mine although it differs in that it has a tin of tomatoes in it, loads of fresh whole garlic (great for ridding those horrible colds and coughs we pick up in winter), and a sprinkling of cumin powder.

IMG_0702

I had a bunch of friends over for lunch the other day and as well as cooking some tasty winter salads had a huge pot of this on the stove. It seemed to go down a treat as there was very little left over once they had gone, another sign that it’s worth giving it a go.

IMG_0700

I like to add a splash of lemon juice liberally at the end, but it’s up to you. Like with all dals they can be made more soupy or firmer depending on personal choice. For this dal I like to make it more soupy so that I can spoon it out of a bowl. If you are cooking it with rice and another dish then maybe you want to add less water. I never really measure the water that goes into it. I always go on how it looks, so my advice is to put in enough water so that it covers the dal by half an inch and then keep adding more boiling water once  the water has soaked up. It’s a winner and so simple. Give it a go and leave me a comment below.

IMG_0697


Tomato and Garlic Red Lentil Dal

Serves 4-6 (4 as a main 6 as a side dish)

300g red split lentil

water, enough to cover the red lentil

1 tbsp groundnut oil

5 (or more) garlic cloves, gently crushed but kept whole

1 tsp panch phoron

1 tsp turmeric powder

1/2 tsp cumin powder

1 tsp salt (to taste)

400g tin of tomatoes

1 lemon, quartered – optional to serve

1. In a deep pan place the red lentils and cover with cold water. Gently wash the lentils using your hand and pour out the murky water. Repeat three times.

2. Add boiling water to the red lentils and cover so that all the lentils are submerged by 1/2 inch. You can add more boiling water once this has soaked up if need be. Boil on a gently heat, skimming off any white residue that comes to the surface. Stir at intervals so that all the lentils cook through and turn from orange to a more yellow colour. Add more boiling water if you prefer it to have a more soupy consistency.

3. In a separate pan heat up the oil and then add the panch phoron. Once they start sizzling add the garlic and move around the pan. After a minute add the turmeric and cumin powder. Keep on a low heat, making sure the garlic and spices do not burn.

4. Add a spoonful of the now yellow lentils to the panch phoron and stir into the spices. Pour the contents of this pan into the pan with lentils and stir in thoroughly. Add a little water to the saucepan to make sure the spices pan is now clear of spices.

5. Add salt to taste and the tin of tomatoes and cook on a low heat for 5 minutes, or until the garlic has softened.

Voila. That simple. Enjoy.


Spiced Pilau Rice

IMG_0211


As winter is officially here and the nights are drawing in so our diet begins to crave more hearty filling food. Stew and warming curries get given centre stage during the winter months, well at least they do in my household. I realise that I have never posted a pilau rice dish, which would be a great accompaniment with a wide range of curries. Plain basmati rice is all very well but if you delicately spice it and accompany it with some nuts or fruit, it just adds a lovely new fragrant dimension to the meal and really only takes a couple of extra minutes to prepare.

I find my spiced pilau rice is really versatile as it works equally well with Middle Eastern dishes as well as Indian curries.


IMG_0150

The three C’s are wonderful spices: cardamom, cloves and cinnamon stick and give a warming aroma to any dish. I also have a particular weakness for cardamom in sweet dishes, but that’s for another post. Star anise not only looks inviting but also has a delicate aniseed smell and taste and is used a lot in Vietnamese and Chinese dishes. The queen of spices is saffron – one of the most expensive so it is used sparingly, hence only a pinch used in this dish. If you do not have saffron you could use a generous pinch of ground turmeric instead, which will give a yellow hue.


IMG_0173

I used blanched almonds this time, but depending on what is in my cupboard I may use cashew nuts or even unsalted peanuts. If you are serving a more Middle Eastern dish then pistachio nuts would also work really well.

Let me know how you get on. Send me a photo of your dish and accompanying curry to my twitter account and I will retweet it to all my followers. Is there any particular pilau rice that you make at home? How does if differ to my spiced pilau?


IMG_0203


Spiced Pilau Rice

serves 4

1/2 tbsp ghee/butter

7cm cinnamon stick, broken in two

2 star anise

4 cardamom pods, slightly opened

3 cloves

190g basmati rice (Approx one handful per person)

350ml cold water

1 tsp salt

2 tbsp hot milk

1 large pinch of saffron (or ground turmeric)

1 tsbp rose water

2 tbsp blanched almonds or cashew nuts

1. First rinse the rice a couple of times with cold water so that the water runs clear and not cloudy. Drain and set aside. If you have time then soak the rice in cold water for 10 minutes then drain.

2. Heat the milk and then place the saffron in the milk. Give a good stir. Leave to soak whilst you prepare the rice.

3. In a pan heat the ghee or butter and when it is melted add the star anise, cardamom, cloves and cinnamon stick. Let them sizzle away for half a minute, before adding the drained rice and salt and stirring together. Add the cold water. As a rule I always make sure that the water is about 1/3 of your smallest finger above the rice. Stir and then let the rice come to the boil which will take a couple of minutes.

4. Once it has come to the boil, turn the heat down and place the lid on the pan. Let the rice gently cook and steam away for 8 minutes. By this time small holes will have appeared in the top of the rice. Turn the heat off and leave the lid on the rice so that it can steam for a further 10 minutes.

5. In a small frying pan dry roast the blanched almonds or cashew nuts for a couple of minutes so that they begin to bronze.

6. Place the saffron milk and rose water over the rice and then gently fluff it up with a fork.

7. Scatter over a platter with the nuts over the top.

Serve with any Indian dal, vegetable, meat or fish curry. It also works really well with Middle Eastern meat or fish dishes.


IMG_0208


Decadent Dal Makhani

IMG_9781

This gloriously decadent dal originates from the Punjab region of North India where black urid beans, also known as black gram, are eaten in abundance. It happens to be my husband’s absolute favourite king of dals. Creamy and rich from the butter, ghee (or oil) and double cream (oh don’t let that put you off!) and yet zings of ginger, garlic and tomato accompanied with a delicious spicy masala.

IMG_9792

Whilst we are lucky to still have some warm days, soon the weather will be turning and this dal is definitely one to bookmark for when there is a chill in the air.

IMG_9785

In the Punjab this dal is eaten on special occasions, such as weddings and religious ceremonies. When all the pomp and glory happens you can guarantee that dal makhani will be offered to guests. Do try it and let me know how you get on.

IMG_9808

Hope you all have a lovely weekend.


Dal Makhani

Serves 4-6

250g black urid beans (also known as black gram)

20g fresh ginger, peeled and grated

3 garlic cloves, grated

2 green chillies, finely sliced

241g tin of red kidney beans (this was the amount once drained)

1 tsp salt

*********************

tadka 

2 tbsp sunflower oil or ghee

1 tsp cumin seeds

1/2 tsp fenugreek seeds

pinch of asafoetida/hing

2 garlic cloves, grated

2 tbsp tomato puree

*********************

Just before serving

1 tbsp butter

40ml double cream

1/2 tsp Kashmiri chilli powder

1/2 tsp garam masala

salt to taste

1. Ideally soak the urid beans overnight submerged in a bowl of water. Equally if you plan on eating them in the evening you can soak them in the morning for around 6 hours.

2. Once the lentils have soaked (see above) drain them and then wash them with clean water and drain 3 times so as to get rid of any impurities.

3. Place them in a large deep pan and completely cover so that the water is just above the beans. You can always add more water during the cooking process if it all gets soaked up. Add the finely grated ginger and garlic as well as the green chilli and salt. Bring to the boil and then simmer for 20 minutes. The scum that comes to the top when cooking can be removed with a spoon and discarded.

4. After about 20 minutes the dal should have softened and much of the water reduced. Press a bean between your thumb and forefinger and it should easily be squashed. If it needs to soften a bit more leave it simmering for a further 5 minutes.

5. Strain the lentils and then place them back in the pan along with the drained tinned red kidney beans. Add 100ml of water and simmer for a couple of minutes.

6. In a separate small frying pan add the oil (or ghee if you are feeling a little bit naughty) and when it is hot gently add the cumin and fenugreek seeds. They will begin to pop after about 30 seconds so proceed to add the garlic, asafoetida and then after a minute add the tomato puree and stir in together. Simmer on a low heat for a further minute.

7. Place the contents of the frying pan into the large pan with the urid and red kidney beans and give a good stir. If it is too thick add a little more water. It is very much down to personal taste on how thick or soupy you wish your dal to be. Simmer together for 10 minutes.

8. A few minutes before serving add the butter, double cream, Kashmiri chilli powder and garam masala. Give a good stir and add more salt as required.

Oh so delicious. I hope you agree.

Do leave a comment below. I love to hear from my readers. 


Moong Dal and a Secret Sri Lankan Gem

IMG_9210


My husband calls me a ‘cheap date’.

Why, you ask?

Well, if the truth be told I would far rather go to a restaurant that is probably unlikely to win any prizes for decor but the food is outstanding moreish and tasty, the kind of places that people who really love food and flavour go, rather than going to places purely to be ‘seen’. These places don’t cost an earth to be fed well – hence the ‘cheap date’ label. A couple of years ago I spoke about a wonderful little place up the Edgware road – see here 

IMG_9233

Don’t get me wrong I can also be a bit of a chameleon and like places that do have great decor, great food and are perhaps a little bit more expensive, but not crazily so – Mr B and I recently visited Bill Granger’s new restaurant, aptly names ‘Grangers’ in Clerkenwell and managed to chat to the man himself – very down to earth and charming. The restaurant ticks all my boxes – great food, ambiance, relaxed atmosphere and not going to break the bank.

IMG_9245

But over in Tooting there is a little Sri Lankan/South Indian restaurant called ‘Apollo Banana Leaf’ that’s a great find for all you spice lovers out there. Friend’s north of the river had mentioned it to us a while ago and spoke about how they made the trip especially to visit this restaurant. It had me thinking, friends making the effort to go to deepest, darkest Tooting – well it must be good!

Mr B and I have been a couple of times at lunch time and feasted on some wonderful Sri Lankan and South Indian food. Each time we are the only diners, but stuck to the window there are endless ‘Time Out‘ and ‘Harden’s reviews. I imagine in the evenings the restaurant is jam packed, but in the day time it feels like private dining.

IMG_9241


Their dal was warming and subtly spiced and keen to replicate it at home Mr B and I tried to work out what they had put in it. Hing – or rather asafoetida was definitely in it coming from the aromas of the dish and then we could see dried chillies, fresh curry leaves, black mustard seeds, and of course turmeric to give it it’s sunshine yellow colour. On close inspection of the menu I realised there was a little onion and fresh ginger in it, however I’ve been cooking it at home without the latter two ingredients. Try it yourself both ways and see which works for you.

It’s the perfect little dish to cook after a long day at work and you want some food that will give you the equivalent of a great big hug.

If you fancy a spice injection head on down to 190 Tooting High Street. I may well see you there for lunch.


IMG_9227


Moong Dal – Sri Lankan Style

Serves 6-8

450g  moong dal, cleaned

900ml cold water

1 tbsp vegetable oil

6 fresh curry leaves

1-2 tsp black mustard seeds

3 large dried red chillies

1/2 (half) tsp  asafoetida/hing

1 tsp turmeric powder

2 tsp salt

******

1. Thoroughly wash the moong dal in a pan of cold water, using your hands. Carefully empty the water from the pan and repeat a couple of times so that the water runs clear.

2. Add 900ml of cold water to the pan holding the moong dal and bring to the boil and then let simmer for around 20-30 minutes. During this time white froth will form at the top of the pan. Using a large spoon skim off the froth that forms and discard. You may find that you require a little more cold water if it has all been soaked up, so just add a little, depending on how soupy you like your dal. When the dal is done it will be slightly lighter in colour and will will be soft to touch – be careful not to allow it to become too mushy through overcooking.

3. In a small pan heat up the oil on a low heat. When it is hot add the black mustard seeds. These will begin to pop almost immediately so be careful. Add the rest of the ingredients and move around the pan for 30 seconds.

4. Take a spoonful of the dal and place in the pan with the spices. Mix together and then pour all the contents of the spice pan into the other pan holding the dal. Place a small bit of water in the spice pan and swirl around so that all the spices are removed from the pan and put into the dal pan.

5. Stir in thoroughly to the dal and simmer for a couple of minutes. If it requires more salt then add a little more at this final stage.  Leave to cool slightly before serving.


Indian Toor Dal with Tamarind and Ginger

IMG_7774

After the excesses of weekend feasting Monday nights in my household are vegetarian and usually include a dal of some sorts. This past weekend has been a whirl of celebration with my eldest daughter’s birthday sleepover followed by a large family lunch to celebrate, as well as squeezing in a celebration dinner in honour of our talented artist friend, Adele Henderson (you heard it hear first folks) who was displaying some of her charcoal paintings at the prestigious Mall Galleries in London.

IMG_7780

Like soups, which I am a huge fan of, dal is the ultimate homely and warming comfort food. There are hundreds of varieties from all over India, Pakistan and Bangladesh and each week I try and cook a different one from the week before. Some require soaking, and others you can cook straight away. This week I have used toor dal (similar looking but smaller in size to channa dal), which I try to soak if I have the time (either overnight if you are very organized or simply for 20 mins). This simply makes the cooking time quicker, but is not essential to the cooking process. My usual routine is to soak the lentils on Sunday night and then to cook the dal on Monday morning. The whole cooking and preparation time takes no longer than 45 minutes (if you have not soaked and less if you have) so can easily be done prior to leaving the house, or returning later in the day.

This dal contains some wonderful flavours that work so well together. Asafoetida, or hing as it is also known, should be used with caution as it has a pungent smell, but adding a good pinch really adds a depth of flavour, which keeps you coming back for more. If you can use fresh curry leaves then use them, otherwise dried is fine. Fresh curry leaves are wonderfully fragrant and again really add great flavours to the dish. Then there is the sweet and sourness from the tamarind. I tend to opt for concentrate as it is easier to come by in regular grocery shops, however if you have some tamarind you can soak it and then strain it and add the tamarind pulp that is strained through the sieve.

IMG_7739

I tend to cook a generous amount of dal so that I can hopefully have some leftover to eat on Tuesday along with a fish curry; one less thing to prepare is always a bonus.

IMG_7742

Indian Toor Dal with Tamarind and Ginger

400g toor dal

3 tbsp vegetable/sunflower oil

1 tsp of fenugreek/methi seeds

1 tsp cumin seeds

1 tsp black mustard seeds

10 fresh curry leaves

2 inches fresh ginger, finely grated/chopped

a good pinch asafoetida/hing powder

2 small chillies, chopped into three

2 tomatoes, chopped

1/2 tsp chilli powder

2 tsp turmeric powder

1 tsp tamarind concentrate

100ml water

2 tsp salt

1. Soak the toor dal in a bowl of water for 20 minutes or overnight if you are well organized. This simply makes the cooking time a little quicker but is not essential (unlike some lentils which you have to soak over night – red kidney beans and green mung beans for example). Make sure the water is sufficiently above the level of the dal. You rinse it through after so the exact amount is irrelevant.

2. Once the 20 minutes soaking are up, rinse the dal through a sieve and place in a large pan and cover with boiling water. This time the water should only be a little bit above the dal.  Gently cook the dal so that it softens, this will take around 20-35minutes (more of you have not soaked). You may need to add more water if it gets soaked up whilst softening. It’s not an exact science so don’t worry too much on water amounts – sometimes I have it more ‘soupy’ in consistency than others. Remove the scum from the top of the pan, which occurs when  cooking the dal.  When it has softened, leave to rest whilst you finish off preparing the rest of the ingredients. To test it has softened squeeze a lentil between your thumb and forefinger. If it soft it is ready for the next stage, however, if the lentil remains hard you will need to boil it a little longer.

3. In a large karahi or frying pan heat up the oil and then add the fenugreek/methi, cumin and black mustard seeds. They will begin to pop so make sure you keep the heat low. Move them around the pan for 30 seconds before adding the curry leaves and give a good stir.

3. After three minutes cooking time add the chillies, fresh tomatoes and asafoetida/hing,  fresh ginger, chilli powder and turmeric and mix in well together.

4. Once the tomatoes have softened – this will take a few minutes, add the tamarind concentrate and water and stir.  You now want to deposit the pan with the toor dal into your karahi/frying pan with the other ingredients, or vice versa, depending on which pan is larger.  Stir in well together and add a little extra boiling water to clean the pan and then turn that water into the main pan.

5. Add the salt to taste and leave to simmer for a further 5 minutes.

Serve with rice or Indian bread or simply on its own. I often like to squeeze in a little fresh lemon or lime as well.

IMG_7736Cumin seeds top right, black mustard seeds bottom and fenugreek seeds top left.


Panch Phoron – Bengali Five Spice and Red Split Lentil Dal

IMG_7307

From top right going clockwise: fenugreek, nigella, fennel, black mustard, cumin seeds

We’ve all heard, and no doubt use, Chinese Five Spice, but the Indian equivalent, Panch Phoron, for some reason is not given as much PR and voice in the West and yet across Bengal, it is a spice mix that is commonly used in every home and very much cherished.

When I launched my blog way back in 2011 one of the first recipes that I posted was my absolute comfort food – red split lentil dal. I cook it often as it is ridiculously easy and provides me with a quick-fix nourishing meal. You can choose whatever vegetable, if any, you need to use up, giving the dal a different twist every time you prepare it. A key seasoning to the dal, which imparts the unmistakable flavour, is panch phoron and whilst I am able to source it from a local Indian supermarket, I know that for some people getting their hands on this magic ingredient could be harder.

IMG_7292

So I wanted to show you how to make your own panch poron. Panch in Bengali is five and phoron is spices and these five spices are: nigella seeds (other wise known as black onion seeds, Kalonji or kalo jeera), fennel seeds (mouri or saunf), fenugreek seeds (methi), black (brown or yellow) mustard seeds (rai) and cumin seeds (jeera). The aromatic spices working together provide a  considerable depth of flavour to any dish and especially to dal.

IMG_7312

Unlike most spice mixes these are not ground to a powder but are cooked whole, either dry roasted in pan or placed in a little oil until they begin to pop and release their flavours – this is known as tempering. There are significant health benefits from eating the spices. In short: cumin aids digestion, fennel contains vitamin a, e and c as well as anti-oxidants, fenugreek aids metabolism, mustard seeds contains omega 3 fatty acids as well as being a good source of selenium and magnesium, nigella seeds balance the hormonal system and have healing qualities.

They store for months in an air tight container so if you make up a batch that should last you for some time as you only need a teaspoon or two every time you use it in a dish.

IMG_7321

There are a couple of lentils that do not require soaking over night and take a very short time to cook. Masoor dal or red split lentils, as they are more commonly known, are a staple in my store cupboard. From cleaning thoroughly to cooking, the dal takes no longer than 20 minutes to prepare – and that’s being generous – on average it’s a 15 minute meal to prepare and cook. Oooh Jamie Oliver would be so proud!

IMG_7322

Red split lentils are also very reasonable to buy so all in all this dish is healthy, speedy and economically friendly. A win win surely!

IMG_7358

I eat this dish all year round and like to change the consistency from a more runny, soupy dish to a thicker dal that may be eaten the Indian way, with your hands, accompanied by some rice or naan.  When the months turn colder I tend to gravitate more and more towards dals and soups to warm me up so this really is the perfect autumn meal to give me that inner glow.

Panch Phoron – Bengali Five Spice

Makes enough to last you for months

3 tbsp cumin seeds

3 tbsp fennel seeds

3 tbsp fenugreek seeds

3 tbsp mustard seeds (I tend to use black, but brown/yellow is also fine)

3 tbsp nigella seeds (black onion seeds)

1. In a bowl mix all the seeds together thoroughly and place in an air tight container.

********************************

Red Split Lentil Dal

Serves 2

200g red split lentils (masoor dal)

500ml of water, add more if you would like it a thinner consistency

1 tbsp oil (mustard,vegetable or sun flower oil)

1.5 tsp panch phoron

2 fresh chilli (red or green), chopped in half

1 tsp turmeric

1 tsp salt

5 cherry tomatoes (or carrots, courgette, marrow, peas etc)

optional

fresh coriander, to serve

lemon wedge, to serve

1. Boil the kettle and meanwhile rinse the red split lentils under the tap so as to fully clean them. Then place the boiling water in the pan with the lentils. Boil for about 10 minutes on a low heat, the lentils will become less orange in colour during the boiling.  If you are going to add a carrot you need to add it to the lentils at this stage so that they are soft in time. Please note you may need to add more water if the water is completely soaked up by the lentils.

2. In a frying pan warm the oil and when it is hot add the panch phoron, fresh chilli and turmeric. Once the panch phoron begins to pop and release the flavours – this will be around 15 seconds, give it a quick stir and then add a ladleful of the watery dal into the frying pan and mix the ingredients together.

3. Now place the contents of the frying pan back into the main pot with the red split lentil and stir.

4. Add the quartered tomatoes (or peas, courgette, marrow, spinach) at this stage and simmer gently for a few minutes.  Add salt to taste.  If you want it more soupy, add more water and if you want it thicker, let it simmer for longer.