Indian Panch Phoron Damson Achaar

After chatting on instagram with my friend Harriet, aka ‘The Nutritional Bean’ about damsons and what to do them – damson wine or chutney was my go-to response, my mother independently called me moments later to ask if I wanted any. Seeing it as a sign, I said yes and she arrived later that day with said damsons, as well as a bounty of other fruits and veg from the garden. Juicy sweet yellow plums, pears and some runner beans and tomatoes. The damsons were so ripe that they were about to turn and go off, so I felt an Indian achaar (chutney) would be a good way to work with them quickly. Indian achaar is different from those made with vinegar, which allows them to keep for a month or two. An achaar is often made and eaten on the same day with dal, rice and/or curry. Whatever fruit or vegetable that needs eating you can make into an achaar. This is my mango  achaar recipe.  They are always deliciously tangy, spicy, sweet and sour and work so well with Indian and Sri Lankan food.

The magic ingredient, which I have spoken about many times over the last nine years of writing this blog, is the Bengali five spice known as ‘panch phoron’. It is often used in achaar in West Bengal. You can either make your own – by reading this post – or you can pick up panch phoron at any Asian grocers and I have even seen some of the large supermarkets stock it. When it comes to de-stoning the damson you can either do it the long way (which was my option) by cutting it half and then scoping out the stone or invest in a cherry and olive pitter, which will also fit damsons. It’s definitely on my Christmas wish list.


Like all chutneys it does involve adding a good measure of sugar to counterbalance the acidity. As you will only be eating one or two spoonfuls per person per sitting, it ends up balancing itself out, but be aware that it does seem quite a lot at first glance. Taste test as you go and if you find your damsons are not too acidic then you can add less sugar.

Whilst you can eat the chutney with Indian snacks, curries or dal, the achaar also works really well with cheese. It lasts in the fridge for 3-4 days. Have you had any damsons this year? If so how are you using them? I would love to know.


Indian Panch Phoron Damson Achaar

Makes a small bowl full

1 tbsp vegetable oil

2 small dried red chillies

1 tsp panch phoron/Bengali five spice

1/2 tsp turmeric powder

655g (or thereabouts) damsons, stone removed

2 tbsp raisins, optional

1 tsp grated ginger

3-4 tbsp sugar (you can use caster or brown)

salt, to taste


  1. In a deep pan heat the oil and then add the 2 dried chillies. Allow them to begin to darken – it may make you cough a little – this is normal.
  2. Next add the panch phoron (fenugreek, nigella, fennel, black mustard, cumin seeds) and allow them to begin to splutter.
  3. Next add the turmeric quickly followed by the damsons. Give a good stir then add the fresh ginger and raisins.
  4. Add the sugar, a little at a time and taste as you go. Depending on the acidity of the damsons depends on how much you will require.
  5. Allow to bubble away on a low heat for 15 minutes. Add a little salt if required.
  6. Allow to cool and serve with Indian food or cheese, it works really well with both – just probably not together.


Cambodian Nut Mix

I wanted to introduce you all to my favourite snackage at the moment. I only came across it recently when I was staying in Kep-sur-Mer in the south of Cambodia – you can read about my stay in Kep here. Most evenings we would head to the sailing club (below – the pool table was a perfect activity during cocktails hour) next to our hotel – Knai Bang Chatt – which I really recommend if you are thinking about a trip – and when you order your drink they give you a bowl of this delicious nut mix.

They are so simple to make and yet completely addictive and because they are a little salty you naturally want more to drink. Clever hey.

Anyway I thought it would be perfect to show you how to make your own nut mix at home. It makes sense to make a decent amount and then store it in an airtight container. There seems a bit of a theme with airtight containers – I blame it on the snow and being stuck inside few weeks back. There is literally 5 ingredients: peanuts – with their red skins on- fresh curry leaves, dried red chillies, garlic and salt. That said I think there may have been some lemongrass mixed in with the nuts, but I can’t be sure, so if you have any by all means finely slice it lengthways and fry it with the sliced garlic.

Cambodian Nut Mix

1 tbsp rapeseed oil

1 whole garlic, pealed and thinly sliced

2 steams of fresh curry leaves (approx 20 leaves)

5 dried red chillies

1kg of red peanuts

rock salt to taste

optional: lemongrass, thinly sliced lengthways and fried with the garlic


  1. In a large pan gently heat the oil and then fry the garlic so it turns a light brown. If you are also going to use lemongrass, add it at this stage.  Remove and place on kitchen paper.
  2. Using the same pan gently fry the fresh curry leaves and add the dried red chillies. I tend to split some of them so as to release some of the seeds to give heat.
  3. Add the nuts and mix thoroughly. Sprinkle with salt.
  4. Take off the heat and add the garlic (and lemongrass if using) thoroughly.
  5. Once cooled store in an airtight container. They will last for ages and are good to bring out with drinks in the evening.


SaveSave

SaveSave

SaveSave


Vietnamese Tofu Banh Mi Sandwich

img_2823

I have a love affair going on when it comes to the ubiquitous Vietnamese sandwich known as banh mi. If the truth be told I love them in every form: pork, chicken, fish, beef, tofu – you name it and I pretty much love all the varieties that you can have. I love the cruchiness and sweet and sour piquant from the pickle, combined with the freshness of the coriander, the spices from the marinaded tofu/meat/fish, the chilli and the freshness from the baguette. Every bite has so much action going on for the palate – sweet, sour, umami chilli notes.

img_2848

They are not as much of a chore as you’d expect if you make them at home. I tend to buy the baguette, but if you have time on your hands, then I can totally recommend The Banh Mi Handbook by Andrea Nguyen to show you how to make the traditional baguette as well. Father Christmas kindly popped it in my stocking a few years back – such a thoughtful fella!

img_2853

I’ll talk your through it step by step, but once you’ve made the pickle – this takes no time at all – you’re pretty much all set. The pickle also lasts up to a month in the fridge so there is no need to use it all in a couple of days.  I am going to show you how to do the tofu version, but if you prefer to make it with chicken or pork then the same marinade can apply.

img_2852

I used the silken firm tofu, which you need to handle with care. Some brands are firmer than others, but ultimately if it falls apart a little it doesn’t really matter once it is in the baguette.

There are a few ingredients that you really need to get hold of before making a banh mi:

  • daikon (also known as mooli or white radish) – it looks similar to horseradish but has a lot milder flavour. I pick mine up from my local Indian grocer.
  • carrots
  • rice wine vinegar
  • a crunchy baguette
  • maggi seasoning sauce – according to Andrea Nguyen for a ‘first class banh mi, drizzle on some maggi sauce; it will boost each bite with an umami hit’ – she goes on to explain that ‘it is practically synonymous with banh mi’. I picked mine up from my local Asian supermarket but you can also order it from Ocado here
  • chillies to give the heat injection
  • fresh coriander
  • cucumber to add texture and crunch
  • mayonnaise (vegan if you want to keep the whole meal vegan)
  • sriracha sauce
  • 1 litre jar for the pickle


So to begin with you need to prepare the pickle. Trust me it is quick and easy to make.


Carrot and Daikon Pickle

500g daikon, peeled and cut into matchsticks *

2 large carrots, peeled and cut into matchsticks (as above)

1 tsp salt

2 tsp caster sugar

100g caster sugar

300ml rice wine vinegar

250ml warm water

1 litre storage jar (can be slightly bigger but no smaller)

  1. After peeling, cut the carrot and daikon up into equal size matches and place them in a bowl.
  2. Sprinkle the salt and the teaspoons of sugar over the carrots and daikon and gently massage them gently for a few minutes using your hands. This will make them become softer and more bendy.
  3. Wash and drain them thoroughly under some cold water before placing them into your jar.
  4. In a separate jug mix the rice wine vinegar, caster sugar and warm water so that the sugar dissolves and then pour into the jar with the carrots and daikon. Discard any left over brine. If you need a little extra brine to cover the carrots and daikon simply add a little more warm water.
  5. Refrigerate for up to a month.

*the exact size of the matchsticks is irrelevant, obviously not too big, but do make sure that the carrot and daikon matchsticks are of similar size if possible.  I have seen them super skinny and slightly wider like mine below. Both ways taste delicious. 

img_2855


Matchstick daikon and carrots above and with salt and sugar ready to be massaged below.

img_2854

Once your carrot and daikon pickle is resting it’s now time to make the marinade for your tofu. I slice my block of tofu gently into about about 9slices. You don’t want to cut them too thin or they will easily break.

Place them gently in a bowl and add the marinade, which consists of: tamari (or soy sauce), 1/2 lime and zest, 1 tsp of minced garlic, 1 tsp minced ginger and cracked pepper. Coat evenly and then leave to marinade for around 20 minutes. Heat some groundnut (or sunflower) oil in a pan and then let the tofu  cook gently on each side for around 3-5 minutes before turning over. It wants to be nicely bronzed.

Tofu Marinade

349g firm tofu (or similar size pack), sliced

2 tbsp tamari (or soy sauce)

1/2 lime, juice and zest

1 tsp minced garlic

1 tsp minced ginger

liberal amount of cracked pepper

1 tsp groundnut/sunflower oil

  1. Slice the tofu gently into approximately 9 pieces and then place in a bowl and cover with the marinade ingredients.
  2. Leave to marinade for 20 minutes.
  3. Heat  the pan with oil and gently space out the marinated sliced tofu. On a medium low heat, leave the tofu for around 3 minutes to see if it is nicely bronzing. If it is then carefully turn it over for a further 3 minutes. Leave a little longer if it requires more time to bronze.
  4. Remove from pan and leave to cool whilst you prepare the rest of the sandwich.

If you are using pork or chicken make sure to slice the the meat thinly and leave to cook for longer on both sides. 

img_2851

The next part is easy. You simply mix a couple of tablespoons of mayonnaise (homemade, vegan or shop bought) and add sriracha to taste. I usually find that around 1/2 tbsp works really well.


Sriracha Mayo

2 tbsp mayonnaise (homemade, vegan or regular shop bought)

1/2 tbsp sriracha, or to taste

  1. Mix the two ingredients together to form a salmon pink sauce. Taste and add more sriracha if necessary.

The next part is the assembling. First you need to slice the baguette, but not all the way through.  Take out some of the white bread part within – this allows more space for the fillings. Now follow the instructions below.

Assembling the Bahn Mi

few drops of maggi seasoning sauce

1/4 cucumber, thinly sliced

handful of fresh coriander

2 red chillies, chopped – optional

  1. Spread out the sriracha mayo evenly along the baguette followed by a few drops of maggi seasoning sauce.
  2. Next add the cucumber, tofu followed by some of the pickled carrot and daikon. You can also add some thinly spiced fresh red chillies for extra heat if necessary or omit this part and just add the fresh coriander.

It sounds terribly long winded but I assure you that it really doesn’t take that long at all. The pickle will last for ages and is pretty quick to make in the first place. The marinading is straightforward and the sriracha mayo takes seconds. So give it a whirl. Trust me you’ll become as addicted as me about banh mi.


Speedy Homemade Hummus

IMG_1206

 Ok ok I know, I admit I’m on a bit of a chickpea roll at the moment. Apologies to readers out there who don’t share my enthusiasm on the humble chickpea. I always have tins in my store cupboard so am constantly thinking of new ways to use them. This recipe is certainly not a new one – in fact I was convinced I had popped it up on my blog a couple of years back, but I was thinking of my baba ganoush recipe – click here, which if you haven’t tried….shame on you. Seriously give it a go. You’ll thank me for it.

IMG_1196

Going back to the more ubiquitous hummus – or the more affectionate name that we call it in our house ‘whole mouse’….it is equally straightforward to make. The only unusual ingredient that you may not have come across, but that you can easily get hold of at any major supermarket, is ‘tahini’, which put simply is sesame paste. It’s most commonly used in North Africa, the Middle East and the Levant. You’ll find it sitting next to the peanut butter in most stores. In my opinion you do need this necessary ingredient to give your hummus a more authentic taste so please don’t leave it out.

IMG_1202

The other key ingredients are olive oil, fresh lemon juice, lots of lovely garlic, cumin powder, salt and a little iced water. How easy!

Now you can jazz things up a bit, which I often like to do by adding one of the following: paprika, sumac, zataar, fried onions or shallots, fresh herbs, roasted beetroot, roasted carrots, cumin powder, black or green olives, turmeric, chilli flakes, sun dried tomatoes….the list is endless. Play around with flavours and find a new version to suit you. I’d love to hear from you if you find a new combination that’s a hit!

IMG_1213

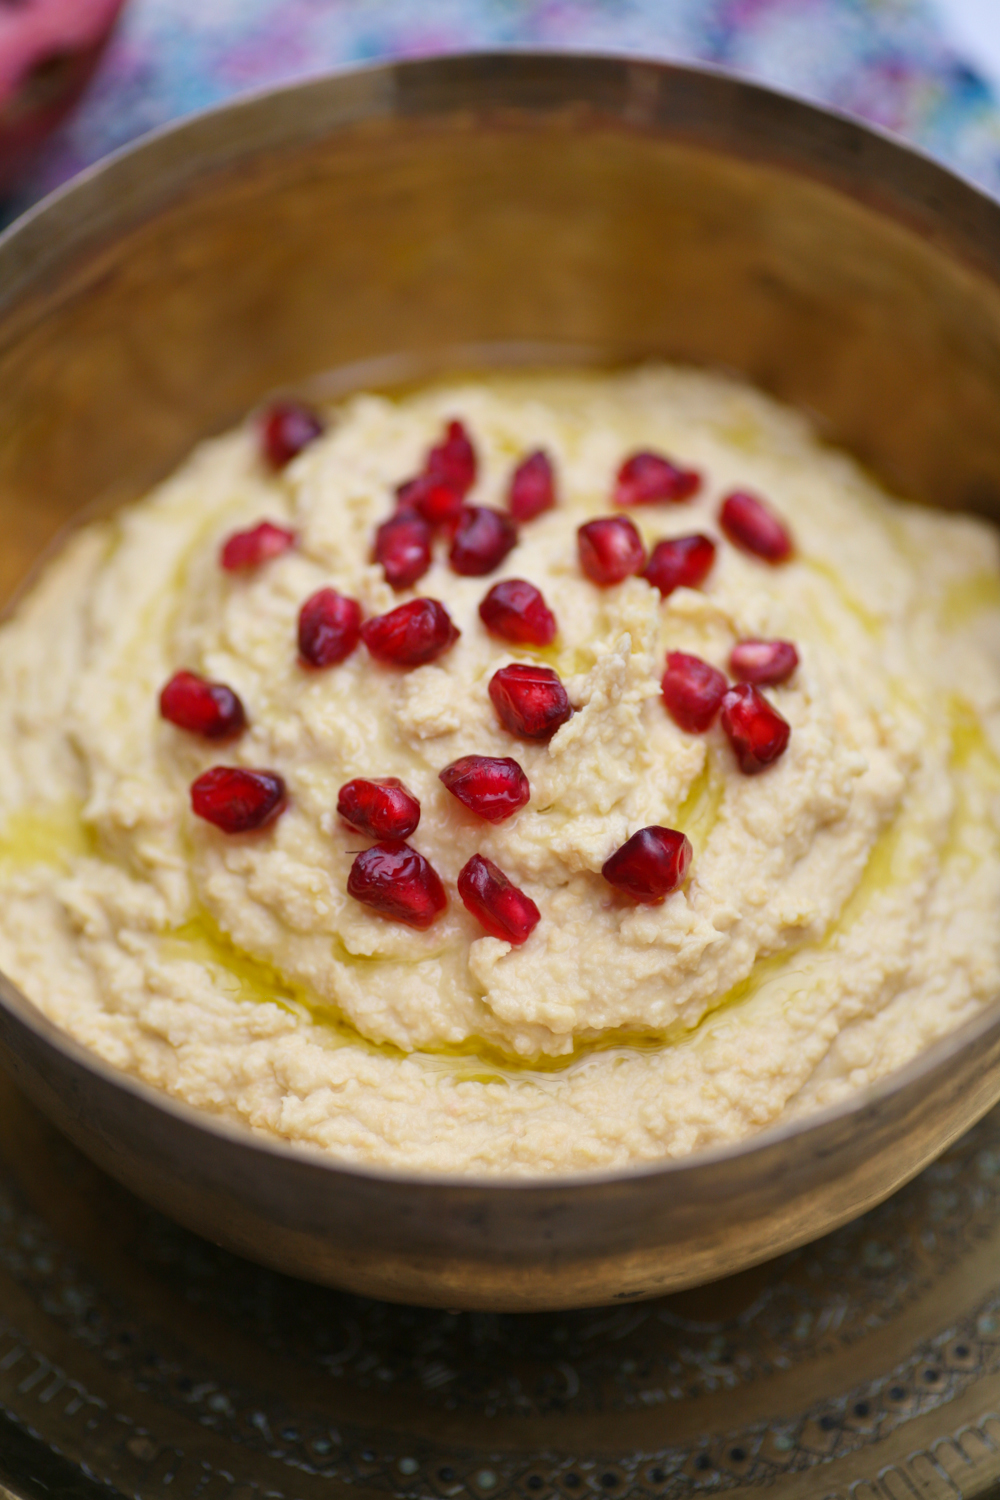
 I’ve kept things simple for my one today by simply adding some fresh pomegranate seeds to give a ruby red jewel effect.  I like the fresh sweetness of the seeds with the hummus. It works really well and looks really pretty too. We eat with our eyes and nose as well as our stomachs after all.

IMG_1214

Homemade Hummus 

Serves – at least 6 (see bowl in photo)

2x400g tins  of chickpeas (if you want it extra smooth and silky you need to peel the chickpeas, but totally fine if you don’t)

3 tbsp/100ml tahini

2 garlic cloves, peeled and crushed

1/2 tsp cumin powder

1 lemon, juice only (if it is a small lemon you may need 2)

3 tbsp olive oil

1 tbsp extra-virgin olive oil (plus a little extra to drizzle at the end)

5 tbsp iced water

salt to taste

Serving Ideas

pine nuts, paprika, pomegranate, fresh parsley, crispy shallots

1. In a blender add the tahini, lemon juice and a couple of tablespoons of iced water. Blitz for a minute.

2. Strain the chickpeas and then add them to a blender along with all the ingredients except the olive oil.

3. Blend the ingredients adding the olive oil gradually until smooth.

4. Taste and add more salt/lemon if needed.

5. Place in a bowl and scatter the pomegranate seeds on top along with a drizzle of olive oil.

The photo above I have not peeled the chickpeas but the one below I have. You can see the difference in the smoothness.


Chicken and Egg Kathi Roll – a Kolkata speciality

IMG_0457

Snow is forecast for London this week and our boiler has decided that this is the week to completely pack up on us *weeps*. Whilst we wait for a new one to be found and fitted, a small fan heater keeps me from freezing in the study. To keep mood and spirits up I have decided that comfort food is what is needed. Step forward ‘chicken and egg kati rolls’.

They are the perfect lunch time (or anytime come to thing of it) snack to perk you up and give you a feeling of happy blissful contentment.

IMG_0441

My husband is originally from Kolkata and these rolls, or wraps if you will, are very popular in the city. They are a cross between a Mexican burrito and a Lebanese chicken shawarma. In short, they are ridiculously delicious and one is never enough. Take a look at the locals in action on this little YouTube clip below.

I have seen some have a little egg omelette inside as well as the chicken, but I find the way that I prepare them below (and also in the video clip) works efficiently and quickly and allows you to wrap the Kathi roll more easily.

IMG_0426

 To save time you can buy your chapatis (or you could use paratha) but I find that making your own is pretty quick and easy and whilst not as circular as the store bought ones are equally delicious. I use a tawa, which is a flat disc like frying pan, which I picked up at my local Indian store, but if you do not have one a regular frying pan will work equally well.

IMG_0435

There are three steps to making these rolls – 1) the chicken filling, which can be made in advance, 2) the chapatis with the egg coating on one side, 3) the coriander and mint chutney, which can also be made in advance.

IMG_0438

They are best eaten straight away when they are hot. You can make a number of the chapatis with the egg topping and place them in a low warm oven to keep warm, whilst you prepare the rest or you can serve them as and when you prepare the chapatis.

IMG_0452

 My coriander and mint chutney is great with any of my curries and can be stored in the fridge for a week. I like to pop a couple of teaspoonfuls in my kathi roll to give it that extra kick. With a squeeze of lime on top then you have yourself a truly delicious treat.

IMG_0462


Coriander and Mint Chutney

1 handful of fresh coriander, washed and chopped

1 handful of fresh mint, washed and chopped

1 (or 2 if you prefer it hotter) small green chilli, chopped

1 small onion, chopped

5 garlic cloves, roughly chopped

1 tbsp fresh ginger roughly chopped

1 tsp cumin seeds

½ tsp sugar

salt to taste

1-2 tbsp lemon juice

  1. Place all the ingredients into a small blender and blend until you have a smooth paste. Taste and add more salt/sugar as necessary.
  2. Store in an airtight container in the fridge until ready to use.


******

Indian Chapatis with an egg coating

 Makes around 6-8 depending on the size of your chapatis

 200g chapatti (wholemeal) flour

 1 tsp sea salt

 2 tbsp sunflower oil

 125ml warm water

3 eggs, whisked

  1. In a large bowl place the flour, salt and oil and rub together with your fingertips. Gradually add the water so that a dough forms and all the flour is gathered up into one large dough ball.
  2. Place the dough ball on a floured surface and kneed for around 8 minutes so that the dough is soft and springs back when you poke it with your finger.
  3. Cover the dough with cling film and leave to rest for 20 minutes.
  4. Kneed once again for a couple of minutes, before breaking the dough up into smaller dough balls the size of large ping pong balls.
  5. Roll out the small dough ball so that it is circular and thin.
  6. Heat your frying pan or tawa on a medium heat and when it is hot add the chapati (do not add any oil). When you begin to see the chapati form bubbles, after about 30 seconds, you can have a look underneath to see if it is beginning to lightly bronze in places. If it is turn over carefully and using a folded over tea towel press down on the chapati and it will begin to puff up. Press down where the puffing occurs to help the air circulate around the chapati. Do not worry if yours does not puff up every time, it will still taste good.
  7. Gently pour a little of the whisked egg mix onto the side of the chapati that has bronzed slightly and using the back of a spoon swirl it around the whole of the chapati and  then carefully turn it over so that the egg cooks onto the chapati.
  8. Place the chapati onto a warm plate and keep in a low heated oven whilst you prepare the rest of the chapatis.

******

Spiced Tomato Chicken filling

2 tsp vegetable/sunflower oil

1 small red onion, finely chopped

1/2 tsp salt

3 medium tomatoes, chopped

1 tsp ginger paste

1 tsp garlic paste

1/2 tsp turmeric

1/2 tsp coriander powder

1/2 tsp cumin powder

1/2 tsp chat masala

1/2 tsp Kashmiri chilli powder

300g boneless chicken thighs, cut into bite sized pieces

1/4 tsp garam masala

To serve

1 red onion, finely sliced

2 limes, quartered

2 tsp coriander and mint chutney (see recipe above)

1. In a pan heat the oil and add the onion and salt and allow the onion to soften for around 5 minutes.

2. Add the garlic and ginger and stir with the onion so that it does not burn.

3. Add all the spices, aside for the garam masala and mix well with the onion, garlic and ginger.

4. Add the chopped tomato and allow to soften for another 5 minutes.

5. Add the chicken and stir into the other ingredients. Place a lid on the pan and allow to cook, stirring at intervals for 15 minutes.

6. Remove the lid and cook for a further 5 minutes so that all the sauce is absorbed and the dish looks dry.

7. Before turning off the heat add the garam masala and stir. Taste and season with more salt if necessary.


Fried Indian Spiced Aubergines

IMG_9073


After the excessive eating around Easter time, which always happens when my family gets together for a few days, it was time to detox a little and by that I mean eat vegetable-only lunch and suppers. If you are a vegetarian, eating and cooking Indian food holds so many delicious possibilities, in fact it would be really easy to be a vegetarian in India as all the vegetable dishes taste so good and in many cases better than their meat and fish counterparts. Anyway after a few days of worthiness we did cook one dish, or perhaps I should call it a snack, that was perhaps a little less healthy – as they are fried – but are very addictive.


IMG_9061

They are incredibly moorish and the perfect accompaniment when eating rice/chapati and dal. The trick is to eat them within a couple of minutes of being cooked as they are not as tasty once they become cold. When eating Indian food with my family at home I tend to eat with my right hand – why? – well I find the food actually tastes better, although be careful not to over eat as it is easy to eat more this way ;o). Eating a thicker dal (not the overly soupy kind) and chapati with these fried spiced aubergines is one of lives pleasures. Have a go and you’ll know what I mean. They may not be pretty but they do taste rather good.

IMG_9070

To cook these little beauties follow these simple instructions:


Fried Indian Spiced Aubergines

4-6 people depending on the size of your aubergine

1 aubergine

100g chickpea/gram flour

100ml water

1/2 tsp chilli powder

1/2 tsp turmeric powder

1 tsp salt

2 tbsp poppy seeds/sesame seeds

2 tbsp vegetable oil


1. To make the batter mix the flour and water together. You want to get the right consistency – not too watery and not too thick so add a little more water/flour as you see fit.

2. Add the turmeric, chilli powder, poppy seeds/sesame seeds and salt and mix into the batter.

3. Slice the aubergine into thin circles – approximately 1cm in diameter. If they are too thick they will not cook through properly.

4. Place the aubergine slices into the batter, a few at a time.

5. Add the vegetable oil to the frying pan on a medium heat. When it is hot add a few of the aubergine slices. Fry on both sides for around 3 minutes per side.

6. Once bronzed place carefully on some kitchen roll and serve immediately with more salt as required.


Cinnamon, Sea Salt and Chilli Chocolate Truffles

IMG_8254

Foodie gifts are always the best. Not only do they show effort and thought but are guaranteed to bring a smile to the receiver and a warm fuzzy feeling to the giver. Recently friends who came for supper bought along four bags of spices from Turkey that they had picked up on a recent business trip. So I now have bags of sumac and spice rubs – you can imagine how overjoyed I was.

IMG_8239

Time permitting, I like to take food gifts, sometimes homemade sometimes not, to friends who are hosting suppers. I find my chipotle sauce always goes down well, or in fact any of my chutneys under the chutney section in my recipe library. Chocolate truffles are always a crowd pleaser and are also perfect for bringing out at the end of a dinner. They take minimal effort to make and you can make them a few days in advance and then store them in the fridge.

IMG_8274

I am more partial to milk than dark chocolate so I have double the amount of milk chocolate to dark, I find this ration works really well. You can do the opposite if you prefer dark. You can also get creative with these truffles and instead of adding cinnamon, sea salt and chilli flakes, who can add just one or perhaps another spice such as cardamom, or perhaps fresh mint, coconut, ginger, nuts, raisons, bacon – the possibilities are endless.

Personally I love the combination of cinnamon, sea salt and a pinch of chilli flakes. Give them a try and leave a comment below and tell me what you think.

IMG_8217

Cinnamon, Sea Salt and Chilli Chocolate Truffles

200ml double cream

100g Green & Black milk chocolate 37% cocoa with sea salt

50g Green & Black dark chocolate 70% cocoa

1/2 tsp cinnamon powder

1  pinch of sea salt

1 pinch of chilli flakes

1 tbsp cocoa powder – for dusting

1. Place the milk and dark chocolate in a freezer bag and seal. Use a rolling pin to bash the chocolate into small pieces.

2. Gently warm the cream in a saucepan. When hot take off the heat and pour the broken up pieces of chocolate into the saucepan along with the cinnamon powder, sea salt and chilli flakes. The chocolate will melt within a couple of minutes. Give a good stir and taste to see if you like the flavour. Add a little more cinnamon powder, sea salt or chilli flakes as your taste requires.

3. Place into a bowl and place in the fridge for an hour and a half, by which time the chocolate will have become firmer to handle.

4. Roll in the palms of your hands to form small bite sized balls. I prefer them to look a little uneven compared to beautifully neat balls, but it’s a personal preference. Please note this part can become a little messy!

5. Roll in the cocoa powder and store  in an airtight container in the fridge until ready to eat. They will last for up to a week.

Instead of rolling the truffles in cocoa powder you could roll in pistachio, hazelnuts or coconut. Experiment and see what works for you.

IMG_8234


Tlayudas – Mexican Open Pizza and Homemade Guacamole

IMG_7052

Homemade guacamole packs a punch well above the bought stuff.  I know this my trade mark line (yawn yawn!), but it really is a breeze to make and is so tasty you’ll be wishing you had bought more avocados. As well as being a moreish dip – I kid you not, if I leave the room with a bowl of guacamole and tortilla chips, when I return the contents of the bowl will be clean – it’s also the perfect filler for the Mexican pizza Tlayudas, pronounced something along the lines of (clae-yoo-das).

These pizzas can be made with Middle Eastern flat breads/pittas a supply of which I always have in my freezer. It’s simply a case of piling on all the ingredients, with the flat breads sitting directly on a frying pan and then folding them over slightly to give the appearance of an thick taco. You can fill the flat breads with whatever takes your fancy, however I find that guacamole; shredded, poached chicken; mozzarella; pecorino; spiced sun blushed tomatoes; spinach; tarragon and rocket really hits the spot.

Be warned eating this is not a tidy pastime. However, you can get seriously involved and at one with your food.

Let me know if you give them a whirl and leave a comment below.

IMG_7036

Homemade Guacamole

adapted from Thomasina Miers’s book Mexican Food Made Simple

Serves 4

1/2 a red onion, finely chopped

2 serrano green chillies (1 if you prefer it less spicy), finely chopped

3 large ripe avocados, stoned and skin removed

1-2 limes, juice

pinch of rock salt

handful  of freshly coriander, chopped

black pepper

1. After finely chopping the red onion and chillies (I tend to leave the seeds in to give it that extra kick) place them in a bowl and  mash them together a little before adding the avocado. If you don’t have a pestle and mortar I find a good sized bowl and an end of a rolling pin work really well.

2. Add the juice of one lime and stir well into the guacamole, along with the salt, pepper and the chopped coriander.

3. Taste and add the juice of a further lime if needed – down to personal choice. I love it limey so tend to add two.

4. Give a good stir and spoon into a serving bowl/dish.  Place in the fridge whilst you are preparing the ingredients for the Tlayudas. Do not prepare too far in advance as the avocado will begin to discolour.

IMG_7059

Tlayudas, Mexican Open Pizza

adapted from Thomasina Miers’s book Mexican Food Made Simple

Serves 4

2 chicken breasts, poached and shredded

1 large bag of spinach

1 tsp of butter

4 large Middle Eastern flat breads

a bowl of homemade guacamole, see above

2 large mozzarella balls, torn into smaller pieces

16 slow baked tomatoes with chilli 

2 handfuls of rocket

1 handful of fresh tarragon

rock salt and pepper

pecorino or cheddar cheese for grating

1. Poach the chicken (in boiling water for up to 20 mins) and then shred it using a fork.  Place to one side.

2. Place a saucepan on low heat and add the butter. Once it has melted add the washed spinach and cook for a minute until the spinach just wilts. Remove from the pan and strain the spinach, pressing down firmly with a spoon so that the water is removed as far as possible. Place to one side.

3. Heat up a large frying pan and when it is hot add a flat bread and press down gently. Sprinkle a drop of water and turn the flat bread over. Now you need to work quickly. Spoon on a generous helping of guacamole followed by the chicken, mozzarella, slow baked tomatoes in chilli, spinach, rocket, salt, pepper and some grated pecorino/cheddar.

4. The flat bread will begin to crisp up quickly and the mozzarella begin to melt, so carefully begin to fold the flat bread over. With a spatula lift the pizza onto a plate and serve immediately.

5. Repeat until everyone is served.

Dive in and enjoy. Don’t forget the napkins.


Spicy Virgin Mary with Rosemary Spiced Walnuts

IMG_6440-2

For as long as I can remember I have adored drinking a Spicy Virgin Mary and time and time again I have been a little disappointed by what some pubs pass off as a Virgin Mary here in the UK. Tomato juice with a little tabasco just really doesn’t pass muster, so it’s not unheard of me asking for the necessary ingredients and making my own. Cheeky I know, but hey! In my old life working as a headhunter in the city I would spend a fair amount of time in hotels around London and other European cities meeting up with candidates who wished to remain incognito. I am not a coffee drinker, other than iced coffee and in particular Vietnamese –  for the recipe click here, and there are only so many cups of teas, water and ginger ales you can drink in a day, so my drink of choice, come the afternoon, would be a Virgin Mary.

IMG_6425

The quality of these Virgin Mary cocktails on the whole were excellent, as you would expect from a five * hotel, however, I recall the ones served to me at Browns Hotel, London and The Four Seasons, Canary Wharf – London and Milan were ahead of the pack. They often came accompanied by some little bar snack – nuts, olives or vegetable crisps, which worked so well with the spicy drink.

IMG_6428

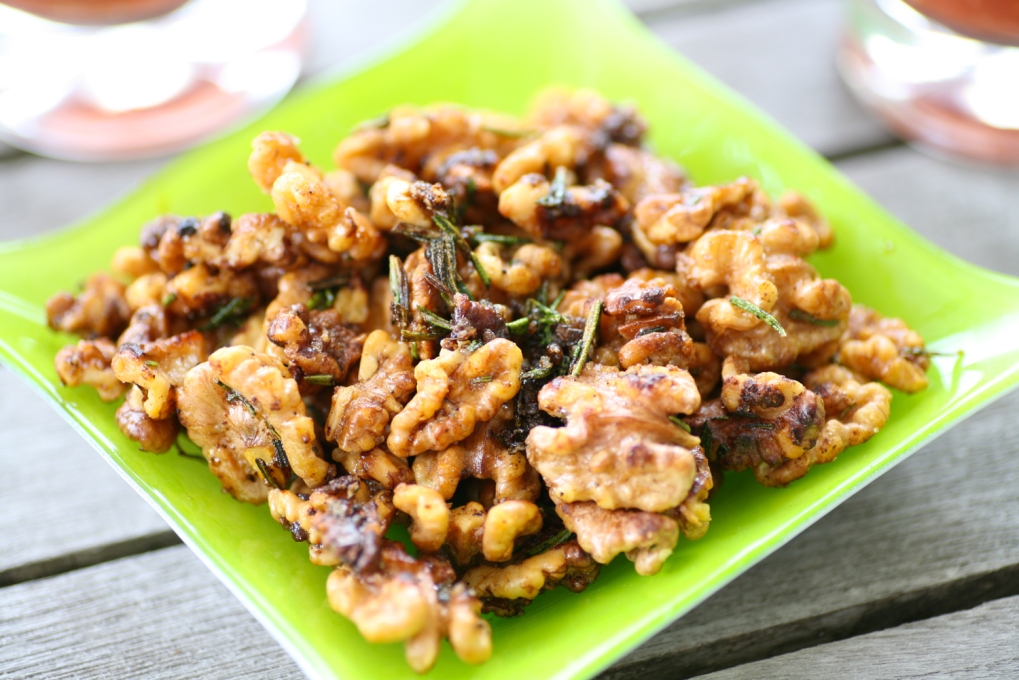
So alongside my recipe of a Spicy Virgin Mary I have found the perfect munchy, Rosemary Spiced Walnuts, which is easy to prepare and guaranteed to please those you hand the bowl to. In fact I have prepared it so many times since stumbling across it on fellow food blogger ‘Gastrogeek’s‘ site that it will definitely be imprinted on my mind as the snack for 2013.

IMG_6458

Spicy Virgin Mary

Makes 1 jug around 6 glasses

1 litre of tomato juice

4 tsp Worcestershire sauce

2 tsp tabasco

juice from half a lemon

2 tbsp horseradish

pinch of celery salt (or normal rock salt)

freshly ground black pepper

fresh celery sticks

extra lemon juice for rim of glass

1. Add all the ingredients together and taste. I do like my horseradish so perhaps add one tablespoonful then taste before adding the second.

2. To decorate the glasses first squeeze the extra lemon juice on a saucer and the freshly ground black pepper on another. Place the glasses first on to the saucer with the lemon juice followed by the saucer with the black pepper.

3. Add the Spicy Virgin Mary followed by a stick of celery in each glass and a slice of lemon and some ice.

If you want to ‘bloody’ the drink then just add vodka!

***********

IMG_6477-4

Summer is the season for having friends around for a BBQ and generally chillaxing so I hope you get to try this fab drink/snack combo. What homemade snacks do you like to serve up when friends come over?

IMG_6479

Rosemary Spiced Walnuts

Adapted from the lovely Rejina over at Gastrogeek, who in turn sourced it from Lawrence Keogh, Head Chef at the Wolseley

1 tbsp butter if eating immediately OR a splash of olive oil if cooking ahead of munching

150g walnuts

1-2 tsp light brown sugar

4 springs of fresh rosemary, chopped into small pieces

splash of water

1 generous pinch rock salt

pinch of ground black pepper

1/2 tsp chilli powder (or you could try smoked/hot paprika/cayenne powder)

1. Heat the butter/oil in a saucepan and add the walnuts. Cover the walnuts in the butter/oil and keep them gently moving around the pan allowing the natural oils to resonate.

2. After a couple of minutes add the sugar and allow the nuts to begin to caramalise.

3. Add the chilli powder (I also sometimes make these with smoked paprika), fresh rosemary, rock salt and black pepper. Continue to stir and shake the nuts around, making sure that they do not burn.

4. After a couple of minutes pour into a serving bowl and sprinkle some rock salt on top.

Perfect with a Spicy Virgin Mary.

IMG_6487-6


Baba Ganoush – it definitely has a ring to it!

I have to admit that it was initially the name of this wonderfully smokey aubergine (eggplant) dip/appetizer that caught my attention. I know you probably think I’m mad and just another one of those English eccentrics, but seriously saying ‘Baba Ganoush’ out loud has a wonderful ring to it – give it a try and you’ll see what I mean. You’ll want to keep saying it again and again, I promise you it’s rather addictive sounding. Coupled with the smokey undertones of this pureed roasted aubergine with tahini (sesame paste), lemon, garlic and olive oil and you have a perfect little dish. The name itself means ‘father pampered or spoiled’ in other words, it’s a dish that will please and delight and give great joy to those who feast upon it. It will bring smiles, rest assured!

It is common place in Lebanon, Israel, Turkey, all the Arab countries and North Africa, with each region taking their own spin on the  added extra ingredients. For example, in Palestine, yoghurt is often added to the mix, whilst in Lebanon pomegranate juice is sometimes added instead of the tahini and in Iran tomatoes, onion and turmeric is added. Some people like it to add cumin but I find that the perfect dish is one that is not too over complicated with different ingredients. The simplicity of it adds to it’s appeal.

We ate it on a number of occasions this summer in Turkey, cooked outside on an open fire. It tasted delicious and I made a note to myself there and then to share this recipe with you all. My recipe is very similar tasting to the one that I used to buy in those Middle Eastern supper markets around the Edgware Road in London. I acquired a taste for that style of Baba Ganoush, so when I started making my own homemade version the one I wanted to replicate was the one I used to eat in my youth – or perhaps I ought to say  early 20’s!

There is no hard and fast rule to making Baba Ganoush, so experiment and get creative and see which type really works for you. What I will say however, is that if you like it smokey – which is kind of the point of the dish – it is important to really burn the outside of the aubergine. Using tongs I roast them initially over a gas flame on my hob before putting them in the oven for 25 mins to soften them completely. If you don’t have a gas flame, placing them under a high grill so that the skins blacken and burn slightly, will have a similar smokey effect, but don’t forget to turn them regularly if you do this!

Baba Ganoush

Serves 4

3 large aubergine/eggplant

3 tbsp tahini (sesame paste)

juice of one and a half lemons

1 large tsp rock salt (or to taste)

3 garlic cloves, crushed

2 tbsp olive oil

1 pinch chilli powder

1 pinch sweet paprika

1 small handful of chopped flat leaf parsley

1. Preheat an oven to 180 degrees. Using tongs hold the aubergine over a gas flame so as to burn and blacken the skin. The more the skin burns the more smokey your Baba Ganoush will be. The skin should be sufficiently burned from between 6-10 minutes.

2. Place the aubergines on a baking tray and place in the oven for 25 minutes or until the aubergine is completely soft.

3. Leave to cool and then peal off the aubergine skin and discard the skin.

4. In a blender add the smoked aubergine flesh, tahini, lemon juice, chilli powder, salt and  half the olive oil and blend to a pulp. Taste and add more lemon juice/tahini/salt if required.

5. Place in a dish and add a pinch of sweet paprika, flat leaf parsley and the remaining olive oil and serve with toasted pitta bread, chapati or middle eastern bread.

It stores well in the fridge for a few days so great to cook in advance.

As you gently singe the skin of the aubergine the lovely smokey smells will come through.

After 25 minutes in the oven the aubergines will be very soft. Leave to cool before peeling off the skin, which should come away really easily. If they are at all hard in places, leave to cook for a further 5 minutes before checking again with a sharp knife. If the knife easily pierces the skin and goes through the aubergine then it is ready.

Into the blender goes the smoked and oven baked flesh of the aubergine, tahini, garlic, pinch of chilli powder, lemon juice, salt and olive oil.

I couldn’t resist a photo of my recent antique find – a c.1860 French steel and rosewood handle herb chopper, with the chopped flat leaf parsley ready to go on the top of the baba ganoush.