Nigel Slater’s Beef and Okra Soup for Stormzy

A recipe in the Guardian caught my eye recently and I made a note to myself to try making it in the New Year. Nigel Slater – who quite frankly is a culinary genius, came up with a dish ‘beef okra soup recipe for Stormzy’.  Now beef is a meat I rarely eat if I’m honest. Large slabs of any meat – particularly steak – don’t really float my boat, but if the meat is slow cooked and falling off the bone, with spices, then that is exciting. The recipe ingredients sung to me: ginger, garlic, plum tomatoes, cumin seeds, black peppercorns, cloves, cinnamon stick, okra, Scotch bonnet chillies. It sounded the perfect meal to make you feel alive and well in the cold bleak month of January. Don’t you agree?


It’s very straightforward but does take time, so if you have things to do in the house one morning then it is the perfect dish to cook. Nigel states that “the dish is even better if refrigerated overnight and reheated the following day”, so would be perfect for feeding a crowd as you can do all the preparations and cooking a day in advance. I’m too excited to dig in so shall be having it for my supper, I can hardly wait.

I’ve made a few changes to the recipe but you can find the original recipe here.

Nigel Slater’s Beef and Okra Soup for Stormzy

serves 6

1.6kg beef short ribs (get your butcher to cut the ribs into short lengths)

3 large onions, roughly chopped

8 garlic cloves, thinly sliced

60g ginger, skin removed sliced and then cut again into thin batons

1.6kg plum tomatoes, cut in half lengthways

3 tbsp beef dripping/oil

2 tsp cumin seeds

12 black peppercorns

6 cloves

1 cinnamon stick

1-2 scotch bonnet, seeds removed (unless you want it super hot) and finely diced (wear gloves)

3 bay leaves

1 litre hot beef stock

350g okra, sliced lengthways

salt and pepper


  1. Heat your oven to 220 degrees centigrade/gas mark 9 and place the ribs in a casserole pan in the oven for 20 mins.
  2. After 20 mins remove from the oven and add the dripping or oil and then add the garlic and onions and return to the oven for 15 minutes, lowering it to 180 degrees/gas mark 4.
  3. Remove from the oven again and this time stir in the ginger, spices, chillies, bay leaves and half of the halved tomatoes (reserve the rest for later).
  4. Return to the oven for 40 minutes and then remove from the oven and pour in the hot stock, cover and return to the oven for an hour.
  5. After the hour place the casserole pot onto the hob and add the okra and remaining tomatoes. Season well with salt and pepper and let it simmer for 20-30 minutes, by which time the okra will have softened.
  6. Before serving cut the beef from the bones and place in a deep bowl and ladle in the broth and vegetables.


Iraqi Jewish Kubbeh and Exploring the Galilee and Golan Heights

Nimrods Fortress

OK my absolutely TOP TIP when you visit Israel – maybe I’m getting ahead of myself, but I reckon you are curious to visit. Am I right? Buy a National Parks Pass. I had no idea they had so many, but there loads with various ruins, waterfalls, forests and deserts. Providing you go to more than three (which you will) it makes sense to buy the pass. When you go off on a hike the important thing is to take loads of water, wear covered shoes, and if you want shade, carry a small umbrella.

Ramparts of Nimrod’s Fortress in the foreground and Banias Nature Reserve in the distance

The Golan Heights area, in the north of the country,  was pretty empty of tourists, but the scenery was stunning. This may have been because it is pretty close to Syria, so most tourists keep away, but we found there was lots to see, it felt safe and we never went closer than 10 miles to the boarder. We even went through an area, which becomes a ski resort in the winter months, with Mount Hermon looming large nearby. Nimrod’s Fortress is a must-see. It takes the mantle of the biggest castle from the time of the Crusaders in all of Israel, a mountain-top stronghold spanning back to the 13th century. You can clamber all over it with virtually no one else there. Below the fortress are the Banias forests with rivers and waterfalls.

Golan Heights is also perfect terrain for vineyards so if you are up for a bit of wine tasting you might want to consider visiting any of the following: Adir winery, Dalton winery, Pelter winery, Chateau Golan, Galil Mountain winery. 

We ended up visiting Jezreel which had some really fine wines with a grape that I don’t often come across – carignan. We learned some super interesting facts about the wines in Israel; such as the fact that many of the wines are kosher – meaning that only religious Jews can be involved in its production. It has to be sealed twice before it can be touched by moderate/non-religious Jew. Had we accidentally touched any of the barrels below, the wine would have had to be discarded immediately. They are trying to appeal to not just a Jewish audience and are beginning to export to the UK. If you are in the wine business then I would highly recommend a trip to Israel to try out the wines. One of the red’s I tried at Jezreel was the best red I have had in ages.

We based ourselves in a house (via Airbnb) in the hills behind Tiberias overlooking the Sea of Galilee – just south of Golan Heights. Tiberias itself was rather built up and did not have many redeeming features if I’m honest, although we did enjoyed a couple of delicious meals at Avi’s restaurant in town. We also drove to the other side of the lake one evening and ate in the Kibbutz En Gev, which had some tasty food.

Dinner at Kibbutz En Gev

Our reason for basing ourselves in this area for a few days was that it was well located to explore the northern region of Israel. The place also feels very familiar as a lot of the sights we visited are spoken about in the bible stories we were told as children – feeding of the 5,000 with five loaves of bread and two fishes (Tabgha), the sermon on the mount (Church of the Beatitudes). The fresh water Sea of Galilee itself is little changed over the centuries. It still has big waves – this surprised us – beautiful sunsets and fish to catch. We bathed in its cool, refreshing waters every day to cool down after a day of touring.

Sea of Galilee from the Church of the Beatitudes

On one day we visited a fascinating archaeological site within Megiddo National Park called ‘Tel Megiddo’ or ‘Armageddon’, as it is known in Greek. During the Iron Age it was a royal city and was of particular importance due to its strategic location overlooking the Jezreel Valley. Some Christians believe this will be the site of the final battle between Jesus Christ and the kings of the Earth who will go to war, as outlined in the Book of Revelation. Interesting stuff, whether you believer or not.

Megiddo

After wandering around the heat, the best thing to do is to submerge yourself in cool waters. Thankfully there is a national park called Gan Hashlosha, also known as Sachne that  is often described as one of the most beautiful places in Israel –  a real-life garden of Eden. It’s basically a series of natural spring pools (at a constant 28 degree Celsius year round). After you’ve swam the length of one you get out and climb into the next. Little fish also swim in these pools and have a tendency to nibble your toes if you take too long to get out – you’ve been warned! There were many families enjoying a day out, cooking their own BBQ lunches and swimming in the pools. There is also an archeological museum here, but we spent our times relaxing in the pools instead.

Gan Hashlosha

I love a good view, especially an elevated one, so before sunset we headed to Belvoir National Park and drove to the highest peak so we could see the whole of the Jordan Valley, with Jordan in the background.

View over the Jordan Valley towards Jordan

Before and after sunset. Totally stunning.

Continuing with the theme that I will incorporate every travel post with a recipe I ate on my travels, today I wanted to show you how to make kubbeh (kubba/kibba), which I mentioned in my post on Jerusalem when I visited Azura restaurant. It’s an Iraqi Jewish recipe that is typically eaten in the winter months, so perfect to eat in the months ahead here in the UK. As I made so many kubbeh – around 24 of so, it made sense to show you two different varieties – one yellowy green and the other red. The kubbeh taste the same, but the soup they are in is very different. The red is sweeter from the beetroot and the yellowy/green is more zingy from the lemon.  What you can do is freeze the patties, pre-cooking, and then use them at a later date if you don’t want to cook them all in one go.

Kubbeh is made with semolina (although I have seen some recipes with 50% plain flour and 50% semolina). They are then filled with minced beef with a hint of cumin, paprika and onion. You can add touch of cinnamon should you wish or perhaps pine nuts; you can be as inventive as you want.

Jewish Iraqi Kubbeh

Makes around 24

2 tbsp olive oil

500g minced beef

1/2 white onion, finely chopped

2 garlic cloves, finely chopped

1 tsp cumin powder

1 tsp smoked paprika

salt and pepper, to taste

*******

640g semolina

400ml warm water, add gradually

1 tsp salt

*******


  1. Heat the oil in a pan and add the onion and garlic. Gently move around the pan to soften for 3 minutes before adding the mince, followed by the spices and salt and pepper. Leave to bronze for 10 minutes, moving the mince around the pan from time to time. Place to one side to cool whilst you prepare the semolina.
  2. In a bowl add the semolina and salt and then gradually add the water. Use your hands to help bind the semolina together so that it comes together like one large play-doh ball. Leave to chill in the fridge for 10 minutes and then remove from the fridge and break off a golf ball size portion of the dough.
  3. Flatten the dough out in your hand and then place a teaspoon amount of spiced beef into the centre. Bring the sides up towards one another and cover so that the semolina dough completely covers the beef. Pat into a round shape and place on a plate whilst you complete the rest.


EITHER

Beetroot Kubbeh

1 tbsp olive oil

1/2 white onion, finely chopped

pinch of cinnamon

1/2 tsp smoked paprika

1/2 tsp cumin powder

salt and pepper

2 tbsp tomato puree

juice of 1 lemon

1.5 litre water

4 beetroot, peeled and chopped into match sticks


  1. In a deep pan heat the olive oil and add the white onion and all the spices and salt and pepper. Move around the pan to soften for a couple of minutes before adding the tomato puree.
  2. Add the water and lemon juice and mix into the ingredients.
  3. Place the beetroot in the pan and gently submerge half the kubbeh. Keep on a low simmer for 20-30 minutes, stirring a few times so that the kubbeh don’t stick to one another.

Serve with fresh parsley.

OR

Greens and Chickpea Kubbeh

1 tbsp oil

1 leek, finely chopped

1 celery, finely chopped

1/8 tsp turmeric powder

1 tsp cumin powder

1 preserved lemon, finely chopped

1 tin (400g) of chickpeas

1 chicken stock cube

1 litre of water

3 tbsp cubed marrow, optional (I had some that needed eating so popped it in)

3 rainbow chard leaves and stalks, finely chopped

salt and pepper to taste


  1. In a separate saucepan, heat the oil and then add the leak and celery and let them soften for a few minutes before adding the spices.
  2. Add the preserved lemon, chicken stock, chickpeas and water.
  3. Now add the marrow (if using), rainbow shard and gently add the kubbeh patties and gently simmer for 20-30 minutes

To serve add some fresh lemon – quartered and some fresh parsley and mint.


Which would you choose?


SaveSave

SaveSaveSaveSave

SaveSave

SaveSave

SaveSave

SaveSave

SaveSave

SaveSave

SaveSave

SaveSave

SaveSave

SaveSave

SaveSave

SaveSave

SaveSave

SaveSave

SaveSave

SaveSave

SaveSave

SaveSave

SaveSave

SaveSave

SaveSave

SaveSave

SaveSave

SaveSave

SaveSave

SaveSave


Vietnamese Beef Stew – Bo Kho

As those who have been following my blog for some time will know, I ADORE Vietnamese food. It is fragrant, spiced but not hot spicy like Thai food. It is also very versatile and is equally loved by young and old alike. As such, my Bo Kho – Vietnamese Beef Stew – is a great meal to serve the whole family.

IMG_2490

It reminds me of the stew my grandmother made the whole time when I was a child, albeit without the spices and fresh herbs, although she may have added fresh thyme. The potatoes and carrots in the stew make it satisfyingly filling and I love the taste of the fresh herbs and crunchy beansprouts. Texture, taste and zing.

IMG_2505

It’s comforting and equally enjoyable on a hot summers eve or a chilly autumn day or, in the case of us Brits, a rather chilly June day (come on sunshine you can come back now!). My girls love it as well as adult guests. I often choose to eat mine with flat rice noodles – medium or thick, but it would work equally well with steamed rice.

Vietnamese Beef Stew – Bo Kho

serves 4-6

2 tbsp ground nut oil

1 large white onion, finely chopped

1 tsp salt

1.2kg stewing/braising beef, cut into 1.5 inch cubes

1 can of chopped tomatoes/400g fresh tomatoes chopped

1.5 tsp Chinese five spice powder

3 tbsp fish sauce

1.5 tsp brown sugar

3 star anise

1/2 tsp paprika

2 tbsp ginger paste/minced fresh ginger

1 tbsp garlic paste

1 bay leaf

2 lemongrass, halved and stalks removed, gently bashed

300ml coconut water (not cream or milk)

100ml beef stock

2 large carrots, cut into into 1 inch pieces on the diagonal

2 medium/large sized potatoes, cut into 4/6 pieces

300g medium or thick rice noodles

large handful of fresh mint leaves

large handful of fresh coriander leaves

large handful of fresh Thai basil leaves

100g beansprouts

2 fresh limes, quartered

 large handful of fried shallots

1 fresh red chilli, finely sliced – optional

  1. In a large cast-iron pan gently heat the oil and when it is hot, but on a low heat, add the onion and salt and allow the onion to soften for 5 minutes.
  2. In batches, brown the beef and then add the tinned or fresh tomatoes and gently simmer for a further 5 minutes.
  3. Add star anise, Chinese five spice, lemongrass, ginger, garlic, paprika, fish sauce, bay leaf, brown sugar and move around the pan before adding the coconut water and beef stock. Gently simmer for 45 minutes on a low heat.
  4. Add the carrots and potatoes and cook gently for a further 30-45 minutes, until soft but not falling apart.
  5. In a separate pan heat some water and when boiling add the rice noodles and allow to simmer for 5 minutes. Drain and then run under cold water until ready to use.
  6. If you are making the fried shallots, thinly slice a couple of banana shallots and allow to crisp up in vegetable oil. They take a few minutes and will burn easily so do not walk away from the pan when crisping them.

To serve:

In deep bowls add a handful of rice noodles to each bowl. If the noodles are stuck together run them under some water to loosen them up. Add the beef and a couple of ladles of the gravy to each bowl. Add the fresh herbs, beansprouts, quartered lime, crispy shallots, fresh chilli (if using) and serve immediately. Equally you could let guests add their own fresh herbs, beansprouts and shallots by placing them in the centre of the table to help themselves.

IMG_2507


Greek Stifado and Broth by Vicki Edgson and Heather Thomas part 2

IMG_9570


Continuing from lasts week’s post where I told you all about the book ‘Broth’ by Vicki Edgson and Heather Thomas and then made a fusion of their classic beef bone broth and rich bone marrow broth I wanted to show you a recipe from their book that used the broth as the foundation to another dish. There were so many options from ‘gulyas’ to ‘osso bucco with gremolata’ to ‘Chinese braised oxtail’ making the decision on what to cook really hard. In the end I opted for ‘stifado’.

IMG_9568It was a stew that was very similar to ones that I had eaten as a child at my maternal grandmothers, but this version was Greek and had some interesting twists that appealed to me. I liked the fact that cinnamon, allspice berries and raisins were added alongside rosemary, bay leaf and shallots. The beef broth that I had laboured over the few days previously also made the dish somewhat delicious. I also found that there was lots of broth left to freeze and use in the future. Result.

IMG_9566

In Greece, Stifado is eaten all year round and is, according to Edgson and Thomas, often a permanent fixture on the menu of most tavernas. It is often made with rabbit or veal, but since we now have rabbits as pets, rabbit on the menu at home has become strictly off limits (understandably) and I wanted to follow the recipe that was in ‘Broth’. I loved the fact that other than a brief amount of cooking on the hob, the rest can be slow cooked in the oven, freeing me up to get on with other things.

The result was a really hearty and delicious stew, where the meat was tender and flaking and the sauce rich and delicately spiced from the herbs and spices. I chose to accompany the dish with Italian orzo, which is similar, albeit slightly larger, to rice in appearance, and found in Puglia in southern Italy. Equally a crusty loaf would work well with this dish, allowing for lots of dunking of the delicious juices.

IMG_9564


Greek Stifado

Adapted from ‘Broth by Vicki Edgson and Heather Thomas, published by Jacqui Small’

4 tbsp olive oil

600g round shallots, peeled

1.5kg lean stewing/chuck steak

4 garlic cloves, halved

125ml of red wine

500ml of beef bone broth

3 tbsp red wine vinegar

3 medium sized tomatoes chopped

1 tbsp tomato puree

1 bay leaf

2 sprigs of rosemary

1 cinnamon stick

3 allspice berries

2 tbsp raisins

salt and fresh ground black pepper, to taste

orzo pasta to serve – optional

  1. Heat the oil in a casserole pan – my Le Creuset is my trusted friend – and on a low heat cook the shallots for 10-15 minutes so that they begin to bronze. Remove from the pan and set aside.
  2. Using the same pan, turn up the heat and add the beef  so that it browns all over.
  3. Then add the garlic and red wine and allow it to bubble away for a few minutes.
  4. Add the beef bone broth, wine vinegar, tomatoes, tomato puree, herbs and spices. Stir all the ingredients together well and then simmer for 1 hour OR place in a preheated oven at 140 degrees (I did the latter)
  5. Add the raisins and shallots and then continue cooking for a further 45-60 mins until the meat is tender and the sauce rich and reduced. Season to taste.

Edgerson and Thomas suggest serving with orzo pasta, which is a great idea. All in all it makes for a really wonderful, hearty dish that feeds the whole family.


IMG_9560


Mexican Chilli Beef with Butternut Squash

IMG_0584

Mexican food is perfect when the chill sets in and yet it also lends itself well to hot, humid weather. So wherever you are based in the world at this point in time this Mexican chilli beef is a must. The warm, smokey taste from the pasilla and ancho chilli add a wonderful, addictive, depth to this dish that are well suited to the adult and child palate.


IMG_0599

If you can cook it a day in advance the flavours really open up, but if you don’t have the time or inclination try and cook it in the morning if you are going to eat it later in the day.

So you may be wondering where on earth do you get Mexican chillies? I tend to buy mine online and I personally find Melbury & Appleton have a good selection and are quick and efficient to deliver. They also provide 1kg catering packs for the serious Mexican chilli aficionados, which is perfect for when I want to make my chipotle en adobe, it also works out far more cost effective in the long run.

IMG_0587

This is cosy, comfort eating at it’s best and perfect to feed a crowd. Washed down with one of my brother’s ales – check out Wiper and True  (he is the True part of the name!) then you have yourself a knock out meal. Don’t go putting his ale in the dish though, it’s too good for that – use any old lager you have to hand.

IMG_0585-2

Just take a look at that tasty morsel of meat with the smokey gravy working it’s magic and the wonderful combination of dry roasted pumpkin seeds, butternut squash, raw red onion, avocado and sour cream. A match made in heaven. Seriously give it a go. You won’t regret it and I can guarantee it will become one of your firm favourites going forward.

 Mexican Chilli Beef with Butternut Squash

Adapted from a recipe ‘Beef and Squash Chilli’ in the December 2014 issue of Bon Appetit

Serves 4

1 large dried pasilla chilli (2 if it is small)

1 dried ancho chilli

700ml chicken broth/stock

2 tbsp olive oil

1kg boneless stewing steak/beef chuck, cut into bite sized pieces

 1tsp rock salt and black pepper

1 large white onion, finely chopped

8 garlic, finely chopped

2 tsp ground cumin

2 tsp dried oregano

1 tsp tomato puree

350ml lager

1 small (500g) butternut squash skin removed, cubed into bite sized pieces

1 lime, juice only

******

To serve

2 avocado, diced into 1 inch cubes

3 tbsp pumpkin seeds, dry roasted

1 tbsp of sour cream per serving

1 red onion, finely sliced

1. First dry roast the dried chillies in a frying pan for a couple of minutes on both sides so that they darken and soften. Remove from the heat and place in a bowl with 500ml of boiling water for up to 30 minutes. Then drain and remove the stork and the seeds and place the chillies in a blender along with the chicken stock, and blend until smooth.

2. In a heavy based pan – I use my Le Creuset Pot – heat the oil and then add the seasoned stewing steak and stir at intervals until the redness has gone and the meat becomes brown. This will take around 5-7 minutes. When the beef is brown take it out of the pan using a slotted spoon and place on a plate. There will be a fair amount of liquid that has come from the beef. Once the beef has been removed, turn up the heat so that the liquid evaporates. This will only take a couple of minutes.

3. Once the pan has become dry, add the onion. You may find you need to add a little more oil at this stage. Stir the onion so that it becomes coated in the remnants of the beef juices, add a pinch more salt at this stage. After 4 minutes add the garlic and stir well into the onions. Let the onions and garlic cook together for a couple of minutes.

4. Add the oregano, ground cumin, tomato puree and stir together for a minute before returning the beef to the pan along with the lager. Increase the heat so that the lager begins to be absorbed. After a couple of minutes add the chilli puree that you made to begin with. Increase the heat so that it boils and then reduce it and leave to simmer gently for around 30 minutes.

5. Add the squash and continue to simmer for a further 15-20 minutes or until the squash has softened. Add the lime juice and stir gently. Leave to rest before serving.

6. Place the pumpkin seeds on a baking tray. Preheat the oven to 180 degrees and then add 1 tsp of olive oil over the pumpkin seeds. Place in the oven for no more than 10 minutes, being careful to check they do not burn. Let them cool before serving.

To plate up add the Mexican chilli beef, a dollop of sour cream on the side, the roasted pumpkin seeds over the chilli beef and sour cream, a scattering of thinly sliced red onions and then a few avocado cubes. The combination of all these flavours makes for a really memorable meal.


Vietnamese Pho Bo – Beef Noodle Soup and finding the perfect cooking course in Hoi An

IMG_5336

Vietnamese cuisine is to put it simply, ‘heavenly’. After my first bite of a Banh Mi, from Banh Min 11, back in London, not that long ago, I knew that it was going to be a culinary love affair. Since arriving in the motherland it has not disappointed. Each meal we have eaten has been a multitude of delicate, fragrant flavours – spices that sing to you and dance on your tongue.

IMG_5119

Herbs feature heavily in most dishes and add real fragrant lift. I was sufficiently enthused that I am going to attempt to grow some of them back in London – for example Vietnamese mint (which I should have no problems growing!), Vietnamese basil, saw tooth coriander, Vietnamese lemon balm, garlic chives. There is a great explanation of Vietnamese herbs here.

IMG_5076

I was keen to attend a cooking course in the UNESCO World Heritage Site of Hoi An and so set about researching a course that best suited my needs. I was given a few recommendations, however, I decided that a course run by the very affable Van, who runs ‘Green Bamboo Cooking School’ suited my needs perfectly.

IMG_5197

The course run by Van offered a detailed tour of the fresh food markets, where we picked up our ingredients; convivial fellow pupils; personal touches by Van who runs the course in her own home; unhurried tutoring over seven hours; a generous range of recipes manifesting itself in a memorable group lunch and a souvenir goodie bag to take home. Throw in door to door service as Van kindly ferried us to and from our hotels, and it is no surprise that Trip Advisor has over 210 positive comments for this class with no dissenters.

IMG_5126

I am pleased to say that course surpassed even my high expectations. Van was charming, spoke excellent English and a was a natural teacher. She also converted me to Vietnamese coffee – the condensed milk being the key.

My fellow students were a really lovely bunch of enthusiastic foodies – three Australians, two Norwegians and two Swiss and all of us had huge grins on our faces all day, clearly revelling in the fact that we had chosen such a perfect course. Here are few photos of the day. Scroll down.

I elected to cook the unofficial national dish of Vietnam – pho bo, beef noodle soup (pronounced ‘fur’). You can find pho stalls on most streets in Vietnam, but to cook it well is the tricky part. I was keen to understand how to cook it from scratch and to make that perfect pho broth. First stop was the market to buy the beef, which was as fresh as it gets as the cow had been slaughtered that very morning. We bought the beef fillet and 1kg of beef bones. Normally Van would have bought the spine, but there had been a run on spine bones that morning from a hotel restaurant, which had bought the lot. So instead we had a range of other beef bones and some shin to add to the flavour.

IMG_5104

Back at Van’s house the first trick I learnt was to gently char the skin of some ginger, shallots and garlic over a flame as this would give the broth a deep smokey flavour.

IMG_5133

It takes no more than a couple of minutes on each side.

IMG_5145

I then removed most of the skin of the ginger, using that back of a teaspoon and also the skin from the shallots and garlic, which is very easy at this stage as they virtually pop out.

After properly cleaning the beef bones, place them in a large pan of boiling water so as to get rid of any scum from the bones before cooking. Submerge them in boiling water for under a minute and then place them into a second large saucepan, which has also has boiling water in it. Discard the water from the first saucepan. You then need to add the charred ginger, garlic and shallots

Continue to add the following ingredients to the pan: 2 chillies, stick of cinnamon, 1 large white onion, 5 star anise, 5 Chinese apples. I had not come across Chinese apples before, but they tasted delicious. As they may be difficult to source for some people, dates work equally well. Add some sugar and salt and if you fancy, some beef stock as well (I decided to omit the beef stock, to see how it would taste in its natural state).

IMG_5146

Place a lid on the top and leave to boil away gently for a further 2 to 3 hours. Add more seasoning to taste and beef stock if necessary.

IMG_5154

Meanwhile, very finely slice the beef fillet and leave in the fridge until ready to use.

IMG_5279

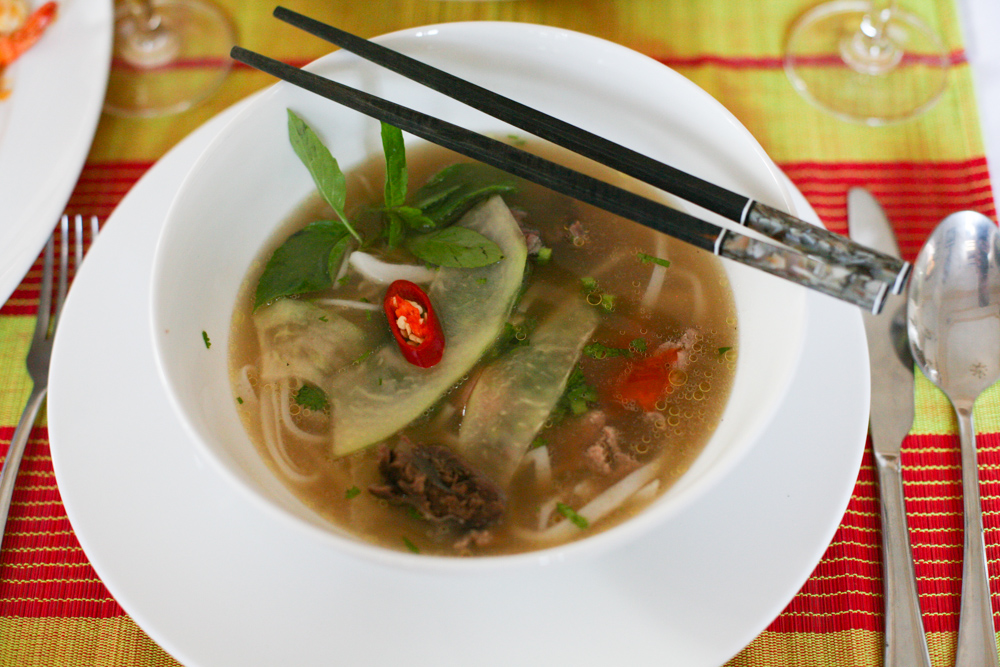
Before serving have individual bowls of bean sprouts and fresh pho noodles/rice noodles, (the noodles you have submerged into boiling water for 30 seconds and drained) at the ready. In a large ladle add a little of the raw beef and submerge it into the pho broth so that the broth fills the ladle. Using a fork or chop sticks, move the beef around in the boiling stock in your ladle for 30 seconds (that magic number) so that it cooks through and ladle it over one of the bowls of noodles that you have prepared.

Add a generous amount of fresh herbs, including Asian basil, coriander, spring onions along with a quarter of a lime and chilli sauce to taste. You can also have a small bowl of soy sauce on the side, should you wish to add a little, as well as some sliced green papaya and fresh sliced chilli.

IMG_5283

IMG_5284

I was delighted by the results and despite having eaten a ridiculous amount of the tastiest Vietnamese food, cooked by my fellow foodies, I managed to see off a bowl of my pho bo.
IMG_5289

Eight happy and well fed people were then deposited back to their hotels, along with a goodie bag provided by Van.

I hope that you too will try this tasty version of pho. Watch this space for more Vietnamese recipes over the coming months.

Pho Bo (Beef Noodle Soup)

Adapted from Van’s recipe, who runs Green Bamboo Cooking School

Serves at least 8

500g fresh pho noodles/rice noodles

300g beef fillet

1 kg beef bones – ideally spine bones or shin

5 litres boiling water

1 tbsp beef stock

******************

5 star anise

1 large stick of cinnamon

1 roasted fresh ginger

5 roasted shallots

1 large roasted bulb of garlic

5 dried Chinese apples/dates

1 whole white onion, peeled

2 red chillies, left whole or chopped in two

2 tsp salt and pepper

1 tbsp raw sugar

**********

50g fresh bean sprouts

50g fresh Asian basil

50g fresh coriander

50g spring onion, finely sliced

2 limes, cut into quarters

green papaya, finely sliced

chilli paste to taste

soy sauce, to taste (optional)

2 fresh chillies, sliced (optional)

1. Wash the beef bones under a tap and then place to one side. Meanwhile bring two large pans of water to the boil. In the first add the beef bones and submerge them for just under a minute and then transfer them to the second saucepan. Discard the water from the first saucepan.

2. Over a gas flame place the garlic, shallots and ginger on a metal grill directly above the flame, allowing them to char/roast. After a couple of minutes turn them over so that both sides are equally charred. Using the back of a teaspoon, peel off a little of the skin of the ginger.

3. Add them to the bones and boiling water, along with the onion, chillies, dried Chinese apples/dates, cinnamon stick and star anise. Add the salt, sugar, pepper and beef stock it you wish and place a lid on the pan and let  it boil gently for 2-3 hours.

4. Meanwhile, very finely slice the beef fillet and return it to the fridge.

5. Before serving, warm the noodles by placing them on a slotted spoon and submerging them in boling water for 30 seconds. Drain and place in individual bowls. Add the bean sprouts to each of the bowls.

6. In a large ladle add a little of the thinly sliced beef fillet and submerge into the pho broth so that the ladle is completely full and the beef is submerged. With a fork or chop sticks move the beef around in the ladle so that it ‘cooks’ through properly.  Pour over the noodles. Please note the pho broth needs to be boiling/bubbling away at this stage so that the beef fillet is cooked properly. 

7. Add the fresh herbs, lime, spring onions, green papaya and chilli paste/soy sauce/fresh chillies to taste.

8. Serve immediately and enjoy piping hot.