Pecan Puffs

IMG_4052

When we arrived back from Hong Kong in the New Year we headed out to the countryside to stay with my parents in order to celebrate Christmas (part 2) with them, my siblings and their partners. The tree was down by this stage, twelfth night had long gone, but that aside my parents sweetly replicated the Christmas that they had had on December 25th again for us as we were back in the UK. Anyone passing by the house would have thought we had all gone completely mad as carols were playing and mulled wine was wafting through the house. We ate turkey, wore silly cracker hats and played parlour games. My mother went to town, as usual, on the food which we all greatly devoured.

It was whilst we were lazing away the hours that I stumbled across a little pot filled with the most delicious, crumbly biscuits I had ever eaten. They were completely heavenly as well as being very addictive and perfect to nibble away at whilst having a cup of tea (we English love our tea) by the fire in the late afternoon.

IMG_4043

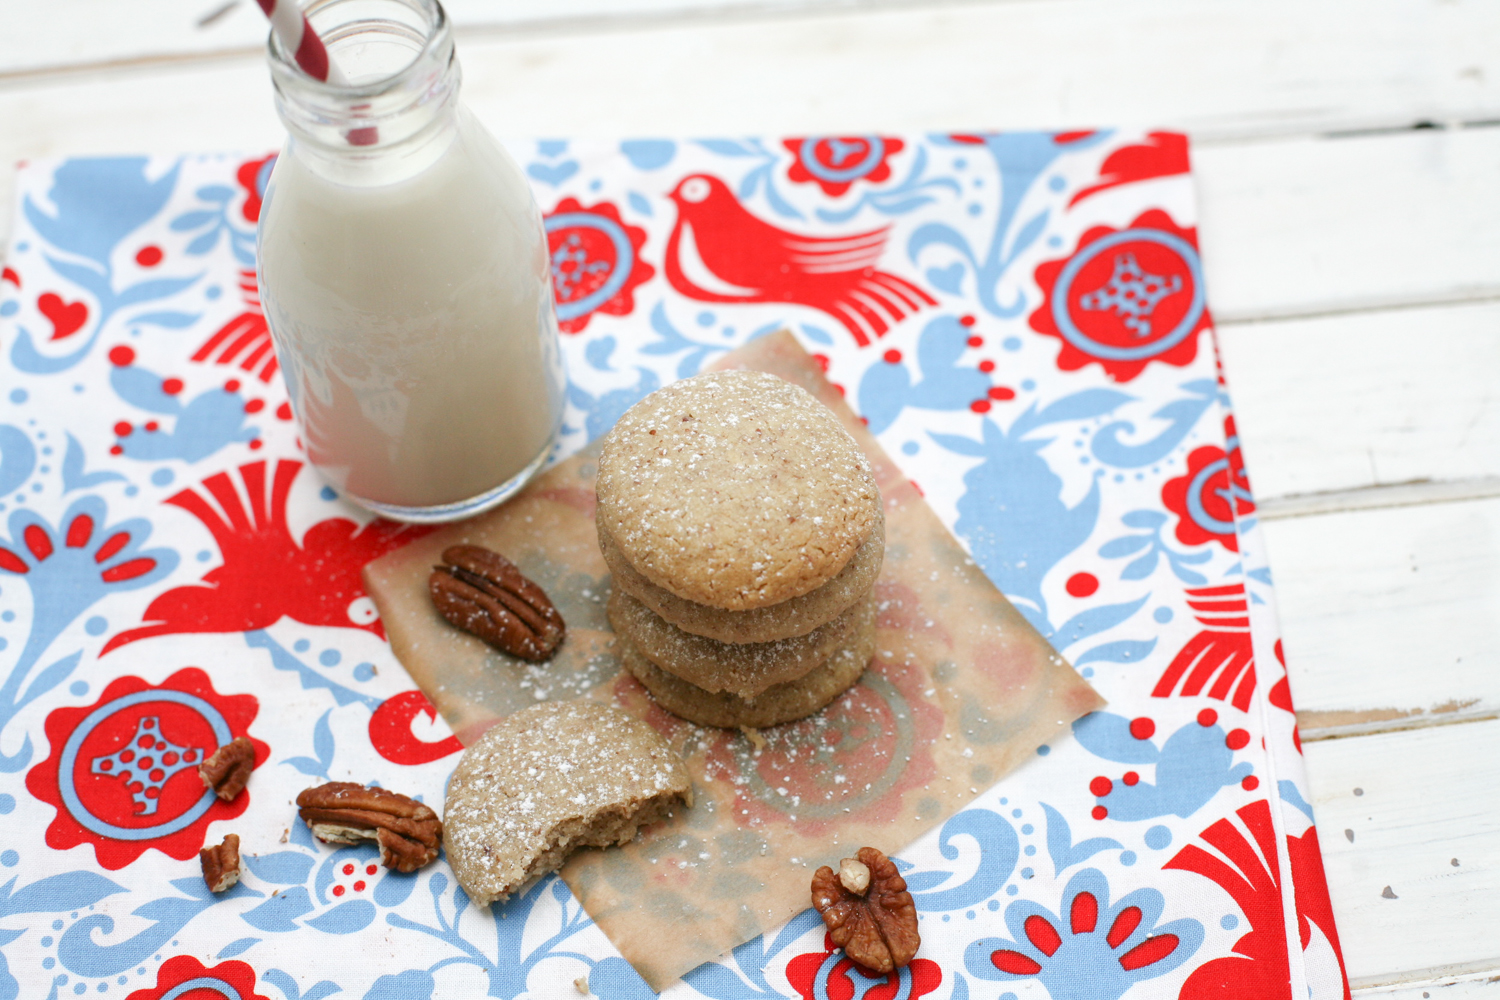
It transpired that they had been sent from the US, lovingly made by a friend of my sister and her beau. Needless to say they did not last long as the whole family took a liking to them.

I urged my sister to track down the recipe so that I could try and make them myself. I had to do all the US conversions from cups to grams and somewhere along the line with my conversions they went wrong. They still tasted delicious but they were not as puff like as the originals as they were coming out of the oven a lot flatter.

IMG_4022

Finally after a few false starts I found the right balance of the ingredients and the delicious puffs returned. They are meant to be crumbly when you bite into them and certainly not the same texture as a biscuit. In as far as they are quick to devour they are also quick to make. Big A and Little Z love to get involved and prepare them with me as they are very straightforward to make.

I rather like the idea of putting them in little packets tied with a bow and given to friends and loved ones. How impressed will the receivers of such fancies be when they taste your pecan puffs. Trust me they will be begging you for the recipe. Send them this way of course. x

IMG_4034

Pecan Puffs

Inspired by Lainy in the US

Makes around 30 (depending on size)

240g unsalted butter, cubed at room temperature

120g pecan nuts, finely ground

240g plain flour, sieved

50g icing sugar

1 tsp salt

1 tsp vanilla essence

1. Finely grind the pecan nuts in a blender and place to one side.

2. Line a couple of baking trays with baking parchment and again place to one side.

3. In a large bowl add the sieved flour, icing sugar and salt.

4. Add the cubed butter to the flour bowl and using your hands begin to mix the ingredients together, softening the butter into the flour as you do so. Once it all begins to come together, add the vanilla essence and the ground pecan nuts.

5. Once all the ingredients have been thoroughly mixed together form a large ball and break off small pieces, a little smaller than a hens egg, but bigger than a quails, and roll in the palm of your hands into a ball and then slightly flatten, but not so much that it is completely flat.

6. Place each pecan puff on to a baking tray so that they are well spread out. I tend to leave a couple of inches around each puff . Whilst you are preparing the puffs preheat the oven to 160 degrees centigrade.

7. Place in the oven for 16 minutes and then leave to firm up before placing them on the cooling rack. When they are completely cool sift icing sugar over the top. Voila your pecan puff is ready to be devoured.


Pistachio and Cardamom Shortbread Biscuits

It’s always good to have a go-to biscuit that is straightforward and not too time consuming to make, but also has an added complexity in taste that makes it stand out from the crowd. This shortbread biscuit ticks all those boxes with flying colours. The flavours of cardamom and pistachio sing to me and the partnership is one to be jubilant about. I find it’s great to make a batch and freeze (before cooking) some of the dough, wrapped in cling film, that you are not needing, until you want to make another batch at a later date. At this stage simply remove from the freezer and let it defrost before making incisions into the dough to make your biscuits.

With the festive season almost upon us, I also find that they are a great offering to give to friends that you are visiting either wrapped in brown baking parchment, tied with some vintage twine or red ribbon, or placed in a sealed jar. Either way, the effort and initiative will definitely bring a smile upon the receiver.

Pistachio and Cardamom Shortbread Biscuits

sourced from Ottolenghi The Cookbook

Makes around 30

8 cardamom pods

200g unsalted butter

25g ground rice

240g plain flour

1/2 tsp of salt

35g icing sugar

60g shelled pistachio nuts

1 free-range egg, lightly beaten

2 tbsp vanilla sugar

1. Crush the cardamom pods, using a pestle and mortar and once the seeds have been released remove the skins and then crush the seeds into a fine powder. The smell is sensational.

2. Place the butter, ground rice, flour, salt , ground cardamom and icing sugar in an electric mixer and whisk until the ingredients have bound together to create a ball shape and immediately transfer the dough onto a cold surface sprinkled with a little flour. (see photo below)

3. Using your hands roll the dough into a log shape. If you want really large round biscuits then keep the the log short in length, however, if you would prefer small or medium sized biscuits then elongate the dough further. There is no hard and fast rule on how large the biscuits need to be. Wrap in cling film and place in the fridge for over an hour.

4. Meanwhile, place the pistachio nuts into the electric mixer and give them a quick wizz so that they are broken up slightly. If you do it for too long they will become too fine!

5. Place the crushed pistachio nuts on a flat surface and take the cling film off  the dough (and place the cling film to one side) and brush the log with the beaten egg. Now roll the dough over the top of the pistachio nuts; you may need to give a helping hand and place a few pistachio nuts into the side of the dough. Put the same cling film back on the dough log and place back into the fridge for a further 30 minutes.

6. Preheat the oven to 150 degrees. Remove the cling film and using a sharp knife cut the dough log into even slices and place them on a baking tray lined with baking parchment, placing them 2cm apart. Dust the biscuits with vanilla sugar and place in the oven for around 20 minutes so that they are golden, but not bronzed. Keep a close eye on them.

7. Remove from the oven and allow to cool completely as they will harden as they cool. If you pick them up before they are cool they may well crumble. Once they have cooled store in a sealed jar or container for up to a week.

Rolled out the dough log on a cold surface sprinkled with flour

Roll out the cold dough log over the pistachio nuts

Place the biscuits slightly further apart (2cm) than I have done above or they will begin to join together.

I was pretty lucky but it got close ;0)

Baked and ready to eat


Mary’s Granola Bars

Mary McCartney has been gracing the pages recently of certain magazines here in the UK, namely The Saturday FT Magazine (April 21st 2012) and the June issue of ‘Red’ Magazine. Known for her talent behind the camera it was a revelation, albeit a positive one, that she has just produced a cook book called ‘Food‘ that she wrote and photographed. For those who are unaware, the McCartney clan are passionate vegetarians and Mary has clearly channelled her love of all things vegetarian into her own tome. Between the two magazines I now have just under 20 of her recipes, which should appeal to a wide audience in that they look straight forward to execute and appetising enough to warrant an attempt at making.

I thought that I would follow her take on the granola bar, which to all intense and purpose is a glorified healthy flapjack right? I am always thinking of little snacks to feed Big A and Little Z when I collect Big A from school, so thought Mary’s granola bar idea would be perfect to give them to fill the gap before supper.  I am also a huge fan of agave syrup, (which I also used in this recipe) which was right at the top of her ingredients list.

The recipe is so incredibly easy that it would be perfect for Big A (whose 6) to cook on her own, with a little overseeing from Mama of course! I followed the recipe religiously, but I think I will get creative next time and change some of the ingredients around. For example I think the bars would also be delicious with pecan nuts, hazelnuts, dates, dried cranberries, coconut. If you get carried away with some new ingredients that work do let me know and maybe next time I’ll follow your suggestion.

Granola Bars

Sourced from Mary McCartney’s recipes in The Saturday FT Magazine, April 21st 2012

Makes 12-14 slices

200ml agave syrup

50g butter

4 tbs vegetable oil

1/4 ground cinnamon

1 tbs vanilla extract

200g porridge oats

80g cornflakes

100g almonds, coarsely chopped

100g dried apricots, coarsely chopped

100g raisins or sultanas

2 tbs sunflower seeds

2 tbs pumpkin seeds

 1. Line a baking tray with baking parchment. I used a 25cm x 25cm tray. Preheat the oven to 180 degrees.

2. Heat the agave syrup in a pan for a few minutes and then add the  vegetable oil and butter. Take it off as the butter melts.

3. Add all the ingredients to the syrup mixture and gently fold in together so that all the ingredients are evenly covered in the syrup.

4. Transfer the contents of the pan to the baking tray and firmly press down evenly.

5. Bake in the oven for 15-20 minutes.

6. Take tray out of oven and leave to cool. When it is cool, cut the granola into square, rectangles – whatever shape takes your fancy! The baking parchment will come away easily once the granola has cooled.

7. Store in an air tight container.


We are off to the island of the gods

OLYMPUS DIGITAL CAMERA

Our family summer holiday beckons. We are heading to the island of the gods – or as it is more recognisably known, Bali. Its been over a decade since Mr B and I have visited this wonderful island and we felt it was time to return, this time with big A and little Z in tow. Its a long way from London town, but we feel that the marathon journey is worth it when we get to this lush green island. We are heading for the jungle first for a week where we hope to be woken by the morning calls of unfamilar wild life. There will be lots to explore and the rhythm of daily life will change considerably. It will do all of us the world of good – well that’s the plan anyway.

I am not so sure how easy it will be for me to blog, so apologies in advance if it is not as frequent as you are use to. I am hoping to adopt some new recipes on my travels and any that make the grade I will certainly share with you.

When going on a journey it is comforting to have a few home comforts or in my case, home made morsels, to nibble on during the flight/drive/sail (delete as appropriate!). These parmigiano reggiano caraway (thats quite a mouthful!) biscuits should go down a treat with the girls and Mr B in moments of hunger on the flight. You can make the same biscuits with cheddar cheese as well, just use whatever variety of hard cheese needs eating in your fridge, and in my case its parmigiano reggiano. There are a number of potential ‘extras’ you can add to the biscuits, such as caraway, sesame or poppy seeds or chilli flakes on the outer rim so experiment and see which you like the best. Within the biscuits themselves I would also add a pinch or two of cayenne pepper, but since the girls will be eating them, and we are going on a journey, I will keep them as plain and simple as possible whilst retaining their moreish quality.

OLYMPUS DIGITAL CAMERA

They are great to freeze – pre cooking – so make a large amount and bring out the rolls as and when you need them. I also find they are great as a little canape when hosting dinners.

Parmigiano-Reggiano Caraway Biscuits

Makes between 50-60 small round biscuits

125g parmigiano reggiano (or any hard cheese – cheddar works equally well), grated

125g cold butter

200g plain flour

1/2 tsp of cayenne pepper, optional

1 egg

pinch of salt

2 tbsp of caraway seeds

1. For speed and ease I tend to use my blender and I literally put all the ingredients in together and whizz for around 30 seconds and by this time all the ingredients have come together to create a dough like ball. If you are doing it all by hand then sift the flour and then mix in the butter, cayenne pepper and salt with your finger tips to create a bread crumb consistency. Then add the grated cheese and the egg, which should then help to bind the ingredients together. If it is too dry then add a tsp of water or if it is too wet then add a little more flour to bind it all together to create a ball.

2. Place on a floured surface and knead so that the ingredients are well bound together.

OLYMPUS DIGITAL CAMERA

3. Roll out your dough into a long sausage shape and cut in two if necessary. Then using either greaseproof paper or cling film place the rolled dough in the centre and spread the caraway seeds over the dough. It is best to gently roll then over the seeds so that they are spread as evenly as possible.

OLYMPUS DIGITAL CAMERA

OLYMPUS DIGITAL CAMERA

4. Wrap the dough in the greaseproof paper or cling film and either put straight into the freezer to use at a later date or place in the fridge for few hours. You will find that it holds together and is better to cut once it has had some time to rest in the fridge.

OLYMPUS DIGITAL CAMERA

5. After some time in the fridge, unwrap the dough and slice it evenly into small biscuits using a sharp knife.

6. Preheat your oven to 180 degrees and while it is heating up grease a baking tray and evenly spread out the biscuits.

7. Place in the oven between 8-10 minutes. They are ready just as they are beginning to bronze. Be careful not to overcook, so do check regularly. They are delicious warm or will store for a few days in an airtight container.

I couldn’t resist this last shot when little Z’s hand crept into the photo frame eager to try one of the biscuits.

OLYMPUS DIGITAL CAMERA