Mustard, Coconut and Colombo Spices Salmon Curry

IMG_8841

A couple of weeks ago I was approached on behalf of Maison Maille the purveyor of fine mustards, oils and vinegars, who have been in existence since 1747 and who have recently opened their first London store at 2 Piccadilly Arcadeto be part of the ‘Maille Culinary Challenge‘. It’s open for food blogger and food reviewers and as such I thought I would throw myself into the challenge and create a dish using one of their products in a recipe that I have devised especially for them and which I hope my readers will try and make.

IMG_8852

The recipes entered will be judged on four main criteria: creativity, originality, taste and visual appeal. I hope the curry I have created ticks all the boxes and in addition is easy for others to attempt to make at home. There is nothing more frustrating when you see a fabulous recipe but to create it involves so many steps and ingredients that it actually puts you off.  I want my recipes to be user friendly and to actually encourage people to cook and try new flavours and tastes. There is a whole flavour universe out there waiting to be sampled so be courageous and follow the simple steps below to try this recipe.

IMG_8863

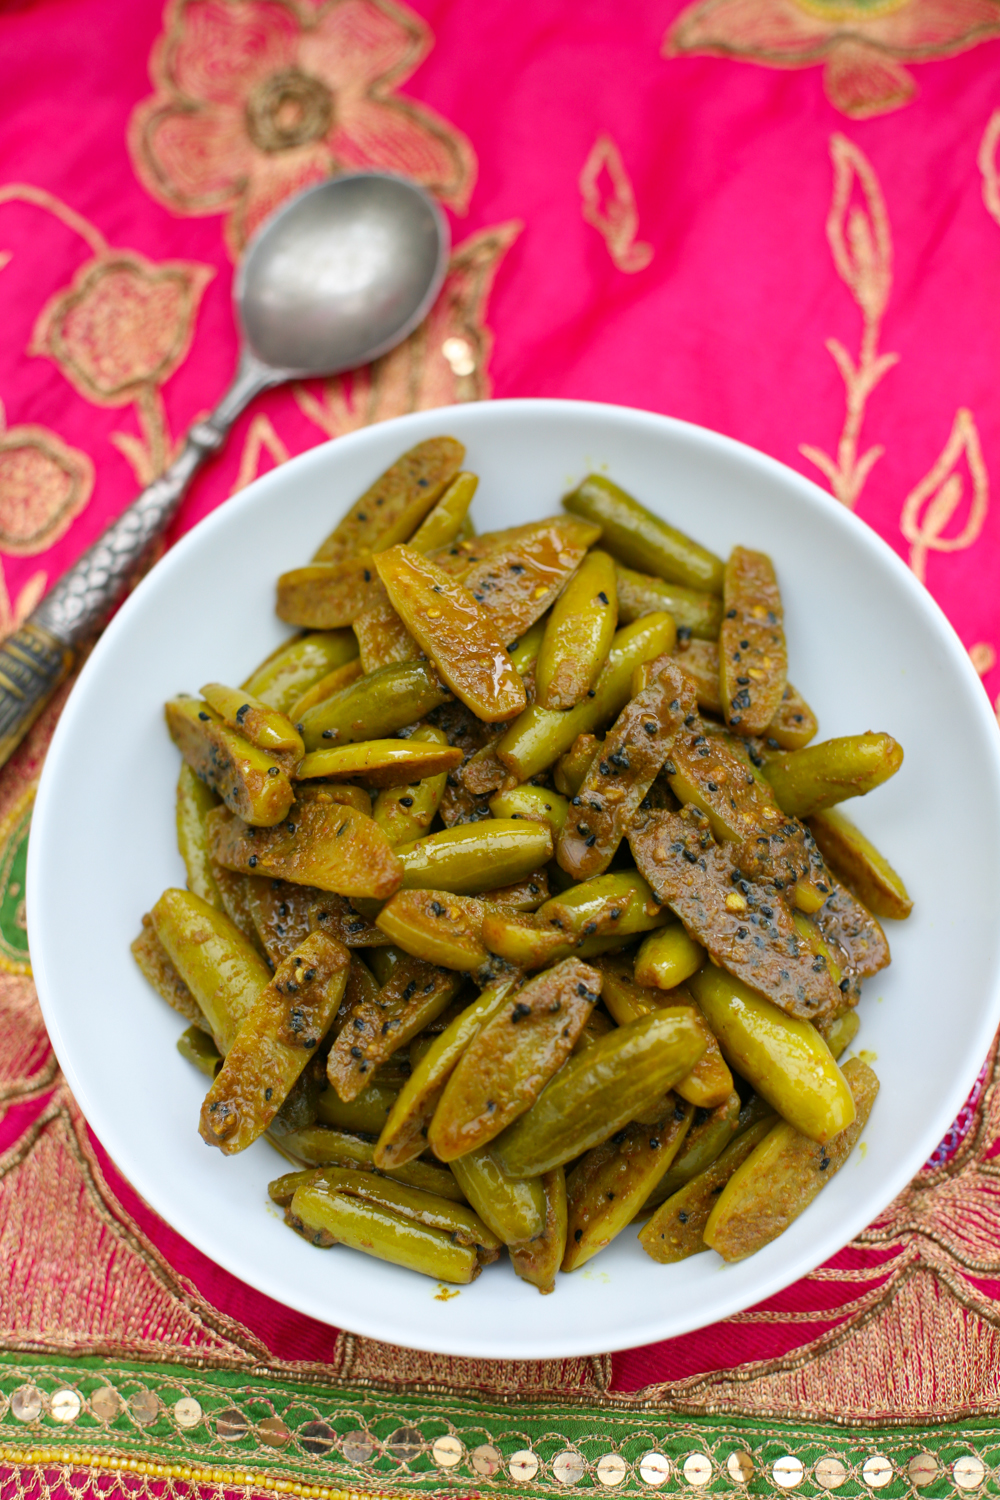
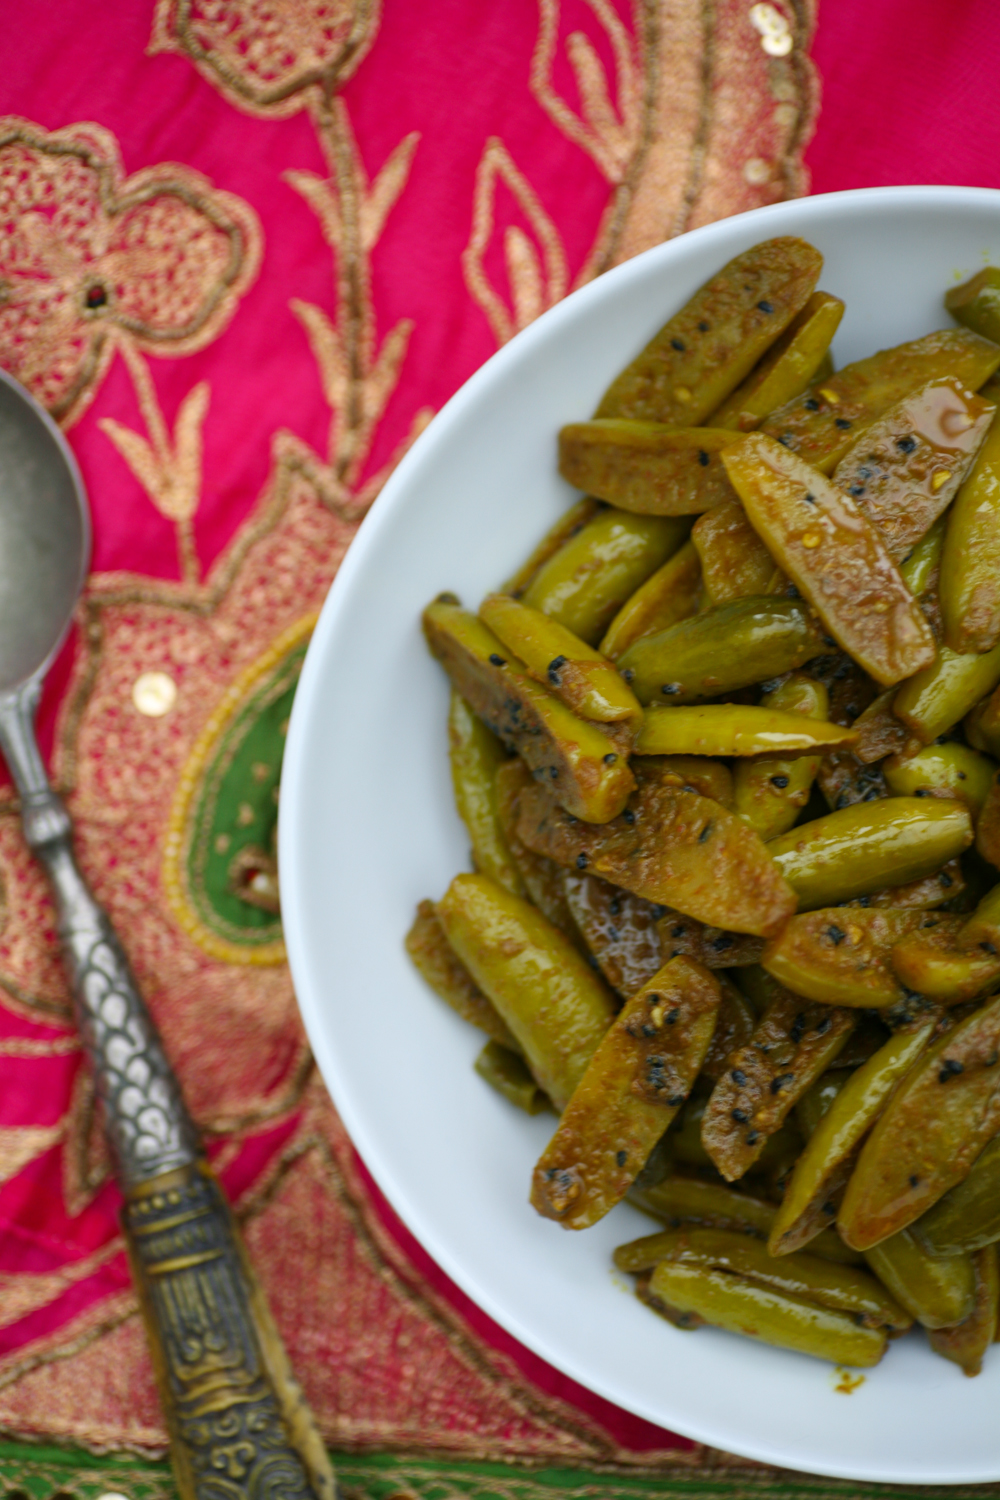
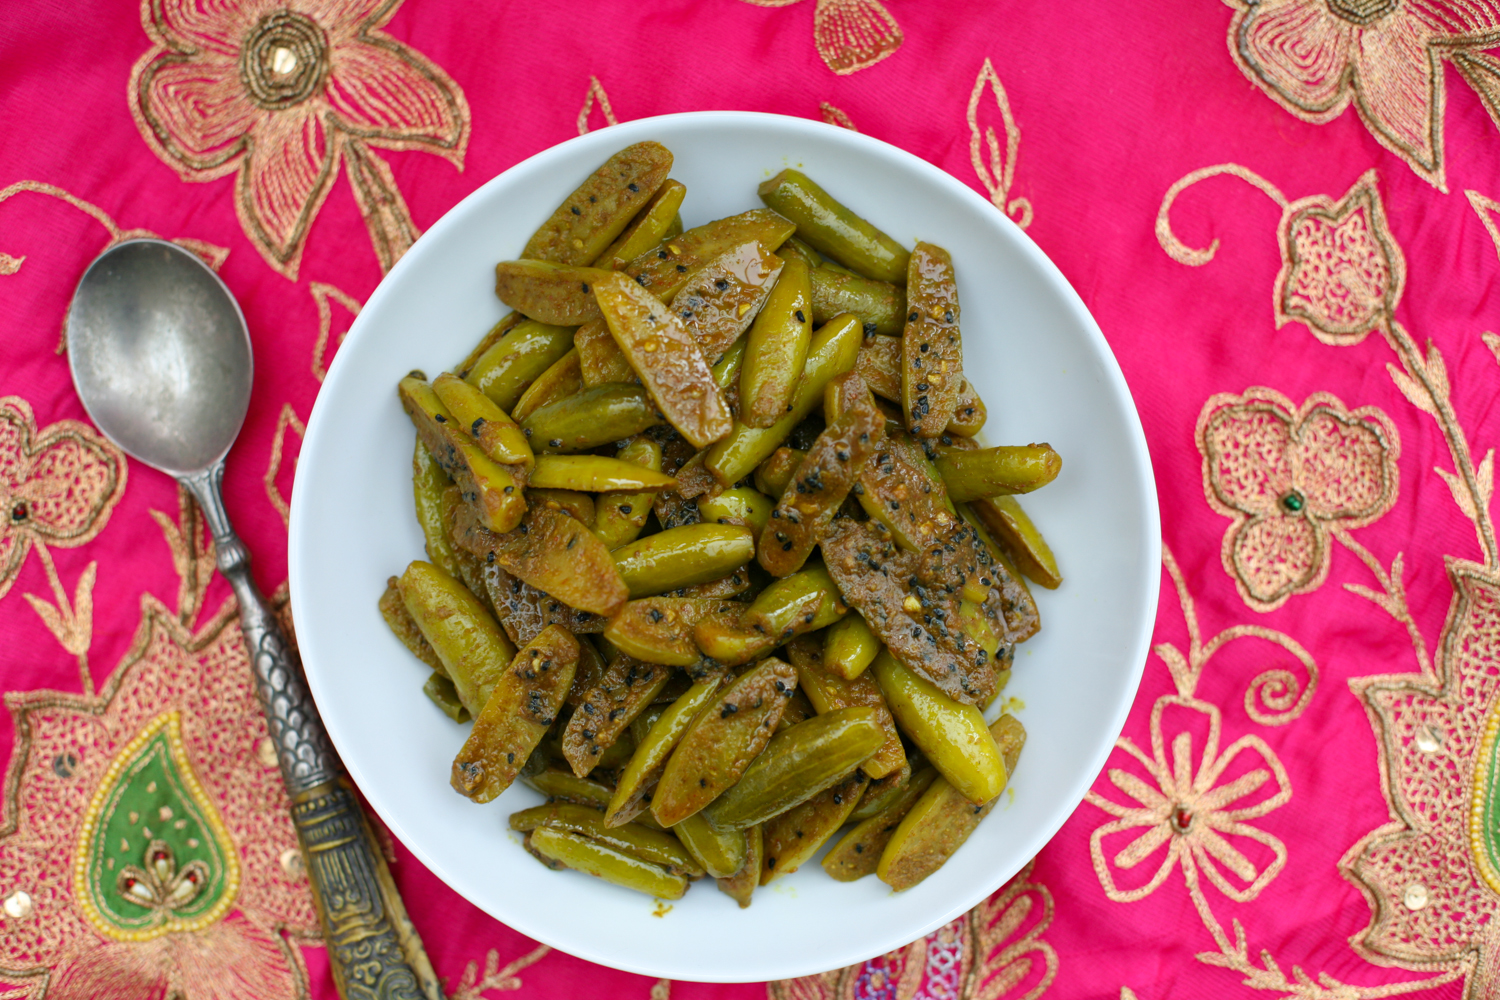
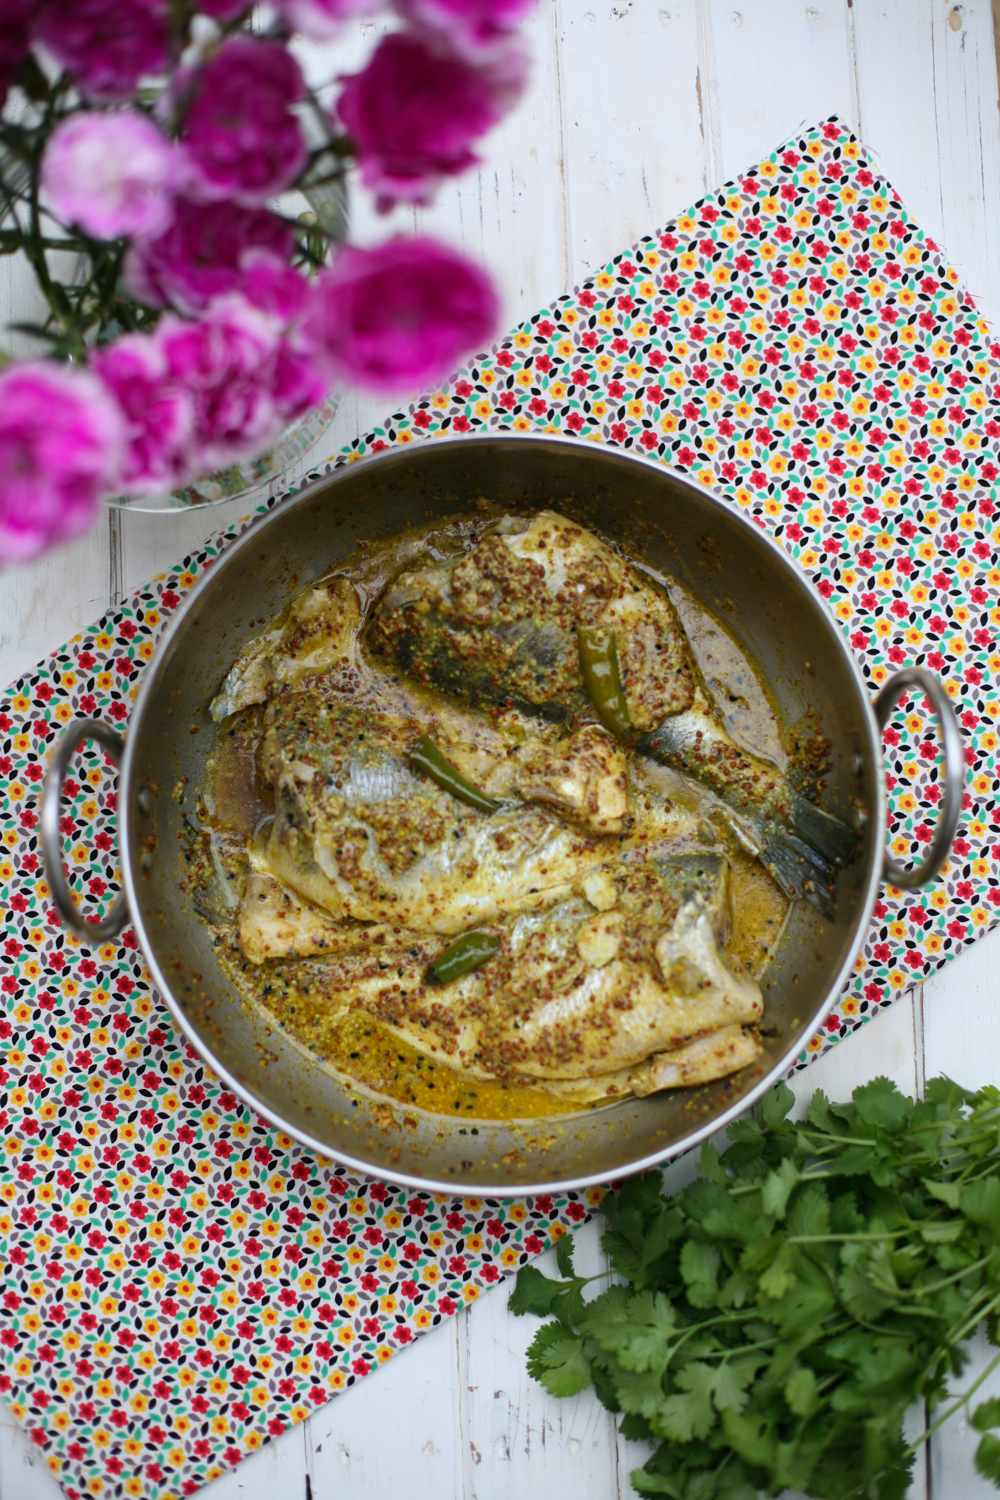
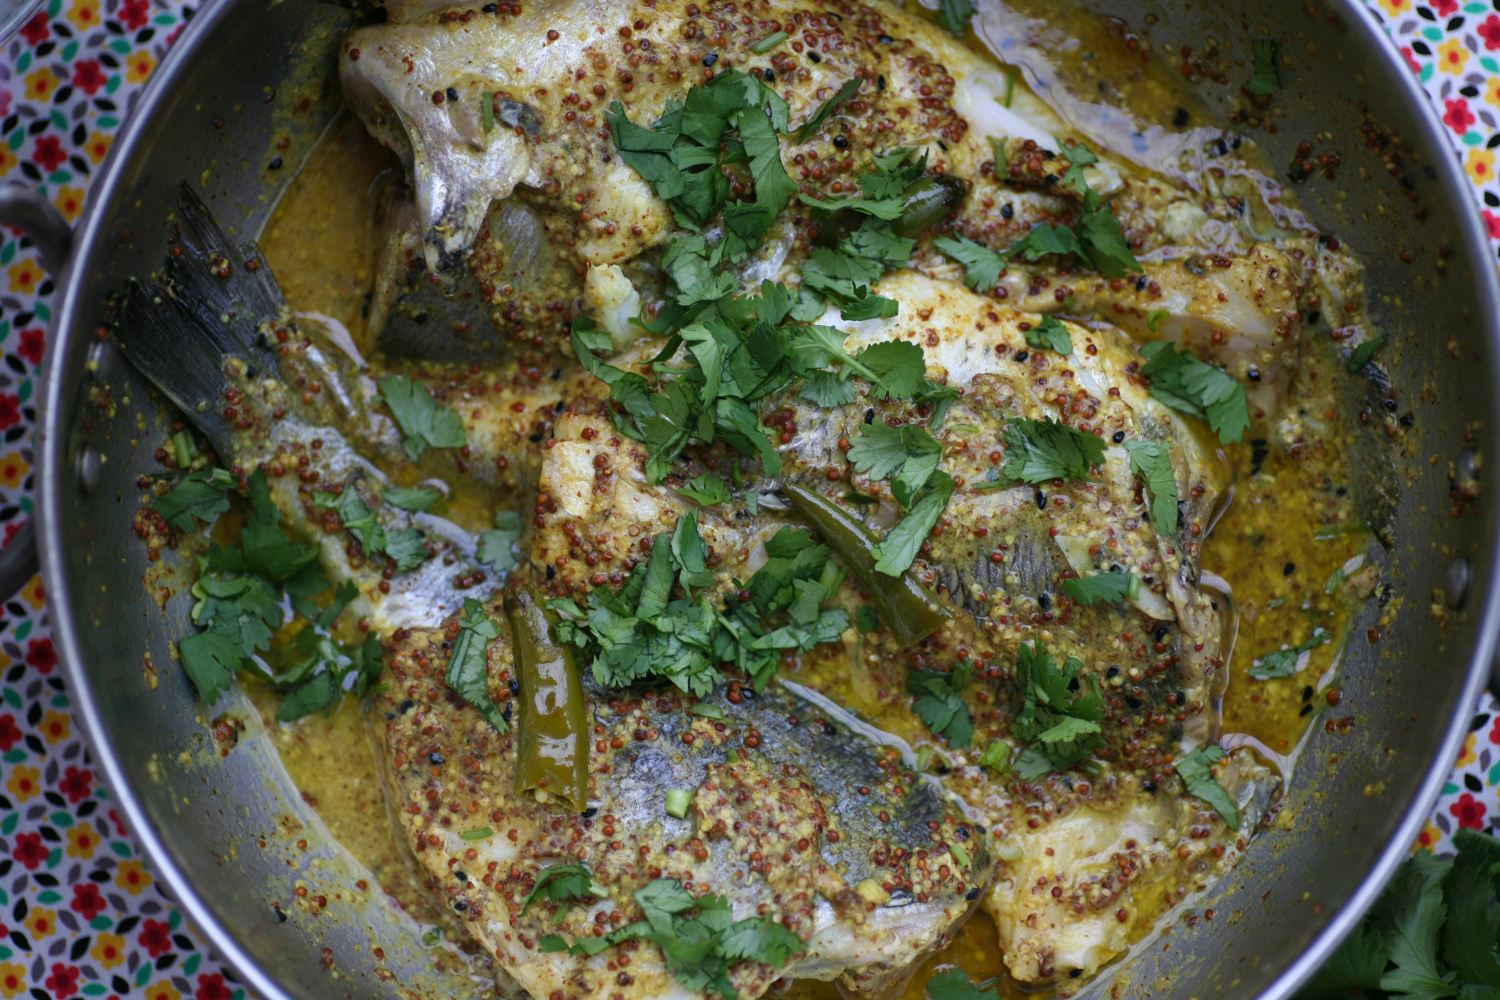
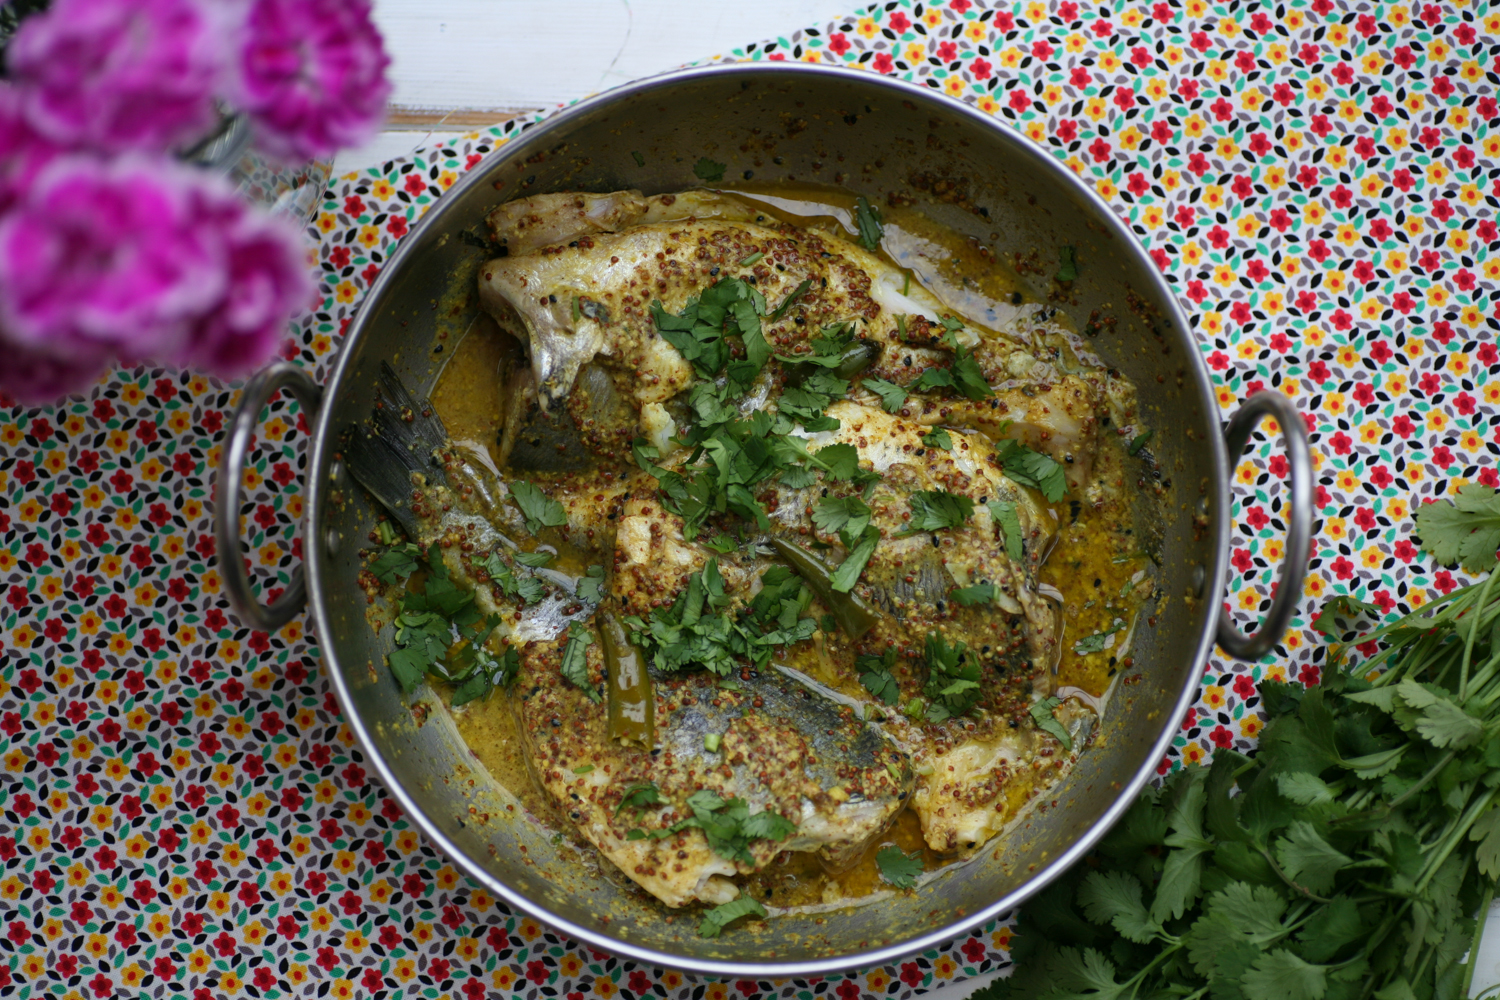
Using mustards, in fish curries in particular, is very common in Bengal where my husband originates from and so I thought that would be a good starting point when coming up with a recipe. I was immediately attracted to the mustard that had coconut and Colombo spices as I thought that they would work really well in a curry. Unlike some coconut curries, which are very creamy, this curry is far more delicate and light and perfect for spring time. I was also conscious not to suppress the wonderful flavours of the mustard, so chose a range of ingredients that I believe complement the mustard perfectly. I hope you agree. Do leave a comment below and let me know what you think. Let’s see what the judges say. Fingers crossed!

IMG_8877

Mustard, Coconut and Colombo Spices Salmon Curry

Serves 4

3 tbsp vegetable oil

1 tsp nigella seeds

2 green chillies, halved lengthways

10 fresh curry leaves (or dried if you cannot find fresh)

15g of fresh ginger, cut into wafer thin batons

2 spring onions, sliced at an angle

1 tsp ground turmeric

600g salmon fillets (5 pieces)

200ml boiling water

2 tsp Maille Noix de Coco et Spices Colombo

1 tsp salt

1/2 tsp caster sugar

1. Gently heat a wide deep pan or karahi with 3 tbsp of vegetable oil. When it is hot add the nigella seeds and move them around the pan and then immediately add the fresh chilli, curry leaves and turmeric. Stir together and then add the ginger and spring onions. Toss in the pan for a minute.

2. Add the salmon fillets – skin side down – and leave them to gently bronze for a further minute. Do not keep touching them as you do not want them to break up.

3. Mix the Maille Noix de Coco et Spices Colombo with 200ml of boiling water and stir thoroughly. Add to the pan so that the salmon fillets are virtually covered.

4. Add the salt and caster sugar and stir gently into the sauce. Spoon some of the liquid onto the salmon and then place a lid on the pan and leave to simmer for 10 minutes. Continue to spoon the liquid onto the salmon fillets a couple of times during the ten minutes. (Depending on the thickness of your salmon the fillets should be cooked by ten minutes. If, when gently cutting into the fillet, it looks a little pink leave for a further couple more minutes with the lid on the pan).

Serve with basmati rice.

******************************

If you are not going to be in London town anytime soon you can order from Maille online HERE if you are based in the UK or France. A few products are on the US site which you can find HERE with more to be added next year.

Thank you to Maille for kindly providing me with the mustard for this post and also the ‘sweet apricot and curry mustard’, which I hope to use in a new recipe soon. 


Ivy Gourd Curry – also known as Gentleman’s Toes

IMG_7967

We all know that lady’s fingers is okra right? But gentleman’s toes? I had no idea there was a vegetable with such an unappealing name, I mean seriously who wants to eat a gentleman’s toe?

IMG_7931

My Bengali mother-in-law introduced them to me only recently and since then I have become hooked. They look similar, and taste not dissimilar in fact, to gherkins which we are huge eaters of in my household – seriously we get through jars of them, even my four year old has a weakness for them. Gentleman’s fingers is also more commonly known as ivy gourd or in Bengal they are known as kundri. Baby watermelon or little gourd are two other names by which they are known.

IMG_7952

Granted, you are unlikely to find them at the big supermarkets but head to any Indian subcontinent grocers and you’ll stumble across these fabulous little vegetables. I know for a fact that you can source them in Tooting and I imagine the same goes for Brick Lane, Southall, Hounslow etc. They are commonly eaten in India and are a great source of vitamin A and C. Eaten alongside a dal and you’ll have a very filling and tasty vegetarian supper.

IMG_7976

Ivy Gourd Curry

Serves 4

550g ivy gourds/kundri/gentleman’s fingers, halved lengthways

4 tbsp olive oil

1 green chilli, halved

1 tsp nigella seeds

1 tsp turmeric powder

1 tsp chilli powder

 2 tsp cumin powder

1 tsp coriander powder

2 tsp salt (to taste)

2 tsp sugar (to taste)

2 tbsp water

1. Heat a large pan with the olive oil and when hot add the nigella seeds followed by the green chilli. After  20 seconds add the ivy gourds and stir into the oils and nigella seeds. Leave to cook on a low heat for 5 minutes.

2. Add all the other ingredients and give a good stir and then place a lid on the pan and leave to simmer, stirring a couple of times, for 20 minutes or until the ivy gourd is soft but not mushy!

So simple and yet ridiculously satisfying.

I hope you get to stumble across these little beauties before too long.


An Indian twist on ‘Greens’

IMG_7668

Growing up I am sure we’ve all encountered our parents encouraging us to ‘eat our greens’ and reluctantly forcing, the invariably boiled, greens into our mouths. I have nothing against greens, far from it, I think they are delicious, I just think that a little helping hand from a few Indian spices goes a long way to making a fairly bland dish into an elevated one that you actually want to eat! There was a great article in the Observer back in September 2013 by journalist Tim Lott (see here)  which discusses the issues parents have surrounding making their children eat greens or green vegetables in general. The crux of the matter is that if it doesn’t taste good they are simply not going to enjoy or want to eat it. Also if we use the health mantra on them constantly this in itself is going to be a turn off.  We seem to be caught up in our own worry of putting healthy things in their months, but if we perhaps stand back and relax they will too and a natural love of these healthy foods will develop.

You’ll see in my recipe that I have added fresh chilli to the dish. I find my eldest daughter likes chilli, but with my four year old I simply omit it as she isn’t quite ready for the chilli kick! Chillies range hugely in heat levels so start off with the very mild ones – they tend to be the large ones you buy in the supermarkets. The smaller the chilli the hotter they tend to be in general.

Whilst the dish I want to show you today is vegetarian I also find that greens and kale work wonderfully well with chorizo (or any pork product really) and butter beans. If you have a moment take a look at my caldo verde recipe – here, for inspiration. It’s hearty and straightforward and perfect for cold winter days.

IMG_7657

Indian Greens

Serves 4

1 bunch of greens, washed and finely sliced

2 garlic cloves, sliced

2 small green chillies, finely sliced

2 tbsp sunflower/vegetable oil

2 tsp nigella seeds

1 tsp turmeric

1 tsp salt (to taste)

1. After preparing the greens, garlic and chilli add the oil to a large pan. When the oil is hot add the nigella seeds and turmeric followed by the garlic and chilli. Reduce the heat and stir to avoid the garlic burning.

2. Add the greens and stir thoroughly so that they become totally covered in the other ingredients. Keep stirring for a few minutes and then place the lid on the pan. You may find that you need to add a little water at this stage.

3. Simmer gently and the greens will wilt and reduce in size. Add the salt to taste and more water if necessary. The dish will take no longer than 10 minutes to cook in total.

Simple, straightforward and totally satisfying.

I like to eat them with a dal or my Indian potato curry (blog post on this soon).


Panch Phoron – Bengali Five Spice and Red Split Lentil Dal

IMG_7307

From top right going clockwise: fenugreek, nigella, fennel, black mustard, cumin seeds

We’ve all heard, and no doubt use, Chinese Five Spice, but the Indian equivalent, Panch Phoron, for some reason is not given as much PR and voice in the West and yet across Bengal, it is a spice mix that is commonly used in every home and very much cherished.

When I launched my blog way back in 2011 one of the first recipes that I posted was my absolute comfort food – red split lentil dal. I cook it often as it is ridiculously easy and provides me with a quick-fix nourishing meal. You can choose whatever vegetable, if any, you need to use up, giving the dal a different twist every time you prepare it. A key seasoning to the dal, which imparts the unmistakable flavour, is panch phoron and whilst I am able to source it from a local Indian supermarket, I know that for some people getting their hands on this magic ingredient could be harder.

IMG_7292

So I wanted to show you how to make your own panch poron. Panch in Bengali is five and phoron is spices and these five spices are: nigella seeds (other wise known as black onion seeds, Kalonji or kalo jeera), fennel seeds (mouri or saunf), fenugreek seeds (methi), black (brown or yellow) mustard seeds (rai) and cumin seeds (jeera). The aromatic spices working together provide a  considerable depth of flavour to any dish and especially to dal.

IMG_7312

Unlike most spice mixes these are not ground to a powder but are cooked whole, either dry roasted in pan or placed in a little oil until they begin to pop and release their flavours – this is known as tempering. There are significant health benefits from eating the spices. In short: cumin aids digestion, fennel contains vitamin a, e and c as well as anti-oxidants, fenugreek aids metabolism, mustard seeds contains omega 3 fatty acids as well as being a good source of selenium and magnesium, nigella seeds balance the hormonal system and have healing qualities.

They store for months in an air tight container so if you make up a batch that should last you for some time as you only need a teaspoon or two every time you use it in a dish.

IMG_7321

There are a couple of lentils that do not require soaking over night and take a very short time to cook. Masoor dal or red split lentils, as they are more commonly known, are a staple in my store cupboard. From cleaning thoroughly to cooking, the dal takes no longer than 20 minutes to prepare – and that’s being generous – on average it’s a 15 minute meal to prepare and cook. Oooh Jamie Oliver would be so proud!

IMG_7322

Red split lentils are also very reasonable to buy so all in all this dish is healthy, speedy and economically friendly. A win win surely!

IMG_7358

I eat this dish all year round and like to change the consistency from a more runny, soupy dish to a thicker dal that may be eaten the Indian way, with your hands, accompanied by some rice or naan.  When the months turn colder I tend to gravitate more and more towards dals and soups to warm me up so this really is the perfect autumn meal to give me that inner glow.

Panch Phoron – Bengali Five Spice

Makes enough to last you for months

3 tbsp cumin seeds

3 tbsp fennel seeds

3 tbsp fenugreek seeds

3 tbsp mustard seeds (I tend to use black, but brown/yellow is also fine)

3 tbsp nigella seeds (black onion seeds)

1. In a bowl mix all the seeds together thoroughly and place in an air tight container.

********************************

Red Split Lentil Dal

Serves 2

200g red split lentils (masoor dal)

500ml of water, add more if you would like it a thinner consistency

1 tbsp oil (mustard,vegetable or sun flower oil)

1.5 tsp panch phoron

2 fresh chilli (red or green), chopped in half

1 tsp turmeric

1 tsp salt

5 cherry tomatoes (or carrots, courgette, marrow, peas etc)

optional

fresh coriander, to serve

lemon wedge, to serve

1. Boil the kettle and meanwhile rinse the red split lentils under the tap so as to fully clean them. Then place the boiling water in the pan with the lentils. Boil for about 10 minutes on a low heat, the lentils will become less orange in colour during the boiling.  If you are going to add a carrot you need to add it to the lentils at this stage so that they are soft in time. Please note you may need to add more water if the water is completely soaked up by the lentils.

2. In a frying pan warm the oil and when it is hot add the panch phoron, fresh chilli and turmeric. Once the panch phoron begins to pop and release the flavours – this will be around 15 seconds, give it a quick stir and then add a ladleful of the watery dal into the frying pan and mix the ingredients together.

3. Now place the contents of the frying pan back into the main pot with the red split lentil and stir.

4. Add the quartered tomatoes (or peas, courgette, marrow, spinach) at this stage and simmer gently for a few minutes.  Add salt to taste.  If you want it more soupy, add more water and if you want it thicker, let it simmer for longer.


Bengali Mustard Fish Curry

This post has been a loooooong time coming. Last week was totally full on with both my daughters now in school. There was a catch however, that being that Little Z was to be weaned on gradually with half days over the course of the week and a half, which mean’t that much of my existence was spent ferrying children in a car back and forth to school – six times per day for me to be precise, therefore allowing very little time to actually get on with anything productive.

At the weekend I threw myself into organsing an a friend’s baby shower so was baking and making in preparation for the event. The spread included: a Victoria sponge cake, flapjacks, egg mayo, smoked salmon with horseradish, cream cheese and cucumber finger sandwiches, rainbow coloured fruit sticks (got to keep it healthy!), a carrot cake and a few other sugary treats accompanied by big cups of tea and coffee, oh and not forgetting peach bellinis upon arrival.

IMG_7126

It’s now Tuesday and calm has reigned once more in my life as Little Z stays at school for her first full day. This now gives me the necessary breathing space to get this blog post out to you all.

•••••••••••••••

IMG_7166

Mustard fish curry – Maach (fish) Jhol (gravy/curry), is probably THE most popular fish dish in Bengal. The Bengali diet includes a lot of fish and mustard oil/seeds/paste is as ubiquitous in Bengali cuisine as pepper is in the west. Traditionally the mustard paste for the curry is made by grinding brown mustard seeds on a ‘sheel nora’ or grinding stone that can be found in traditional Bengali kitchens. I learn’t this recipe however from my husband, Mr B, and my mother in-law who have converted to the quicker version of mixing some smooth Dijon mustard with some wholegrain mustard, which works superbly. Cheating? Well not really, just speeding up the process, which is always a bonus in our otherwise hectic lives.

This time I used sea bream, mainly because it is what I had in my freezer, but mackerel, tilapia, salmon or trout work equally well. Served with a bowl of rice it is perfect for a speedy week(end) night supper.

IMG_7226

Some recipes require that you rub turmeric and salt into the fish first and then deep frying them for a 2/3 minutes and then in a separate pan adding the mustard oil, nigella seeds and mustard paste followed by the fried fish. I have always tended to omit the first part, keeping the dish healthier, but by all means try both versions and see which you prefer. Similarly I often cook the dish with the fish whole, but head removed. However, you can also chop the fish into smaller pieces but do not fillet it as it will not work so well.

Bengali Mustard Fish Curry 

Serves 3 (if serving for 4 add one more fish and an extra chilli or two!)

3 sea bream/mackerel/tilapia/salmon/trout, head removed but kept whole

3 tbsp mustard oil

1 tsp nigella seeds

1/2 tsp chilli powder

1/2 tsp turmeric

3 green chillies, halved (more if you prefer it hot hot)

1 heaped tsp Dijon mustard

3 tbsp wholegrain mustard

pinch of salt

8 tbsp water

1. In a pan/wok/kadai heat up the mustard oil. When it is hot carefully add the nigella seeds, chilli powder and turmeric. Stir for a few seconds before adding both mustards. Stir well.

2. Add the chilli and then place in the fish using a spoon to cover the fish in the mustard juices. Add a pinch of salt and some water and place a lid on the pan so that the fish can steam. Keep the heat low so as not the burn the bottom of the pan. If it is drying out add a little more water or oil if need be. Spoon the juices over the fish from time to time.

3. The fish will be cooked within 10 minutes. Leave to rest. Scatter with chopped coriander before serving. To reheat, simply add a sprinkling of water and warm the pan.

Serve with rice.

IMG_7224


Fine Green Bean and Potato Curry

After every few days if I have not had Indian food (basically my chilli fix) of some capacity I start craving dal, vegetable curry or some succulent fish or meat curry. They are always fun to make and really do not take long to prepare once you know how and best of all they are always guaranteed to bring a smile to Mr B’s face after the stresses of commuting in London town. I am a total believer that the way to a man’s heart is through his stomach – although the same could be said for me come to think of it.

As delicious as steamed or boiled fine green beans are in their own right, this Bengali dish just takes them to a new level and gives them their own identity. It’s definitely one of those dishes that you can rustle up in a short space of time and enjoy with dal (or a meat/fish curry) and some Indian bread or rice, to create a really delicious, healthy (let’s just ignore the cooking oil this once!) and low cost meal.

The ingredient list is short and I always have them in my store cupboard. The only spice that maybe unknown to some of you is kalo jeera – which is also known more widely as nigella seeds. They are really easy to come by and are pretty mainstream even in the supermarkets. I have used mustard oil, but if you do not have this to hand a simple vegetable oil will be equally suitable.

 Fine Green Bean and Potato Curry

Serves 2-3 (accompanied by a dal)

350g fine green beans

1 large potato, peeled and cut into small cubes

2 tbsp mustard oil (or vegetable oil)

1 tsp nigella seeds

1 tsp turmeric

150ml boiling water

2 tbsp of chopped tinned tomatoes

1/2 tsp salt

1/4 chilli powder (optional)

1. Heat the mustard or vegetable oil in a pan and when it is piping hot add the nigella seeds. After 10 seconds add the potato and green beans and stir to coat the vegetables in the nigella seeds.

2. Add the turmeric, salt, chilli powder (optional) and chopped tomatoes and stir once again. After a few minutes add 50 ml of boiling water, stir and place a lid on the pan. Keep on a low heat and simmer gently.

3. Once the water has completely dried up add a further 50 ml of  boiling water, which will help soften the potato and green beans. You will probably need to add a further 50ml of boiling water during cooking as you want the beans and potato to be soft and not crunchy. The dish should be ready between 20-25 minutes. It can be stored easily in the fridge for a couple of days should you not finish it all in one sitting – although if you are like me, you will.

Happy eating.


Save the English cauliflower from extinction by EATING it!

It was during a recent family conversation about how cauliflower consumption is in decline, that gave me the idea for this blog. I wanted to do my bit, so as to speak, to give the cauliflower some much needed positive PR and encourage people actually to buy and eat the vegetable.  The sad truth is that if we don’t consume them we will slowly see them disappearing from our farmers’ markets, grocers, supermarkets (delete as required) and they will join the list of other extinct vegetables. A really interesting article was published a couple of  years ago in “The Daily Telegraph” with the heading ‘Cauliflower to make a comeback with environmentally friendly rebranding’ – it’s worth a read so just click here.

I think a lot of people are not too sure what to do with cauliflower, other than the obvious cauliflower cheese, which don’t get me wrong is tasty, especially when you add crispy bacon bits to the topping, but there are so many other delicious things to do with cauliflowers.

So I thought I would share two completely different recipes with you to inspire you to love and eat cauliflower. Broccoli and other so called ‘superfoods’ seem to have taken centre stage due to their health benefits, but the fact is that cauliflower is also very nutritious, perhaps not quite as much as broccoli, but close, and if the truth be told cauliflower has less calories than broccoli. You can check out the facts here if you don’t believe me!

First up…………………………drum roll please……………………. is………………………………………………..

Sweet Piccalilli, which is a gloriously tangy and vibrant looking relish which includes cauliflower as the main ingredient, along with green beens, courgette/marrow, pickled onions and spices. It’s also been referred to as ‘Indian Pickle’, indicating that it’s origin stems from the Indian subcontinent. I recently made a huge batch and then gave a number away as gifts at christmas time. A dollop of this relish is the perfect accompaniment to hams and cheeses, in fact you are guaranteed always to see it on the plate when ordering a traditional ploughman’s lunch at any good English Pub.

This recipe is sourced from my favourite preserves and pickling book called The Complete Book of Preserves and Pickles by Catherine Atkinson and Maggie Mayhew. I have remained pretty loyal to the original recipe other than the fact that I do add a little more flour as I like the piccalilli to be slightly thicker. It’s personal choice, so see how you get on and don’t be afraid to add a little more flour if need be. It is also really important to note that steps 1 and 2 you need to do 24 hours before the next steps can be completed.

Sweet Piccalilli

Makes circa 1.8kg/4lb, which was precisely 7 jars  and I bought them from here.

1 large cauliflower

450g pickling (pearl) onions

900g mixed vegetables (marrow/courgette, cucumber, French green beans)

225g salt

2.4 litres/4 pints cold water

200g granulated sugar

2 garlic cloves, peeled and crushed

2 tsp of mustard powder

1 tsp of ground ginger

1 litre/1 and three quarters distilled (white) vinegar

25g plain flour

1 tbsp turmeric

1. Clean and cut the cauliflower into small edible florets and cut off the ends of the French green beans and cut them into 2.5cm/1inch in length. The pickling onions I use are small, but if you have bought the slightly larger ones you will need to quarter them.

2. In a large bowl place the vegetables in layers and add a sprinkling of salt over each layer. Pour the water over all the vegetables and then cover with cling film and leave to soak for 24 hours.

24 hours later

3. Drain the soaked vegetables and discard the brine. You will need to rinse them well several times in cold water so as to get rid of the salt. You may find it easier to do this in batches.

4. In a large pan (preserving pan if you have one) add the sugar, garlic, mustard, ginger and 900ml/1 and a half pints of the vinegar. Gently heat the pan stirring occasionally until the sugar has dissolved.

5. Add the vegetables to the pan and bring to the boil and then reduce the heat and simmer for 10-15 minutes or until they are almost tender.

6. In a separate bowl stir the turmeric into the flour and then add to the remaining vinegar. Stir this mixture into the vegetables. Bring to the boil and stir and then turn down the heat so that it simmers for another 5-10 minutes allowing the piccalilli to become thick. If it is not the consistency you want, simply add a little more flour and it should thicken up.

7. Into warmed sterilized jars, add the sweet piccalilli and cover and seal. Store in a cool dark place for at least 2 weeks. Use within the year.

——————————————————————————————

The second recipe I wanted to share with you is Cauliflower Curry, which is really straight forward and speedy to make and perfect to eat either on its own or with a bowl of dal on the side; I also like to have mine with a little natural yoghurt. This recipe comes from my mother-in-law who stores all her recipes in her head and never seems to have precise measurements. It’s always a little bit of this and a little bit of that, and the result is always divine.  I think you will be pleasantly surprised at how tasty and simple this dish is to make.

Cauliflower Curry

Serves 2-4 accompanied with another dish such as dal or speedy salmon curry

1 large cauliflower

2 tbsp of mustard oil (or sunflower oil if you do not have mustard oil)

1 tsp  nigella seeds

1 tsp turmeric

1tsp ground coriander (cilantro)

1tsp ground cumin

1tsp garam masala

1 tsp salt

half tsp chilli powder

3 inch cinnamon bark, broken into smaller parts

splash or two of water

1 heaped tsp of ghee or butter, optional

1. Wash and cut the cauliflower into small florets. Do not discard the outer green bits as these too can be used in the curry.

2. In a pan warm up the oil on a low heat and when it’s hot add the nigella seeds. After 10 seconds add the cauliflower and stir into the seeds and the oil. Add the turmeric and then let the cauliflower gently cook away. You want to begin to see the cauliflower bronzing before adding any more of the ingredients, this will take between 5-10 minutes. Keep the oil on a low heat or you will find that the cauliflower will burn, which is not the effect that you want to achieve.

3. Add all the rest of the ingredients, aside from the ghee/butter and water. Stir them all together and then add a small amount of water to help soften the cauliflower and help it cook. Cook for further 10 minutes and then add the ghee/butter and stir into the cauliflower to give it a more buttery taste. This is not essential so try it both ways and see which you prefer.

4. Serve with natural yoghurt.

Do you have any any cauliflower recipes that you cook at home and would recommend? I’d love to hear them.