Coconut and Lemongrass Prawns

I’ve just returned from a relaxing week in Wales, where the sun shone in all it’s glory and we spent the days exploring the coast line, swimming in the sea, eating tasty food and just generally relaxing. It was so good to have a change of scene after lockdown.

Returning to London I rather fancied eating prawns so set about making a curry – not an Indian one this time but more of a Burmese inspired dish with lemongrass, coconut and lime. I had recently been sent a most delicious pot of Maya’s Nørrebro Chilli Sauce. The name and back story immediately caught my attention. I’m loving the chilli on the viking helmet!

Maya was born and raised in Denmark in an area of Copenhagen called…you guessed it…… Nørrebro, to India parents. The chilli sauce is nod to her Indian origin with the design and aesthetics being very much Danish in style. The sauce tastes absolutely delicious and has no preservatives, salt or sugar and could be used in a number of ways. I’ve eaten it at breakfast with my wilted spinach and tomatoes, with scrambled eggs, avocado toast, but today I thought it would really work well in a prawn curry.

It tasted so delicious I thought I would share the recipe for you all to try. Maya has recently launched her business so I know would love some support, especially in these rather challenging times for anyone in the food business. You can order your jar here.


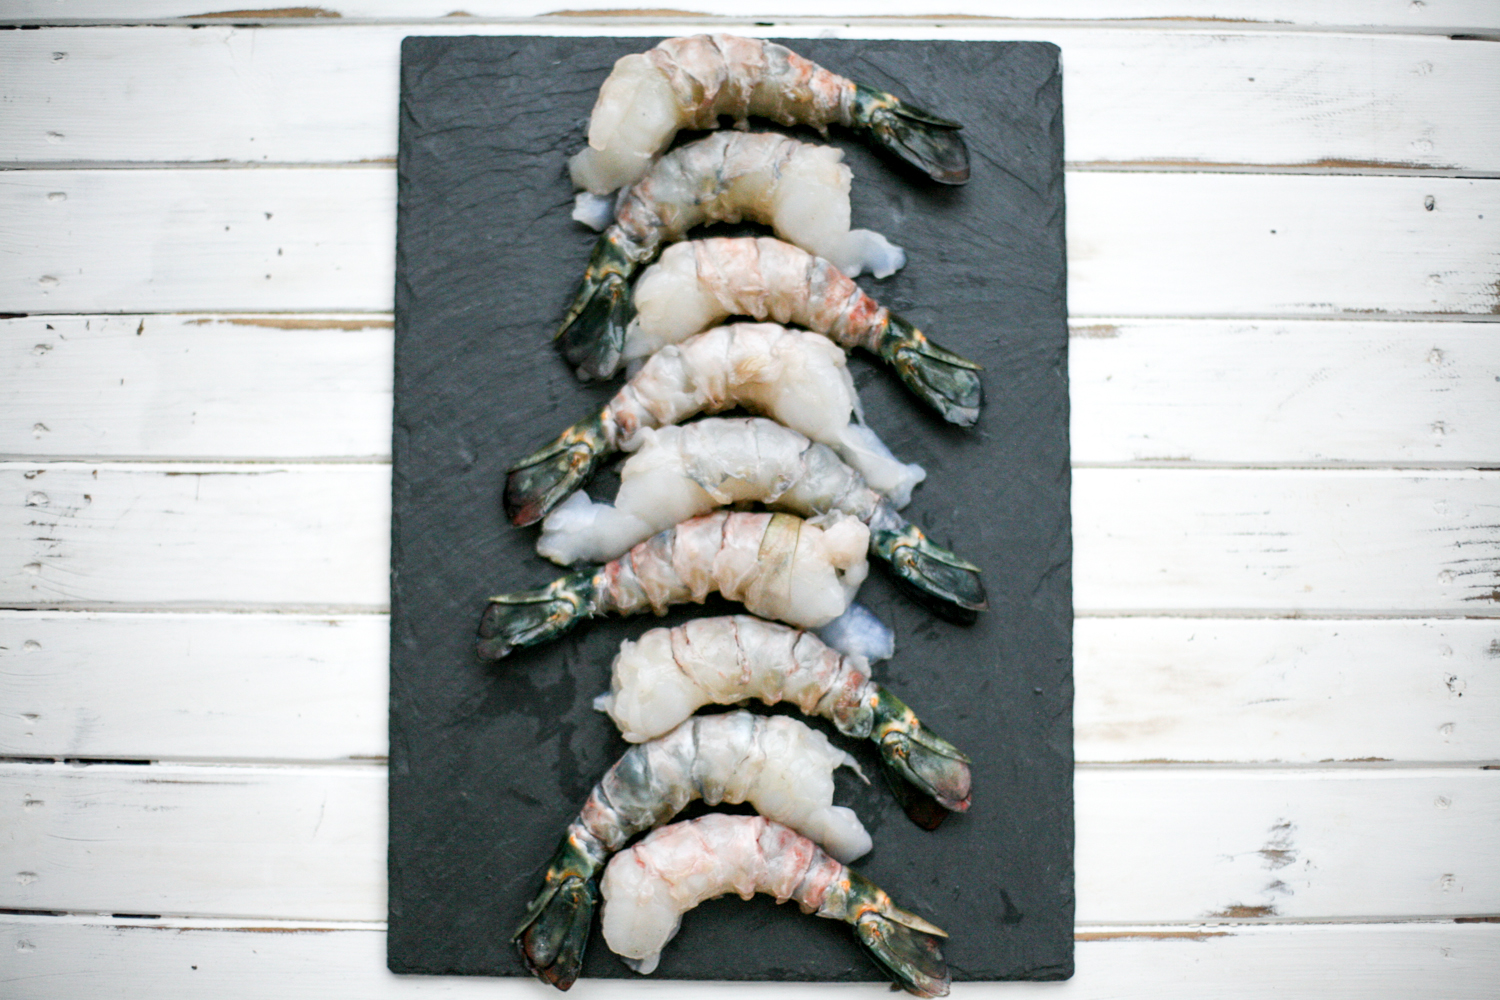
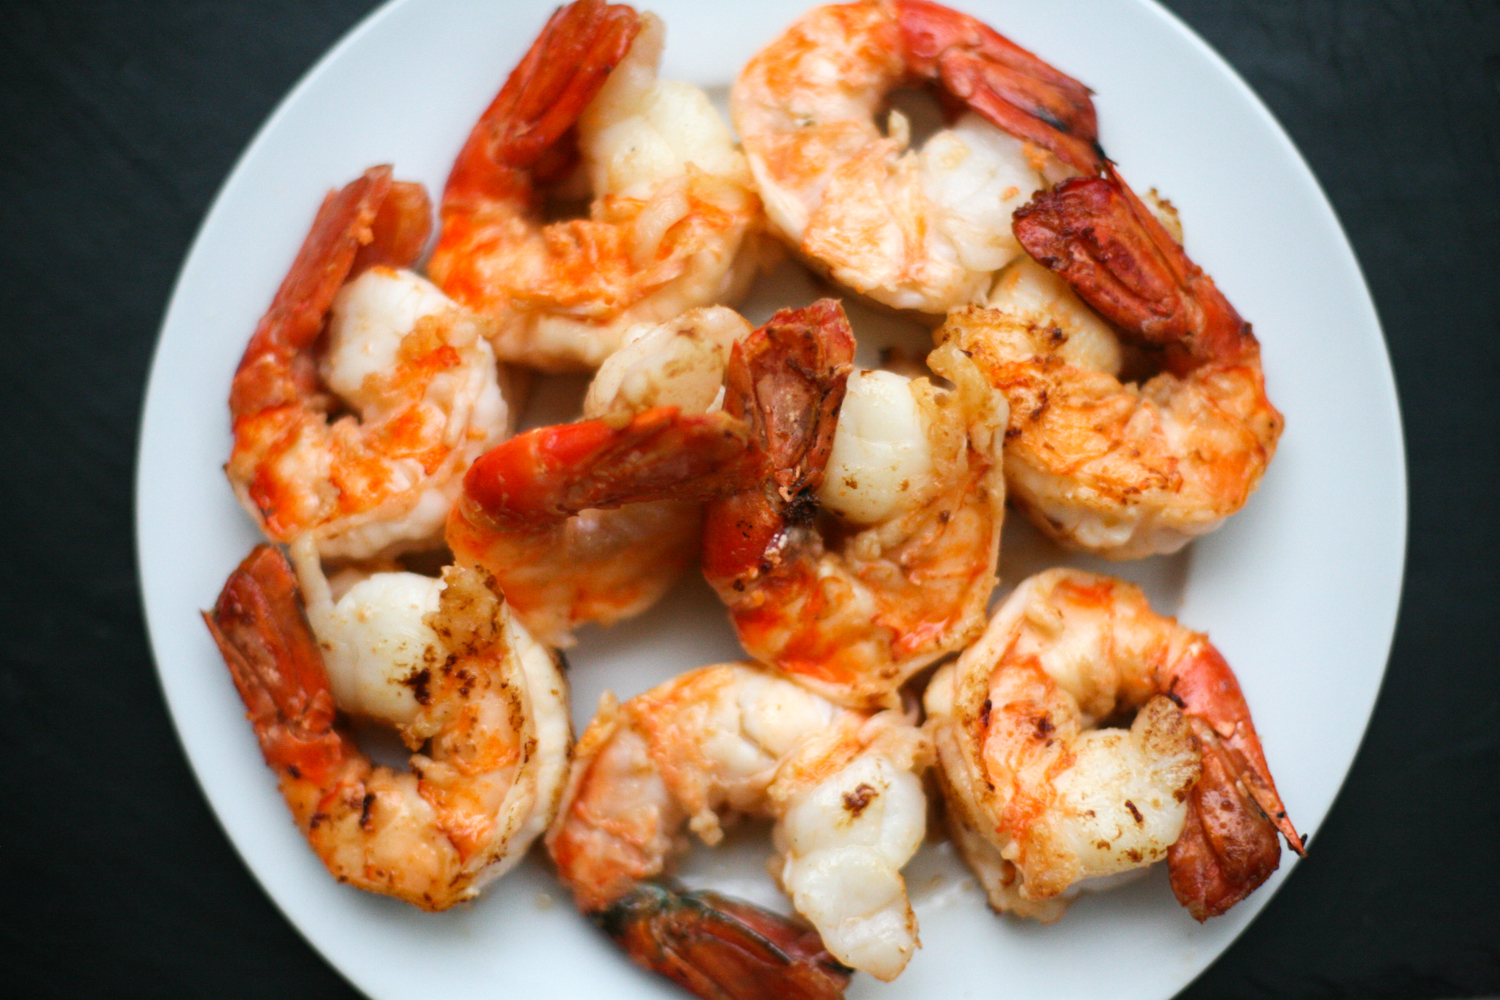
When you buy your prawns make sure to buy them with the shells on so that you can also make my prawn bisque with the shells. It takes around 10 minutes to remove the shells, although I like to keep the tails on – for aesthetic reasons mainly, if I’m honest. Pop the turmeric powder and a little salt over the prawns whilst you prep the other ingredients.

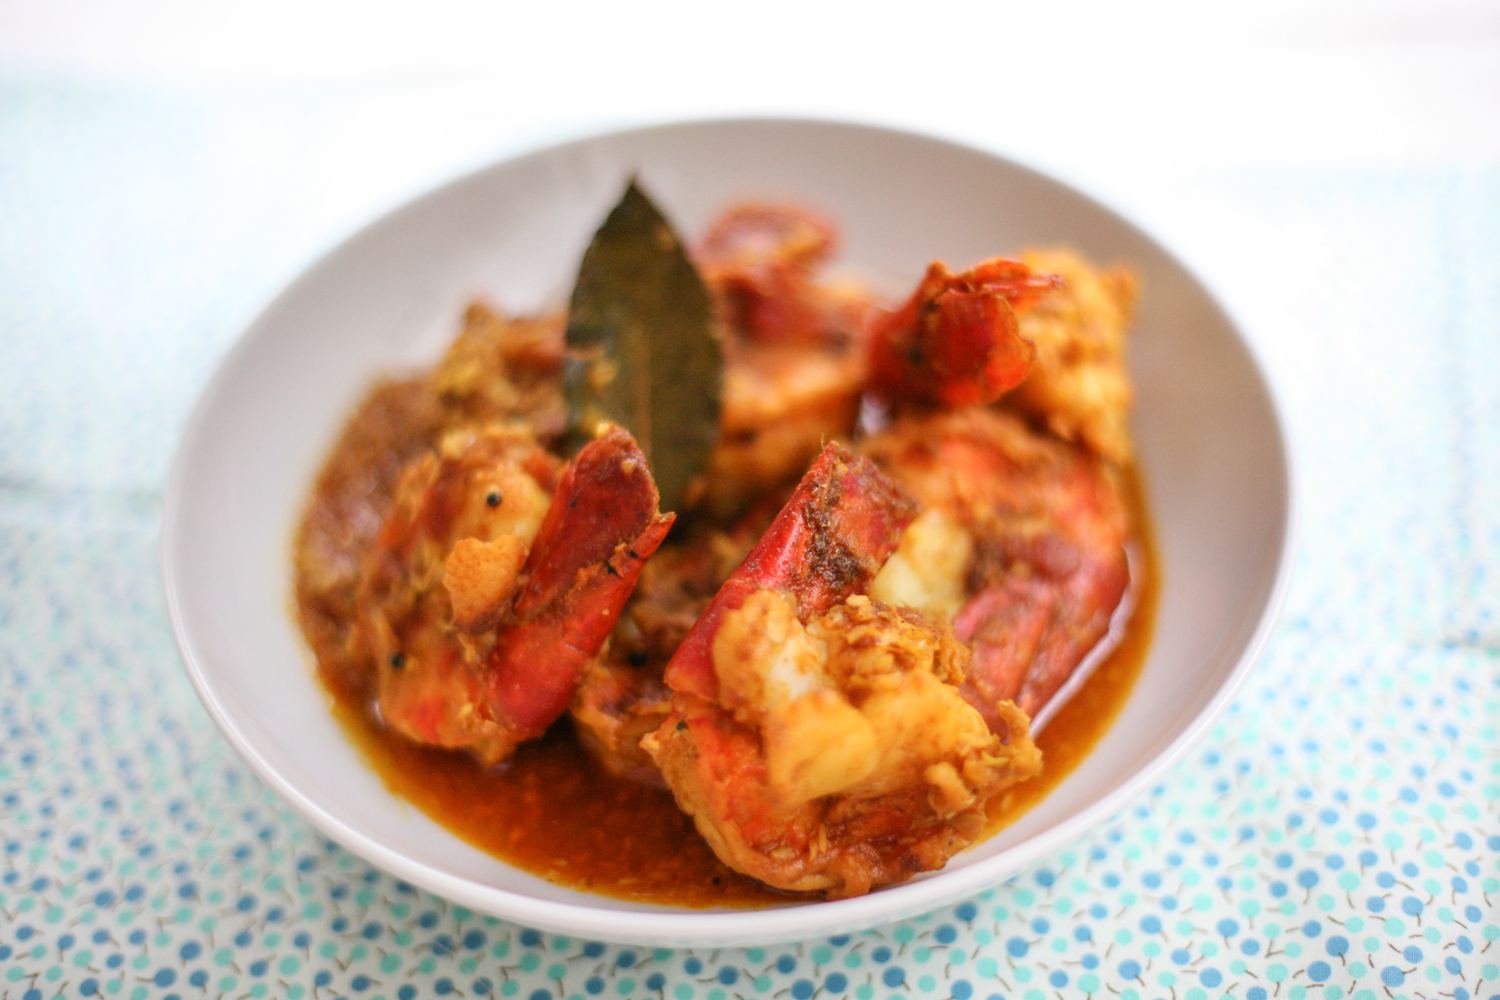
I added 2 tbsp of Maya’s chilli sauce, but start with one and then add the other a little later to see if the heat works for you. This is not meant to be a super hot blow-your-head-off curry, but one that the whole family can eat and enjoy that is full of delicious flavours.

Coconut and Lemongrass Prawns

Serves 4

900g prawns, remove shell but keep tails on and devein. Keep the shells to make this

1 tsp turmeric powder

1/2 tsp salt

1 tbsp vegetable oil

***

2 tbsp vegetable oil

1 red onion, finely chopped

1 heaped tbsp fresh ginger, grated

3 garlic cloves, grated

2 lemongrass, ends and outer skin removed and cut into 3 pieces each

1 tbsp Maya’s Nørrebro Chilli Sauce

1 tsp salt

400ml coconut milk

2 tbsp fish sauce

1 tsp jaggery/brown sugar

2 medium sized tomatoes, blended

1 more tbsp Maya’s Nørrebro Chilli Sauce, optional

1 lime, juice only


  1. In a bowl add the prawns, turmeric powder and salt and mix well. Leave for 10 mins
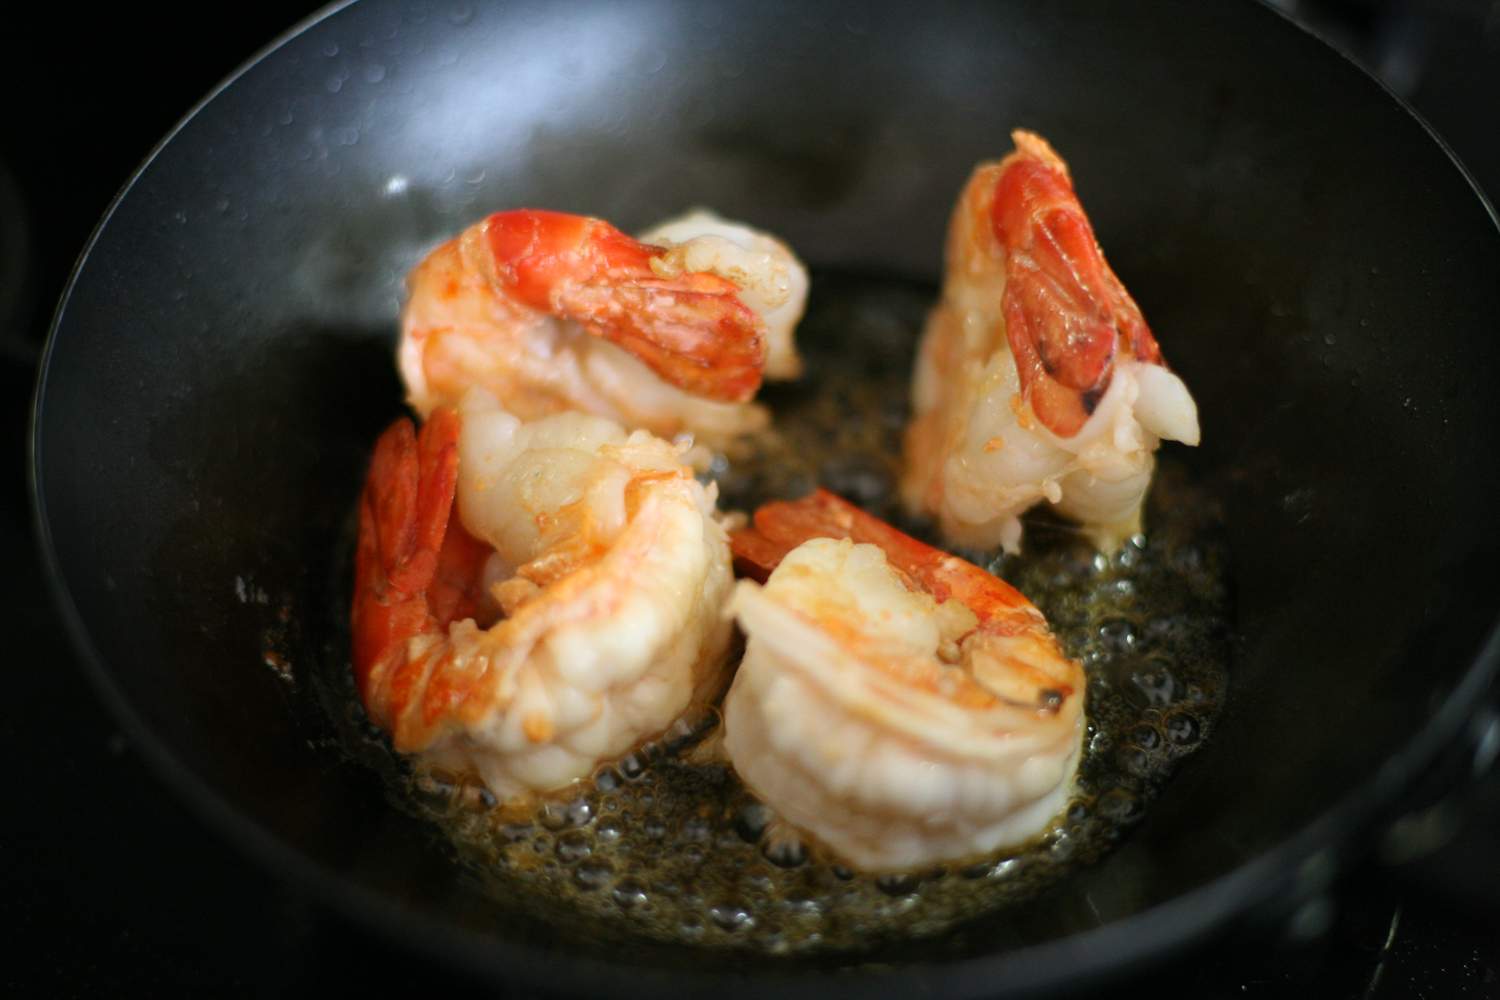
  2. In a frying pan heat the oil and add half the prawns so that they bronze. A couple of minutes on each side will be sufficient. Remove and leave on a plate whilst you gently fry the remaining prawns.
  3. In a slightly deeper pan than a frying pan, heat the oil and when it is hot add the red onion. Leave to lightly bronze which will take around 6-8 minutes.
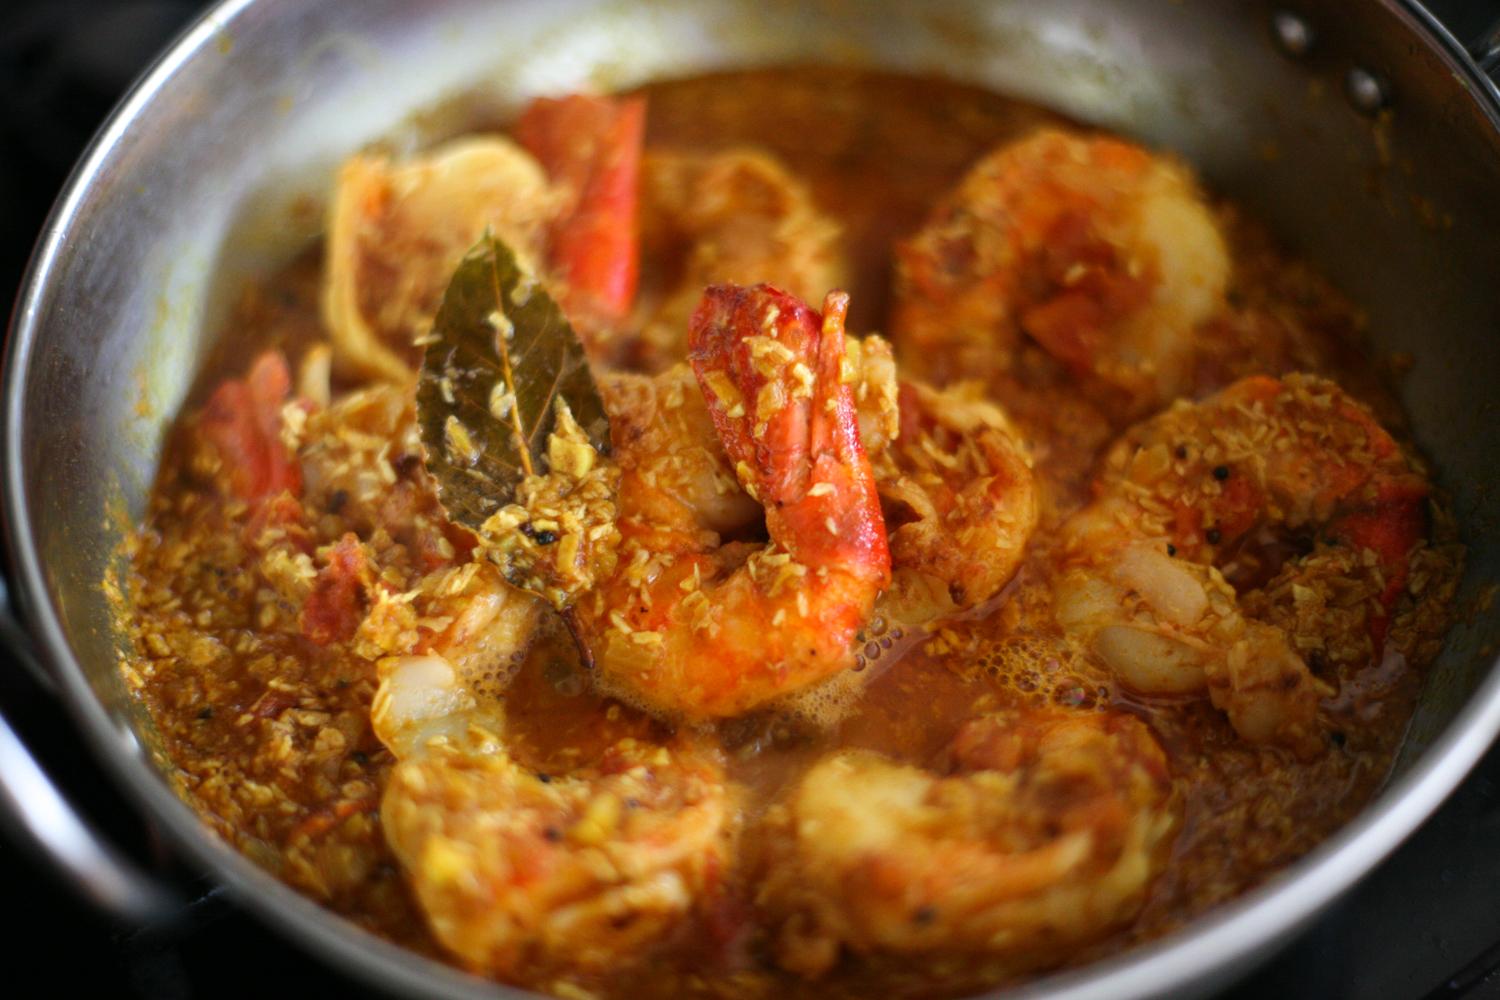
  4. Add the grated ginger and garlic and lemongrass and mix well.
  5. After a couple of minutes add the coconut milk, jaggery/brown sugar and fish sauce. If there is any turmeric water from the bowl the prawns were in add this too.
  6. Add Maya’s Nørrebro chilli sauce and stir well. Leave to simmer whilst you blend the tomatoes in a chopper.
  7. Add the tomatoes and stir. Simmer for a further few minutes before adding the prawns. Keep the heat low and cover.
  8. Taste test the sauce and add one more tbsp of Maya’s Nørrebro chilli sauce if required. I did and it tasted heavenly.
  9. From the time the prawns are in the sauce they will only need 5 minutes before they are cooked.

Serve with some steamed rice and I finely chopped some savoy cabbage and added it to a pan with oil and fresh garlic which had softened. I then add a couple of tbsp of soy sauce and allow the cabbage to soften.

I was kindly gifted a pot of Maya’s Chilli Sauce, but all my view and opinions are my own.


The most delicious homemade prawn bisque

Have you ever had prawn bisque at a restaurant and wondered how you could recreate it back in your home? To remind you of those summer days spent by the sea, listening to the gentle lapping of the waves and the fishermans boats bobbing around in the water on the horizon. We associate food with memories and I hope my prawn bisque will bring back happy memories when you make it.  It’s surprisingly very simple indeed. Basically the next time you are cooking prawns in the shells – perhaps on the BBQ like we did.

OR even a curry – perhaps my Bengali prawn curry – make sure you keep the heads and tails – in fact the whole shell, as you will then be able to make the most exquisite prawn bisque afterwards. The pile of shells may not look pretty or particularly appetising, but I can assure you that after you’ve added the ingredients listed below and let it simmer gently for half an hour, all the flavours from the prawn shells are drawn out. Don’t worry about the heads and tails –  that all gets blitzed up and then after going through a sieve the bisque is completely smooth and delicate.

Seriously it is so good there will be no going back once you have made it once.


Prawn Bisque

serves 4 

All the prawn shells and heads from the prawns you used from your BBQ/curry. I had 800g of prawns and used all the shells

(even if I have a little less I still follow the same recipe and the same goes if you have a little more)

cover the prawns completely with boiling water

1 red onion,  chopped

1 garlic clove, chopped

4 bay leaves

5 black peppercorns

1 tsp salt

1 tbsp butter

1/2 tsp smoked paprika

juice of quarter of a lemon

1 tbsp tomato puree

1/2 (half) tsp white sugar, optional

salt to taste

1 tsp cornflour – 3 tsp cold water

  1. Place the prawns shell and heads in a deep pan and cover completely with boiling water.
  2. Add the bay leaves, peppercorns, salt, red onion and garlic to the pan and simmer for 30 minutes.
  3. Using a hand blender blend the contents of the pan. This might sound unusual to blend the shells and heads, but trust me the flavour that comes from them is incredible.
  4. Place the contents of the pan through a fine sieve. Use the back of a spoon to push all the goodness through. What comes through should be a completely fine liquid. Discard the remaining shells that have not gone through the sieve. Overall it will make around 800ml-1 litre of liquid.
  5. In the same pan add the butter and when it is melted add the tomato puree, smoked paprika, lemon juice and sugar. Add the prawn broth liquid and stir gently. Simmer for a couple of minutes.
  6. In a small bowl add the cornflour and cold water to make a smooth paste and then add the broth to thicken slightly. Simmer gently for a further few minutes. Add more water if necessary.
  7. Season further to taste and then serve. You could also easily freeze this once it has cooled ready to use on a separate occasion.

Vietnamese Prawn, Mango, Lemongrass and Coconut Curry

IMG_2436

Don’t ever throw away coriander stalks as they are bursting with flavour and are perfect for making a delicious paste to go in all manner of curries. Today I wanted to show you one of my Vietnamese inspired prawn curries that combine lemongrass, ginger, garlic, chilli, coriander stalks, jaggery (palm sugar – or you can just use caster sugar), fresh mangoes and coconut milk.  To say it’s sublime would be an understatement. It is so downright delicious that you’ll be wanting to make it on repeat.

IMG_2430

I always seem to have frozen prawns in my freezer as, once thawed, they are hugely versatile to make all manner of curries or prawn cakes and generally speaking I find that most people like prawns. I had some fresh mangoes and lemongrass that were needing to be eaten so I thought that I would work the recipe around my three main ingredients – prawns, mangoes and lemongrass.

My hand blender is back in action (rejoice – how I missed it) so it took no time to whizz up a paste that tasted of the exotic Far East. By adding a little coconut milk allowed the paste to become smooth, whilst retaining its thickness.

My mother-in-law modelled the mangoes and I bought king prawns that had already been deveined and peeled to save time. So all in all from start to finish this is definitely a 15 minutes tops kind of meal, unless you are slow at peeling and cutting up your mangoes, which in that case might add on another 5 minutes or so.

If you love prawns you might also like Bengali Chingri Maach or perhaps Keralan Prawn and Kokum or my Prawn and Tamarind Curry or if you buy prawns with shells on don’t forget to keep the shells and heads so that you can make a heavenly Prawn Bisque

Happy Easter All.

IMG_2422


Vietnamese Prawn, Mango, Lemongrass and Coconut Curry

paste

40g coriander stalks

2 lemongrass stalks, outer layers removed and finely chopped

1 red chilli

1 tsp ginger paste

1 tsp garlic paste

1 tsp jaggery/palm sugar or caster sugar

a little coconut milk from a 400ml tin

*****

2 tbsp vegetable/coconut oil

15g shallots, finely sliced

1 tsp salt

700g king prawns, deveined and peeled

2 mangoes, cut into bite sized pieces

the remaining coconut mil from the 400ml tin

  1. Place all the paste ingredients into a hand blender and whizz them up to form a smooth paste. Adding a little of the coconut milk will loosen up the ingredients and help the paste to become smooth.
  2. In a deep pan or karahi add the oil and when it is hot add the shallots and salt. Move them around the pan for a couple of minutes, being careful not to let them burn.
  3. Now add the paste and simmer gently for 3-5 minutes before adding the rest of the coconut milk. Let the coconut milk heat up before adding the prawns.
  4. Move the prawns around the pan until they become pink. This will take no more than a few minutes. Simmer for an extra couple of minutes before adding the mango.

Serve with rice with some fresh lime on the side and a sprinkle of fresh coriander on the top.

If you like this recipe I am sure you will love my Butternut Squash, Lemongrass, Coconut and Coriander Curry


Keralan Prawn and Kokum Curry – Chemmeen Olarthiathu

IMG_2240


Hidden away in the calm and tranquil backwaters of Kerala you will find a homestay called ‘Philipkutty’s Farm’ that sits on 35 acres of a small island, which totals 750 acres. The island was reclaimed from the backwaters of Lake Vembanad in the 1950’s by the present inhabitant’s late husband’s grandfather.

IMG_8660


Today the farm is run by Anu (pictured above) and her mother-in-law, known as Aniamma, but it was Anu who warmly greeted us as we made our way from the opposite shore in a wooden canoe known locally as a ‘vallam’ (country boat), powered by a local using a wooden punt. After sipping on homemade cool ginger lemonade we were shown our cottage where we would be spending the next couple of nights.

IMG_8659


To say that it was charming was a massive understatement. I read in the visitors book that one lady had stayed for 5 weeks and had returned numerous times. I could see the attraction. It was without doubt the perfect place to unwind, write a book perhaps or simply just relax.

IMG_8638


Without modern day distractions such as television (there was only wifi in the main house) you felt positively cut off from the outside world. Bliss. It enabled you to sit and admire the views and watch the passing traffic, aka houseboats, drift by. My daughter’s fished with Anu’s daughter and managed to collect a number of fish, before always returning them to the waters. Mr B bravely swam in the backwaters themselves, much to all our amusement.

IMG_8639

The highlight of staying at Philipkutty’s Farm, however, is the food. Aniamma, Anu and their team of helpers prepare breakfast, lunch and dinner for guests, which all congregate in a thatched pavilion close to the main house. As there are only a handful of cottages there tend to be no more than 12 or so guests. We all sat on one large table, swapped storied and filled our bellies with dish after memorable dish of food.  The cuisine was predominately Syrian Christian with a strong backwater influence. The vegetables and spices were grown on the farm and these were accompanied by a wide range of fish and meats. I was in heaven.

IMG_8634

I have a feeling that if I stayed for 5 weeks, like one guest, there would be a high chance that I would return home a little more ‘wholesome’ than when I arrived!

IMG_2912Each evening Anu and Aniamma would do a cookery demonstration of a couple of the dishes we were to eat that evening. So it was during these informal demonstrations that I learned a host of new recipes.

IMG_2905

This prawn and kokum curry – known as chemmeen (prawn) olarthiathu, was interesting as it included an ingredient I had not come across before. Kokum is a fruit bearing tree that is native to Western coastal regions of India and has many health benefits. The outer skin of the fruit is halved and dried, which in turn curls and becomes a dark purple black colour – apparently the darker the colour the better the kokum.
IMG_2217

Whilst they undoubtedly add a sweet and sour element to a dish (similar to tamarind) they also add a smokiness that is unlike anything that I have tried before. They never drown out the main taste of a dish, instead complementing it with their gentle souring notes.  As such they are used in a host of fish and prawn curries as well as dals and vegetable dishes. I realise that a trip to Kerala to source kokum maybe a little tricky for my readers so instead you can easily buy them online here or here. It stores easily for a year, I am told, in a sealed jar.

IMG_2221

I used prawns with tails on but you can use whatever prawns you wish.

IMG_8722

You’ll need red onion, shallots, ginger, garlic and fresh curry leaves. You can pick up fresh curry leaves from most Asian grocers. I tend to freeze mine and then dig them out of the freezer as and when I need to use them, which is most days.
IMG_8725

Above shows Aniamma adding the cherished kokum to her curry.

IMG_2251

I served mine with my Indian toor dal, which you can find here and some basmati rice.

IMG_2246


Kerala Prawn and Kokum Curry (Chemmeen Olarthiathu)

Serves 4-6

1-2 tbsp coconut oil

1 large or two small red onions, finely chopped

3 garlic cloves, roughly chopped

2 inch fresh ginger, roughly chopped

3 shallots, finely chopped

10 curry leaves

1/2 tsp salt

1/2 tsp turmeric

1 tsp chilli powder

2 medium sized tomatoes, roughly chopped

500g prawns

4 pieces of kokum, pre soaked in 150ml boiling water for 20 minutes

1 tsp freshly ground black pepper

  1. Heat the coconut oil and then add the garlic, shallots, ginger and curry leaves.
  2. After a minute add the red onion, salt and chilli powder (if using).
  3. On a medium to low heat, add the turmeric and allow the ingredients to soften, which will take around 5-7 minutes.
  4. Add the fresh tomatoes and stir into the other ingredients and allow to soften.
  5. Add the prawns and move around the pan so that they are coated in all the ingredients.
  6. After 3 minutes add the kokum and gently cook for a further 5 minutes.
  7. Add the fresh black pepper powder just before serving.

IMG_2253


Each morning at Philipkutty’s Farm the urns would have different arrangements of fresh flowers floating in them. So pretty and symmetrical.


Please note the comments below where one reader kindly informed me that the ‘kokum’ is in fact a close relative known as ‘kodampuli’ and the fruit show in my photos are in fact kodampuli.  Thank you so much indusinternationalkitchen.com  for highlighting this to me. You can read more about this fruit here

IMG_8641


Chicken, Ginger and Spring Onion Gyoza/Jiaozi/Pop Sticker

IMG_8706

Mention the worked ‘gyoza’ in my household and you will hear yelps of delight – and that’s not just from the children. These moreish savoury dumplings are incredibly addictive and are a great little starter or snack, although you can off course have them as a main meal along with some steamed greens with soy and garlic perhaps.

Japan and China both have their version of the dumpling, although these dumplings first originated from China and were then adopted by the Japanese. The Chinese dumplings are known as jiaozi if they are boiled or steamed and guo tie if they are fried, in Japan – gyoza and the US – pot sticker.

The Chinese variety have slightly thicker wrappers and have a far wider combination of fillings than their Japanese counterparts. They are often steamed, whereas the Japanese gyoza are fried for a few minutes and then steamed for a further few minutes. The fillings I typically use for the vegetarian are tofu and shiitake mushrooms, or the meat variety filled with pork, chicken or duck or the seafood version, which tends to be prawn. Whatever takes your fancy these little dainties will be forever cherished by those who sample them.

IMG_8670

Now the question is to lovingly prepare your own wrappers or to buy some from your local Asian grocers or online. Basically it will come down to time on your part. Making your own takes a little time, but its the perfect activity to do with a mate who comes over for coffee – just rope them in they’ll love the experience or even with the kids. Shop bought is pretty cheap, as you can see for the price sticker I left on above, and are likely to be more uniform in thickness, but I’ll leave it to you to decide which suits your lifestyle.

IMG_8662

For those who wish to make their own it is SO simple. Seriously you only need a couple of ingredients and then a bit of kneading.

IMG_8653

Homemade Gyoza Wrappers

Makes around 20

210g plain flour, seived

125ml warm water

 pinch of salt

1. Stir the salt into the warm water until it completely dissolves.

2. Place the sieved flour into a large bowl and add the warm water. Using a wooden spoon mix the flour and water together and then use your hands to create a ball.

3. Kneed the dough on a cold surface for around 10 minutes, when it will be soft and springy to touch. Sprinkle more flour onto the dough if it is getting too sticky.

4. Wrap in cling film and place in the fridge for 30 mins.

5. Take small balls of the dough – about the size of apricot – and flatten it with your hand. Gently roll the dough into a round shape, turning it after every roll. Using a round cookie cutter (or the bottom of a saucer) cut out a round circle and cover gently with flour and place in a pile.

6. Continue until the dough has been used up. You should make around 20 dough wrappers with the proportions above. Whilst you prepare the filling place a damp cloth over the wrappers so they do not dry out.

IMG_8655

So now you have the wrappers ready to go you need to prepare the filling. Whether you want to use chicken, pork mince, prawn, duck or shiitake mushrooms and tofu the rest of the ingredients remain the same.

IMG_8680

Whilst using Chinese cabbage is the most authentic, use whatever green cabbage you have in your fridge. Place two large leaves in a pan of boiling water for 1 minute and then drain and pat completely dry with kitchen paper. You then want to slice and cut them up as small as you can. You can blitz everything in a blender but I tend to often take the slightly slower version of cutting by hand. Today I used chicken and as I tend to find minced chicken hard to source so I bought boneless chicken thighs and cut up them up into small pieces. I also added spring onions, chopped garlic, finely grated ginger, soy sauce, sesame oil, salt and pepper and hey presto you have your filling. You can get creative and add any other ingredient you think might work – how about carrot, fresh chilli, five spice.

IMG_8687

Wrapping the dumplings is rather satisfying and you will begin to get into a rhyme with them. Don’t overfill the gyoza, instead putting a teaspoonful in the centre and then, using your finger tip, wet the low half rim of the circle. You then want to fold over the gyoza in half and then begin to pleat from left to right, making sure the filling is securely inside the parcel. It is definitely a case of the more you do the better you become. My 8 year old is a complete natural and can do multiple pleats across the top. You only pleat one side of the gyoza s0 do not turn over and attempt to do more on the other side.

IMG_8721

The above photo shows half of the gyoza pleated. I finished doing this row, but did not turn it over to attempt to do the other side. To pleat you simply use your thumb and forefinger to make small pleats going over the last. Make sure you press the top together so that it is firmly stuck together – you don’t want them opening up in the pan.

IMG_8693

So you can see some are neater than others above. They will still taste delicious even if you haven’t got the perfect symmetrical pleating!

IMG_8708

Dumpling Filling

to fill around 20 dumplings

2 large leaves from a green cabbage/Chinese leaf cabbage

2 garlic cloves, finely sliced

20g ginger, peeled and finely grated

3 spring onions, finely sliced into small pieces

1 tsp sesame oil

1 tsp soy sauce

1 tsp mirin rice wine

275g boneless chicken thighs/or chicken mince (or duck, pork mince, tofu and shiitake mushrooms)

100 ml water

************

Dumpling Dipping Sauce

3 tsp rice vinegar

6 tsp soy sauce

1 tsp chilli oil (optional)

1 tsp sesame seeds

**********

1. Finely chop all of the ingredients and then bind together using your hands.

2. Place a heaped teaspoon of the ingredients onto one of the wrappers in the centre.

3. Wet the rim of the lower half of the wrapper using your finger.

4. Fold the wrapper in two and then pleat from left to right across the top, making sure to firmly seal the top of the wrappers.

5. Bend the wrapper slightly so that it is in a crescent moon shape and so it can stand up unaided. Place to one side whilst you prepare the rest.

6. Using a large nonstick pan add a tablespoon of sesame oil and when hot add the dumplings so that they are standing up and not sticking to one another. Fry them for 3 minutes, by which time they will have bronzed underneath. If they have not bronzed sufficiently leave them to fry for a little longer.

7. Add 100ml of water to the pan and place a lid on the top. Leave to steam for a further 3-4 minutes so that the water has completely dissolved.

8. Mix the ingredients of the dipping sauce together and then place to one side in a little bowl.

9. Serve immediately with the dipping sauce.

IMG_8719


Bengali Prawn Curry

IMG_4683

This Bengali prawn curry is one that was passed on to me by my mother-in-law and is, without doubt, my favourite of all prawn curries. The sweet undertones from the desiccated coconut and prawns blends superbly with the black mustard seeds and chilli powder, giving it a gently kick. I love to cook it using the king of all prawns, but it tastes equally good if you cook it using the smaller varieties as well. I do prefer to keep the tails mind you, both for appearance and because it holds the prawns together well, so if you can find prawns with shells and tails on I would always opt for those as opposed to buying the ones that have already been shelled and deveined.

IMG_4611

The prawns will be a greyish colour when you buy them. I bought frozen prawns and then let them defrost slowly over night in the fridge before peeling and deveining them in the morning. They remind me of the giant grilled prawns I would eat most evenings when I was staying on the shores of Lake Malawi for my honeymoon, many moons ago.

IMG_4620

Within seconds of being gently cooked the prawns will turn a fabulous pink and begin to curl into themselves. They only need a minute or so cooking on each side to seal them.

IMG_4629

The sealed prawns waiting to go into the curry sauce. The meatiness of them makes them a very satisfying and filling meal.

IMG_4641

Once the prawns have been added to the curry sauce let them simmer gently for a few minutes, making sure you coat the prawns sufficiently in the delicious sauce. Sprinkle ground garam masala over the prawns and give a little stir, before serving with basmati rice.

Bengali Prawn Curry

Serves 3-4

600g prawns, peeled, deveined but tails left on (I used 9 frozen super king prawns)

1 medium sized white onion, finely chopped

3 garlic cloves, finely chopped

1 inch piece of fresh ginger, skin removed and grated

vegetable oil

2/3 bay leaves

1 tsp black mustard seeds

25g (or 4/5 tbsp) desiccated coconut

1 tsp turmeric powder

1 tsp sugar

1 tsp chilli powder (less if you prefer it less hot)

1 tsp cumin powder

1 tsp coriander powder

1 tsp salt (you may wish to add one more – taste first)

2tbsp chopped tin tomatoes

200ml boiling water

1 tsp ground garam masala

1. Heat a couple of tablespoons of vegetable oil in a fairly deep frying pan or karahi. On a low heat add the prawns, in stages if your pan is on the small side, so as to seal them. They will curl up slightly and take on a vibrant pinkish hue. After a minute or so turn them over so that both sides are sealed. Then turn them on to their backs so as the top side is also cooked. Remove from the pan and place on a plate to one side, whilst you finish cooking the remaining prawns.

2. Add a little more vegetable oil if it is running dry and keeping the oil at a low heat add the black mustard seeds. They will burst open and sizzle so make sure the oil is not too hot as they will spit! Add the bay leaves and stir with the black mustard seeds.

3. Add the onion, garlic and ginger to the pan and cook gently for around 5/6 minutes until they begin to bronze in colour.

4. Add all the spices apart from the garam masala, as well as the salt and sugar.  Stir together and add the tinned chopped tomatoes.

5. Add 200ml of boiling water and add the desiccated coconut. Bring to the boil gently stirring and add the prawns. Gently cover the prawns in the sauce and simmer for a few minutes. Taste and add more salt if necessary.

6. Add the ground garam masala over the prawns, give a quick stir and serve immediately.

Serve with basmati rice.