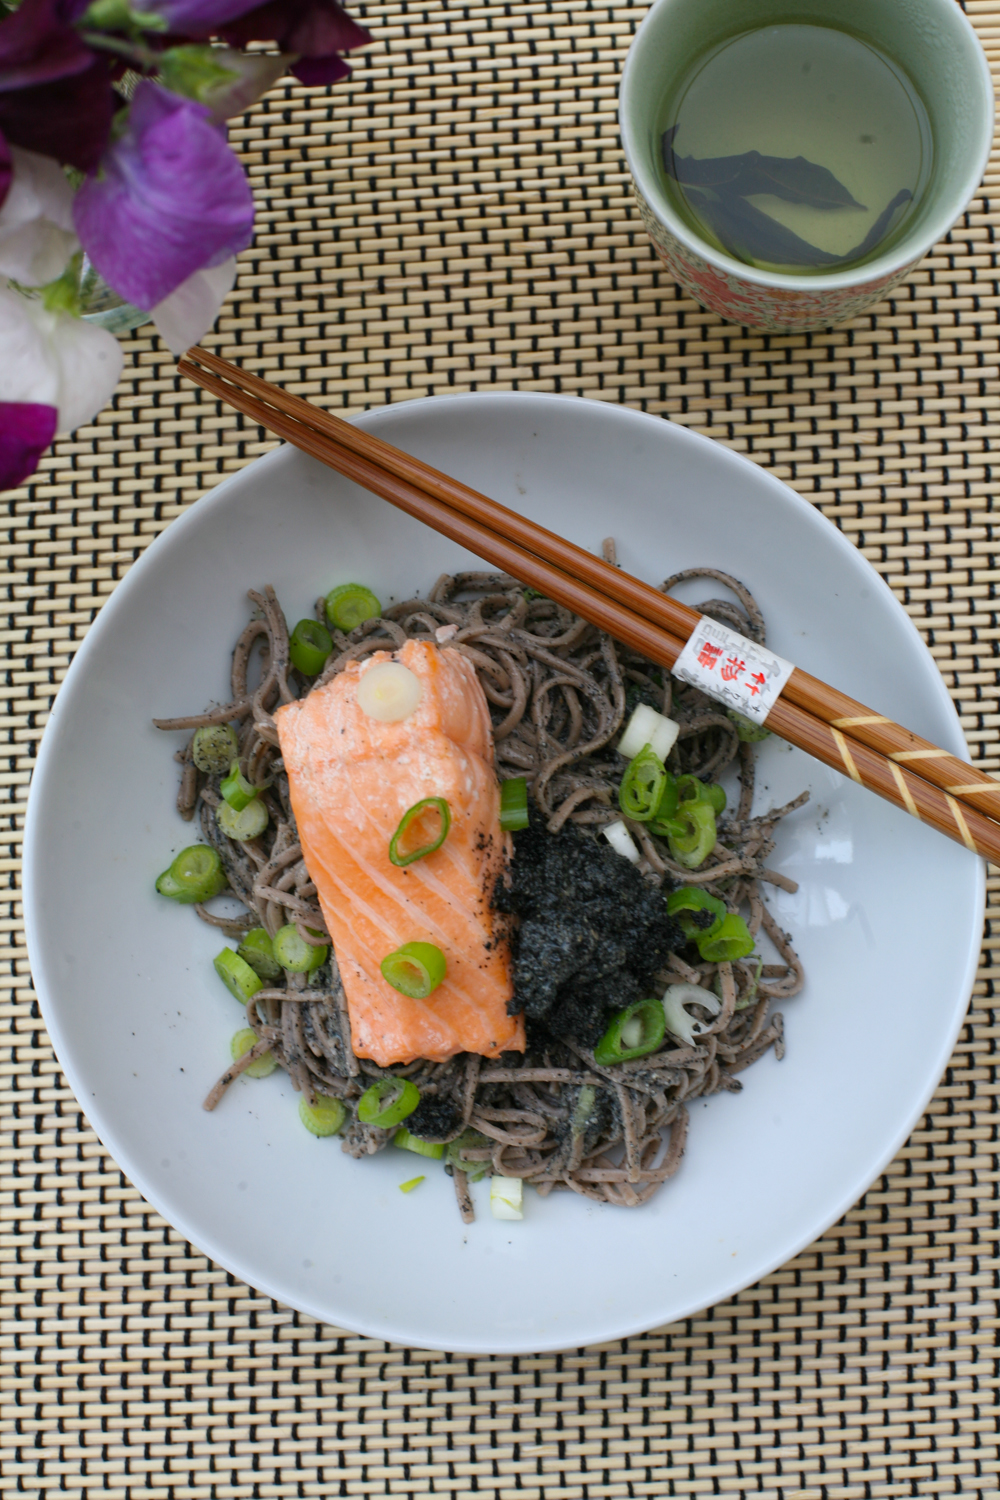
Mango Lassi

IMG_9634

“The choicest fruit of Hindustan for garden pride the mango is sought. Ere ripe, other fruits to cut we ban, but mango serves, ripe or not.” says Amir Khusro in his Persian verse.


*****************************

IMG_9652

This is so true. Mangoes are loved the world over, not least in India where the mango is used to make kulfi (Indian ice-cream), chutney – see my recipe here, or as a sweet mango lassi.

At Boro Amma’s (my husband’s granny) house in Kolkata a mango tree stands bearing sweet fruit outside the kitchen window.  The rustle of the leaves in the gently breeze and the sweet scent of the mangoes is always tempting us. When the fruit is tok (sour) we prepare mango chutney, which is heavenly. As the fruit softens we sip on mango lassi, which cools us in the heat of the day.

IMG_9658


This year mangoes imported from India, including the legendary Alphonso mangoes, where banned by the EU after authorities in Brussels found some mangoes infested with fruit flies, which they fear could damage European salad crops. So while it is possible to buy mangoes here in the shops in the UK, we were not able to feast on the lusciously sweet Alphonso, much to the everyone’s chagrin.

IMG_9660

Making mango lassi does not necessarily require fresh mangoes however. Tinned mangoes will also work equally well and for this recipe I used tinned. It’s so simple and sweetly delicious I urge you to try it one hot summers day.

IMG_9638


Mango Lassi

Makes 4 glasses

2 cans of mango slices in syrup (approximately 230g of mangoes per tin after syrup has been drained) or fresh mangoes

250g natural yoghurt

300g milk

3 tbsp maple syrup, to taste

6 ice cubes

1/4 tsp of ground cardamom

1. After straining the syrup from the mangoes add all the ingredients and blend together in a juicer/blender. If you prefer it thinner in consistency simply add a little extra milk or water.

Serve in glasses on warm summer days.


Moussaka and a Greek Escape

IMG_9602

Before I headed off to the Greek Island of Kefalonia – you know the one that Captain Corelli’s Mandolin was based and filmed, my Italian friend in London said I HAD to seek out a certain restaurant where he had tasted, and I quote, “the best Moussaka in my life”.


IMG_1857


IMG_1723

IMG_1738

I didn’t need to be told twice. With no restaurant name and only scant directions to go by (on the left hand side at the top of the road as you leave the famous Myrtos Beach….. if you are interested), we did manage to find the restaurant. It was called ‘Alexandros’ and yes the Moussaka was heavenly and without doubt the best we had sampled. So much so it has inspired me to recreate it back in Blighty.

IMG_1801


Here is a photo of the legendary Moussaka. Pipping hot in its own terracotta pot. It looks similar to an English Cottage or Shepherds pie, but don’t be fooled. This moussaka was filled with aubergine, slices of potato and delicately spiced lamb mince. Oooooh it was so good. Thanks Carlo for the tip!

IMG_1689

Other than eating we did a lot of swimming in glorious hidden beaches or  in the pool (see photos below). We were based in the north of the island in a wonderful villa in a little rural hamlet outside the charming town (although to be fair it is more of a village) of Fiscardo, which is a mecca for those who love yachting (aka my father who was with us). It’s quiet, calm and peaceful and my idea of the perfect relaxing holiday.

IMG_1804

IMG_1695

A short drive up the coast is picturesque Assos with it’s sheltered harbour – another great spot for swimming and  for exploring it’s ruined Venetian castle on the hill facing the town.

IMG_1765


It’s pretty remote and most of the people living there are working the ‘tourist’ season, so much so that only around 40 people remain through the winter months. We were told that in the northern part of the island (which includes Assos) around 300 hundred people remain on the island. Flights onto the island stop at the end of October and do not resume again until spring. If you need to reach the island you have to get there the old fashioned way – by boat. We contemplated for some time what it must be like to live there in a place where everything shuts down for 6 months of the year. The inhabitants must feel so isolated from the worries of the outside world. It made me think of the film ‘The Wicker Man’.

IMG_1731

IMG_1849


After swimming around this glorious bay I climbed up into the woods to take the photo above. I then stumbled across the sign below about 20 feet from where I was standing.  Needless to say I was back in the water quick smart!


IMG_1847IMG_1685


IMG_1734

IMG_1721

IMG_1692

IMG_1691

IMG_1875

IMG_1873

So I hope you will try my version of Moussaka. It’s delicately spiced with cinnamon, all spice, nutmeg, dried oregano and bay leaves, and similarly to Alexandros I have also added potato as well as aubergine. You can prepare most of the dish a day in advance, apart from the béchamel sauce and the potatoes, which are best prepared just before you start layering the ingredients.


So here the steps you need to take to make this deliciously Greek dish.


IMG_9600


Greek Moussaka

Serves 6

1 tbsp olive oil

1 white onion, finely chopped

2 garlic cloves, crushed

3 bay leaves

1 tsp ground cinnamon

1/2 tsp ground allspice

1 tsp ground nutmeg

400g lamb mince

390g chopped tomatoes (fresh or tinned)

1 tsp sugar

1 tbsp red wine vinegar

1 tsp oregano

50 ml red wine

370g potatoes (I used 1 very large potato), thinly sliced

2 aubergine, finely chopped width ways

olive oil for frying

*****************************

Bechamel Sauce

70g plain flour, sieved

70g butter

50g parmesan, freshly grated

pinch of salt

pinch of ground nutmeg

600 ml milk, warmed

2 eggs, whisked

1. Warm the olive oil in a large pan and then add the onion and gently cook for 5 minutes, before adding the garlic and cooking for a further minute.

2. Add all the spices and bay leaves and stir into the onion and garlic. Now add the lamb and use a wooden spoon to break up the mince. Stir well.

3. After 10 minutes the lamb should now all be brown, with no pink meat remaining. If there is any pink meat cook for a little longer.

4. Add the tomatoes, sugar, red wine vinegar, red wine and stir into the mince. Leave to simmer for a further 15-20 minutes, then leave to cool.

5. In a separate pan boil some water and place the sliced potatoes into the pan. Simmer for 10 minutes. You do not want the potato to be soft, instead take it out of the water just before it becomes soft. Strain and place in a bowl of cold iced water to prevent it cooking further. Place to one side.

6. In a large frying pan add a little olive oil and then place some of the sliced aubergine in the pan to bronze. It is best to do this in batches. You will find that the aubergines will probably need a little more oil during cooking as they do tend to soak it up fast. After 5 minutes turn and fry for a further 5 minutes so that both sides have begun to bronze. Remove from the pan and place on kitchen paper.

7. To make the béchamel sauce, heat the milk in a pan to warm – although do not boil it. Then place in a pouring jug.

8. In a separate pan add the butter and when it is melted add the flour and stir together. Gradually add the warm milk, stirring each time some more milk is added. Add a pinch of salt and ground nutmeg followed by half of the parmesan cheese. Simmer gently for a few minutes, by which time the sauce will be thick. Leave to cool.

9. Once it has cooled add the eggs and stir into the sauce.

10. To layer up the moussaka, first add some of the aubergine so that it coves the bottom of the dish. The dish I use is 12×9 inch. Then add half the mince followed by the potato, followed by the rest of the mince and another layer of aubergine. The final topping is the béchamel sauce, which completely covers all the other ingredients. Sprinkle the remaining parmesan on the top.

11. Place in a preheated oven at 180 degrees and cook for 35-40 minutes when the top begins to bronze.

Serve once it has begun to cool slightly as it will be very hot when it comes out of the oven.

Happy Holidays everyone.

IMG_9618


Kale, Coconut and Durum Wheat Salad with a Sesame Oil Dressing

IMG_9528

Oh boy it’s been getting pretty hot here in London town. We’re almost hitting 30 degrees and that is pretty darn for HOT for England. All this humid weather means that the fresh water lido’s, that I love to swim in, are heating up nicely to a refreshing 21 degrees. I’ve also been doing a bit of sea swimming, which has been lovely.

When it comes to food and cooking though the hot weather really makes us a little sluggish and well hot, so the last thing we want to be doing is spending hours in a kitchen labouring over a stove.


IMG_9491

This recipe takes around 10-15 minutes to make from beginning to end. The combination of flavours and textures make it a joy to eat, and something a little different. It is simple and has few ingredients and requires no salt as that is provided by the tamari. I am a huge fan of kale and eat it through out the year in many forms – have you tried homemade crispy kale yet? After cleaning the kale, dry it thoroughly, add a tablespoon of extra virgin olive oil and massage it into the kale leaves (remove any thick stalks). Pop in a low oven – around 160 degrees centigrade is perfect – for 9-10 minutes, by which time it will have completely crisped up. Sprinkle with some rock salk and serve. Delicious snack.

IMG_9513

Anyway there is a super interesting article all about the benefits of kale written by Dana Gill – editor-in-chief of Healthyline.com. You can read her article here.

Now back to the recipe for today, if you want to make even more of a meal out of it you could add grilled tofu or some salmon or trout fillets. I added a sprinkling of chilli flakes, but it also works really well in it’s simplest form.


IMG_9515

If you can’t get hold of durum wheat you could use farro or another whole grain.

IMG_9503


Kale, Coconut and Durum Wheat Salad with a Sesame Oil Dressing

Inspired and adapted from Heidi Swanson’s Kale Salad in Super Natural Every Day

Serves 4

125g kale, chopped (stems removed)

100g unsweetened large coconut flakes

175g pure durum wheat  or farro

******

80ml  extra virgin olive oil

1 tsp sesame oil

2 tablespoons of tamari or soy sauce

******

chilli flakes, optional

1. Preheat the oven to 170 degrees centigrade.

2. Chop the kale and place in a large bowl along with the coconut flakes

3. Mix the olive oil, sesame oil and tamari together in a small bowl.

4. Pour two-thirds of the oil mixture over the kale and coconut flakes and really mix in thoroughly so that all the leaves are completely coated in the oil.

5. Place in the oven for 10-12 or until the coconut flakes begin to bronze and the kale begins to darken slightly. Keep an eye on it as they can get burn easily and the kale crisp up too much.

6. Whilst the kale and coconut are in the oven place the durum wheat in a pan of cold water and gently simmer for around ten minutes, or according to instructions on the packet. Strain thoroughly.

7. Return all the ingredients to the bowl and mix again with the remainder of the oil mixture.

Serve immediately.

It works wonderfully well on it’s own or equally you could add some grilled salmon or trout or possibly some grilled tofu. Experiment and let me know what works for you.

Notes: I have also made this replacing the coconut flakes with powa flakes, sunflower seeds and 1 tsp of maple syrup to the dressing. Worked equally well. 


IMG_9531

Happy summer days.

IMG_9569


IMG_9563


Spanish Baked Chicken and Pea and Mint Soup with Crumbled Feta

IMG_9453

It’s always good to have some quick, easy and tasty recipes up your sleeve if you feeding a crowd. I know how it is difficult to decide what to pair up with what in as far as a starter, main and dessert is concerned. I always find it helpful in cookery books when they give suggestions. It’s surprising how many do not actually do this!

IMG_9445

Both these recipes turned up on my blog when I first started back in 2011 and I felt that the photos needed a little improving so decided to re post with new ones that I recently took. They are both definitely ‘go-to’ recipes for me. Hearty food with wonderful herbs, but light and fresh – perfect for summer days.

IMG_9414

They are so quick and easy to prepare that if you have friends coming over or you are doing your own catering on holiday, they take no time and will not cause you any stress. The dessert I accompanied these dishes with was Rose and Summer Berry Skinnifreddo, which I found on fellow food blogger Kellie’s blog – kelliesfoodtoglow.com. It was wonderfully fresh, colourful and healthy and  complements my starter and main beautifully. Her blog is really rather lovely so do take some time to look around it – I am sure you will be inspired.

IMG_9440

The above photo is of the chicken after marinading but before cooking

Spanish Baked Chicken

Sourced and inspired by Simply Recipes

serves 4-6

3.5 pounds/1.6kg  chicken thighs

100 ml red wine vinegar

100ml olive oil

1 handful fresh oregano

100g raisins/sultanas

1 tsp garlic powder

1/2 tsp salt

pepper

100g stoneless green olives

4 bay leaves

150 ml white wine

2 tbsp brown sugar

1. Cut the excess fat off the chicken thighs, pierce the skin with a fork and place in a large mixing bowl. Then add all the ingredients, except the white wine and brown sugar, to create the wonderful marinade. You don’t have to stick rigidly to the amounts for the olives and raisin/sultanas ingredients – if you love olives throw in a little more and same goes for the raisins/sultanas. Really mix all the marinade thoroughly over the chicken using your hands. Cover with foil and place in the fridge overnight or for as many hours as you can.

2. Transfer the chicken and the marinade to an oven proof dish. I often use a couple of dishes so that the chicken thighs are evenly spread out. Then pour the white wine and sprinkle the brown sugar over the chicken thighs.

3. Place in a pre-heated oven at 180 degrees centigrade for 50 mins remembering to spoon the marinade over the chicken during cooking. This will ensure the chicken has a golden brown glow when it is cooked.

****************************

Pea and Mint Soup with Crumbled Feta

Serves 4

4 spring onions, sliced

50g butter

700g frozen peas

1 pint/600ml milk

1 pint/600ml of vegetable stock

one handful of fresh mint (or two if you like it really minty)

black pepper

salt

75g feta

1. Melt the butter slowly in a pan, careful not to burn the butter. When melted add the sliced spring onions and stir into the butter for 5 minutes. Stir in the peas, vegetable stock and mint and leave to simmer for around 20 minutes (30 minutes if you are using fresh peas).

2. Puree the soup to the consistency that you require. Then add in the milk – if you like a thicker consistency then add less milk than the amount given above. Season to taste with salt and pepper.

3. Immediately before serving sprinkle each portion with crumbled feta.


Mung Bean, Date and Avocado Salad with a Soy Miso Dressing

IMG_9473


Long, lazy summer days await. Relaxing long lunches with friends in the sun/shade. You don’t want to be spending hours in the kitchen preparing food, so I hope that this summer salad ticks all the boxes. It’s easy of assemble, tasty and not at all complicated.

IMG_9423

Mung beans are a fabulous little pulse that are really versatile. As well as salads they work really well cooked with Indian spices and in dals. They do require soaking so you have to be a little prepared. I tend to soak overnight and then boil them for around 40 minutes, the following day.

I like the variety of colour and texture in this salad. From the crunchiness of the carrot, to the smoothness of the avocado, to the sweetness of the dates. The dressing brings it all together, giving it a slightly Asian twist.


IMG_9485

Mung Bean, Date and Avocado Salad with a Soy Miso Dressing

Serves 4-6

500g mung beans

1 carrot, chopped into small cubes

1/2 a red onion, finely chopped

150g cherry tomatoes, quartered

1 avocado, chopped into cubes

10 dates, chopped

*********

Soy Miso Dressing

2 tbsp sesame oil

1 tbsp soy sauce

1/2 tsp chilli flakes

1 tbsp honey

1 tsp sweet miso – I use this one

1 lime – juice only

1. Place the mung beans in a large bowl and cover with cold water. Leave overnight or for at least 5 hours

2. After the mung beans have soaked, strain the water and then place them in a pan and boil them in water for 40 minutes, by which time they will have softened.

3. Finely chop all the ingredients to make the salad and toss gently together in a large mixing bow along with the cook and strained mung beans. Note: it is advisable not to prepare the avocado until you are almost ready to eat as they will begin to discolour.

4. Mix all the ingredients of the dressing together and pour over the salad. Mix with some salad tongs and serve immediately.

IMG_9462


Spicy Black Eye Bean Curry

IMG_9409

This is my final recipe for June supporting the ‘Curry for Change‘ – Find Your Feet campaign. I hope you have enjoyed my journey through the hamper of goodies kindly supplied to me by Natco Foods as part of the ‘Blogger’s Challenge‘. I have enjoyed experimenting with some ingredients that were new to me and as a consequence will be incorporating them as part of my diet going forward.

Out of the four recipes I posted I’m curious as to which YOU liked the look of most. Was it the Indian Powa Fuel, or my Lotus Seed/Phool Makhana Curry, my Dried Ginger and Lentil Spiced Chicken Balti or the one that I have posted today? Don’t be shy now…be brave and leave a little comment below.

I hope that I may have encouraged you to host a curry evening of your own to support the wonderful charity Find Your Feet – see details on the Curry for Change site. If you do I would love to hear how it went.

Over the next few weeks I will be tempting you with some refreshing, fragrant and tasty summer salads that you can pull together for a BBQ, summer picnic or a leisured lunch at home.

Now I must return to watching Wimbledon. The summer season has begun.

Spiced Black Eye Bean Curry

250g black eye beans

275g/3 medium sized red onion, roughly chopped

250g/3 medium tomatoes, roughly chopped

1 tsp garlic paste

3 tbsp vegetable oil

1 tsp cumin seeds

3 bay leaves

1 3inch stick of cinnamon

4 cloves

1 tsp turmeric powder

1 tsp coriander powder

1 tsp mango powder (also known as amchoor powder)

1 tsp Kashmiri chilli powder

1 tsp garam masala

salt to taste

500ml of cold water

1. Soak the black eye beans in a bowl of cold water overnight. Rinse them the following day and place in a saucepan along with boiling water to cover them. Simmer on a medium heat for around 30 minutes, or until the black eye beans have softened. Drain and place to one side.

2. In a blender add the onions and blend to a smooth paste. You may need to add a little water to help it become more paste like in consistency. Remove from the blender and place in a bowl to one side.

3. Rinse the blender and then add the tomatoes and blend so that a smooth paste forms. Remove from the blender and place in a bowl to one side.

4. In a deep pan or karahi add the vegetable oil and when it is hot add the cumin seeds, bay leaves, cinnamon stick and cloves. Stir them around the pan for 30 seconds.

5. Add the onion paste and a little salt to the pan and lower the heat so that the onion cooks through and begins to bronze slightly. This will take around 10 minutes.

6. Add the garlic paste, followed by the turmeric powder, coriander powder, mango powder, Kashmiri chilli powder and garam masala. Stir in thoroughly to the onion, garlic paste. Cook for a further 3 minutes.

7. Now add the tomato paste along with 50 ml water and simmer gently for a further 5 minutes.

8. Place the black eye beans into the curry and cover them in the sauce along with up to 450 ml of water, depending on how thick you like your sauce to be.

9. Simmer for a further 5 minutes and add more salt if necessary and serve.

Serve with a squeeze of lemon and a dollop of natural yogurt on the side. I like to make homemade chapatis to go alongside this curry. I realise I need to post a recipe on how to make them so watch this space….they are ridiculously easy and great fun for all the family to make.


Indian Powa Fuel

IMG_9365

This week I have another recipe for you that I created using some ingredients from the hamper that Natco foods sweetly provided me for the the Curry for Change bloggers challenge. For those who have not read my two previous posts (shame on you ;o), for the month of June I will be cooking recipes using the ingredients that Natco foods sent me to inspire YOU at home to cook your own Indian food to support ‘Curry for Change’ that in turn supports a wonderful charity called ‘Find Your Feet‘, which does exactly what it says on the tin….help rural communities in Asia find…..their….feet in order to bring them out of poverty and be self sufficient.

IMG_9354

I pulled out a packet of powa flakes from the hamper and decided to create an appetising Indian inspired dish that you too could easily make at home. Powa flakes are flattened pre-cooked rice, that look fairly similar to white Kelloggs corn flakes. Similarly they can be used in sweet dishes, but can also be used in a number of savoury dishes and snacks. I have always tended to eat them as part of a crispy, fried snack, similar to a Bombay mix, but after a bit of researching I decided to use them in a more substantial meal. They are low in fat and high in fibre so tick many boxes from a health perspective. You’re probably wondering where on earth you can buy them. Well any Asian/Indian grocers will definitely stock them or you can order them online from Natco – here.

Unlike rice, that requires a little longer to cook, powa flakes only require soaking in cold water for a couple of minutes. Once they are drained, they only require a few minutes cooking before they are ready to be eaten. I honestly think that they are the perfect ingredient to use after a shattering day at work/looking after the kids (delete as appropriate) when you cannot be bothered to cook. Within 10 minutes this dish is cooked and it is so satisfying and filling. Seriously I think I am onto a winner here. I am totally converted and you will be too if you seek out the powa.

IMG_9378

My eldest, who is 8 years old, absolutely loves this meal and eats it exactly as I do (with chilli). However, it has only really been in the last year that she has been able to eat many of the same curries as me and Mr B. She has been gradually weened on over the years. Children can and do enjoy spice, however, it is best to gradually build up their tolerance and love of spices. My four year old in comparison has made it very clear that she only likes traditional English food and not spicy Indian food. More left for me, Mr B and Big A then.

***********

Indian Powa Fuel

Serves 4

125g powa flakes (medium thickness)

3 tbsp vegetable/olive oil

1 tsp black mustard seeds

1 dried red chilli

2 fresh green chilli, finely chopped

1/8 tsp hing/asafoetida

1/2 (half) tsp of ground turmeric

30g cashew nuts

10 fresh curry leaves

1 small red onion, finely chopped

1 tsp salt

1 lemon, juice only

150g of finely cubed carrots

handful fresh coriander, finely chopped

1. In a bowl cover the powa flakes with cold water.

2. In a karahi, wok or frying pan, add the oil and when it is hot, but on a low heat, add the mustard seeds. They will begin to pop after about 10 seconds.

3. Immediately add the dried chilli, turmeric, hing/asafoetida, cashew nuts, green chilli, curry leaves and stir together. Stir in the pan for a minute.

4. Now add the onion and salt and stir well into the ingredients in the pan. Fry the onion for 5 minutes until softened and then add the lemon juice.

5. Add the finely cubed carrots and place a lid on the pan so that the carrots soften. As they are small this will not take more than a few minutes.

6. Add the drained powa flakes and gently mix into the ingredients in the pan, without making them too stodgy. Sprinkle the fresh coriander around the pan and serve warm immediately.

********

As for the ‘Curry For Change’ competition, well my recipe, which was this one,  sadly did not win. However, two out of the three winners I am twitter friends with so I am thrilled that their recipes made it through. They have now been filmed cooking their winning recipes, so am looking forward to seeing the result, when it goes live on the curry for change site. In the mean time check out their recipes on their sites below and try making them. I would love to hear from you if you try any of the recipes I am cooking this month or any of the winning recipes below. Leave a comment below.

· Ellie Matthews with ‘Spiced Roast Lamb with Butternut Squash and Spinach Dhal’ – http://theyoungdomesticgoddess.blogspot.co.uk/

·         Deena Kakaya with ‘Black Eyed Bean Pakora and Coconut Kadhi’ – www.deenakakaya.com

·         Zoe Perrett with ‘Bombay Bad Boy Chocolate Cheesecake’ – http://culinaryadventuresofthespicescribe.wordpress.com  and http://culinaryadventuresofthecocoanut.wordpress.com


IMG_9380


Lotus Seed/Phool Makhana Curry

IMG_9310

Continuing on the theme of providing an Indian dish for you each week, through the month of June, as part of Curry for Change, I hereby introduce a curry that I imagine many of you have never come across before – Lotus Seeds – otherwise known in India, as Phool Makhana. When Natco foods sent me a huge box of goodies for me to create a dish as part of a competition for food bloggers, (more about this click here from last weeks post), a large packet of phool makhana – popped lotus seeds – definitely stood out. They look very similar to popcorn or little cotton balls.

IMG_9264

In all honesty I had not eaten or even seen lotus seeds before, which was even more of a reason to experiment and give them a try. I discovered that they are greatly valued for their nutritional (powerful antioxidants) and healing properties, especially in Chinese medicine. In India, the state of Bihar produces the most amount of lotus seeds, largely owing to it’s climate and geography. They are  grown in stagnant water of wetlands, ponds and lakes and are completely organic. The seeds themselves can be eaten raw, fried or toasted – I opted for the latter as I was putting them in a curry.

IMG_9344

This curry is a winner for anyone wanting to avoid meat. It’s quick and easy to execute and kind on your waste line. It’s also rather tasty! We try to have meat free mondays, so this curry will definitely be making more appearances going forward. Have a look out for the seeds when you next visit your local Asian grocers.

Oh and if are wondering how I got on with the bloggers curry competition….you are going to have to wait an extra week as I don’t want to spill the beans before it’s official….(clue: it wasn’t me but will reveal more soon ;o)

***********

Lotus Seed/Phool Makhana Curry 

Serves 4 (or 6 if serving with other dishes)

60g lotus seeds/phool makhana

1 tsp olive oil

50g cashew nuts, soaked in 100ml of warm water

1 large onion, finely chopped

2 tbsp olive oil

2 large tomatoes, finely chopped

2 tsp ginger and garlic paste

1 tsp Kasmiri chilli powder (less if you prefer it less hot)

1/2 tsp tumeric powder

1 tsp garam masala

2 tsp coriander powder

1 tsp salt

70g frozen peas

2 tsp dried fenugreek/methi leaves

200ml water

1. Place the olive oil in a non-stick saucepan and gently fry, stirring continuously, the lotus seeds for 5 minutes to allow them to bronze slightly and crisp up.

2. Place in a bowl and leave to one side.

3. In the same non-stick pan gently fry the onion for 5 minutes to allow to soften and become translucent. Add the garlic ginger paste and stir into the onions. After a minute, add the tomatoes and stir into the other ingredients.

4. Now add the Kashmiri chilli powered, turmeric, coriander powder, garam masala and salt. Stir well and leave to simmer for 3 minutes.

5. Transfer the contents of the pan into a blender and then return to the blender once you have a smooth sauce. Continue to simmer for a couple of minutes.

6. Place the cashew nuts, and the water they are soaking in, into a blender to form a paste. I find that my spice grinder works well at blending the nuts smoothly (do not add the water to the spice grinder!) and then stir into the water after they have been ground up. Add to the main pan and simmer for a minute.

7. Add the dried fenugreek/methi leaves and the peas and stir into the smooth sauce along with 200ml of water and simmer.

8. After 5 minutes add the lotus seed and stir thoroughly into the sauce. Simmer for a further couple of minutes then serve.

9. Serve with some chopped fresh coriander and a wedge of lemon.

IMG_9279


Dried Ginger and Lentil Spiced Chicken Balti and the Curry For Change Campaign

IMG_9027

For the month of June folks, I’m going to share recipes that include some of the ingredients that were kindly sent to me by Natco foods as part of the ‘Curry for Change campaign’ competition. As part of the competition, food bloggers had to use at least 3 ingredients to come up with an original curry that would be easy to replicate at home by YOU.  Check out the varied array of goodies they sent me. My mind was working in overdrive to come up with a curry that would appeal from a taste and ease perspective.

I’m curious as to what you would have created using some of the ingredients below…..leave a comment for us all to see.

IMG_8956 But first let me take a few steps back to explain what ‘Curry for Change Campaign’ is all about and how you too can get involved.

In short, the campaign is about raising awareness of families who suffer from hunger across the world and how by cooking or eating a curry can help support a wonderful charity called ‘Find Your Feet’. The charity helps rural communities in Asia and Africa by giving them the knowledge and skills to become self sufficient and feed their families and communities. Rather than just offering handouts the charity gives the communities knowledge, understanding and education that allows them to bring themselves out of poverty and hunger. You can read more about the charity – here.

IMG_9032

You are probably wondering how eating or cooking a curry is going to actually help these communities?

Well a number of well-known Indian restaurants across the capital, in June, have thrown themselves into the campaign by creating a number of special dishes to help raise money for the cause. For those of you who are keen cooks, however, you can sign up for a Curry for Change event pack http://www.curryforchange.org.uk  for you to host a spicy night in with friends. All your friends need to do is to donate what they would spend on a typical Indian take-out. The pack includes spices from Natco Foods, cooking tips and recipes from the campaign ambassadors. On top of that you will also have my recipes over the month to give you more ideas on what to cook as well as my extensive list of recipes in my recipe library.

IMG_9013

So what are you waiting for? Do leave comments below and let us know how you get on. Spread the word on this exciting campaign. I’ll be giving you details of who won the competition in my next post ;o)….so watch this space.

Dried Ginger and Lentil Spiced Chicken Balti

5 tbsp vegetable oil

10g dried ginger

1 tbsp shredded coconut

500g chicken breast, cut into bite sized pieces

1 tsp turmeric

1 white onion, finely chopped

1 tsp garlic paste

2 tsp salt

1x 4 inch piece of cassia bark, broken in two

2 green chillies, stalk removed but kept whole

1 tsp Kashmiri chilli powder

6 large tomatoes (900g), finely chopped

400g boiling water

100g yellow split peas

*******

to make the Tarka

1 tsp cumin seeds

2 dried red chillies

10 fresh curry leaves (or dried if you can’t get hold of fresh)

Ingredients in bold were part of the Natco hamper sent to me.

1) Heat a large deep pan with 1 tablespoon of oil. When it is hot add the dried ginger and move around the pan for under a minute. Remove the ginger and place in a spice grinder/blender along with the shredded coconut.

2) In a bowl add the chicken pieces, turmeric powder, the ground dried ginger and shredded coconut as well as one tablespoon of vegetable oil. Stir well so that all the chicken pieces are coated. Leave to rest whilst you prepare the rest of the dish.

3)  In the same large deep pan that you heated the dried ginger, add 3 further tablespoons of vegetable oil. When it is hot add the onion and gently fry it until it begins to brown in colour. Add the garlic paste, salt, Kashmiri chilli powder and cassia bark and stir for a few minutes.

4) Add the spiced chicken pieces to the pan and stir into all the other ingredients. Place a lid on the pan and allow the chicken to whiten and begin to bronze in places. Stir at intervals. This will take around 10 minutes.

5) Add the chopped tomatoes and the boiling water, which will allow the yellow split peas to cook easily. Continue to cook the curry on a medium heat for 20 minutes with the lid on. Then remove the lid and simmer for a further 10 minutes.

6) In a separate small pan heat one tablespoon of vegetable oil and when it is hot add the cumin seeds, dried red chilli and curry leaves –  this will be the tarka. The cumin seeds will begin to sizzle almost immediately. Move the ingredients around the pan for one minute and then pour into the main pan when ready to serve.

Serve with either plain rice, naan, paratha or puri.

Note: If you prefer less of a sauce keep the lid off the pan for a little longer, which will allow the sauce to thicken and reduce.

    IMG_9039  


Moong Dal and a Secret Sri Lankan Gem

IMG_9210


My husband calls me a ‘cheap date’.

Why, you ask?

Well, if the truth be told I would far rather go to a restaurant that is probably unlikely to win any prizes for decor but the food is outstanding moreish and tasty, the kind of places that people who really love food and flavour go, rather than going to places purely to be ‘seen’. These places don’t cost an earth to be fed well – hence the ‘cheap date’ label. A couple of years ago I spoke about a wonderful little place up the Edgware road – see here 

IMG_9233

Don’t get me wrong I can also be a bit of a chameleon and like places that do have great decor, great food and are perhaps a little bit more expensive, but not crazily so – Mr B and I recently visited Bill Granger’s new restaurant, aptly names ‘Grangers’ in Clerkenwell and managed to chat to the man himself – very down to earth and charming. The restaurant ticks all my boxes – great food, ambiance, relaxed atmosphere and not going to break the bank.

IMG_9245

But over in Tooting there is a little Sri Lankan/South Indian restaurant called ‘Apollo Banana Leaf’ that’s a great find for all you spice lovers out there. Friend’s north of the river had mentioned it to us a while ago and spoke about how they made the trip especially to visit this restaurant. It had me thinking, friends making the effort to go to deepest, darkest Tooting – well it must be good!

Mr B and I have been a couple of times at lunch time and feasted on some wonderful Sri Lankan and South Indian food. Each time we are the only diners, but stuck to the window there are endless ‘Time Out‘ and ‘Harden’s reviews. I imagine in the evenings the restaurant is jam packed, but in the day time it feels like private dining.

IMG_9241


Their dal was warming and subtly spiced and keen to replicate it at home Mr B and I tried to work out what they had put in it. Hing – or rather asafoetida was definitely in it coming from the aromas of the dish and then we could see dried chillies, fresh curry leaves, black mustard seeds, and of course turmeric to give it it’s sunshine yellow colour. On close inspection of the menu I realised there was a little onion and fresh ginger in it, however I’ve been cooking it at home without the latter two ingredients. Try it yourself both ways and see which works for you.

It’s the perfect little dish to cook after a long day at work and you want some food that will give you the equivalent of a great big hug.

If you fancy a spice injection head on down to 190 Tooting High Street. I may well see you there for lunch.


IMG_9227


Moong Dal – Sri Lankan Style

Serves 6-8

450g  moong dal, cleaned

900ml cold water

1 tbsp vegetable oil

6 fresh curry leaves

1-2 tsp black mustard seeds

3 large dried red chillies

1/2 (half) tsp  asafoetida/hing

1 tsp turmeric powder

2 tsp salt

******

1. Thoroughly wash the moong dal in a pan of cold water, using your hands. Carefully empty the water from the pan and repeat a couple of times so that the water runs clear.

2. Add 900ml of cold water to the pan holding the moong dal and bring to the boil and then let simmer for around 20-30 minutes. During this time white froth will form at the top of the pan. Using a large spoon skim off the froth that forms and discard. You may find that you require a little more cold water if it has all been soaked up, so just add a little, depending on how soupy you like your dal. When the dal is done it will be slightly lighter in colour and will will be soft to touch – be careful not to allow it to become too mushy through overcooking.

3. In a small pan heat up the oil on a low heat. When it is hot add the black mustard seeds. These will begin to pop almost immediately so be careful. Add the rest of the ingredients and move around the pan for 30 seconds.

4. Take a spoonful of the dal and place in the pan with the spices. Mix together and then pour all the contents of the spice pan into the other pan holding the dal. Place a small bit of water in the spice pan and swirl around so that all the spices are removed from the pan and put into the dal pan.

5. Stir in thoroughly to the dal and simmer for a couple of minutes. If it requires more salt then add a little more at this final stage.  Leave to cool slightly before serving.