King Prawn Noodle Broth – effortless joy in a bowl

OLYMPUS DIGITAL CAMERA

Do you ever feel too exhausted to cook in the evenings but want a fresh, healthy, comforting dish that you can prepare in lightening speed with very little effort? I think all of us do from time to time, I certainly did this evening. So I put together this wonderfully flavoursome broth in less than 10 minutes. I feel it cleanses the body and heightens ones senses. It’s definitely my kind of dish.

King Prawn Noodle Broth – Serves 2

190g  Jumbo king prawns (or any prawns will do)

1 bag/ 200g of udon noodles (double the amount if you are feeling hungry)

1 tamarind broth cube (Knorr make them)

1 garlic clove, finely sliced

6 thin slices of fresh ginger

half a red chilli, finely sliced

1 lime

1 spring onion, finely sliced

1/2 tsp of lemongrass paste

2 tsp of light soy sauce

1 tbsp sesame oil

1 tbsp of coriander, chopped

1. Thinly slice the garlic, ginger, red chilli and spring onion. Heat the sesame oil in a pan, and when it is hot, add the chopped ingredients and the lemongrass paste, and cook gently for a couple of minutes.

OLYMPUS DIGITAL CAMERA

2. Meanwhile put 600ml of boiling water in a pan on a low heat and break up the tamarind broth cube into the water. Then add the prawns and watch them reduce in size slightly – this will only take a couple of minutes – be careful not to over cook them!

OLYMPUS DIGITAL CAMERA

OLYMPUS DIGITAL CAMERA

3. Place the contents of the pan with the garlic, ginger, chilli, lemongrass and spring onion into the broth along with the udon noodles. Whilst I use udon noodles any type of noodles will work equally well. Experiment and see which you prefer. Cook the noodles for 3 minutes and during this time add the soy sauce and the juice from half a lime.

4. Serve piping hot with chopped coriander on the top with a lime quarter on the side.

If you are feeling under the weather or want a general ‘pick me up’ this warming broth is sure to reinvigorate you. Instead of prawns you could use chicken or for a vegetarian option: broccoli, sugar snap peas, mange tout or pak choi.


My mother’s legendary ‘Smokey Barbeque Sauce’ and ‘Tarragon and Lemon Chicken’

OLYMPUS DIGITAL CAMERA

No barbeque is complete without my mother’s legendary smokey barbeque sauce. It’s straightforward to make and always guaranteed to please. There are certain things that you eat as a child that remain in your memory forever and this sauce is definitely one of those happy memory tastes. We were blessed with stunning weather this past weekend – for the Wimbledon finals – so having a barbeque was definitely in order. A glass of Pimms, that ubiquitous English summer tipple, a game of croquet (which is seriously addictive) all in all made for a perfect summer’s day.

OLYMPUS DIGITAL CAMERA

Smokey Barbecue Sauce

Makes approximately 1/2 pint/300ml

25g /1oz butter

1 onion, peeled and finely chopped (although my mother uses leeks as my father has an onion intolerance, which works equally well)

1 garlic clove, crushed

2 tbsp white wine vinegar

150ml/1/4 pint of water or vegetable stock

1 tbsp English mustard

2 tbsp demerara sugar

1 slice of lemon

1 bay leaf

Pinch of cayenne pepper

2 tbsp of Worcestershire sauce

5 tbsp of tomato ketchup

3 tbsp tomato puree

salt

fresh ground pepper

1. Melt the butter in a saucepan and fry the onion (or leek for those with an onion intollerance) and garlic until soft and translucent.

OLYMPUS DIGITAL CAMERA

2. Now add the vinegar, water or stock, mustard, sugar, lemon slice, bay leaf and cayenne. Bring slowly to the boil and simmer for 15 minutes, stirring occasionally.

3. Stir in the remaining ingredients with salt and pepper to taste. Simmer for a futher 10 minutes. I tend to leave the bay leaf in when I serve the sauce as I like the rustic, homemade quality to it.

OLYMPUS DIGITAL CAMERA

As an alternative to simply just barbequing chicken, which is delicious in its own right, my mother’s ‘Tarragon and Lemon Chicken’ is a good alternative. It’s best to marinade the chicken for as long as possible, ideally overnight and to pierce the skin of the chicken so that the flavours can really be absorbed by the chicken. Serve with a crisp green salad and piping hot new potatoes with a dollop of butter and some chopped up fresh parsley and my mother’s legendary smokey barbeque sauce.

Tarragon and Lemon Chicken  serves 4

3.5lb whole chicken cut into pieces

5 fl oz olive oil

6 tbsp lemon juice

1 onion (or leek), finely chopped

1 large handful of fresh tarragon

1 large handful of fresh parsley (flat leaf or curly), finely chopped

few drops of tabasco

salt and pepper

lemon wedges and fresh tarragon sprigs to garnish

1.  Season the chicken with salt and pepper and then make a few knife incisions into the chicken pieces. This is to enable the marinade to really penetrate the chicken so that it is more flavoursome when it is cooked. In a separate bowl mix together the olive oil, lemon juice, onion (or leek), the handful of tarragon and parsley and tabasco. Then add the chicken pieces and with your hands really work the marinade into the chicken pushing some of the onion and herbs into the small incisions that you have made.   Leave the chicken to marinate in the fridge overnight.
OLYMPUS DIGITAL CAMERA
2.  Take the marinated chicken out of the fridge for over an hour before cooking time and leave to stand at room temperature.
3.  When the barbeque is ready brush the grid with olive oil.  Drain the chicken pieces, reserving the marinade, and place chicken on the grid starting with the bony side down. Brush the chicken pieces with the marinade at intervals during cooking, remembering to turn the chicken so that it is cooked sufficiently.
4.  Barbequing the chicken takes 30 minutes. You know that the chicken is cooked when the juices run clear when pierced with a knife through the thickest part of the meat.
5.  Garnish with tarragon sprigs and serve with lemon wedges.
OLYMPUS DIGITAL CAMERA

Watermelon, Feta, Black Olive, Mint and Lime Salad – a knockout combination

OK, I take it all back. The weather gods have clearly been reading my blog so much so they have decided to let it shine big time. Ever since I wrote my blog about ‘Raoul’s Eggs Rock‘ and that it is incessantly raining, the sun has come out to the extent that it’s been a scorcher ever since. A few days ago London was hotter than the Caribbean, which is wonderful really wonderful, aside from the fact that England is not really set up for extreme conditions – hot or cold. Its been so humid I keep having to go down to our cellar to get some cool air. Even the paddling pool water has heated up to bath water temperature. I don’t know about you but when it is really hot and humid I really like eating mountains of fresh fruit. A huge bowl of sweet melon, mango, strawberries, raspberries and fresh mint always goes down a treat.

This inspired me to share one of my absolute favourite salads with you. I have been cooking it for years and then discovered that the ubiquitous kitchen goddess – Nigella – has a similar recipe. It combines fresh, cleansing watermelon with the salty robust feta cheese. The flavours combined are perfectly balanced, although I know its hard to believe. Then with lime juice, black olives, fresh mint and a splash of olive oil you have a heavenly dish.

Its simple to create, truly delicious and very memorable. Perfect for a light lunch or for an evening dinner served alongside some grilled chicken. Give it a try and let me know what you think.

Watermelon, Feta, Black Olive, Mint and Lime Salad

Serves 4

 1 mini watermelon (circa 2kg in weight), cubed

200g/8oz feta cheese, cubed

100/4oz black pitted olives

2 limes, squeezed

2 tbsp of olive oil

1 handful of fresh mint, torn into small pieces

1. Cut the watermelon into bite sized cubes and place in a bowl. Try not to handle it too much as it will begin to break and become more juice than melon.

2. Similarly cut the feta cheese into slightly smaller cubes than the watermelon. Place into the same bowl as the watermelon along with the black olives.

3. Squeeze the juice of two limes over the ingredients as well as 2 tbsp of olive oil. Using your hands mix into the ingredients gently.

4. Tear some fresh mint over the salad and serve.


Raoul’s Eggs Rock

OLYMPUS DIGITAL CAMERA

England is experiencing the ‘great flood’ take 2. Not literally of course, but after the great weather in April and May to say it has declined would be an understatement. Its Wimbledon week, the crowds are here and the grey clouds are looming large over London town. I feel sorry for the individuals responsible for rescheduling the matches so that they are all played in the two week Wimbledon window. Headache or what! But hey lets look on the bright side (us Brits are good at that) our reservoirs must be full again, there won’t be a hose pipe ban and our gardens are lush bright green.

So with all this wet weather I thought it was high tide (sorry I could not resist) to take a little trek across town to buy some of the tastiest eggs on the planet. If the sun refuses to come out in our skies then I will recreate it on the plate. Well that was my thinking.

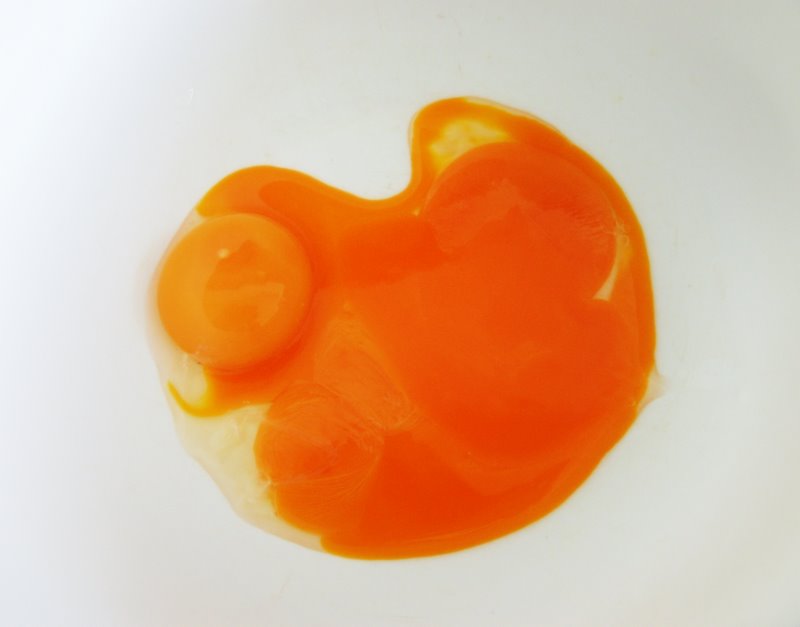
There is this wonderful restaurant/brunch establishment, and grocery store in Maida Vale, called…..you guessed it, ‘Raoul’s‘. The brunch menu is heavenly and it is there that they serve and sell these wonderful eggs, which they source from Italy. They taste incredible and the yolks are so yellow I really wouldn’t be surprised if they had been injected with turmeric.

OLYMPUS DIGITAL CAMERA

I stumbled across this little gem of a place years ago when I was looking for a place to live. I thought Maida Vale looked charming and villagey being nestled by ‘Little Venice’ and not far from Regents Park. When I stopped to gather my thoughts and look through the suggestions the estate agent had given me I refuelled in Raoul’s. It was a defining moment because I fell completely in love with this brunch hangout. With its wonderful eggs benedict royal and fresh fruit smoothies, I was sold. I decided there and then that the property I was going to live in HAD to be in walking distance of Raoul’s. I imagine it never crossed estate agents minds that something as simple as an eatery could convince someone to buy in an area. If I was to pin point it even further I think it was the eggs that won me over.

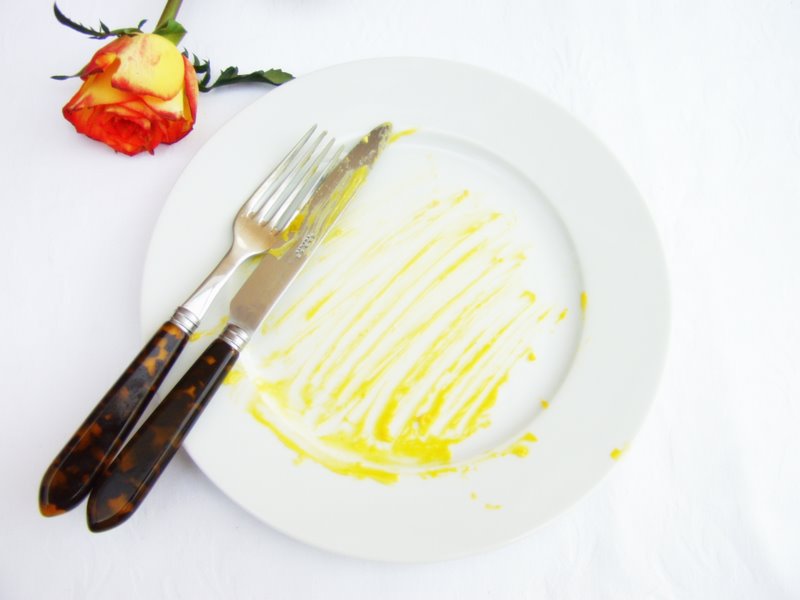
I think you kind of get my gist on how mind blowing these eggs are.

It wasn’t until I bought a dozen at the weekend that I actually decided to dig a little further and find out more about the eggs in question. All I knew was that they were from Italy. The packaging has changed since I was last there – which was quite a few years ago – and the eggs are imported by a company called ‘Machiavelli Foods‘, which focuses on importing food from Italy to London. On the packaging it says that the ‘hens are fed on a purely vegetarian diet of corn, grain and soy with marigolds and acorns added to help develop the rich and flavourful yolk’. So there you go folks if you want your hens to lay eggs with a deeper, rich, yellower colour, feed your hens marigolds and acorns. For those of you who keep hens let me know how you get on, I am really curious to see  if you notice a difference in the colour of your hens’ yolks. I genuinely would be interested to know.

OLYMPUS DIGITAL CAMERA

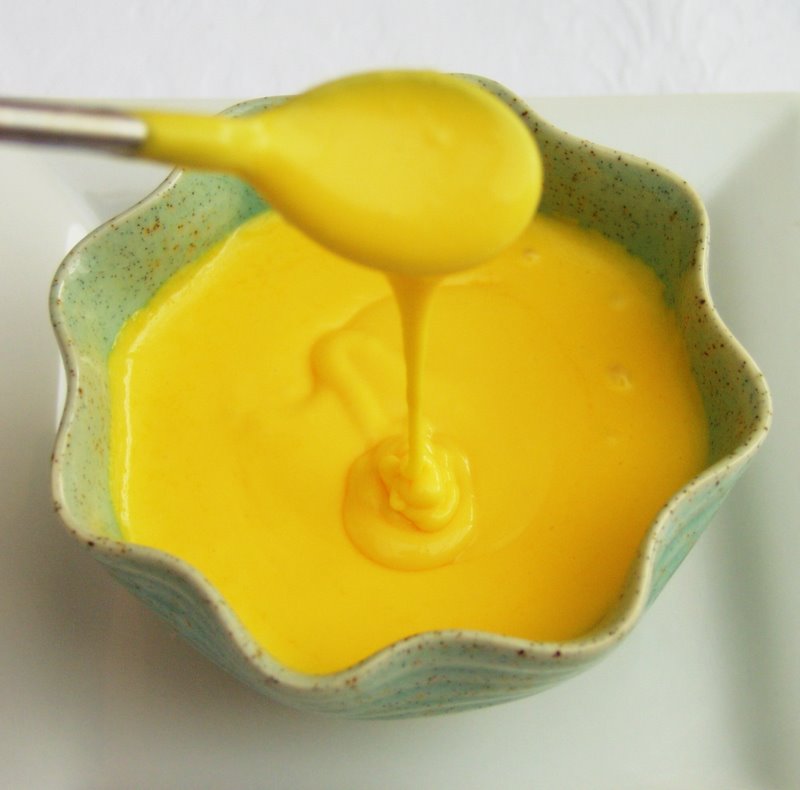
I thought I would recreate eggs benedict royale for you to try at home. My hollandaise sauce recipe is fail proof  and super easy (I use a blender) so give it a try.

Hollandaise Sauce 

Serves 4

3 egg yolks

150 g unsalted butter

juice from half a lemon

pinch of salt (optional)

1. Separate 3 egg yolks from the whites. This is easy to accomplish by breaking the egg and then placing the yolk back and fourth between the two broken egg shell halves. Save the eggs whites for later on – you could make an egg white omelet.

OLYMPUS DIGITAL CAMERA

2. Squeeze the juice of half a lemon onto the egg yolks, less if you prefer it less lemony. Add a pinch of salt at this stage, although I personally find it unnecessary if you are going to be using smoked salmon for the eggs benedict royale. Blend the egg yolk mixture for 20 seconds at a medium speed. It should appear slightly lighter in colour.

OLYMPUS DIGITAL CAMERA

3. Slowly, and that is the key, heat up the butter, making sure not to let it boil.

4.  When the butter is melted, slowly add it to the egg mixture, continuing to blend (I use the pulse button at this stage)as you do so. The speed of the blender and the heat from the butter will heat the yolks slightly without them scrambling. Blend for a couple of seconds once all the butter has been incorporated into the mixture.

OLYMPUS DIGITAL CAMERA

5. Taste the mixture and add more salt or lemon as you see fit. If you like a thinner consistency then add a little warm water and blend briefly.

OLYMPUS DIGITAL CAMERA

6. Keep the hollandaise sauce warm until you are ready to use by placing the blender container or small bowl you have transfered it into, in a pan of hot tap water.  Use within 1 hour.

As well as eggs benedict royale, hollandaise sauce works really well over asparagus, broccoli, salmon (although that might be a bit 70’s!).

Eggs Benedict Royale

Serves 4

4 white muffins, toasted

4 eggs, poached

few drops of vinegar

cling film (to wrap the poach eggs in)

4 slices of smoked salmon

4 tbsp of hollandaise sauce (see above)

1. Prepare the hollandaise sauce first (see above) and put to one side in a warm place.

2. I have a number of ways to poach eggs but the method I am presently using is the one I saw my brother doing at Christmas when he was preparing brunch for the family. Basically you crack an egg over some cling film – enough so that you can gather the ends up easily and there is some left over (which you can place over the side of a pan). You must make sure that there is no air in the little cling film egg parcels. Place a few drops of vinegar with the egg. It is easy to poach many eggs at once like this by separating them into their own little cling film parcels.

3. Boil a pan of water and place the eggs into the boiling water. Leave for 2/3 minutes.

4. Meanwhile toast the muffins and then separate onto plates placing a slice of smoked salmon onto one half of the muffin. The extra half of muffin I leave to one side so as to mop up the hollandaise sauce and egg at the end.

5. Once the eggs are done, place them directly on top of the smoked salmon and then place a large tablespoon of the hollandaise sauce over the top.

6. Garnish options could be ground pepper, parsley or chives. I personally like to leave it plain as there are so many wonderful flavours coming from the dish already.

OLYMPUS DIGITAL CAMERA


Ma Po Tofu – a Sichuan classic


A couple of years ago I stumbled across the most exquisite looking cookery book. Its cover drew me in and before I knew it I was leafing through the pages drooling over the divine recipes. Some of the ingredients I was unaccustomed to, and I think it was this that really attracted me to buy the book. Who wants to remain in their culinary comfort zone, not me, so with a youthful enthusiasm I purchased it. Since it has been in my possession I have lovingly poured over it, and if the truth be told I have even been known to take it to bed to read and study the recipes on numerous occasions. The book in question is called ‘Balance & Harmony, Asian Food’, by the Australian chef Neil Perry, who I had previously never heard of before. I personally find it rare to come across a cookery book where I actually want to cook more than a dozen dishes from it, but with Neil’s book I really want to try them all.

Its beautifully set out into chapters focusing on basic techniques and recipes then moving onto advanced recipes and banquet menus. The dishes are beautifully photographed and styled, interspersed with stunning old prints of Chinese women in traditional dress. If there are prizes for stunning cookery books this would surely win the top prize. Oh, and for the sceptical amongst you, although I am sure there are none, I am not being paid to say any of these kind words about Neil Perry’s book.

A wonderful recipe from his book to share with you, dear reader, is Ma Po Tofu, or as it is also affectionately known, Pockmarked-Face Lady’s Tofu. Put off?  Don’t be, as you are in for a treat and you’ll be doing cartwheels of delight after your first mouthful. Mark my words.

To read the full story of where this recipe derives its name click here. The dish is a Sichuan classic, and is cooked with pork or beef mince with tofu, in a spicy chilli bean sauce. Not the type of chilli that has you gasping for milk, but one that urges you to have more mouthfuls, so please do not be put off by thinking it will be too hot. Sure it’s feisty, but it has a wonderful balance of sweetness and spiciness, which prevents it being too overpowering. If you are a vegetarian you can also enjoy the dish, by simply omitting the pork or beef. Tofu is easy to find and tastes delicious in this dish. It lasts for ages in the fridge so I usually keep a stock of it ready for when I feel the urge to cook and eat Ma Po Tofu.

Its one of my  favourite things to eat at the moment and is absolutely guaranteed to bring a smile to the face of anyone who eats it.  I’ll introduce you to other recipes from Neil’s book soon, but try this one first and let me know how you get on.

Ma Po Tofu

Serves 2 hungry people

300g of silken tofu, cut into 2cm cubes (I use slightly more, see packet above!)

2 tbsp of vegetable oil

500g minced pork (Neil uses 200g)

1 clove garlic, finely chopped

2 spring onions (scallions), sliced

2 tbsp hot bean paste (I use Lee Kum Kee’s Chilli Bean)

125 ml (4 fl oz/1/2 cup) fresh chicken stock (if you have it, otherwise I tend to use Kallo organic chicken stock cube – sorry Neil)

1 tsp of shaoxing

1 tsp of light soy sauce

1/2 tsp dark soy sauce

2 tsp sugar

1/4 tsp sea salt

a good pinch of Sichuan pepper

1/2 tsp sesame oil

1. Cube the tofu into 2cm/3/4 inch cubes and set aside.

2. Heat the wok/pan until it is smoking and then add the vegetable oil. When the oil is hot add the minced pork and stir-fry until browned. This won’t take longer than 5 minutes.

3. Then add the garlic, spring onion and bean paste and stir into the pork.

4. After a couple of minutes add the stock, shaoxing, soy sauces, sugar and salt and bring to the boil.

5. Gently add the tofu, being careful not to break the cubes, and reduce the heat to a gentle simmer. Allow the liquid to thicken slightly.

6. Add the Sichuan pepper and sesame oil and gently mix together.

Serve with a bowl of steamed rice.


Bream me up Scotty!

If you were to open my fridge at any point in time you can pretty much guarantee that you will find some fresh red and green chilli, garlic, ginger and coriander/cilantro lurking within. They are like my kitchen essentials. I adore them I really do. They make what would otherwise be a rather bland dish into one that wants to shout from the roof tops ‘I’m alive and kick ass’. From these ingredients I can pretty much conjure up a feast without too much effort.

Following a glorious full on wedding weekend I thought it was a good idea come Monday to cleanse the body and soul with some tasty bream and some of my kitchen essentials. Its certainly no ‘rocket science’ recipe but it certainly tastes good and can be adapted to suit ones liking to chilli, or not, as the case may be.

I had some wonderful bream in my freezer, which I defrosted the night before to make the dish. Bream is a delicious fish, similar to seabass in texture being firm and sweet.  As an added bonus you can sleep soundly at night, dear reader, with the knowledge that it is not on the endangered list like cod and halibut. Its reasonably priced, simple to cook and not overly boney.  So what’s stopping you? Seek it out and let me know what you think.

This recipe is quite a personal thing in the sense that you can emphasise more or less of the ingredients depending on your preference to them, or not as the case maybe. I tend to cook it with no particular guidelines, however, I realise that this is not very helpful when you are trying to pass on a recipe so here goes at me noting down how to create this gem of a dish.

Bream with chilli, spring onions, garlic and ginger

Preparation time: 5 minutes

Cooking time: 13 minutes

Serves 3 (hungry people or 6 less greedy people)

6 pieces of Bream or 3 Bream

3 spring onions, chopped

4 garlic cloves,  choppped

2 inches of ginger, grated finely

2 chilli, chopped

1 lime, chopped into two

4 tbsp of soy sauce

2 tbsp sesame oil

Handful of chopped coriander/cilantro

Whole grain rice

1. Place the rice in a pan of boiling water and simmer gently for the required time. Whole grain rice takes a little longer than white, normally around 20/25 minutes.

2. Place the oil in a relatively deep pan on a low heat.  When the oil is hot add the garlic, ginger, spring onions and then the chilli. Fry gently for a couple of minutes and then add the bream  pieces. Squeeze in the lime halves and then leave in the pan so that the flavours can blend together.

3. After a minute add half the soy sauce and add a splash of water so as to give more of a steam effect to the cooking of the fish, placing a lid on top.

4. After 5 minutes turn the bream over and cook for a further 5 minutes, so that it is cooked/steamed sufficiently on both sides.

5. Just before you take it off the heat, place a good handful of corriander/cilantro over the fish. This adds a wonderful aroma to the dish.

6. Serve with whole grain rice.

So speedy to prepare and cook that even those with a busy schedule can cook such delights.


In the mood for ‘Italian Salsa Verde’

OLYMPUS DIGITAL CAMERA

My family has been craving greenery. We spent the last week in the beautiful Var valley in France and whilst we had some wonderful dishes we felt that perhaps, without sounding too rude, French food is slightly stuck in a 1970’s time warp and is due a food revival. Meticulously prepared and presented, the food still remains pretty rich and creamy with lots of unpasteurized cheese not much veg and basically not ideal if you happen to be under 10, pregnant or health conscious. Before you ask, no I am not pregnant, but one of the friends we went with is, and she found it slightly restrictive on what she could actually eat. A favourite dish that one of our party devoured was scallops in a creamy curried sauce, similar to coronation chicken in taste – the sauce that is; surprisingly delicious but a little 70’s kitsch you have to agree. If only I’d taken a photo as evidence.

So back in Blighty we gathered some fresh herbs to make an Italian Salsa Verde to detox our bodies from all the cheese and cream laced food we had eaten across the waters.

Italian Salsa Verde 

Not to be mistaken with French sauce verte, German green sauce, Mexican salsa verde and Argentinian chimichurri

1 large handful of fresh mint

1 large handful of fresh basil

2 large handfuls of fresh flat leaf parsley

3 pieces of chopped garlic

6 anchovies chopped

1 large handful of chopped cornichons or gherkins

1 large handful of capers

2 tbsp of olive oil

3 tbsp of red wine vinegar

1 dsp (dessert spoon) of dijon mustard

pepper

salt

1. Finely chop the garlic, cornichons, anchoives. If you are doing it all by hand then you will also need to finely chop the fresh flat leaf parsley, mint and basil, if however you are like me and you want to save time, use a blender. Also add the capers and olive oil at this stage.

OLYMPUS DIGITAL CAMERA

2. After an initial quick blend – so that it is NOT smooth in consistency, add the red wine vinegar and dijon mustard. Season to taste although you will probably find that the saltiness of the anchovies suffice.

OLYMPUS DIGITAL CAMERA

OLYMPUS DIGITAL CAMERA

The girls loved it so much they even ended up licking out the remainder from the blender with a spoon. How sweet !


3. Salsa Verde is so versatile that it can be eaten with meat, fish, poultry or vegetables. I decided to serve mine with grilled chicken, vine tomatoes and borlotti beans on the side, and hunks of crusty bread to mop up the salsa. Delicious and not too 70’s !

OLYMPUS DIGITAL CAMERA

SaveSave


Want to join the ‘obscure vegetable movement’?

Have you ever been just a little bit curious about what all those rather unusual looking vegetables might actually taste like, when browsing around an Asian food market. Well I certainly have. I’ve been thinking…..we’ve had the ‘slow food movement’, ‘organic food movement’, perhaps now’s the time of the ‘obscure vegetable movement’. Maybe they need a voice, just like the potato did when we all gave them a chance when Sir Walter Raleigh returned with them after his voyage to the Americas, during the reign of Queen Elizabeth I. Perhaps carrots, broccoli, peas, onions, leeks and potatoes need to be knocked off their pedestal of most well loved and consumed vegetables.

One such vegetable, which I discovered not too long ago, is karela, also known as bitter melon/gourd. It’s completely ubiquitous in the tropics mind you, just a little bit unusual over here in your average food market – unless it’s an Asian one.  Its not a pretty vegetable in the slightest. Warty, green and up to eight inches long it looks slightly like a cucumber, but less appealing.

IMG_5809

It has a really bitter taste, but it is so different from anything I have ever eaten that I actually like the vegetable. It has the same divided opinion as marmite does in the UK. You either love it or hate, nothing in between.

Karela is actually very versatile, but I like to cut it width ways into thin slices and then slowly fry them in a pan until they begin to brown and then turn them over until they brown that side as well. After patting them with kitchen paper I then sprinkle some salt over them and eat them as a snack, or with rice and dahl.

As an alternative you can sprinkle the raw slices with salt and turmeric and then fry them. You can then stop there and eat them or if you feel the need for spice with a kick follow the next step………..

Put a tbsp of oil in a pan and when hot add a pinch of  asafoetida, which is also known as ‘Devils Dung Stinking Gum’ – how cool is that? 1-2 dried red chilli and 1 tsp of mustard powder. Stir for a minute and pour over the karela. Delicious and definitely packs a punch.

IMG_5810

High in iron, it also has a wide range of medicinal qualities and is purported to be the best herbal medicine for liver problems, aid people with psoriasis and diabetes. Curious…………go on give them a try, but be open minded! They are easy to find at any Asian food store, you just won’t be finding them at Tesco quite yet.

IMG_5818