Marrow Dal and Fried Marrow Skin (Khosha Bhaja)

IMG_6968

My husband once asked a fellow foodie friend, who used to write for the food section of one of the large weekend newspapers here in the UK, for suggestions of ways to cook with marrow, to which her response was ‘you can start by throwing it in the bin’.  Ever so harsh but she is not alone! Many people often overlook the humble marrow and regard it as tasteless. I can tell you however, that marrow completely comes into its own cooked in Indian dal and even the skin need not be discarded as you can cook a completely separate delicious dish using it.

IMG_6961

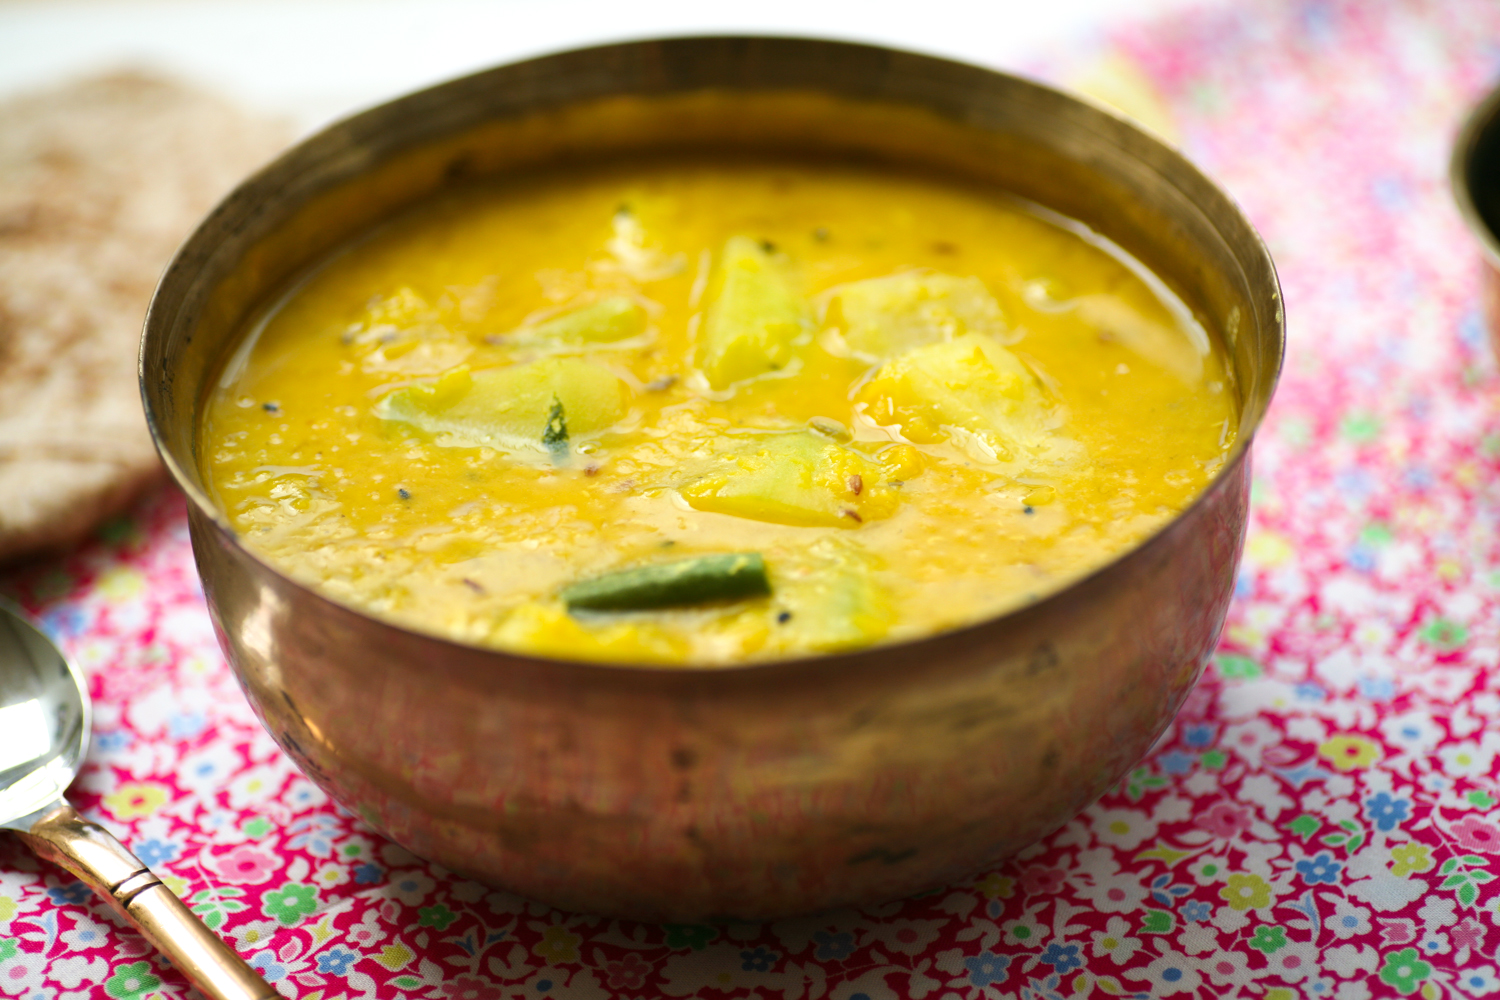
In the hot sweltering heat of an Indian summer, eating marrow is the perfect way to cool down as it’s made pretty much made of water. So by combining it with red split lentils to form a dal is a wonderfully satisfying way to eat marrow in all it’s glory. Gardens here in England are bursting with marrows at the moment and although I have none growing in my postage stamp garden both my mother and mother-in-law are supplying me with endless amounts of marrow.

So dive in and give this glorious dal a go. I bet you’ll even surprise yourself as to how good it tastes.

IMG_7031

Marrow Dal

Serves 2-3

125g red split lentils

500g marrow, skinned and cubed (remember to keep the skin)

600g boiling water

1 tsp salt

half tsp turmeric

1 tbsp vegetable/mustard oil

1tsp Panch Phoran (Bengali five spice – see below)

2 green chillies, chopped in two

Panch Phoran is a uniquely Bengali (East India and Bangladesh) five (panch) spice mix. It has a magnificent aroma so I often use it in my red split lentil dals. If you cannot find a packet in your local Asian grocers you can make it yourself by mixing the following seeds together in equal parts: fennel, cumin, nigella, fenugreek and mustard. Store in an airtight container and it will last months. 

1. Rinse the red split lentils under cold water so as to clean them thoroughly. Repeat the process a couple of times.

2. In a saucepan add the cleaned red split lentils and 500g of boiling water. Add the turmeric and leave to simmer for 7-10 minutes. If the lentils begin to dry out add a little more boiling water.

3. Add the marrow and stir into the dal. Add a further 100ml of boiling water and continue to simmer for another 5 minutes.

4. In a separate pan heat the oil and when it is hot gently add the panch phoran. They will begin to pop immediately so keep them moving around the pan. Add the chillies and mix in together. Now pour the marrow dal on top of the panch phoran and chillies and stir in together. Add the salt and then simmer for couple of minutes. Let it cool slightly before serving. You may need to add more salt if required.

In India many people often add a little ghee (clarified butter) on top just before serving to give it that extra delicious taste. If you are watching your waste line simply ignore this step!

***********************************************************

Fried Marrow Skin – Khosa Bhaja

Skin of a marrow

1 tbsp vegetable/mustard oil

1 tsp nigella seeds

1/2 tsp turmeric powder

pinch of chilli powder (optional)

1 green chilli, finely sliced

1 tsp salt

1. Peel the skin of a marrow and slice into fine, small strips. Place in a pan of boiling water and gently simmer for a couple of minutes.

2. Strain and place to one side. Heat a pan with oil and when it is hot add the nigella seeds. After a few seconds add the marrow skin followed by the turmeric, chilli powder, green chilli and salt. Cook on a low heat until the marrow skin begins to bronze.

Serve with the marrow dal above.


Mung Bean and Cumin Dal and Durga Puja Festivities

This past weekend has been one of celebration as it was Durga Puja. For Bengali Hindus (my husband’s side of the family) Durga Puja is the biggest religious festival in the Hindu calender. In Kolkata, which is the heart of Bengal, I am told it is taken to another level altogether, when families feast, dance and pray to the goddess Durga – the conquerer of good over evil and the mother of the universe, as well as her children: Ganesh, Saraswati, Lakshmi and Kartik. Schools close and everyone takes time off work to celebrate.

The statue of goddess Durga on her lion fighting the demon Mahishasura in the Hounslow Pandal

Tooting Goddess Durga 

The making of the statues is a hugely lucrative business in India and at the end of the six day festival the statues are ceremoniously carried to the Ganges and left to drift away and be reabsorbed into the Ganges. The statutes themselves are made of straw and mud from the Ganges and then glazed with paint to give them that glossy shine; the craftsmanship and detail never ceases to impress me.

There are thousands of Durga Puja pandals, which are basically huge structures housing the goddess and her children, erected all over the different Kolkata neighbourhoods. It’s all hugely competitive and each pandal competes for attention in beauty and innovation. I visited two different ones in London – one in Tooting and the other in Hounslow and both were very spectacular in terms of colour and design, the latter I know had been shipped from Kolkata.

Ganesh – one of Durga’s offspring in the Hounslow Pandal

The banging of the drums, the blowing of the conch shell, the incense, the chanting of the prays and hustle and bustle of people coming and going really transports you to India. It’s all rather frenetic and yet very warm and inviting at the same time. In the Hounslow pandal alone thousands of visitors came and went over the course of a few days. Catering for that number must be rather daunting but I was very impressed by the taste and quality of the food and the fact that it was all hot. It was the longest queue for food I have ever witnessed, but it moved quickly and before long we were given a plate of tasty vegetarian food.

Some vegetarian cuisine given to those who attended the Hounslow puja in London

Back at home I have been cooking an endless amount of Indian dishes from: methi and pomegranate pork curry to amma’s chicken curry, red lentil dal with spinach, yellow dal with courgette, Bengali fish curry and mung bean and cumin dal.

It is the mung bean dal recipe that I wanted to share with you all today. Unlike red split lentil and some yellow dal it does require a little more forward planning as it needs to be soaked, ideally overnight.

It’s delicious, nutritious, cheap to make and other than the soaking of the mung beans, is very straightforward. My mother-in-law makes a completely different tasting mung bean dal, which I will post another time, but to get you started try this one and let me know how you get on. It’s perfect for a week night vegetarian supper.

Mung Bean and Cumin Dal

Serves 4

250g mung beans (also referred to as moong bean), soaked overnight

3 tbsp mustard oil

1 white onion, finely chopped

1 tsp cumin seeds

1 tsp turmeric

half tsp red chilli powder

half tsp garam masala powder

half tsp cumin powder

1 tsp salt

juice of half a lemon

fresh coriander to serve

1. Place the pre soaked mung beans in a pan and cover with water and gently simmer until softened. This will take around 40 minutes.

2. Meanwhile, place the oil in a pan and gently fry the cumin seeds for a minute or so until they begin to bronze. Immediately add the onion and mix together with the cumin seeds.

3. When the onions have softened and become translucent add the cumin powder, red chilli powder, turmeric and garam masala and stir together.

4. Drain the mung beans and then transfer them to the pan with the onions and fold in thoroughly. Add the salt and lemon juice and simmer together for a further 5-10 minutes. You may need to add a little more water at this stage.

Whilst it is delicious to eat on its own or with a chapati it is also great to accompany it with a fish, meat or vegetarian curry (see my recipe library) if you wish to make a more substantial Indian feast.

Mung beans soaked overnight

Step 3 above


Bavani’s Cinnamon and Ginger Dal (Parripu)

Very recently I was served this comforting and fragrant dal by my Sri Lankan friend, Bavani. It tasted so darn good that I immediately asked her what she put in her red split lentil dal and proceeded to cook it the following night for the toughest of critics….my husband AND father-in-law. Yes I am definitely keen and eager when I come across a good recipe! They both gave it a definite thumbs up and declared it was unlike all the other dals they eat on a regular basis.

Don’t get me wrong I love my red split lentil dal, but this one tastes so completely different that I will definitely be cooking it from time to time. It’s not a true Sri Lankan dal or parripu, as it is known in Sri Lanka, but instead Bavani’s version of lentil soup for the Western diet. A true Sri Lankan dal would contain turmeric, green chilli mustard seeds, curry leaves, curry powder etc, but I think Bavani’s alternative will definitely appeal to a wide audience. It has a gentle chilli kick and subtle cinnamon and ginger undertones, very different from my red split lentil dal which has turmeric and panch phoron.

Red split lentils are the easiest of all lentils to cook as they are cooked in 10 minutes and do not need any soaking first – so perfect for a quick meal when you are tired and exhausted after a manic day. They are also really cheap and most importantly – healthy, so perfect for the bank balance and general well-being.

Bavani’s Cinnamon and Ginger Dal (Parripu)

Serves 4

400g red split lentils

2 tbsp mustard oil (or vegetable if you don’t have mustard)

1 whole garlic bulb, peeled and sliced

1 thai red chilli, thinly sliced

2 cinnamon bark sticks

half tsp of asafoetida

1 tsp cumin powder

2 inch of fresh ginger thickly sliced

2 carrots, sliced into small cubes

1 tsp salt

fresh coriander, chopped to serve

1. Place the red split lentils in a pan and run under cold water and wash through thoroughly, using your hands, a couple of times. This is to clean the lentils before cooking them.

2. Place boiling water into the pan with the red split lentils so that there is a good inch of water above the lentils. During the course of the cooking you may need to add more boiling water if all the water has been soaked up or if you prefer the dal to be more soup like in consistency! The lentils should be cooked after ten minutes – if you place one lentil between your forefinger and thumb it should be soft to touch; the colour will also have lightened.

3. In a large separate saucepan/wok heat the mustard oil and add the garlic and red chilli and gently cook for a couple of minutes before adding the carrots, cinnamon bark, cumin powder, asafoetida and the fresh ginger. (You want to keep the ginger fairly thickly sliced so that they are easy to identify and scoop out before serving). On a low heat mix the ingredients together for roughly 6 minutes.

4. Transfer a large spoonful of the cooked red split lentil dal to the saucepan and mix together and then place all the ingredients BACK into the saucepan with the dal. Stir in throughly and add the salt – to taste.

5. Let the dal simmer for a further five minutes or until the carrots are completely soft. You may find you need to add a little more boiling water at this stage. It is not an exact science but more one of personal taste. Add a little water at a time as you can always add a little more if necessary.

 6. Before serving scoop out the fresh ginger and cinnamon bark. Serve with fresh coriander and eat either on its own, with rice or a chapati.

It also works really well accompanying Speedy Salmon Curry,  Goan Hot and Sour Pork Curry, Chicken Liver Curry, Goat Curry


Chickpea Curry with Tomatoes, Spinach, Fresh Mint and Coriander

After a full on Monday there is nothing more exhausting than having to cook a long and complicated recipe for supper. So I always try to cook something healthy, tasty and speedy in equal measure. I have always loved the taste of chickpeas and find they compliment so many dishes, but for this dish they feature as the main ingredient. There are so many good chickpea curries I was in a quandary on which to show you first, but settled with this one as it can be prepared and cooked within 15 minutes. Seriously it is so fast you’ll impress even yourself. The fresh mint and coriander, whilst not usually paired together, compliment each other well in this dish as the mint gives a sweet undertone that balances really well with the bold coriander and all the other Indian spices.

I cook this curry using canned chickpeas (shock horror), which will save you having to soak them overnight and boil them for an hour or two. Whilst the curry is perfect to eat on it’s own, if you want to make more of a feast you could cook this delicious salmon curry, which also takes no time at all. I will be eating mine with some wholemeal pitta bread, a dollop of natural yoghurt and squeeze of lemon. Simple and yet satisfying, I hope you agree.

Chickpea Curry with Tomatoes, Spinach, Fresh Mint and Coriander

Serves 2 (as a main meal or up to 4 if having other dishes)

1 tin of drained chickpeas

2 tbsp ghee (or ground nut/mustard oil)

2 green chillies, chopped

1 onion, chopped

2 garlic cloves, chopped

1 tsp ground turmeric

1 tsp paprika

1 tsp garam masala

1 tsp ground cumin

1 tsp ground coriander

2 large tomatoes, chopped

1 handful chopped fresh mint

1 handful chopped fresh coriander

2 handfuls of fresh spinach

1 tsp salt

50ml boiled water

1. Heat the ghee/oil and when it is nicely hot add the chopped onion, garlic and chillies. After a few  minutes, when the onions are beginning to brown slightly, add the ground turmeric, ground cumin, ground coriander, paprika (I use this hot paprika one I mentioned in this blog post) and garam masala and stir into the onions, garlic and chillies. Leave to simmer gently for another minute.

2. Add the chopped tomatoes, mint and coriander and again stir into the other ingredients. The smells coming from your pan will be heavenly!

3. After draining the chickpeas add them to the curry and stir in thoroughly. As the curry will seem a little dry at this stage, add the boiled water and stir into the ingredients. Leave to simmer for a few minutes.

4. Add a couple of handfuls of fresh spinach and stir into the curry. Once it is wilted (this will only take a minute) leave the curry to simmer for a couple more minutes. If you think it is still a little dry just add a little more water. Add the salt and stir into the curry before letting it rest for a short while before eating. Equally you can cook it earlier in the day and simply reheat it when you are ready to eat in the evening, although you will have to add a little boiled water when you re-warm it.