Homemade Gnocchi with Basil Pesto and Roasted Cherry Tomatoes

IMG_8522

Have you ever made homemade gnocchi? I am sure the cynics out there will say it’s way too time consuming and just buy a packet instead. Killjoys would be my response. Not only is it ridiculously straight forward and freezes really well but it is also great fun, especially if you get your children involved. Mine are on half term, so it was a perfect activity to do on a rainy morning. If you have ever made your own play dough then you will find making gnocchi super easy.

IMG_8494

After gently boiling 1kg of potatoes in their skins until they are soft – under an hour, you peel them and then put them through the mouli  when they are still hot and the skins now removed.

IMG_8498

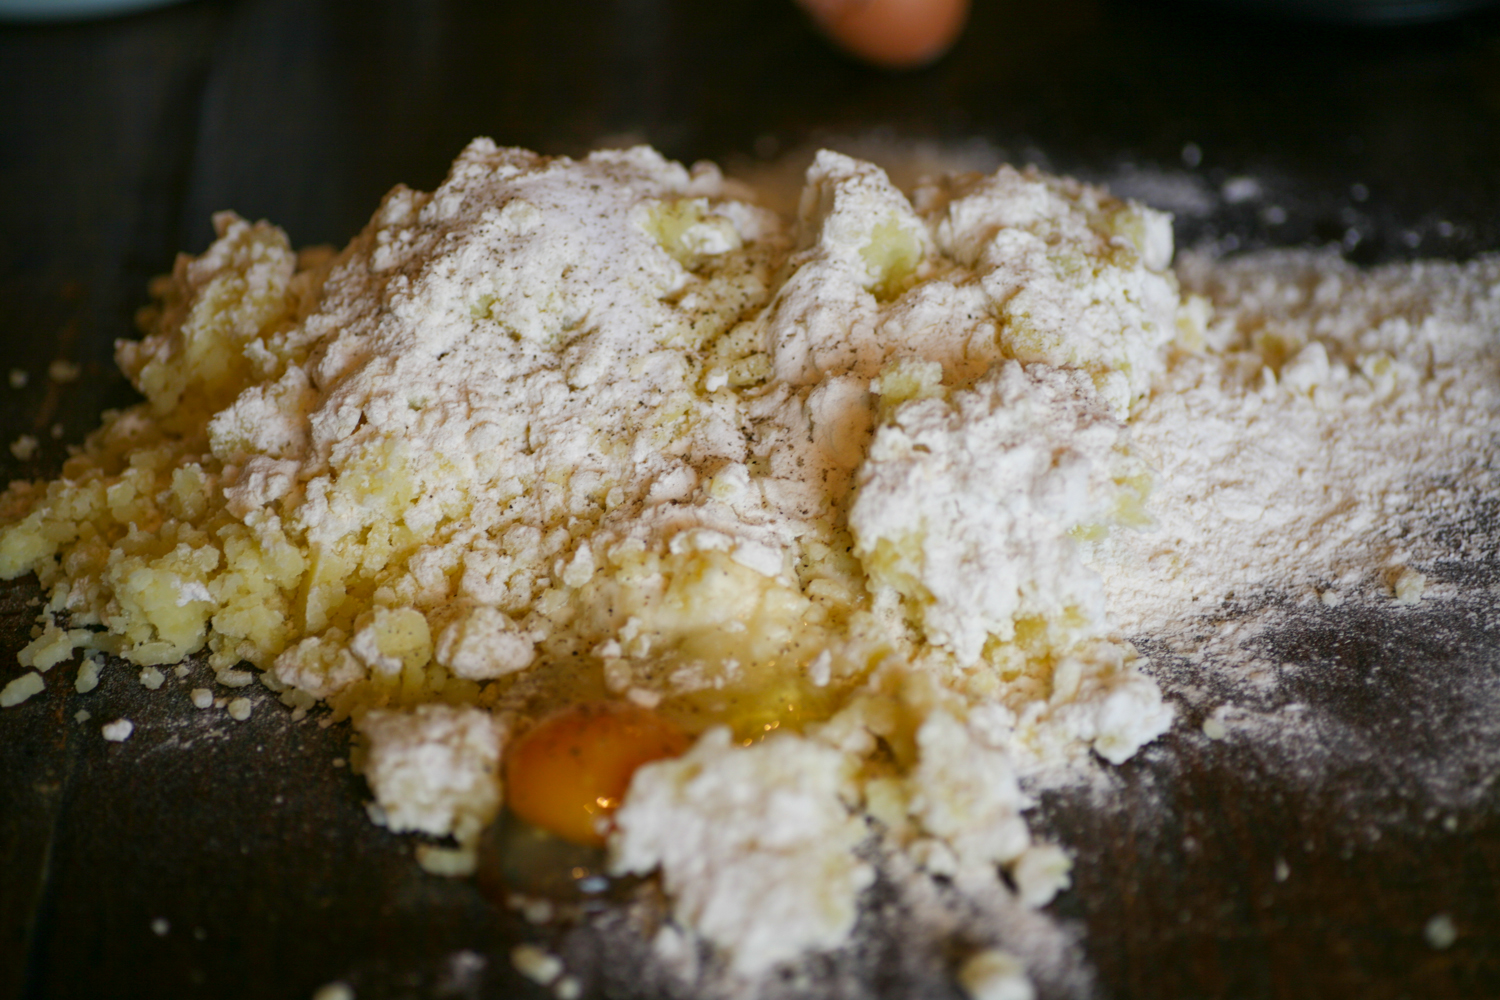
Mix the potato, pasta flour, egg and seasoning on a clean surface using your hands – now this is the fun bit!

IMG_8506

It won’t take long before you will have created a large warm dough ball.

IMG_8508

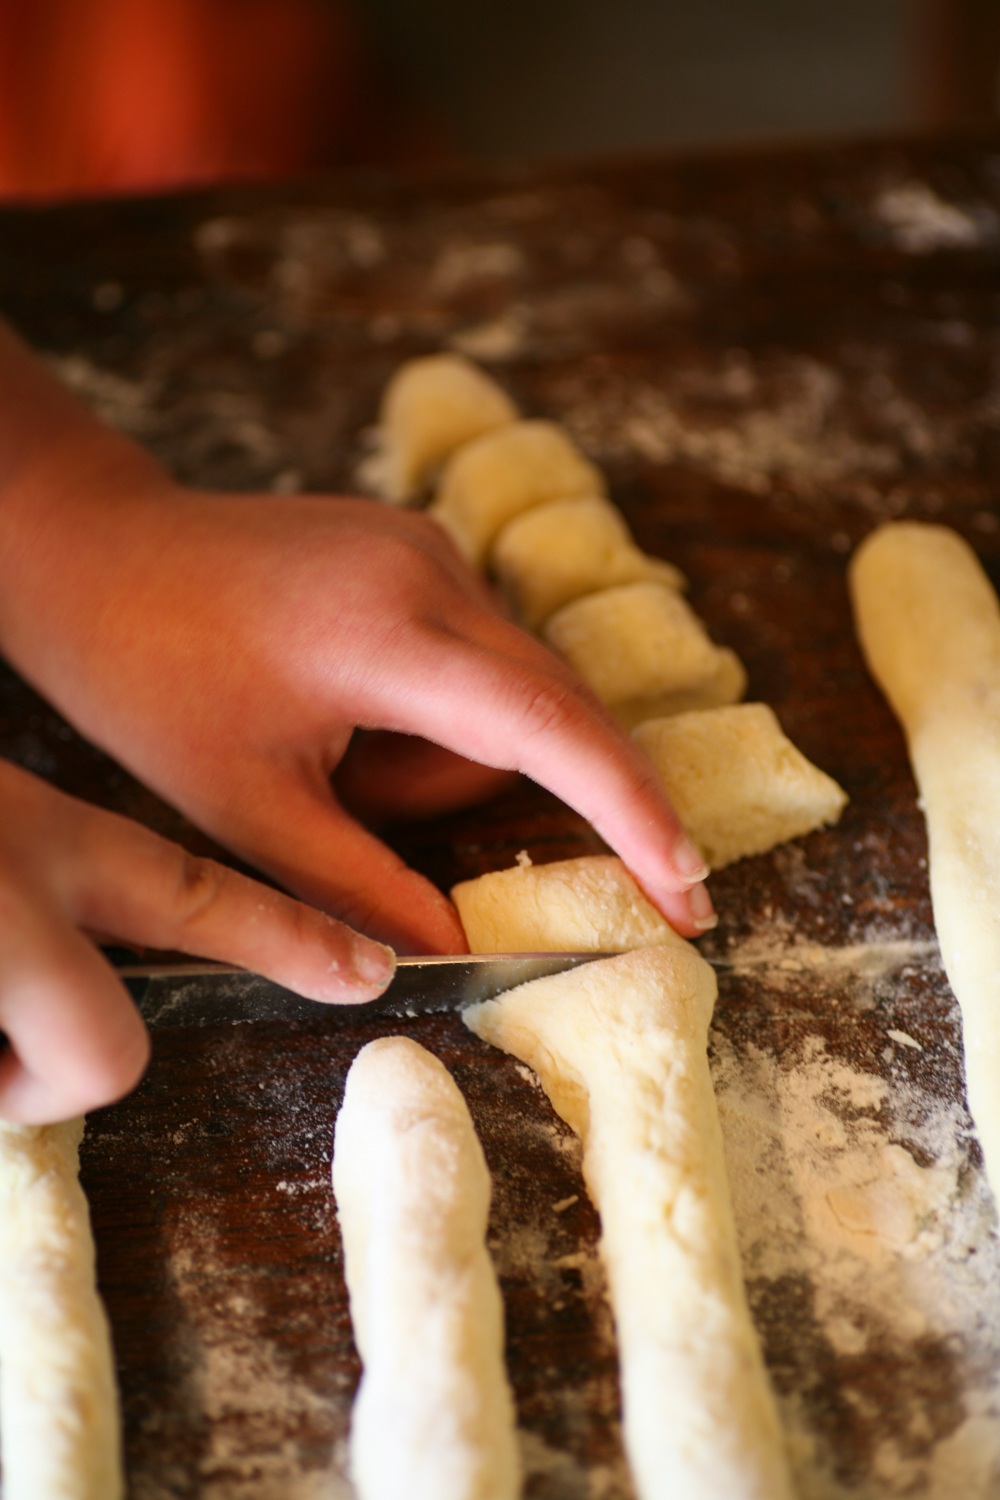
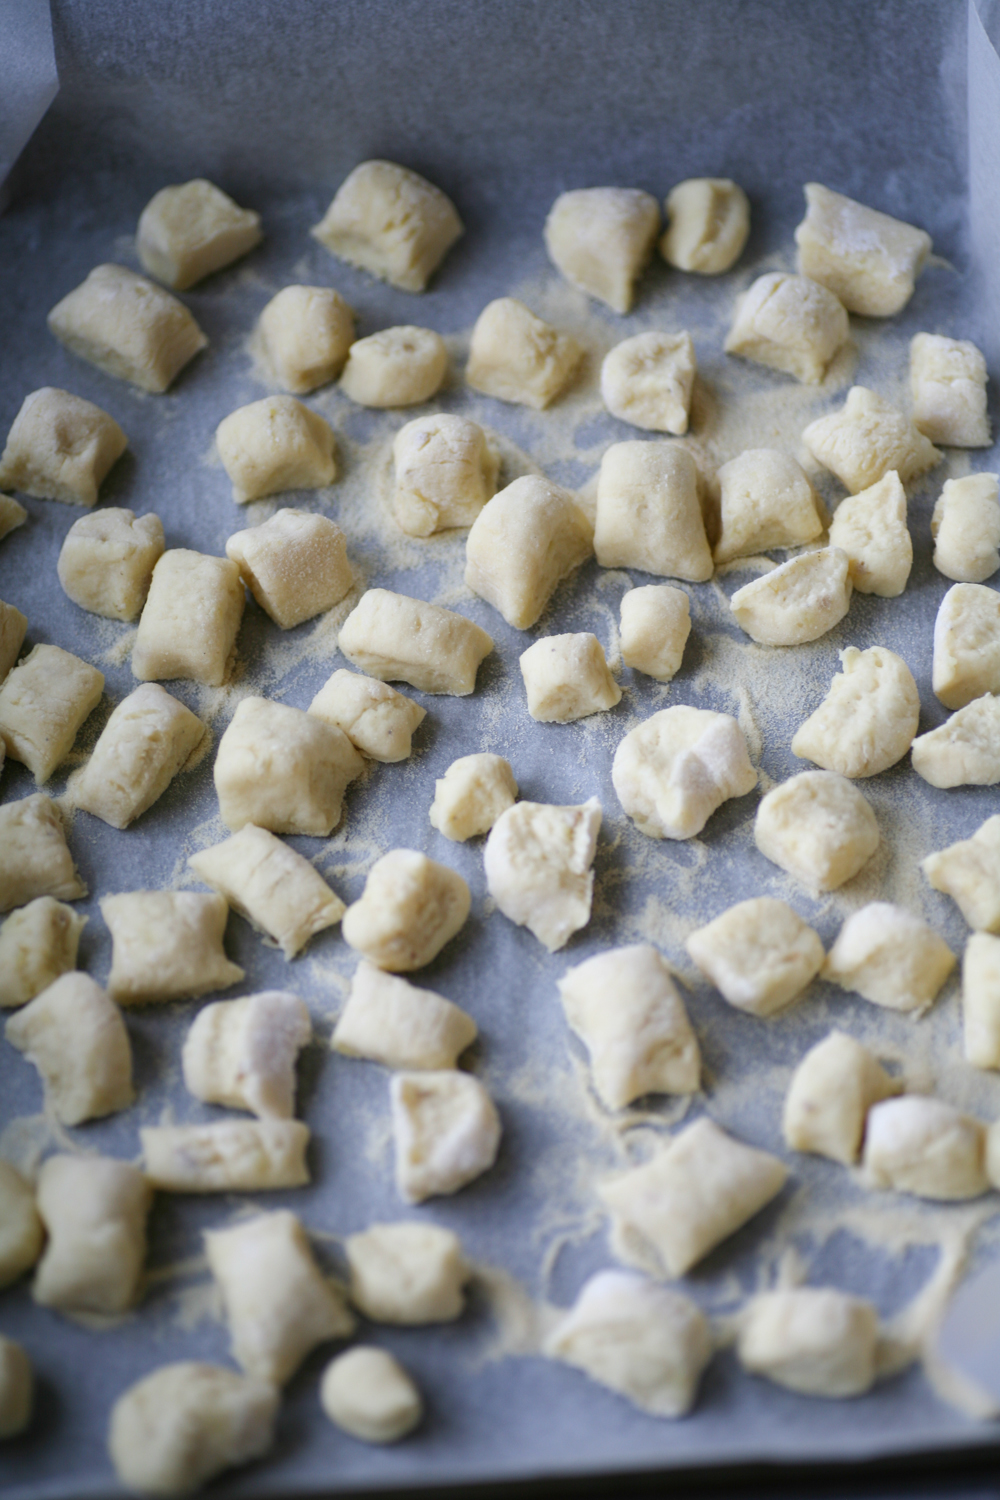
Split the dough into small balls and then roll out into long stripes. You want then to cut them up into bite sized morsels – see photos above and below.

IMG_8512

IMG_8513

Place the bite sized cubes onto a tray with greaseproof paper which is already scattered with semolina or flour. You can either freeze them like this on the tray and when they are frozen transfer into freezer bags. Equally if you are going to eat them immediately, prepare a pan of boiling water and then drop them into the water. When they rise to the top they are ready and you simply need to remove them with a slotted spoon.

IMG_8519

There are so many combinations that are so tasty to eat with gnocchi. If you fancy a sausage and fennel ragu then see my recipe here. Today we decided to make some homemade basil pesto and then roast some cherry tomatoes in the oven for a short while.

IMG_8564

A simple and most satisfying meal that is loved and cherished by the whole family. What sauces do you like to have with your gnocchi? Leave a comment below to let us all know.

IMG_8567

Basil Pesto

serves 4-6

40g fresh basil leaves

50g pine nuts

4 garlic cloves

6 tbsp extra virgin olive oil

30g pecorino cheese

salt to taste

1. In a blender add all the ingredients and whizz for 30 seconds. Season to taste.

That easy !

****************************

Roasted Cherry Tomatoes

250g cherry tomatoes

1 tbsp olive oil

rock salt

1. Place the cherry tomatoes in a baking tray and pour the olive oil on top with a sprinkling of rock salt.

2. Place in an oven at 180 degrees for 20 minutes.

************************************

Homemade Gnocchi

serves 4-6

1 kg floury potatoes (King Edwards, Maris Piper etc)

300g ’00’ pasta flour (you can get this in any supermarket)

1 egg

1 tsp salt

few twists of black pepper

1. In a pan of boiling water add the potatoes, with the skins on – this will make them less watery – until they are soft. Depending on the size this will take under an hour.

2. Drain the water from the pan and using a fork and knife peel the skin from the hot potatoes and place them in the mouli one at a time. Turn the mouli handle around so that the potato goes through the mechanism.

3. Turn the potato out onto a clean surface and add the flour, egg, salt and pepper. Using your hands fold the ingredients into one another so that you form a compact dough ball.

4. Split the dough into smaller parts and roll into a long sausage using your hands, so that the dough is roughly 2cm thick.

5. Using a knife cut the dough sausage into bite sized cubes and place on a tray with baking paper scattered with either a little flour or semolina.

6. If you are freezing then place then in the freezer like this until they are frozen, then transfer to a freezer bag.

7. If using immediately then boil a large pan of water. Add a little salt and gently place the gnocchi in the water. When they rise to the top you can remove them from the water using a slotted spoon.

8. When they are still hot mix thoroughly with the basil pesto and place on a serving platter, sprinkled with the roasted tomatoes.

Serve immediately when hot.


Moroccan Giant Couscous Salad and a Mung Bean, Carrot and Feta Salad

IMG_8380

I had a few girlfriends over for lunch this week and thought it might be helpful to give you the low down on some of the things I prepared which allowed me to have a stress free time. Planning ahead is absolutely essential. There is nothing worse than having to fret over food last minute when all you really want to be doing is catching up with everyone. I tend to opt for large healthy salads and then prepare a hot soup of some sorts to warm the belly and soul.

IMG_8373

So first up was a mung bean, carrot and feta salad with cumin, caraway and fennel seeds. It requires some forward planning in that you need to soak the lentils overnight, but other than that it is very straightforward and ticks all the boxes for healthiness and importantly tastiness.

IMG_8388

Then I prepared my Vietnamese inspired salmon, cucumber, red onion and grapefruit salad with a mirin lime dressing. I posted it on my blog about a year ago. Check out the recipe here.

IMG_8390

Then I made one of my absolute favourite salads – a miso soy chicken with spinach, lentils, slow baked tomatoes, green  (you can use puy, beluga whatever takes your fancy) lentils and pine nuts. Recipe here. I opted to make my own slow baked tomatoes – you can find a recipe for them at the bottom of the post if you click here. Very easy to prepare and taste so delicious.

IMG_8389

To balance out the flavours, palate and colours I then prepared a Moroccan influenced salad of giant couscous, Moroccan spices, sultanas, pine nuts, fresh mint and pink lady apples. Recipe below.

IMG_8387

Excuse the rather hazy shot of the final ‘salad’, but I opted for shredded duck with pomegranate, spring onions, mint and coriander with a raspberry vinegar dressing. I posted the recipe here on my blog a while ago.

The hot soup that I prepared I completely forgot to take a photo of – so I will do a separate blog post on that another time – but it was a red lentil (I am slightly obsessed by these delicious little beauties), coconut milk and smoked paprika with a chilli oil and fresh coriander sprinkled on top.

Needless to say I cooked far too much of everything so will be eating tasty leftovers for the next few days!

IMG_8386

I’ll leave you with a pretty flower shot. I am so pleased that finally some of the wonderfully colourful and sweet smelling flowers are beginning to grace our florists.

Until next week folks…..

Moroccan Giant Couscous Salad

Serves 4-6

Inspired by a similar recipe from Red Magazine online

300g giant couscous

1 tbsp butter

50g sultanas

1 tsp smoked paprika

1/2 tsp cinnamon powder

1/2 cumin powder

2 shallots, finely chopped

1 garlic, finely grated/chopped

2 tbsp toasted pine nuts

handful of fresh mint, chopped

zest of a lemon

1 red chilli, finely chopped (half if you prefer it less hot)

2 pink lady apples, diced and cored

1. Place the couscous in a pan and completely cover with boiling water. Simmer gently for 6-8 minutes so that the couscous is soft. Strain and run under the cold tap. Shake off the water as much as you can. Place to one side.

2. Using the same pan melt the butter and then add the sultanas so that they are completely coated in the melted butter.  Now add the ground cinnamon, cumin and smoked paprika and simmer for one minute and then place to one side.

3. Dice and core the apple (if serving at a later stage hold off on cutting up the apple until almost ready to serve as it will begin to bronze), deseed the chilli and finely chop. Finely chop the shallots and grate the ginger and garlic cloves.

4. In a mixing bowl add the couscous, the sultanas with all the spices and butter juice and mix together. Now add the shallots, ginger and garlic and continue to fold into the couscous.

5. Scatter the apple on top along with the mint and lemon zest and serve.

Leftovers can easily be stored in the fridge for a couple of days.

*******************

Mung Bean, Carrot and Feta Salad with Cumin, Caraway and Fennel Seeds

Adapted from Yotam Ottolenghi’s recipe in ‘The Guardian’

Serves 4-6

300g dried green mung beans

1 tbsp chilli oil (or olive if you prefer to have less of a kick)

1 tbsp olive oil

1 tsp cumin seeds

1 tsp fennel seeds

1 tsp caraway seeds

2 tbsp white wine vinegar

2 garlic cloves, peeled and finely chopped

1/2 tsp dried chilli flakes

3 good sized carrots cut in to batons

1 tsp salt

1/2 tsp sugar

150g feta, crumbled (not finely)

handful of freshly chopped coriander

1. Soak the dried mung beans overnight in water that completely covers them.

2. The following day, rinse them a couple of times in cold water and then place them in a pan and cover with boiling water. Simmer gently for 25-30 minutes to soften them but so they still retain a bit of a bite.

3. Drain and rinse through cold water and set to one side in a large bowl.

4. In a small pan add the chilli oil (or olive see above) and when hot add the seeds and allow them to start popping, which will take no longer than 30 seconds. Stir a couple of times and then transfer the seeds and oil into the large bowl with the drained mung beans.

5. Add the white wine vinegar, garlic, chilli flakes and stir in together.

6. In a separate large shallow pan lay the carrot batons and almost cover with cold water. Add one further spoonful of olive oil along with the sugar and salt. Simmer on a high heat for 7 minutes by which time the carrots will have soften and the water will have drastically reduced – drain any excess. The sugar will allow the carrots to slightly caramelise.

7. Add the carrots to the mung beans and stir in gently. Add more salt if necessary. Transfer to a serving platter and crumble with feta.

Again this stores well in the fridge for a couple of days.

IMG_8394


Chana Masala at L’atelier des Chefs by St Paul’s Cathedral

IMG_8345

A stone’s throw away from the iconic St Paul’s Cathedral in the heart of the city of London you will find Foster Lane and nestled down it at number 10, the cookery school and cook shop, ‘L’atelier des Chefs‘. This is one of two – the other is in Wigmore Street – soon to be three locations of the cooking school, with a further 17 across the water in France.

IMG_8368

Originally set up by two French brothers, Nicolas and Francois Bergerault who wanted to bridge the gap between chefs and the day to day cook. The ethos of the company was to bring people back in the kitchen, around the table and share the love of cooking. The brothers have hired passionate and skilled chefs to teach cooking classes to budding food enthusiasts. Classes range from half an hour, whereby you cook one dish over a lunch time or after work, to a four hour ‘chefs masterclass’, therefore appealing to those of all standards and budget. Class sizes also range from small intimate groups to larger corporate events/team bonding; there is even a class for kids so everyone is included and encouraged.

IMG_8367

I headed down there earlier this week with my mother in tow. I enlisted the pair of us on the Indian cooking session. Whilst I am very comfortable around the spice rack and cooking Indian food, my mother, who is a fabulous cook, is slightly less comfortable cooking a curry. I was keen to see if the session would appeal to both of us.

IMG_8310

We were greeted by friendly staff who offered us teas and coffees before class began. There were seven of us in our class and we were introduced to chef Daniel Stevens who has just returned from an extended visit to Kochi in Kerala, India, where he has been working closely with Lily Vanilli and Atul Kochhar in their new joint venture, Bloomsburys Cafe, which focuses on celebrating Kerala flavour in Western style patisserie.

IMG_8290

Introductions over we rolled up our sleeves, washed our hands and began slicing, dicing and chopping away. Over the course of the morning we all helped to prepare a lamb rogan josh (lamb curry), chana masala (chickpea curry), vegetable pakoras (similar to an onion bhaji) with a tamarind chutney and saag aloo (potato and spinach curry). We all took turns with stirring and adding ingredients and all tasted for spiciness and saltiness along the way. I liked how Daniel allowed the class to decide if more salt, spice, sourness or sweetness was required in a particular dish. After all Indian cooking is not an exact science like baking where exact measurements are integral to the success of the cake or bread. Indian cooking allows you to be a little flexible with measurements and a more ‘go with the flow approach’ to creating a dish – something that definitely appeals to my style of cooking.

Time raced by and after two hours we had prepared all the dishes. We all sat down on a long table, admired the curries we had created and dived in before anything got cold. We all agreed that the morning had been a real success. We had all picked up new tricks and skills and unanimously agreed that we would all be able to replicate the same dishes again in the comforts of our own home kitchens. Would we return? Most definitely. In fact a couple of my class mates were already on their third return visit and if that isn’t the seal of approval on a fun and informative cooking school, I don’t know what is.

After squeezing in second helpings we were given goodie bags to take home some more. We said our goodbyes and headed out into the rain with a glow in our bellies and a spring in our step.

Chana Masala

Adapted from the L’atelier des Chefs recipe.

Serves 4-6

250g tinned chickpeas

2 tbsp vegetable oil

3 whole cloves

1 whole cinnamon stick

3 green cardamom pods, split open

2 medium sized white onion, finely sliced

1 tsp turmeric

1 tsp red chilli powder

2 tsp ground coriander

2 inch fresh ginger, peeled and finely grated

2 whole garlic, finely grated

4 tomatoes, chopped into small bits

150ml vegetable stock

1 handful of fresh coriander

2 tsp rock salt

1 lemon, juice

1. Heat a saucepan and add the vegetable oil. When it is hot add the cloves, cardamom pods and cinnamon stick and allow the aromas to be released. After a minute add the onion to the pan and cook on a medium heat for around five minutes until it begins to soften and brown.

2. Now add the turmeric, chilli powder and ground coriander and give a good stir. Add the garlic and ginger and stir to make sure they do not burn at the bottom of the pan. Adding a very little water helps to prevent burning!

3. Add the tomatoes and allow them to soften for a few minutes before adding the vegetable stock and chickpeas and allowing the curry to simmer and soften gently. Allow the juice to soak up and if it becomes too dry then just add a little more water.

4. After ten minutes add some salt to taste and then turn off the heat and scatter the fresh coriander on top. Before serving add some lemon juice

Chilli and Mint was a guest of L’atelier des Chefs. You can find more details about the course and other courses on offer here.


Indian Aubergine/Eggplant, Peanut and Tomato Curry

IMG_8109

Have you ever been a little ambivalent about aubergine/eggplant? On the one hand loving their smooth, shiny plum coloured exterior but never really in raptures about the taste. Well my other half, Mr B, tended to fall into this category, so a while ago I set out to prove him wrong.

IMG_8072

After mutterings of ‘you know aubergine is my least favourite vegetable, I prefer greens’, he tasted one mouthful and that completely shut him up. Murmurs of approval were given between mouthfuls and a 9/10 score (yes we regularly mark our food – is that unusual?). RESULT. Surprisingly my eldest child also adored it, surprising as it does have a fair amount of chilli in it! If you don’t like chilli, but like spice, just reduce or take out the chilli in the recipe below.

IMG_8093

The combination of aubergine, peanuts and sesame seeds works ridiculously well together so much so that you will have to restrain yourself from wanting to guzzle up the whole dish. Combine that with a spiced onion and tomato sauce and you have yourself a winning dish.  So put your assumptions to one side for a moment and give this recipe a whirl and I can assure you you will be more than pleasantly surprised.  I couldn’t resist the bijou aubergines on sale at my local market but a regular sized aubergine will work equally well. Just slice the aubergine into chunky chip sized pieces, keeping the skin on of course.

IMG_8097

Indian Aubergine/Eggplant, Peanut and Tomato Curry

450g baby aubergine/eggplant (normal size is fine too), sliced lengthways or chunky chip sized if using a regular aubergine

cooking oil, enough to deep fry the aubergine

2 tbsp olive oil

1 tsp black mustard seeds

1 tsp cumin seeds

2 dried red chillies

1 small green chilli, finely chopped (optional)

5 curry leaves (fresh or dried)

1 tsp turmeric powder

1 tsp of garlic paste

1 tsp ginger paste

1 white onion, finely chopped

200g chopped fresh tomatoes

1 tsp coriander powder

1 tsp cumin powder

1/2 tsp Kashmiri chilli powder

2 tbsp salted peanuts

1 tbsp sesame seeds

150ml water

1 tsp salt (to taste)

1. If using baby aubergine/eggplant slice lengthways removing the stalk. If using a regular sized aubergine slice into chunky chip sized, again removing the stalk. Once sliced, immediately place in a pan of boiling oil to sizzle away and bronze. This should take no longer than ten minutes.

2. Remove the aubergine with a straining spoon and place on some kitchen roll whilst you prepare the next steps.

3. In a new large pan add the olive oil and when hot add the mustard and cumin seeds. They will begin to pop immediately so move them gently around the pan for 15 seconds before adding the dried red chilli, fresh small green chilli (optional), curry leaves (fresh or dried), turmeric, garlic, ginger paste and onion. Continue to cook on a medium heat for around 7 minutes by which time the onion should have nicely softened, but not bronzed.

4. Add the chopped tomatoes, coriander, cumin and Kashmiri chilli powder and simmer for a further 5 minutes, by which time the tomatoes will have totally softened and blended into the sauce. Return the aubergines to the pan and fold gently into the sauce.

5. In a small pan dry roast the peanuts and sesame seeds for a couple of minutes, making sure to constantly move them around the pan so that the heat is evenly distributed and they do not burn. They will begin to bronze at which point you need to remove them from the pan.

6. Using a spice grinder (definitely one of my most useful items I own in my kitchen) – this is the one I use – see here – grind the peanuts and sesame seeds together to form a paste.

7. Add the peanut sesame paste to the pan and stir into the curry, adding more water if necessary. As I used salted peanuts I only needed to add a little more salt. Simmer for a few minutes and serve. If cooking ahead and leaving to rest you will have to add a little more water when heating up.

Serve with rice or Indian bread and you have yourself a vegetarian – in fact vegan – treat. Try it and leave a comment below.

IMG_8116


Chickpea, Tomato, Spinach and Feta Soup

IMG_8018

With a guest over recently, I found myself improvising with some ingredients to bulk up lunch. It was an unplanned creation and hence the results were all the more exciting and satisfying.  I literally threw together some ingredients I already had in the house to make a very comforting and warming soup/vegetarian stew. It took under fifteen minutes from fridge to stove to table and the silence as everyone delved into their bowl with concentration, was deeply reassuring. As they came up for air, the verbal endorsements confirmed this.

IMG_8036

It’s important to be able to whip up a meal in a matter of minutes. We all need an arsenal of these for when we have little energy or inclination to cook but want to be nourished by good home-cooked food. You can’t beat home-made soups – not only do they taste better, but you can also monitor exactly what goes into them.

I always have a range of tinned lentils on standby to use for soups, stews and salads, so for this soup I used a tin of trusty chickpeas. Everything else I had in my pantry (aka pull out cupboard…buy hey we can dream!) or in the fridge. I always have a pack or two of feta in my fridge as it can last unopened for around three months.

IMG_7992

Chickpea, Tomato, Spinach and Feta Soup

2 tbsp olive oil

3 garlic, peeled and roughly chopped

1 banana shallot (or small white onion), peeled and roughly chopped

2 large red chillies/chilli peppers (not the hot variety), chopped into inch pieces

4 fresh tomatoes, diced

1 x 400g tin of chopped tomatoes

1 x 400g tin of chickpeas

1 tsp of sweet paprika

1 tsp vegetable bouillon

200ml boiling water

1 tsp rock salt

pinch of black pepper

200g fresh spinach

100g feta, crumbled

1. Heat the olive oil in a large pan and when it is hot, but on a medium/low heat, add the shallot and garlic and gently fry.

2. After a couple of minutes add the chilli/chilli pepper and continue to stir for a further couple of minutes.

3. Add the fresh tomatoes and continue to cook on a medium/low heat until they begin to soften. Add the tinned tomatoes to the pan and stir into the other ingredients.

4. Now add the drained chickpeas, the sweet paprika, vegetable bouillon, salt and the boiling water. Give a good stir and let simmer for a couple of minutes.

5. Finally add the fresh spinach and place a lid on the pan. After a minute give a good stir and add a little more boiling water if necessary. Taste and season.

6. Ladle into bowls and sprinkle with a liberal amount of feta.

All these steps will not take more than 15 minutes max to prepare and cook.

IMG_8034


Ivy Gourd Curry – also known as Gentleman’s Toes

IMG_7967

We all know that lady’s fingers is okra right? But gentleman’s toes? I had no idea there was a vegetable with such an unappealing name, I mean seriously who wants to eat a gentleman’s toe?

IMG_7931

My Bengali mother-in-law introduced them to me only recently and since then I have become hooked. They look similar, and taste not dissimilar in fact, to gherkins which we are huge eaters of in my household – seriously we get through jars of them, even my four year old has a weakness for them. Gentleman’s fingers is also more commonly known as ivy gourd or in Bengal they are known as kundri. Baby watermelon or little gourd are two other names by which they are known.

IMG_7952

Granted, you are unlikely to find them at the big supermarkets but head to any Indian subcontinent grocers and you’ll stumble across these fabulous little vegetables. I know for a fact that you can source them in Tooting and I imagine the same goes for Brick Lane, Southall, Hounslow etc. They are commonly eaten in India and are a great source of vitamin A and C. Eaten alongside a dal and you’ll have a very filling and tasty vegetarian supper.

IMG_7976

Ivy Gourd Curry

Serves 4

550g ivy gourds/kundri/gentleman’s fingers, halved lengthways

4 tbsp olive oil

1 green chilli, halved

1 tsp nigella seeds

1 tsp turmeric powder

1 tsp chilli powder

 2 tsp cumin powder

1 tsp coriander powder

2 tsp salt (to taste)

2 tsp sugar (to taste)

2 tbsp water

1. Heat a large pan with the olive oil and when hot add the nigella seeds followed by the green chilli. After  20 seconds add the ivy gourds and stir into the oils and nigella seeds. Leave to cook on a low heat for 5 minutes.

2. Add all the other ingredients and give a good stir and then place a lid on the pan and leave to simmer, stirring a couple of times, for 20 minutes or until the ivy gourd is soft but not mushy!

So simple and yet ridiculously satisfying.

I hope you get to stumble across these little beauties before too long.


Broccoli, White Beans and Lemons with Red Pepper Flakes

IMG_7917A very HAPPY NEW YEAR to you all. I hope that you saw in the new year in style. I tend to opt for more relaxed, low key affairs on New Years eve so that I can wake feeling as fresh as daisy on the first of January. I am always impressed by those who are able to take part in the Hyde Park New Year’s Day run or those who decide to enter the freezing waters surrounding Britain, which is becoming increasingly more popular as the years roll by. Typically my family go on a good long ramble and play board games in front of the fire. This year we’ll be playing a lot of ‘Pucket’, which was given to me this Christmas. It’s hugely addictive and really good fun and I’ve turned into a little demon playing it, much to the annoyance of my siblings. You can purchase your very own board here.

IMG_7916

As is often the way we all start the year with many good intentions, whether that be to exercise more, drink less, eat more healthily, read more, achieve more (* delete as appropriate) but as the months go by some of our good intentions begin to wane. I thought that I would lend a hand however on the eat more healthily part. I can bet that we’ll be seeing numerous detox diets and health programmes in the papers and magazines this coming weekend. I do think it is good idea to cleanse the body but to bear in mind that it is January and it is cold and therefore we do need those hearty dishes now and again to fill our bellies. Pulses, vegetables and fish is a great way to start off the year and to only eat meat products a couple of times a week – avoiding too much diary is also a sensible way to crack on with the year.

IMG_7922

I thought this recipe would be a great one to kick off the year with as you may already have all the ingredients in your kitchen waiting to be thrown together. It’s incredibly quick to prepare and can be eaten hot or cold, on its own or accompanied by some white fish or a crab cake perhaps. Tasty and packed with goodness, it’s definitely a feel good dish. Helen who runs the website ‘Well-Being Secrets’ has written an in-depth piece on the benefits of broccoli here, which is both fascinating and highly informative, so have a read. I also like Joey Bruno’s, founder of Thrive Cuisine, article here.

For those who had a ridiculously large night and are feeling a little worse for wear, might I suggest the health regime starts tomorrow and you tuck into some of these little beauties instead – see here.

Broccoli, White Beans and Lemons with Red Pepper Flakes

adapted from the December 2013 issue of Bon Appetit Magazine

Serves 4

3 large tbsp of olive oil

4 garlic cloves, finely sliced

3 anchovy fillets packed in oil

1 lemon, washed and finely sliced (pips removed)

225g broccoli, chopped into small florets

5 stems of fresh thyme

2x400g tins of cannellini beans, rinsed

200ml water

salt and pepper

generous pinch of red pepper flakes

2 tbsp parmesan, finely grated (plus a little extra for grating on top)

1. Gently heat the oil in a large deep pan and then add the garlic, lemons and anchovies, stirring occasionally to help break up the anchovies. Cook for 5 minutes before adding the broccoli florets and thyme and stirring into the juices from the lemon.

2. After a further 5 minutes add the cannellini beans and water and stir into the other ingredients. Season with salt and pepper, bring to the boil and then reduce the heat to a simmer allowing the flavours to blend together for a further 5 minutes.

3. Add the parmesan and stir into the ingredients and place a lid on the pan and take off the heat.

4. Turn out onto a serving dish and sprinkle with red pepper flakes (chilli flakes could also be an option here in fact) and an extra scattering of fresh parmesan.

IMG_7891

SaveSave


Aloo Shaak – Potato Curry

IMG_7716

Back in my university days I often used to make myself aloo shaak when I had the munchies. It was so quick, cheap and easy that it made a perfect snack to nourish my hunger. I would place it in a bowl with a dollop of natural set yogurt on the side and then dip the potato cubes into the natural yoghurt. Happy memories.

To this day I continue to cook it and often serve it up with a dal for a vegetarian supper, or as a complimentary dish if I am cooking a larger Indian banquet with a meat and/or fish curry. At this time of year when the cold sets in this bowl of carbs is highly appealing and is easy to feed to the whole family. As I only chop the chillies in two I find that it does not make the dish too chilli, unless of course you actually munch on the chilli – which I always leave for the adults to do.

IMG_7727

On the subject of munching chillies, if you are feeling a little under the weather I really recommend eating a cooked chilli either in a dish like this or one of my dal dishes (see under Recipe Library). Packed full of vitamin c, they give the immune system a good burst and can bring you back to the land of the living if you are feeling under the weather. Just remember if you ever find the chilli too hot, don’t drink a glass of water as that will spread the heat across the tongue, milk and yoghurt however are able to numb it as they contains a protein called ‘casein’, which breaks the bond between the the pain receptors in your tongue and capsaicin, which is an oil found in chilli – the seeds are always the hottest part so you can remove these if you prefer less of a kick.

Aloo Shaak – Potato Curry

Serves 4

600g sweet potatoes, roughly 1 inch cubes

600g white potatoes, roughly 1 inch cubes

3 tbsp vegetable oil

2 green chillies, chopped in two

2 tsp cumin seeds

1 heaped tsp turmeric powder

2 tsp rock salt

Optional: fresh coriander to serve and/or a dollop of natural set yoghurt

1. Place the cubed potatoes in a pan of boiling water for 13 minutes. You want them to begin to be soft, but not completely soft that they just fall apart!

2. Strain the potatoes. In a large pan heat the oil and add the cumin seeds, chillies and turmeric powder. Let the sizzle for 30 seconds before adding the potatoes and coating them in the seeds and powder.

3. Cook the potatoes on a medium low heat for a further 7 minutes, turning carefully a couple of times. Add the salt, stir one last time and then serve. If you find the potatoes are still a little hard, add a little water and place the lid on the pan and they will soften after a couple of minutes.

an alternative way to cook this is to omit the first step and let them fry in the oil with the cumin seeds, turmeric powder and fresh chilli, immediately. Once they begin to bronze add a little water and let them soften. At university I  tended to opt for this version, but now I find that parboiling them first ensures that they soften to how I want them. 

If you like this potato recipe you may also like to try my ‘Curried Potatoes’ another time.


An Indian twist on ‘Greens’

IMG_7668

Growing up I am sure we’ve all encountered our parents encouraging us to ‘eat our greens’ and reluctantly forcing, the invariably boiled, greens into our mouths. I have nothing against greens, far from it, I think they are delicious, I just think that a little helping hand from a few Indian spices goes a long way to making a fairly bland dish into an elevated one that you actually want to eat! There was a great article in the Observer back in September 2013 by journalist Tim Lott (see here)  which discusses the issues parents have surrounding making their children eat greens or green vegetables in general. The crux of the matter is that if it doesn’t taste good they are simply not going to enjoy or want to eat it. Also if we use the health mantra on them constantly this in itself is going to be a turn off.  We seem to be caught up in our own worry of putting healthy things in their months, but if we perhaps stand back and relax they will too and a natural love of these healthy foods will develop.

You’ll see in my recipe that I have added fresh chilli to the dish. I find my eldest daughter likes chilli, but with my four year old I simply omit it as she isn’t quite ready for the chilli kick! Chillies range hugely in heat levels so start off with the very mild ones – they tend to be the large ones you buy in the supermarkets. The smaller the chilli the hotter they tend to be in general.

Whilst the dish I want to show you today is vegetarian I also find that greens and kale work wonderfully well with chorizo (or any pork product really) and butter beans. If you have a moment take a look at my caldo verde recipe – here, for inspiration. It’s hearty and straightforward and perfect for cold winter days.

IMG_7657

Indian Greens

Serves 4

1 bunch of greens, washed and finely sliced

2 garlic cloves, sliced

2 small green chillies, finely sliced

2 tbsp sunflower/vegetable oil

2 tsp nigella seeds

1 tsp turmeric

1 tsp salt (to taste)

1. After preparing the greens, garlic and chilli add the oil to a large pan. When the oil is hot add the nigella seeds and turmeric followed by the garlic and chilli. Reduce the heat and stir to avoid the garlic burning.

2. Add the greens and stir thoroughly so that they become totally covered in the other ingredients. Keep stirring for a few minutes and then place the lid on the pan. You may find that you need to add a little water at this stage.

3. Simmer gently and the greens will wilt and reduce in size. Add the salt to taste and more water if necessary. The dish will take no longer than 10 minutes to cook in total.

Simple, straightforward and totally satisfying.

I like to eat them with a dal or my Indian potato curry (blog post on this soon).


Green Tomatoes – Two Ways

IMG_7506

During half time we went and spent some time at my parents house, which is hidden away in the depths of the Sussex countryside. Life slows down and allows you to become at one with nature. I love living in the city and am not the type to rush out to rolling green hills at every opportunity, but that said now and again it really does ones soul the world of good. Breathing in fresh air, getting properly muddy and having walks in the woods. Also if the truth be told I love my folks wood burning fire that warms the house and wafts woody smells throughout.

IMG_7572

My mother is Mrs green fingers and has an enviable vegetable patch, which supplies my father and her with bountiful crops of endless vegetables and fruit. She has been overrun with green tomatoes this year and had a couple of troughs full sitting in her pantry so I asked if I could take one to make into a chutney and a relish back in London.

IMG_7585

The result has been pleasing and I wanted to share both recipes with you. They are perfect to bring out with pretty much any cold meat, especially any type of pork product.

IMG_7596

The photo above and below are of the cucumber and green tomato relish.

IMG_7606

Green tomatoes are simply tomatoes that have not ripened in the sun. Change in weather can mean that some of your crop just aren’t able to make the transition from green to red. That said you can bring the whole plant inside and there are ways to help them turn red – see here for tips, but my mother had already picked the remaining tomatoes, most of which were green.

IMG_7515

To eat raw, whilst still green, would not be advisable as they are tart, however by cooking and making into a chutney or relish brings them into their own and sweetens them enough to make a fabulous little preserve.

IMG_7523

Both recipes require a fair amount of chopping so if you can gather in helpers that will certainly speed up the laborious part of the preparation.  The above photo shows the layered vegetables in the colander sprinkled with salt – they leave them like this overnight.

The photo below is the pickling spice that is used in the chutney but not the relish!  I have made my own pickling spice – you can add whatever you fancy, but I decided upon bay leaves, green cardamom, black mustard seeds, dried chillies, whole cloves, cinnamon bark, allspice and peppercorns.

IMG_7534

Once you have made either the relish or chutney – or both, once sealed in jars, leave to rest in a dark, cool place for a couple of weeks for the chutney and 1 week for the relish. The chutney will last longer – around a year, whilst the relish should be eaten within 6 months. Once open store in the fridge and eat with in a couple of weeks.

Both recipes below I have adapted from ‘The Complete Book of Preserves & Pickles’ by Catherine Atkinson and Maggie Mayhew

Green Tomato Chutney

makes approx 8 jars. I mainly use Wares of Knutsford 250ml Mason jars

2.3 kg green tomatoes, chopped

600g cooking apples, chopped – cored and peeled

600g onions, chopped

4 garlic cloves, crushed

1.5 tbsp salt

1 small muslin bag full of pickling spice (see below)

800ml cider vinegar

600g granulated sugar

**********************************

Pickling spice

1/2 tsp allspice

2 bay leaves

3 green cardamom pods

1 tsp black mustard seeds

2 inch piece of cinnamon bark, broken into pieces

4 cloves

5 peppercorns

2 dried red chilli

1 small piece of muslin cloth

some string

You can also add dried ginger, cassia, coriander seeds

1. After roughly chopping all the tomatoes, apples, onions and garlic place them in a large pan (or two if you need to) and add the salt. Add the muslin full of pickling spice, securely tied, along with half the vinegar and bring to the boil.

2. Once it has reached boiling point, reduce the heat and let it simmer for an hour stirring at regular intervals to aid with the softening of the ingredients.

3.  In a separate pan add the remaining cider vinegar and sugar and gently heat, stirring until the sugar has completely dissolved. Once this has happened pour into the main pan and give a good stir. The chutney needs a further hour and a half to simmer and become thick.

4. In the last half hour of number 3. wash the jars and lids in hot soapy water and then place in a cold oven. Turn the oven on to 110 degrees and then let the jars and lids (do not place the lid on the jar) sterilise for 30 mins.

5. Once the jars and lids have sterilised and the chutney has become thick remove the muslin and then spoon the hot chutney into the warm jars and seal. I find this wide neck funnel, immensely useful during this process as it means I keep the rims of the jars clean. I tend to put a waxed disc on top (was side down), although I think with the two piece gold disc and screw band lid it is probably not necessary.

6. Label and store in a cool dark place and leave to mature for a couple of weeks before opening. It will last for up to a year.

IMG_7539

Cucumber and Green Tomato Relish

Makes approx 5 jars

2 cucumbers, cubed 1cm

900g green tomatoes, cubed 1cm

4 onions, finely chopped

1.5 tsp salt

350ml white vinegar

150g demerara sugar

200g granulated sugar

1tbsp plain flour

1/2 tsp mustard powder

1.  Layer the cubed cucumber, green tomatoes and finely sliced onions in a colander placed over a bowl and sprinkle each layer with salt. Leave to drain for minimum 6 hours or overnight if you can.

2. Removing the salty liquid and place the vegetables in a large pan along with 320ml of the white vinegar. The remaining 30ml of white vinegar will be used later! Add both sugars to the pan and gently heat, stirring to allow the sugars to dissolve. Simmer gently for 40 minutes.

3. In a bowl add the flour, mustard powder and remanding white vinegar to form a paste and then add to the relish. Simmer for a further 20 mins or until the mixture is thick.

4. Similarly to point 4. in the instructions for the green tomato chutney, sterilise the jars and then spoon the contents of the relish into each one, remember to push the relish down firmly so that there are no air bubbles. Add the waxed disc, waxed side up (if using) and place the gold disc and screw top lid on top.

5. Store in a cool dark place for a week before using. Use within 6 months. Once opened store in the fridge and eat within a couple of weeks once opened.