Vietnamese Pancakes – Bahn Xeo

IMG_0773

Savoury food for breakfast has always been my kind of thing. Other than the pain au chocolat craving I had when I was pregnant with my first, savoury food has always been my go to breakfast choice. As such Asian food in general is my idea of heaven. Curry for breakfast, a bowl of hot steaming Vietnamese pho or Vietnamese Bahn Xeo (Vietnamese pancakes), and I am in culinary nirvana. These kind of foods I could eat all day so I am not necessarily suggesting you start cooking Vietnamese pancakes before the school/office run but having the recipe in mind when you want to try something new at any time of day.

IMG_0791

Banh Xeo (pronounced Ban say-oh – see video below if you want to sound like a pro) are thin crisp pancakes made with rice flour, coconut milk (or beer in fact), turmeric, and water. Traditionally they are filled with both pork (thinly cut pork belly strips) and prawns, but for mine I have omitted the pork and used just prawns. If you are vegetarian you could equally use some fried tofu, which would taste really good. Xeo actually means ‘sizzling’ in Vietnamese and it is this sound that you want to hear when the pancakes are crisping up. They are also known as ‘happy pancakes’ and you’ll see why after you have tasted your first mouthful.

IMG_0766

I pick up my rice flour from my local Asian supermarket or you can easily buy it online, it’s also only a matter of time before the bigger supermarkets will start stocking it too. I rather love the packaging of the one that I use – it’s got happy flour written all over it!


IMG_0768

The turmeric gives the lovely bright yellow hue to the pancakes and I also put in coconut milk. Some central parts of Vietnam do not use coconut milk and instead opt for beer to give the pancakes an extra crispiness, but I personally love the coconut taste to the pancakes.

IMG_0788

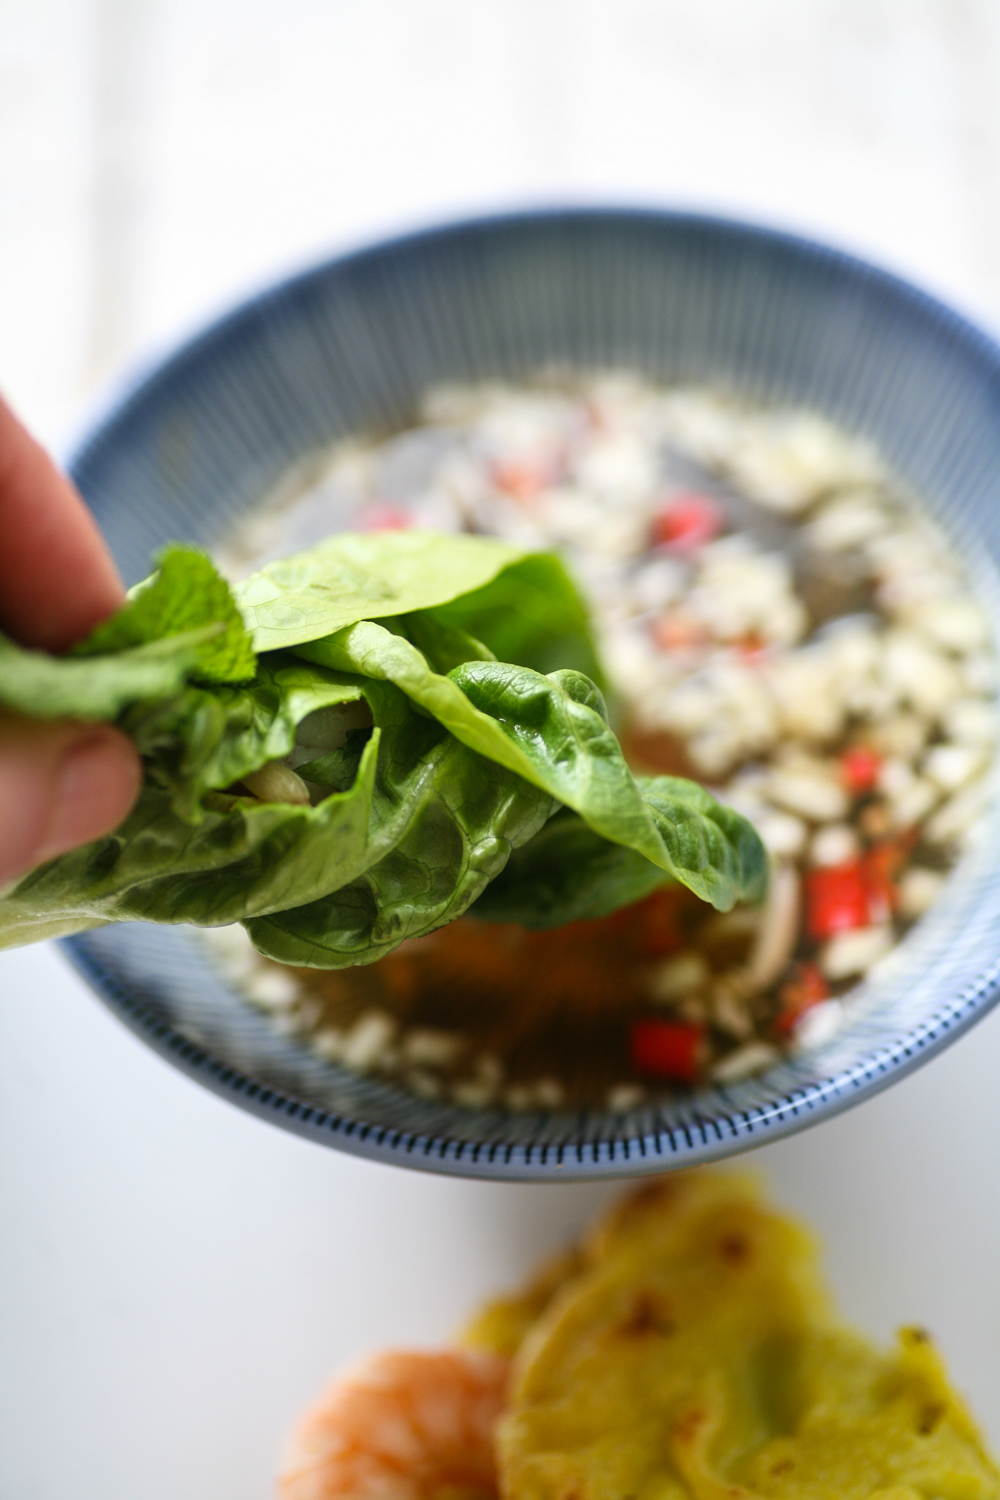
Now eating the crispy pancakes can be done in a couple of ways. You can either simply use a knife and fork and eat it like that, or in Vietnam you are often provided with a spoon and large lettuce leaves along with fresh herbs such as coriander and mint. You break off a little of the pancake …..like so

IMG_0797

and then place it on the lettuce leaf, along with the herbs …..

IMG_0804

and then roll it so you are able to pick it up and dip it in your nuoc cham dipping sauce. Easy hey. I cannot stress how delicious this is, so much so that I am craving more of these writing this post. Seriously seek out rice flour and give these a shot – I promise you you won’t regret it.

IMG_0806


Vietnamese Pancakes – Bahn Xeo

Makes 7 Pancakes

Pancake batter

250g rice flour

1/2 tsp ground turmeric

pinch of salt

400ml coconut milk

250ml cold water

*******

1 tsp coconut/groundnut oil (to go into the pan for each pancake made)

 for the filling

350g king prawns, shelled and deveined

4 spring onions, finely sliced on the diagonal

125g beansprouts

a handful (per person) of mixed herbs: coriander, mint, thai sweet basil


Nuoc Cham Dipping Sauce

2 tbsp rice vinegar

5 tbsp fish sauce

2 small red chillies, finely chopped

2-3 tbsp caster sugar

2 garlic cloves, finely chopped

200ml cold water

1 lime, juice only (optional)

To Serve

3x cos lettuce, broken up into lettuce cups


1. First you want to make the batter. Mix all the ingredients together with a whisk so that the mixture is smooth and not too thick in consistency. You want to make it a similar consistency as if you were cooking regular European pancakes. Place to one side to rest ideally for at least 30 minutes.

2. To prepare the nuoc cham dipping sauce place the garlic and chilli in a bowl followed by the water, sugar, fish sauce, vinegar and lime (if using). Stir well so that the sugar dissolves. Place to one side.

3. Next prepare the filling. Place a small amount of coconut oil in a pan and cook the prawns on a medium low heat for 3 minutes, turning and stirring as you do so. Once they have become pinker in colour, transfer them to a plate.

4. Heat a large non-stick skillet or frying pan and when it is hot add 1 tsp of coconut oil (or ground nut oil) and then ladle in one spoonful of the pancake mixture. Move it around the pan immediately so that it is completely covered. Lower the heat and let it cook for 3 minutes.

5. Place some beansprouts over one half of the pancake, along with some spring onions and place a lid on the pan for a further 2 minutes.

6. Now remove the lid and place the prawns on top of the beansprouts and spring onions. Cook for one more minute checking to see that the underside of the pancake is beginning to bronze slightly and crisp up. Place some fresh coriander, mint, Thai basil on top of the prawns and then fold one half of the pancake over the other. Leave to cook for 20 more seconds and then place on a serving plate with more fresh herbs and some lettuce cups.

To Serve:

Serve immediately when it is hot. Cut a bite sized portion off the pancake and place on a lettuce leaf. Add a few more herbs and then roll so that you can pick it up and dip it into the nuoc cham dipping sauce.

The video below shows you how to eat it.


Tomato and Garlic Red Lentil Dal

IMG_0701


This recipe is for all of you lovely people out there who claim you don’t have time to cook. It is super quick, satisfying and great for cold winter nights. It literally takes no longer than 15 minutes to cook from beginning to end. To be fair it is very similar to this dal of mine although it differs in that it has a tin of tomatoes in it, loads of fresh whole garlic (great for ridding those horrible colds and coughs we pick up in winter), and a sprinkling of cumin powder.

IMG_0702

I had a bunch of friends over for lunch the other day and as well as cooking some tasty winter salads had a huge pot of this on the stove. It seemed to go down a treat as there was very little left over once they had gone, another sign that it’s worth giving it a go.

IMG_0700

I like to add a splash of lemon juice liberally at the end, but it’s up to you. Like with all dals they can be made more soupy or firmer depending on personal choice. For this dal I like to make it more soupy so that I can spoon it out of a bowl. If you are cooking it with rice and another dish then maybe you want to add less water. I never really measure the water that goes into it. I always go on how it looks, so my advice is to put in enough water so that it covers the dal by half an inch and then keep adding more boiling water once  the water has soaked up. It’s a winner and so simple. Give it a go and leave me a comment below.

IMG_0697


Tomato and Garlic Red Lentil Dal

Serves 4-6 (4 as a main 6 as a side dish)

300g red split lentil

water, enough to cover the red lentil

1 tbsp groundnut oil

5 (or more) garlic cloves, gently crushed but kept whole

1 tsp panch phoron

1 tsp turmeric powder

1/2 tsp cumin powder

1 tsp salt (to taste)

400g tin of tomatoes

1 lemon, quartered – optional to serve

1. In a deep pan place the red lentils and cover with cold water. Gently wash the lentils using your hand and pour out the murky water. Repeat three times.

2. Add boiling water to the red lentils and cover so that all the lentils are submerged by 1/2 inch. You can add more boiling water once this has soaked up if need be. Boil on a gently heat, skimming off any white residue that comes to the surface. Stir at intervals so that all the lentils cook through and turn from orange to a more yellow colour. Add more boiling water if you prefer it to have a more soupy consistency.

3. In a separate pan heat up the oil and then add the panch phoron. Once they start sizzling add the garlic and move around the pan. After a minute add the turmeric and cumin powder. Keep on a low heat, making sure the garlic and spices do not burn.

4. Add a spoonful of the now yellow lentils to the panch phoron and stir into the spices. Pour the contents of this pan into the pan with lentils and stir in thoroughly. Add a little water to the saucepan to make sure the spices pan is now clear of spices.

5. Add salt to taste and the tin of tomatoes and cook on a low heat for 5 minutes, or until the garlic has softened.

Voila. That simple. Enjoy.


Tamarind Noodles with Five Spice Tofu

IMG_0572

This past week I have been avoiding the kitchen. Don’t worry I am not on some crazy January diet that involves me starving myself or anything, goodness no. For those of you who read my last post you’ll know that my boiler died a death over a week ago, which has resulted in my house becoming rather Baltic. The kitchen is the coldest room in the house so instead of pottering in there as I normally would, when the heating works, I have been hibernating in one of the smallest rooms in the house – the study, with an electric heater going at full blast. It’s fairly roasty toasty so I try to avoid leaving it for long periods of time.

IMG_0568

However, when my mother in-law (aka my culinary spy) recently came back from a trip to Sri Lanka, she handed me a piece of paper with a very short ingredients list for a tamarind noodles dish that she has eaten and adored by a chef called Anura. If you are out there Anura and are reading this then this dish is in honour of you.

The recipe was for the sauce itself and I just got creative in turning it into a dish that my whole family will adore. If you don’t love tofu then you could always replace it with chicken or pork by following the same steps, but crispy five spice tofu – what’s not to like folks!

IMG_0578

Take a look at those crispy tofu bites, with sweet red peppers, soya beans and tamarind noodles, which have been coated in yet more tamarind sauce.

IMG_0549

Tamarind Noodles with Five Spice Tofu

Serves 4

tamarind sauce

3 tbsp tamarind paste

4 tbsp jaggery (palm sugar)

3 tbsp coconut milk

2 tbsp caster sugar

75ml chicken stock

2 lemongrass, chopped very finely

*****

350g firm tofu, bite sized cubes

2 tsp Chinese five spice

2 tbsp cornflour

2 tbsp sesame oil

2 sweet red pepper, cut julienne

200g frozen soya beans

4 nests of medium egg noodles

1. First cut the tofu into bite sized cubes. Place the cornflour and Chinese five spice into a shallow bowl and then add the tofu so that the cubes are all coated in the flour.

2. Heat a pan with the oil and when it is hot add the tofu in batches, turning at intervals so that it browns and crisps slightly. Place on kitchen roll to soak up the oil whilst you are frying the next batch.

3. Boil all the ingredients of the tamarind sauce until the sauce is smooth. Transfer to a pouring jug.

4. Using the same pan as the tamarind sauce, gently fry the sweet red peppers so that they soften. This will only take a couple of minutes.

5. In another pan boil some water and add the soya beans. After 3 minutes add the noodles and cook according to packet (usually a couple of minutes). Strain and place in a mixing bowl along with the sweet red peppers and 2 tbsp tamarind sauce. Mix together well.

6. Place the noodles into bowls and add the five spice tofu on top along with a little more tamarind sauce.

Serve and eat whilst hot. Enjoy.

Any leftover tamarind sauce can be stored in the fridge for up to a week. 


Baked Spiced Beetroot and Feta Samosas

IMG_0331

For as long as I can remember I have enjoyed devouring vegetable samosas. They are basically the Indian vegetarian version of the Cornish pasty and are a great all day snack. At university I would regularly eat one for breakfast before heading off to lectures. Filling and wonderfully spicy, they were a great way to warm the belly and the soul.


IMG_0310

I often make them the ‘traditional’ way with potatoes, peas, carrots, spices and chilli, but sometimes for a change I like to make them with a twist. Beetroot works really well and if you combine it with feta, cumin seeds, chilli and fresh coriander then you have yourself a really tasty little treat. I thought they seemed quite festive and would make the perfect little starter/snack over the Christmas season.

IMG_0317


Making the filo parcels is a lot easier than you would imagine. If you look at the photographs below you will get the picture of how straightforward they really are to prepare.


IMG_0320


First you start by placing a tablespoonful of the cooked spiced beetroot and feta in the bottom right hand corner. You then need to glaze gently the sides of the filo pastry with melted butter so that the samosa sticks together well.


IMG_0321

By bringing the bottom right hand corner up to the left hand side you create the first triangle. Should it break at all at this stage do not panic as it will all be hidden as you go on folding the triangles.

IMG_0323


Keep folding the triangle over so that it alternates from side, upwards and then side again until you reach the top. Then add a little more melted butter to the top of the filo pastry and fold over one last time.


IMG_0326

Viola. Now you need to give the topside a melted butter glaze and then place on a baking tray lined with baking paper.

IMG_0329


After twenty minutes in the oven at 180 degrees you have beautiful bronzed samosas ready for eating. Eat immediately – or once they have cooled slightly.


IMG_0342


I often serve them as a starter/snack before serving a curry such as lamb curry, Indian greens and a tasty dal and spiced rice.


IMG_0336

They are also an irresistible after school snack (just remember to reduce the chilli if your children are not used to chilli).

IMG_0338


Baked Spiced Beetroot and Feta Samosas

350g beetroot

2 tbsp vegetable oil

1-2 heaped tsp cumin seeds

1 small fresh green chilli, finely sliced (1/2 if you prefer it less hot)

150g feta, diced

1/2 sweet paprika

handful of fresh coriander

8 filo pastry sheets (will make 16 samosas)

butter, for glazing

1. Wash the beetroot and leave the skins on at this stage. Cut the stems so they are short.  Boil in a pan of boiling water for around 20-30 minutes so that they have softened. Test with a sharp knife, if it goes in easily then they are done. The skins will also be able to come away easily when they are ready.

2. Chop into small cubes and place to one side. In a frying pan add the vegetable oil and when it is hot add the cumin seeds and fresh chilli. After 30 seconds add the beetroot and stir well so that they begin to be coated in the cumin seeds and chilli.

3. Add the paprika, fresh coriander and leave on a low heat for 5 minutes.

4. Add the feta and gently fold into the beetroot and spices. Leave for a minute before taking off the heat to cool. Leave to cool for 15 minutes.

5. Preheat the oven to 180 degrees.

6.Place one sheet of filo pastry on a chopping board and cut it in half lengthwise. Using the first pasty strip, lightly brush the pastry with melted butter around the edges and place a tablespoonful of the filling in the bottom right hand corner. Bring the corner up to the left hand side of the pastry therefore making a triangle shape. Then bring the triangle straight up to create another triangle before folding over once again so that the triangle folds over to the right hand side of the pastry once again. (See photos above)

7. Continue all the way to the top. With the final edge brush with melted butter and fold over neatly. Turn over and place on a baking tray lined with baking paper. Brush the exposed side of the samosas with melted butter.  Repeat until you have completed the process.

8. Place in the oven for 20 minutes or until the samosas has bronzed nicely. Serve immediately with  a chutney or two on the side.

Come back to my blog in a weeks time to get a fab chutney recipe.

Note: You can prepare them (pre cooking) and then freeze them. When you are ready to eat them simply glaze them with melted butter and place them in the oven for 20-25 mins until bronzed. 


Indian Cabbage with Fennel Seeds

IMG_0274

Oh the humble white (or green for that matter) cabbage. It’s one of those ingredients that cooked with no herbs or spices tastes, to put it simply, bland. It’s kind of like sprouts. Boiling the hell out of the vegetable just does not do it justice. I have a fantastic sprout curry – have you tried making it yet? If not I absolutely urge you to give it a go. I know I am biased but it’s seriously good and will convert even the non sprout lover. Here is the recipe – click here. Go on give it a try. It’s an alternative way to cook sprouts.

IMG_0270

In the meantime may I encourage you to try picking up a regular white cabbage from the market/supermarket/garden (delete as appropriate) and make this ‘Indian Cabbage with Fennel Seed Curry’. Fennel and sultanas gives it a sweetness but combined with the spices, salt and chilli it becomes a very satisfying savoury dish. I often accompany it with a dal and if I am cooking for others I will often do a meat or fish curry as well.

IMG_0267

Indian Cabbage with Fennel Seeds

Serves 4

2 tbsp vegetable/olive oil

1 tsp salt

2 small potatoes, cut roughly into 3cm pieces

2 bay leaves

1tsp heaped fennel seeds

1 tsp ground turmeric

1/2 tsp of chilli powder

1/2 tsp sugar

half a large white or green cabbage, shredded finely

1 handful of sultanas

1. In a large pan add the oil and a pinch of salt and when it is hot add the potatoes and cook on a low heat for 10 minutes so that the potatoes begin to bronze. Remove from the pan and place on some kitchen paper.

2. Wash the cabbage thoroughly under the tap and then drain using a colander. Set to one side.

3.Using the same pan as you cooked the potatoes, add the bay leaves, fennel seeds, turmeric, chilli powder and sugar. Move them around the pan for 30 seconds before adding the finely shredded cabbage and sultanas. Turn the cabbage and sultanas over in the pan so that they are coated in all the spices. Add the fried potatoes, which will begin to soften whilst cooking with the cabbage. Place on a medium to low heat and simmer.

4. As you have washed the cabbage before adding to the pan you probably will not need additional water, however, if it becomes too dry simply add 2/3 tbsp of water to the pan.

5. Simmer for a further 10 minutes or until the cabbage and potatoes have softened.

Easy hey! So what are you waiting for give it a go and let me know how you get on.


IMG_0295


Spiced Pilau Rice

IMG_0211


As winter is officially here and the nights are drawing in so our diet begins to crave more hearty filling food. Stew and warming curries get given centre stage during the winter months, well at least they do in my household. I realise that I have never posted a pilau rice dish, which would be a great accompaniment with a wide range of curries. Plain basmati rice is all very well but if you delicately spice it and accompany it with some nuts or fruit, it just adds a lovely new fragrant dimension to the meal and really only takes a couple of extra minutes to prepare.

I find my spiced pilau rice is really versatile as it works equally well with Middle Eastern dishes as well as Indian curries.


IMG_0150

The three C’s are wonderful spices: cardamom, cloves and cinnamon stick and give a warming aroma to any dish. I also have a particular weakness for cardamom in sweet dishes, but that’s for another post. Star anise not only looks inviting but also has a delicate aniseed smell and taste and is used a lot in Vietnamese and Chinese dishes. The queen of spices is saffron – one of the most expensive so it is used sparingly, hence only a pinch used in this dish. If you do not have saffron you could use a generous pinch of ground turmeric instead, which will give a yellow hue.


IMG_0173

I used blanched almonds this time, but depending on what is in my cupboard I may use cashew nuts or even unsalted peanuts. If you are serving a more Middle Eastern dish then pistachio nuts would also work really well.

Let me know how you get on. Send me a photo of your dish and accompanying curry to my twitter account and I will retweet it to all my followers. Is there any particular pilau rice that you make at home? How does if differ to my spiced pilau?


IMG_0203


Spiced Pilau Rice

serves 4

1/2 tbsp ghee/butter

7cm cinnamon stick, broken in two

2 star anise

4 cardamom pods, slightly opened

3 cloves

190g basmati rice (Approx one handful per person)

350ml cold water

1 tsp salt

2 tbsp hot milk

1 large pinch of saffron (or ground turmeric)

1 tsbp rose water

2 tbsp blanched almonds or cashew nuts

1. First rinse the rice a couple of times with cold water so that the water runs clear and not cloudy. Drain and set aside. If you have time then soak the rice in cold water for 10 minutes then drain.

2. Heat the milk and then place the saffron in the milk. Give a good stir. Leave to soak whilst you prepare the rice.

3. In a pan heat the ghee or butter and when it is melted add the star anise, cardamom, cloves and cinnamon stick. Let them sizzle away for half a minute, before adding the drained rice and salt and stirring together. Add the cold water. As a rule I always make sure that the water is about 1/3 of your smallest finger above the rice. Stir and then let the rice come to the boil which will take a couple of minutes.

4. Once it has come to the boil, turn the heat down and place the lid on the pan. Let the rice gently cook and steam away for 8 minutes. By this time small holes will have appeared in the top of the rice. Turn the heat off and leave the lid on the rice so that it can steam for a further 10 minutes.

5. In a small frying pan dry roast the blanched almonds or cashew nuts for a couple of minutes so that they begin to bronze.

6. Place the saffron milk and rose water over the rice and then gently fluff it up with a fork.

7. Scatter over a platter with the nuts over the top.

Serve with any Indian dal, vegetable, meat or fish curry. It also works really well with Middle Eastern meat or fish dishes.


IMG_0208


Indian Rasam – Spiced Tomato Soup

IMG_0021

There is nothing more sublime than a spicy hot tomato soup to warm you up and give you that inner glow. If you are feeling under the weather with a cold or fever, which invariably many of us do at this time of year, this is a great way to blast your system with goodness and help pull you through. Rasam, as it is known in South India, translates to ‘juice’ or in Sanskrit rasa means ‘taste’. I think ‘tasty juice’ is the perfect way to describe this warming, fragrant and flavoursome soup. Traditionally it is made with tomatoes or tamarind with a host of spices and fresh curry leaves giving it a comforting aroma and taste.  Being totally addicted to tomatoes I tend to make my rasam with tomatoes as the base note.

IMG_0010

Traditionally it is eaten in India at the end of a meal, but I tend to serve it the opposite way round and kick a meal off with a warming cup of this thin spiced tomato soup to whet the taste buds. It is often served in a mug or cup or can be poured over a bowl of hot steaming basmati rice. It’s also the perfect drink after a long, cold and invariably wet winter walk. With a roaring fire going and a cup of rasam you will feel a state of happiness surround you. Seriously try it and you’ll know what I mean.

IMG_0033

The only tricky (ish) ingredient to source is fresh curry leaves. If you go to your local Asian grocer they are likely to have some, or at least will be able to point you in the right direction. So what are you waiting for – give it a go and leave and comment below to let me know how you get on.

**********

Indian Rasam – Spiced Tomato Soup

Serves 4

2 tbsp sunflower oil

1 heaped tsp of garlic paste/fresh garlic grated

1 heaped tsp of ginger paste/fresh ginger grated

2 large dried red chillies (1 if you prefer it with less of a kick)

12 fresh curry leaves

1/2 tsp of crushed black pepper

1 tsp salt

1 tsp sugar

700g fresh tomatoes, roughly chopped

350ml water

a couple of sprigs of fresh coriander to garnish

black pepper to garnish

1. Warm the oil in a deep non-stick pan and when it is hot add the garlic, ginger, dried red chillies, fresh curry leaves and crushed black pepper and gently move around the pan so that the chillies darken and the ginger and garlic begin to bronze. Keep on a medium heat for a few minutes before adding the tomatoes, salt and sugar.

2. Move around the pan so that the tomatoes begin to soften and are completely covered in all of the ingredients. Then add the water and let it boil for a couple of minutes before lowering the heat and cover for 30 mins.

3. Using a hand blender blend the soup so that it is smooth and then pass through a sieve so that there are no pips or tomato skin and what remains is brilliant red, smooth thin rasam. Heat up the smooth rasam gently in the pan before serving.

4. Pour into cups and garnish with some fresh coriander and black pepper.


IMG_0027


Gujarati Kadhi – a delicately spiced yogurt soup

IMG_9991

It is bucketing down outside this afternoon and I am feeling rather cosy inside out of the rain. After taking the photos for this blog post I had a bowl full of this hot, delicately spiced warming soup. Seriously delicious and quite filling, owing to the yogurt, potatoes and mooli.  Now that Autumn is well and truly here this soup comes into its own and I urge you to try making yourself some.

IMG_0006

It was Durga Puja last weekend – you can read up what goes on exactly at this Indian celebration in my posts from last year and the year before  see here and here. During the festivities at the Hindu temple prasad is often taken. Prasad is literally a religious offering or gift that comes in the form of a meal. Always vegetarian and gently spiced it allows families and friends to come together to share a meal that is blessed during this auspicious occasion. One of the curries we were served was this Gujarati Kadhi. I adored the delicately spiced yogurt soup so much so I was allowed to venture into the kitchens to see how it was being prepared. Huge caldrons of the soup were being constantly stirred over hot stoves before being taken out to hungry worshippers.

IMG_9990

I’ve made my own additions and twists but the taste is pretty similar to the one that I had last weekend. It is so different from any soup or dal I have tried before that it immediately appealed. All the ingredients are pretty easy to pick up at your local supermarket. I have seen gram flour in the big supermarkets here in the UK and I noticed that Waitrose was even selling fresh curry leaves the other day. Times are changing!  Mooli is harder to track down if you don’t live near an Asian grocers so just omit that part if you can’t find it. As with most of my recipes it is quick and easy so if you are feeling adventurous then give this fabulous dish a try.


Gujarati Kadhi

Serves 4-6

500g natural yogurt

2 tbsp gram flour (chickpea flour)

1/2 tsp green chilli paste

1/2 tsp ginger paste

700ml water

1 tsp salt

•••••••••••

1 tbsp ghee/butter

1/2 tsp black mustard seeds

1/2 tsp cumin seeds

3 cloves

2 small cinnamon sticks

2 dried red chillies, broken into pieces

10 fresh curry leaves

pinch of asafoetida

75g mooli (also known as daikon or white radish)/, cut into thin matchsticks

1 small potato, cut into thin matchsticks

1 tsp jaggery/sugar

1. In a large bowl mix the yogurt, gram flour, green chilli and ginger paste, salt and water using a hand whisk.

2. In a deep saucepan add the ghee and when it is melted add the mustard and cumin seeds and after 30 seconds add the cloves, cinnamon sticks, dried red chillies, fresh curry leaves and asafoetida. This is known as tempering.

3. Add the mooli and potato matchsticks and stir into the spices for one minute.

4. Gently pour in the yogurt/gram flour mixture over the potato, mooli and tempering spices and stir continuously to prevent the yogurt from separating.

5. If you find the mixture too thick simply add a little more water.

6. Add the jaggery or sugar if you don’t have any jaggery to hand. Stir into the soup. Simmer for  around 15 minutes or until the potato and mooli matchsticks are softened.

Serve with basmati rice or simply on its own in a bowl.


IMG_0002


Coconut Infused Corn on the Cob with Cumin and Black Mustard Seeds

IMG_9899


Corn on the cob is one of those things that represents the beginning of Autumn for me, although this year we seem to be having a late Indian summer, which is a little bit surreal as the conkers are already falling from the horse chestnut trees. After the rains of last night the air remains warm and humid, the birds are singing and it almost feels like Asia. Whilst I love the traditional way of eating corn on the cob – with lots of butter and maybe a pinch of paprika and a squeeze of lime, I do rather like my Indian version, which makes a refreshing change.


IMG_9916


If you are using fresh corn on the cob it is hard, but not impossible, to cut through the cob to make 3 or 4 smaller pieces. Use a sharp knife and press down firmly. Once you have made an inroad into cutting it you will find that you can simply break off the section. Equally if you want to cook this dish all year round – which I do – you can use frozen sweetcorn which you can buy already chopped up into smaller pieces, which makes it a lot easier and even quicker.

IMG_9902


If you are having an Indian feast why not cook this dish alongside my laal maas or bengali chicken curry or perhaps bengali mustard fish curry or aubergine, peanut and tomato curry as well as a satisfying dal and perhaps some Indian greens. Equally if you are wanting a quick and light supper then this dish and a dal or vegetable curry would be perfect.

*****************

Coconut Infused Corn on the Cob with Cumin and Black Mustard Seeds

Serves 4

1kg frozen mini corn cobs or fresh corn on the cob chopped into smaller pieces

160ml coconut milk

1 tsp salt

2 dried red chillies, broken into smaller pieces

1 tbsp sunflower oil

1 tsp cumin seeds

1 tsp black mustard seeds

1 fresh green chilli

1/2 juice of fresh lime

1 handful of freshly chopped coriander/cilantro leaves

1. On a medium heat place the sweetcorn pieces, coconut milk, salt and dried red chillies in a large pan and place the lid on. If you are using frozen sweetcorn cook for 3 minutes and if you are using fresh cook for 10 minutes. Stir at intervals so that the sweetcorn pieces are nicely covered with coconut milk.

2. Meanwhile in a separate pan heat the oil and then add the cumin and black mustard seeds. Once they begin to pop after 20 seconds add the contents of the pan to the larger pan with the sweetcorn. Stir well.

3. Add the fresh green chilli, fresh coriander and lime juice and let simmer for a further 4 minutes with the lid off so that the coconut milk reduces slightly.

4. Serve immediately and pour the remaining liquid over the cob pieces so they soak up all the delicious flavours.


Black Sesame Paste Soba Noodles with Salmon and Spring Onions

IMG_9857


There are some plates of food that when presented in front of you you are a little bit sceptical that the dish will actually taste good. This dish, being predominately grey and black with only a splattering of green and white from the spring onions and the delicate pink from the salmon, is a case in point. You are going to have to trust me on this one when I say that this meal is seriously delicious. It also ridiculously quick (I know I know I say that with most of the dishes I put up on my blog) – it takes the amount of time that you cook your salmon in the oven – 15 minutes.


IMG_9858


Black sesame seeds may require a bit of effort to hunt down – I found mine at my local Asian grocers, but other than that you should be able to get hold of the rest of the ingredients pretty easily. If you don’t have tamari, just use soy sauce – they are very similar.


IMG_9868

I ate mine with a hot cup of fresh lemon verbena tea, which I have become rather addicted to since I was sweetly given a bag full of the stuff last weekend. Have you tried it before? Does anyone grow it in their gardens? Is it easy to maintain? I’d love to know as lemon verbena has a wonderful aroma and taste.

IMG_9864

I hope you get to try this dish very soon. I adore buckwheat soba noodles – I tend to buy the Clearspring variety – they look like this. They’re wheat free noodles, low in fat and a great source of protein and fibre. Go on give this dish a go and leave me a comment below.


Black Sesame Paste Soba Noodles with Salmon and Spring Onions

Adapted from Heidi Swanson’s ‘Super Natural Everyday’ – Black Sesame Otsu

Serves 4

black sesame seed paste

1 tsp sunflower seeds

1 tsp pine nuts

60g black sesame seeds

1 1/2 tbsp demerara sugar

1 tbsp sesame oil

1 1/2 tbsp tamari/soy sauce

2 tbsp brown rice vinegar

pinch of cayenne pepper

*************

350g buckwheat soba noodles

4 salmon fillets – skin removed (optional)

3 spring onions, finely sliced

1 tbsp extra virgin olive oil

**************

1. Preheat your oven (I use a fan oven – if you are not increase the temperature by 10 degrees) to 180 degrees. Equally you can steam the salmon if you prefer. Using a cooking brush gently wipe each salmon fillet with sesame oil. Place in a non stick dish and cook for 15 minutes.

2. Meanwhile, in a frying pan dry roast, on a low heat, the pine nuts and sunflower seeds for a couple of minutes so they begin to bronze. You will need to keep moving the pan to prevent burning. As the pine nuts begin to bronze add the black sesame seeds and move them around the pan for a minute. Transfer to a spice grinder (or pestle and mortar).

3. After whizzing the ingredients for 10-15 seconds so that they are properly blended, transfer the paste into a mixing bowl and add the remaining ingredients to make the black sesame paste. Place to one side.

4. Place the soba noodles in a pan of boiling water and cook according to instructions – should be around 5 minutes on a low heat. Before draining save 100ml of the noodle water and leave in a jug. Drain the soba noodles and run under cold water to prevent further cooking. Before adding the soba noodles to the black sesame paste, remove 1/4 of the paste and place in a separate cup. Add the soba noodles to the large mixing bowl with the remaining black sesame paste, the 100ml of noodle water, extra virgin olive oil and almost all of the spring onions and gently stir into the paste.

5. Serve a generous portion of noodles to each bowl or plate and place the salmon fillet on top along with a dollop of remaining black sesame paste which you have reserved and a scattering of spring onions.

It can be eaten at warm, room temperature or cold. You can replace the salmon with trout or even with tofu gently fried. It would in fact make an original and tasty lunch box alternative.