Indian Aubergine/Eggplant, Peanut and Tomato Curry

IMG_8109

Have you ever been a little ambivalent about aubergine/eggplant? On the one hand loving their smooth, shiny plum coloured exterior but never really in raptures about the taste. Well my other half, Mr B, tended to fall into this category, so a while ago I set out to prove him wrong.

IMG_8072

After mutterings of ‘you know aubergine is my least favourite vegetable, I prefer greens’, he tasted one mouthful and that completely shut him up. Murmurs of approval were given between mouthfuls and a 9/10 score (yes we regularly mark our food – is that unusual?). RESULT. Surprisingly my eldest child also adored it, surprising as it does have a fair amount of chilli in it! If you don’t like chilli, but like spice, just reduce or take out the chilli in the recipe below.

IMG_8093

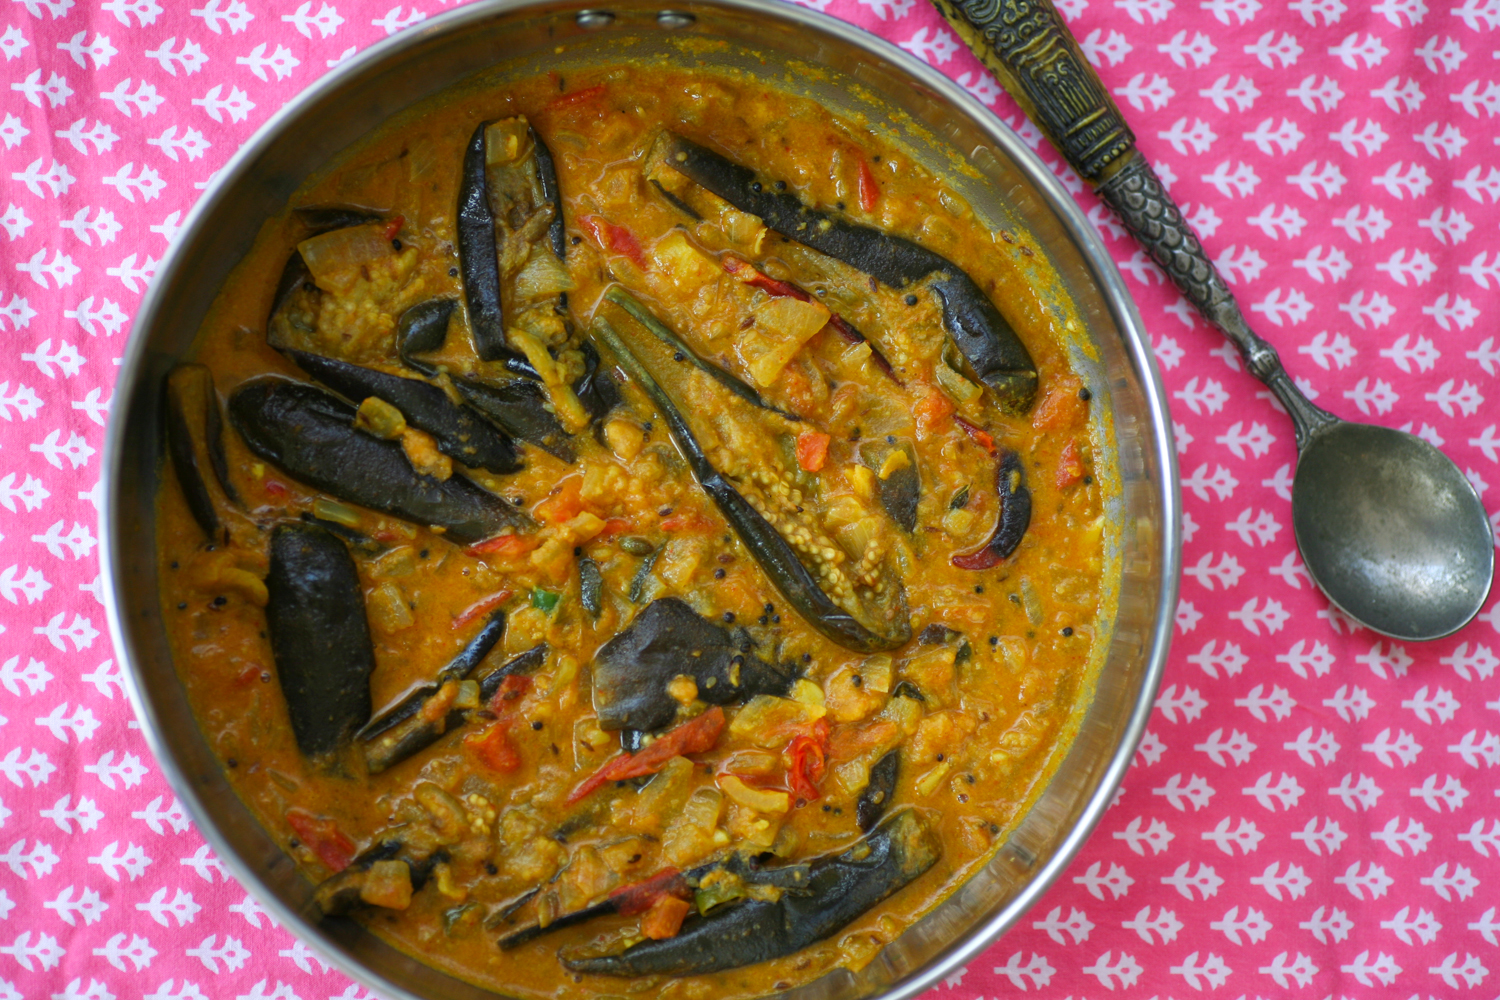
The combination of aubergine, peanuts and sesame seeds works ridiculously well together so much so that you will have to restrain yourself from wanting to guzzle up the whole dish. Combine that with a spiced onion and tomato sauce and you have yourself a winning dish.  So put your assumptions to one side for a moment and give this recipe a whirl and I can assure you you will be more than pleasantly surprised.  I couldn’t resist the bijou aubergines on sale at my local market but a regular sized aubergine will work equally well. Just slice the aubergine into chunky chip sized pieces, keeping the skin on of course.

IMG_8097

Indian Aubergine/Eggplant, Peanut and Tomato Curry

450g baby aubergine/eggplant (normal size is fine too), sliced lengthways or chunky chip sized if using a regular aubergine

cooking oil, enough to deep fry the aubergine

2 tbsp olive oil

1 tsp black mustard seeds

1 tsp cumin seeds

2 dried red chillies

1 small green chilli, finely chopped (optional)

5 curry leaves (fresh or dried)

1 tsp turmeric powder

1 tsp of garlic paste

1 tsp ginger paste

1 white onion, finely chopped

200g chopped fresh tomatoes

1 tsp coriander powder

1 tsp cumin powder

1/2 tsp Kashmiri chilli powder

2 tbsp salted peanuts

1 tbsp sesame seeds

150ml water

1 tsp salt (to taste)

1. If using baby aubergine/eggplant slice lengthways removing the stalk. If using a regular sized aubergine slice into chunky chip sized, again removing the stalk. Once sliced, immediately place in a pan of boiling oil to sizzle away and bronze. This should take no longer than ten minutes.

2. Remove the aubergine with a straining spoon and place on some kitchen roll whilst you prepare the next steps.

3. In a new large pan add the olive oil and when hot add the mustard and cumin seeds. They will begin to pop immediately so move them gently around the pan for 15 seconds before adding the dried red chilli, fresh small green chilli (optional), curry leaves (fresh or dried), turmeric, garlic, ginger paste and onion. Continue to cook on a medium heat for around 7 minutes by which time the onion should have nicely softened, but not bronzed.

4. Add the chopped tomatoes, coriander, cumin and Kashmiri chilli powder and simmer for a further 5 minutes, by which time the tomatoes will have totally softened and blended into the sauce. Return the aubergines to the pan and fold gently into the sauce.

5. In a small pan dry roast the peanuts and sesame seeds for a couple of minutes, making sure to constantly move them around the pan so that the heat is evenly distributed and they do not burn. They will begin to bronze at which point you need to remove them from the pan.

6. Using a spice grinder (definitely one of my most useful items I own in my kitchen) – this is the one I use – see here – grind the peanuts and sesame seeds together to form a paste.

7. Add the peanut sesame paste to the pan and stir into the curry, adding more water if necessary. As I used salted peanuts I only needed to add a little more salt. Simmer for a few minutes and serve. If cooking ahead and leaving to rest you will have to add a little more water when heating up.

Serve with rice or Indian bread and you have yourself a vegetarian – in fact vegan – treat. Try it and leave a comment below.

IMG_8116


Ivy Gourd Curry – also known as Gentleman’s Toes

IMG_7967

We all know that lady’s fingers is okra right? But gentleman’s toes? I had no idea there was a vegetable with such an unappealing name, I mean seriously who wants to eat a gentleman’s toe?

IMG_7931

My Bengali mother-in-law introduced them to me only recently and since then I have become hooked. They look similar, and taste not dissimilar in fact, to gherkins which we are huge eaters of in my household – seriously we get through jars of them, even my four year old has a weakness for them. Gentleman’s fingers is also more commonly known as ivy gourd or in Bengal they are known as kundri. Baby watermelon or little gourd are two other names by which they are known.

IMG_7952

Granted, you are unlikely to find them at the big supermarkets but head to any Indian subcontinent grocers and you’ll stumble across these fabulous little vegetables. I know for a fact that you can source them in Tooting and I imagine the same goes for Brick Lane, Southall, Hounslow etc. They are commonly eaten in India and are a great source of vitamin A and C. Eaten alongside a dal and you’ll have a very filling and tasty vegetarian supper.

IMG_7976

Ivy Gourd Curry

Serves 4

550g ivy gourds/kundri/gentleman’s fingers, halved lengthways

4 tbsp olive oil

1 green chilli, halved

1 tsp nigella seeds

1 tsp turmeric powder

1 tsp chilli powder

 2 tsp cumin powder

1 tsp coriander powder

2 tsp salt (to taste)

2 tsp sugar (to taste)

2 tbsp water

1. Heat a large pan with the olive oil and when hot add the nigella seeds followed by the green chilli. After  20 seconds add the ivy gourds and stir into the oils and nigella seeds. Leave to cook on a low heat for 5 minutes.

2. Add all the other ingredients and give a good stir and then place a lid on the pan and leave to simmer, stirring a couple of times, for 20 minutes or until the ivy gourd is soft but not mushy!

So simple and yet ridiculously satisfying.

I hope you get to stumble across these little beauties before too long.


Lamb and Spinach Curry – a warming curry for cold winter nights

IMG_7698

Given the recent drop in temperature my cravings for comforting meat dishes grows. Lamb works so well in curries that through the winter months I am always digging into my recipe library (see above) to cook either my lamb keema, my rezala, which is heavenly if you haven’t tried it already, or my goat curry, which you can cook with lamb instead.

With a lamb and spinach curry on my mind I set out to buy the ingredients – most of which I had at home, however the lamb and spinach needed to be procured. I picked up some halal lamb from my local butcher, so much better priced than supermarkets I might add, which was mostly off the bone. Personally I rather like meat on the bone as it tastes so much better, but I know that it can put off some guests who are unaccustomed to eating meat in this way. After purchasing a few other sundries, I arrived home and realised that I had forgotten the fresh spinach.  I decided to improvise and use the frozen spinach that I always have a packet of in the freezer. It works really well so don’t stress if you too go down the route of frozen as opposed to fresh spinach.

IMG_7673

I have a propensity to always cook more food than one can eat in a single sitting so that I can stretch the meal over two days. So whilst the meat quantity looks a lot it can be eaten in one go if you have 4-6 guests or over two days if you are feeding 2-4. As is always  the case with my blog the amount of chilli you put in is up to your own individual taste. If it were just me and Mr B eating it I would spice it up a lot more than if we are sharing it amongst guests.

IMG_7694

Lamb and Spinach Curry

Serves 4-6

3 tbsp vegetable oil

2 white onions, sliced

4 bay leaves

2 inch fresh ginger, finely grated

5 garlic cloves, crushed

1.4 kg diced lamb (mainly off the bone)

5 cardamom pods, seeds taken out

1 tsp cumin seeds

1 finger sized piece of cinnamon bark, broken up

2 tsp Kashmiri red chilli powder

2 tsp ground coriander

1/2 tsp ground turmeric

salt and pepper to taste

400g tin of tomatoes

700g frozen spinach (or fresh if you remember!)

500ml water

1. Heat a large casserole dish (or any that you can use both on a hob and in an oven) and add the oil followed by the sliced onions and bay leaves. Keep on a low heat for 10 minutes so that they soften and begin to brown in colour. If they remain translucent, increase the heat for a couple of minutes, stirring to make sure they do not burn.

2. Whilst the onions are cooking prepare the spice mix of cardamom seeds, cinnamon bark and cumin seeds in either a spice grinder (one of my favourite kitchen tools) or pestle and mortar. Add the ground turmeric, coriander and red chilli powder and place to one side.

3. Add the ginger and garlic to the onions and give a good stir. Remove from the pan and place in a bowl, whilst you bronze the lamb.

4. On a medium heat add a little more oil to the pan, if needed, lightly brown the lamb in batches.  This should only take a few minutes per batch. Return the cooked onion, garlic, ginger to the pan and add the spice mix. Stir into the meat and onions before adding a little salt and pepper, tinned tomatoes, spinach and water. Heat on the stove for 10 minutes before transferring to a preheated oven set at 150 degrees ( if using a fan oven), ten degrees higher if not. Place a piece of parchment paper over the casserole dish followed by the lid and leave to cook slowly in the oven for 1hour 30mins hours, stirring a couple of times during cooking. Leave to rest for 10 minutes before serving.

5. Taste before serving to check the salt/chilli level and adjust if necessary. I find this curry is great to make ahead of time as it tends to taste even better once it has rested for a while. When you are ready to eat simply heat up gently on the hob.

Serve with rice or naan bread.

What hearty, warming curries do you like to make and eat as the winter evenings draw in? Are there any curries you would like to see me make on this blog? Leave a comment below and let me know….don’t be shy now ;o)


Bengali Mustard Fish Curry

This post has been a loooooong time coming. Last week was totally full on with both my daughters now in school. There was a catch however, that being that Little Z was to be weaned on gradually with half days over the course of the week and a half, which mean’t that much of my existence was spent ferrying children in a car back and forth to school – six times per day for me to be precise, therefore allowing very little time to actually get on with anything productive.

At the weekend I threw myself into organsing an a friend’s baby shower so was baking and making in preparation for the event. The spread included: a Victoria sponge cake, flapjacks, egg mayo, smoked salmon with horseradish, cream cheese and cucumber finger sandwiches, rainbow coloured fruit sticks (got to keep it healthy!), a carrot cake and a few other sugary treats accompanied by big cups of tea and coffee, oh and not forgetting peach bellinis upon arrival.

IMG_7126

It’s now Tuesday and calm has reigned once more in my life as Little Z stays at school for her first full day. This now gives me the necessary breathing space to get this blog post out to you all.

•••••••••••••••

IMG_7166

Mustard fish curry – Maach (fish) Jhol (gravy/curry), is probably THE most popular fish dish in Bengal. The Bengali diet includes a lot of fish and mustard oil/seeds/paste is as ubiquitous in Bengali cuisine as pepper is in the west. Traditionally the mustard paste for the curry is made by grinding brown mustard seeds on a ‘sheel nora’ or grinding stone that can be found in traditional Bengali kitchens. I learn’t this recipe however from my husband, Mr B, and my mother in-law who have converted to the quicker version of mixing some smooth Dijon mustard with some wholegrain mustard, which works superbly. Cheating? Well not really, just speeding up the process, which is always a bonus in our otherwise hectic lives.

This time I used sea bream, mainly because it is what I had in my freezer, but mackerel, tilapia, salmon or trout work equally well. Served with a bowl of rice it is perfect for a speedy week(end) night supper.

IMG_7226

Some recipes require that you rub turmeric and salt into the fish first and then deep frying them for a 2/3 minutes and then in a separate pan adding the mustard oil, nigella seeds and mustard paste followed by the fried fish. I have always tended to omit the first part, keeping the dish healthier, but by all means try both versions and see which you prefer. Similarly I often cook the dish with the fish whole, but head removed. However, you can also chop the fish into smaller pieces but do not fillet it as it will not work so well.

Bengali Mustard Fish Curry 

Serves 3 (if serving for 4 add one more fish and an extra chilli or two!)

3 sea bream/mackerel/tilapia/salmon/trout, head removed but kept whole

3 tbsp mustard oil

1 tsp nigella seeds

1/2 tsp chilli powder

1/2 tsp turmeric

3 green chillies, halved (more if you prefer it hot hot)

1 heaped tsp Dijon mustard

3 tbsp wholegrain mustard

pinch of salt

8 tbsp water

1. In a pan/wok/kadai heat up the mustard oil. When it is hot carefully add the nigella seeds, chilli powder and turmeric. Stir for a few seconds before adding both mustards. Stir well.

2. Add the chilli and then place in the fish using a spoon to cover the fish in the mustard juices. Add a pinch of salt and some water and place a lid on the pan so that the fish can steam. Keep the heat low so as not the burn the bottom of the pan. If it is drying out add a little more water or oil if need be. Spoon the juices over the fish from time to time.

3. The fish will be cooked within 10 minutes. Leave to rest. Scatter with chopped coriander before serving. To reheat, simply add a sprinkling of water and warm the pan.

Serve with rice.

IMG_7224


Rezala – Lamb Rib Chop Curry with Rose Water and Saffron

IMG_4595

Tomorrow I am heading off to Asia once again, returning to Hong Kong, but also managing to squeeze in a long overdue visit to Vietnam. I’m looking forward to visiting my favourite eating haunts that I discovered on my last visit to Hong Kong in December/January, as well as scoping out new restaurants that I never had time to visit. As for Vietnam, well I cannot wait to see what it has to offer on the food front. I am definitely going to be seeking out the ubiquitous Pho – the legendary Vietnamese soup and Banh Mi, which I fell in love with after eating my first here in London, it’s basically a Vietnamese version of a sandwich but is off-the-charts incredibly tasty. I am also looking forward to sampling a variety of Vietnamese spring rolls and hoping I can remember how to make them when I come back home so that I can share the recipes with you. Whilst I am not a coffee drinker I hear the coffee in Vietnam is out of this world and may even win over a non-coffee drinker….so let’s see.

In the meantime the dish I wanted to leave you with today, and one that I hope that you will try, is a Bengali dish known as ‘Rezala’, whose roots lie with the Muslim rulers of the Mogul era. It is both fragrant and sweet and yet there are some sharp notes from the lime that compliment the overall taste of the dish. Other flavours resonate from the dish as well including: cloves, cardamom, saffron, ginger, garlic, cumin and chilli powder. It is a dish that heightens the senses and beckons you to eat more….so you’ve been warned!

Rezala – Lamb Chop Curry with Rose Water and Saffron

Adapted from Mridula Baljekar’s recipe in ‘Curry Lovers Cookbook’

Serves 6-8 (or 4 with leftovers for another day!)

3 medium sized onions, chopped

splash of water

3 garlic cloves, crushed/chopped

3 tsp grated fresh ginger

6 cloves

18 peppercorns

8 green cardamom pods

4 small pieces of cinnamon bark

14 lamb rib chops

2 medium sized onions, very finely sliced

200ml natural plain yoghurt

75g butter

vegetable oil

1 tsp salt

1 tsp ground cumin

1 tsp chilli powder

1 tsp sugar

juice of half a lime

pinch of saffron – place into a small bowl with 1 tbsp of hot water for 10 minutes

1 tbsp rose water

rose petals

1. Place the three chopped onions into a blender with a splash of cold water and blend until you have a smooth puree.

2. Place the puree into a large bowl along with the grated ginger, garlic, cloves, cardamom pods, peppercorns and cinnamon bark and stir together before adding the lamb rib chops. Use your hands to  coat the lamb fully. Cover with cling film and place in the fridge for a few hours – or overnight if you can. Remember you need to bring the meat back up to room temperature before cooking it!

3. Heat some oil in a large pan and gently fry the remaining 2 onions, which need to be finely sliced. Gently fry until the onions have browned, which will take around 6 minutes. Remove the onion from the oil and place on some kitchen paper so as to soak up the oil.

4. Using the same pan, fry the marinated lamb chops for 5 minutes before reducing the heat and simmering on a low heat covered for another 5-7 minutes.

5. In a separate pan mix the butter and yoghurt together, stirring constantly for around 5 minutes before stirring into the lamb chops, along with the salt, cumin and chilli powder. Cover and gently cook for 50 minutes.

6. Finally add the sugar and stir into the curry before adding the lime juice, saffron and rose water. Mix well and simmer for a few minutes.

Serve with the fried onions and a scattering of rose petals. The sweet smells coming from this dish are sublime. Eaten with rice or naan, this dish is very memorable. I hope you agree.

IMG_4590


Bengali Prawn Curry

IMG_4683

This Bengali prawn curry is one that was passed on to me by my mother-in-law and is, without doubt, my favourite of all prawn curries. The sweet undertones from the desiccated coconut and prawns blends superbly with the black mustard seeds and chilli powder, giving it a gently kick. I love to cook it using the king of all prawns, but it tastes equally good if you cook it using the smaller varieties as well. I do prefer to keep the tails mind you, both for appearance and because it holds the prawns together well, so if you can find prawns with shells and tails on I would always opt for those as opposed to buying the ones that have already been shelled and deveined.

IMG_4611

The prawns will be a greyish colour when you buy them. I bought frozen prawns and then let them defrost slowly over night in the fridge before peeling and deveining them in the morning. They remind me of the giant grilled prawns I would eat most evenings when I was staying on the shores of Lake Malawi for my honeymoon, many moons ago.

IMG_4620

Within seconds of being gently cooked the prawns will turn a fabulous pink and begin to curl into themselves. They only need a minute or so cooking on each side to seal them.

IMG_4629

The sealed prawns waiting to go into the curry sauce. The meatiness of them makes them a very satisfying and filling meal.

IMG_4641

Once the prawns have been added to the curry sauce let them simmer gently for a few minutes, making sure you coat the prawns sufficiently in the delicious sauce. Sprinkle ground garam masala over the prawns and give a little stir, before serving with basmati rice.

Bengali Prawn Curry

Serves 3-4

600g prawns, peeled, deveined but tails left on (I used 9 frozen super king prawns)

1 medium sized white onion, finely chopped

3 garlic cloves, finely chopped

1 inch piece of fresh ginger, skin removed and grated

vegetable oil

2/3 bay leaves

1 tsp black mustard seeds

25g (or 4/5 tbsp) desiccated coconut

1 tsp turmeric powder

1 tsp sugar

1 tsp chilli powder (less if you prefer it less hot)

1 tsp cumin powder

1 tsp coriander powder

1 tsp salt (you may wish to add one more – taste first)

2tbsp chopped tin tomatoes

200ml boiling water

1 tsp ground garam masala

1. Heat a couple of tablespoons of vegetable oil in a fairly deep frying pan or karahi. On a low heat add the prawns, in stages if your pan is on the small side, so as to seal them. They will curl up slightly and take on a vibrant pinkish hue. After a minute or so turn them over so that both sides are sealed. Then turn them on to their backs so as the top side is also cooked. Remove from the pan and place on a plate to one side, whilst you finish cooking the remaining prawns.

2. Add a little more vegetable oil if it is running dry and keeping the oil at a low heat add the black mustard seeds. They will burst open and sizzle so make sure the oil is not too hot as they will spit! Add the bay leaves and stir with the black mustard seeds.

3. Add the onion, garlic and ginger to the pan and cook gently for around 5/6 minutes until they begin to bronze in colour.

4. Add all the spices apart from the garam masala, as well as the salt and sugar.  Stir together and add the tinned chopped tomatoes.

5. Add 200ml of boiling water and add the desiccated coconut. Bring to the boil gently stirring and add the prawns. Gently cover the prawns in the sauce and simmer for a few minutes. Taste and add more salt if necessary.

6. Add the ground garam masala over the prawns, give a quick stir and serve immediately.

Serve with basmati rice.


Mung Bean and Cumin Dal and Durga Puja Festivities

This past weekend has been one of celebration as it was Durga Puja. For Bengali Hindus (my husband’s side of the family) Durga Puja is the biggest religious festival in the Hindu calender. In Kolkata, which is the heart of Bengal, I am told it is taken to another level altogether, when families feast, dance and pray to the goddess Durga – the conquerer of good over evil and the mother of the universe, as well as her children: Ganesh, Saraswati, Lakshmi and Kartik. Schools close and everyone takes time off work to celebrate.

The statue of goddess Durga on her lion fighting the demon Mahishasura in the Hounslow Pandal

Tooting Goddess Durga 

The making of the statues is a hugely lucrative business in India and at the end of the six day festival the statues are ceremoniously carried to the Ganges and left to drift away and be reabsorbed into the Ganges. The statutes themselves are made of straw and mud from the Ganges and then glazed with paint to give them that glossy shine; the craftsmanship and detail never ceases to impress me.

There are thousands of Durga Puja pandals, which are basically huge structures housing the goddess and her children, erected all over the different Kolkata neighbourhoods. It’s all hugely competitive and each pandal competes for attention in beauty and innovation. I visited two different ones in London – one in Tooting and the other in Hounslow and both were very spectacular in terms of colour and design, the latter I know had been shipped from Kolkata.

Ganesh – one of Durga’s offspring in the Hounslow Pandal

The banging of the drums, the blowing of the conch shell, the incense, the chanting of the prays and hustle and bustle of people coming and going really transports you to India. It’s all rather frenetic and yet very warm and inviting at the same time. In the Hounslow pandal alone thousands of visitors came and went over the course of a few days. Catering for that number must be rather daunting but I was very impressed by the taste and quality of the food and the fact that it was all hot. It was the longest queue for food I have ever witnessed, but it moved quickly and before long we were given a plate of tasty vegetarian food.

Some vegetarian cuisine given to those who attended the Hounslow puja in London

Back at home I have been cooking an endless amount of Indian dishes from: methi and pomegranate pork curry to amma’s chicken curry, red lentil dal with spinach, yellow dal with courgette, Bengali fish curry and mung bean and cumin dal.

It is the mung bean dal recipe that I wanted to share with you all today. Unlike red split lentil and some yellow dal it does require a little more forward planning as it needs to be soaked, ideally overnight.

It’s delicious, nutritious, cheap to make and other than the soaking of the mung beans, is very straightforward. My mother-in-law makes a completely different tasting mung bean dal, which I will post another time, but to get you started try this one and let me know how you get on. It’s perfect for a week night vegetarian supper.

Mung Bean and Cumin Dal

Serves 4

250g mung beans (also referred to as moong bean), soaked overnight

3 tbsp mustard oil

1 white onion, finely chopped

1 tsp cumin seeds

1 tsp turmeric

half tsp red chilli powder

half tsp garam masala powder

half tsp cumin powder

1 tsp salt

juice of half a lemon

fresh coriander to serve

1. Place the pre soaked mung beans in a pan and cover with water and gently simmer until softened. This will take around 40 minutes.

2. Meanwhile, place the oil in a pan and gently fry the cumin seeds for a minute or so until they begin to bronze. Immediately add the onion and mix together with the cumin seeds.

3. When the onions have softened and become translucent add the cumin powder, red chilli powder, turmeric and garam masala and stir together.

4. Drain the mung beans and then transfer them to the pan with the onions and fold in thoroughly. Add the salt and lemon juice and simmer together for a further 5-10 minutes. You may need to add a little more water at this stage.

Whilst it is delicious to eat on its own or with a chapati it is also great to accompany it with a fish, meat or vegetarian curry (see my recipe library) if you wish to make a more substantial Indian feast.

Mung beans soaked overnight

Step 3 above


A special curry for REAL foodies

I’ve been procrastinating about sharing this blog recipe with you all for some time now as I know that if I mention three certain words I would guess that possibly 80% of you will just reach for your mouse or control pad and head straight out of this blog entry, quicker than you can say…….

CHICKEN

LIVER

CURRY

Ahhhhhh I said it. Is anyone still there?

Anyone?

Anyone?

Phew at least there are still a few of you still curious to find out more.

I think our fear and loathing of liver stems largely from our school days where it was rather unceremoniously dumped on our plates with some watery greens and some white looking mush that vaguely resembled mashed potato. It wasn’t great, I admit – and thats coming from someone who actually liked her school food.

My opinion of liver changed completely when my mother-in-law started cooking chicken liver curry for me. It completely took me by surprise, so much so that I thought that I would try and convert a few of you. A real bonus as well is that chicken livers are so cheap to buy that even if you give this a shot once and you absolutely loathe it (which you won’t) then you are not wasting loads of money. It’s not as if I am asking you to try making lobster thermidor!

Chicken Liver Curry

Serves 4

Preparation time: 10 minutes

Cooking time: 35 minutes

1 large potato, diced

500g chicken livers

1 large onion, chopped

2 inch ginger, grated

2 small fresh red or green chilli (optional), chopped in two

1 large tsp of ground turmeric

1 tsp of ground coriander

1 tsp of ground cumin

1 tsp of salt

5 garlic cloves, kept whole

1 cinnamon stick, broken up

3 cardamom, opened up slightly

1 small tsp of vindaloo curry paste

100 ml water

a few glugs of olive oil

1. Peel and dice a large potato and then fry it gently in some olive oil for 5 minutes, stirring occasionally so that the cubes don’t get stuck at the bottom of your saucepan. Make sure that you are using a pan that is deep enough to hold all the ingredients and some water. After 5 minutes spoon out the potatoes and put to one side.

2. Fry the onions in the pan that the potatoes were in. You may need to add a little more oil at this stage.  After 6 minutes the onions should begin to be turning brown. At this stage add the grated ginger (and fresh chillies if you are using them – I tend not to for this curry) and stir into the onions.

3. Add the chicken livers and let them turn a whiter colour. Do not add any further ingredients until they have become paler in appearance, this should not take longer than 10 minutes. If you are cooking with rice, this is the perfect time to start boiling your rice so that the curry and rice are ready around the same time.

4. Now add the ground turmeric, ground cumin, ground coriander, salt, garlic and the potato to the chicken livers. Stir well, but gently, so that all the spices are mixed up evenly.

5. Add the broken up cinnamon stick, cardamom and vindaloo curry paste. Gently add a little boiling water – I tend to add the water in two stages of 50ml each. You may find that you do not need this much so add a little at a time. It will help soften the potatoes and garlic.

Serve with rice and dal.  I really think you will be pleasantly surprised. Let me know how you get on.