Sticky Ginger Loaf

One of my all time favourite bought cakes growing up was without doubt Jamaican ginger cake, which was deliciously sticky, sweet and gingery. It’s still available at some large supermarkets for a mere 65p. It is also a really lovely one to make at home yourself and tasting it automatically takes me back to my childhood. For those who really like ginger you can add some finely chopped stem ginger bites, or if you prefer a smoother cake consistency just omit this part. I added it this time, but often simply add ginger powder.

adapted from Afternoon Tea at Bramble Cafe by Mat Follas

Sticky Ginger Loaf

100g unsalted butter

100g light soft brown sugar

100g Lyle’s golden syrup

100g Lyle’s black treacle

200g self-raising flour

1 tbsp Chinese five spice powder

2 tsp ginger powder

250 ml milk

1 egg

optional: if you really like ginger you can also add 90g of finely chopped stem ginger and add it to the flour. Sometimes I do and other times I don’t. I tend to find my children prefer it when I omit this part. 

  1. First preheat an oven to 140 degrees centigrade.
  2. In a saucepan add the butter, light soft brown sugar, golden syrup and treacle and stir on a low heat so that all the ingredients combine smoothly.
  3. In a mixing bowl sieve the flour and add the Chinese five spice and ginger powder. (if you are adding stem ginger then add it at this stage)
  4. In a separate bowl whisk the egg and milk and keep to one side.
  5. Add the mixed butter syrup to the bowl of  flour and fold in to combine.
  6. Follow this with the whisked egg and milk so that the mixture is nice and smooth. I used my new Kitchen aid and it worked a treat.
  7. Line a baking loaf tin with parchment paper on the bottom and a longer strip in the middle going up the sides – see photo – this helps to remove it from the tin after baking.
  8. Add the mixture to the tin and then place in the middle of the oven for 60 minutes. Use a skewer in the centre to test it comes out clean and therefore is cooked. If it doesn’t return it to the oven for a little longer.
  9. Remove from the oven and allow to cool before taking it out of the tin.

Cut into slices to serve either as is or with a little butter on top.


Double Ginger Cake

img_3641

I am not a big baker. I leave that to the precision experts like my father. My kind of cooking tends to gravitate to more savoury, spiced and packed with flavour. That said I do like an uncomplicated sweet recipe or in this case a double ginger cake. I don’t have a kitchen aid or anything fancy, instead when I bake a cake I like to do everything in a bowl, ideally by hand or a hand whisk if necessary. I was browsing through Nigel Slater’s ‘The Kitchen Diaries’ the other day – great book if you haven’t got a copy, otherwise one for the christmas list – and his double ginger cake stood out for three reasons. One it was ginger – I love ginger, two – it looked quick and easy to make and three – it did not require any specialist equipment.

img_3636

My father’s belated birthday family lunch was the ideal excuse to try out Nigel’s recipe. After a long lingering lunch, cooked by my mother – parsnip soup for starters (above), followed by roast pork with fennel, finished off with blackberry and apple crumble, we donned winter coats and wellies and headed for the woods for a walk at dusk.

img_3642

Upon returning the feasting continued with my ginger cake (and a coffee cake that the birthday boy had made himself – just in case no one else had made him a cake) and tea. It got the thumbs up all round. The sponge was moist and deliciously gingery and as there was no sight of icing, it was not too saccharine sweet.

img_3644

Double Ginger Cake

Adapted from Nigel Slater’s Double Ginger Cake from ‘The Kitchen Diaries’ 

Serves 10+

250g self-raising flour

1 level tsp bicarbonate of soda

2 tsp ground ginger powder

halt a tsp cinnamon powder

pinch of salt

200g golden syrup

2 tbsp syrup from the stem ginger jar

125g unsalted butter

3 lumps (about 53g) stem ginger in syrup, finely diced

2 tbsp sultanas (optional)

125g dark muscovado sugar

2 eggs

240ml milk

I used a 25cmx25cm tin (Nigel used one slightly smaller). I also think it would work well in a loaf tin.

  1. Line the tin with baking parchment and place to one side.
  2. Preheat the oven to 180 degrees.
  3. Sift the flour, ginger powder, cinnamon, bicarbonate of soda and salt into a large bowl and place to one side.
  4. In a pan heat the golden and ginger syrup along with the butter, keeping it on a low heat.
  5. Add the finely diced ginger, sultanas (if using) and sugar to the pan. Stir allowing the sugar to dissolve completely for a couple of minutes before gently pouring it into the bowl with the flour and stirring all together so that the flour has been absorbed into the hot syrupy butter.
  6. In a small bowl break the eggs and using a fork gently beat them. Add to the milk before adding that into the bowl with the mixture.
  7. Pour into the lined baking tin and place in the oven for 35 minutes. You want to be able to able to insert a skewer and for it to come out clean.

Leave in the tin to cool completely, unless you are wanting to eat immediately that is. You can wrap it in foil and eat over the next few days – Nigel mentions allowing it to mature for a day or two will enhance the flavour further. Thankfully there are leftovers so I will be having a square every day for the next few days.

img_3643


Butternut Squash, Lemongrass, Coconut and Spinach Curry

IMG_0868

Increasingly more and more people are balancing their diet with vegetarian food and cutting out meat completely on some days of the week #meatfreemondays. Whilst I do eat meat and fish I am consciously eating less meat and more fish and vegetables. A balanced diet is important and I do enjoy eating meat but I am in the camp that it is unnecessary to eat it everyday.

IMG_0856

My recipe here ‘Butternut Squash, Lemongrass, Coconut and Spinach Curry’ will hopefully convert even the meat lovers amongst you. It is packed with so much goodness and tastes really good, with a lovely chilli kick reverberating through the dish. For those who claim they can’t cook, seriously try this one. It is very easy to make and you can cook it in under 30 minutes. The hardest part is peeling the butternut squash. *Inventors* out there I would love you to come up with a device that makes it quick and easy to peel any type of squash or pumpkin. I use my regular peeler and knife and whilst it does not take long I know it can be done faster.

IMG_0824

This recipe shouts SPRING to me, although that maybe because I put daffodils in the photo shoot. The bright yellow orange hue coming from the butternut squash and turmeric sings to me and makes it wonderfully appetising to look at and eat. I also love the burst of green from the spinach, fresh herbs and lime.

IMG_0830

I have used fresh ginger paste and garlic paste, as I always have pots to hand in the fridge and for speed they are wonderfully helpful, but by all means use fresh ginger and garlic and then simply finely grate them so they become more paste like.

IMG_0836

The sweetcorn adds a lovely crunch and texture to the dish alongside the soft butternut squash and spinach. I have added kaffir lime leaves as I often have some in my fridge/freezer. They freeze well and you can pick them up at the big supermarkets.

IMG_0842

I don’t bother to take out the kaffir lime leaves or lemongrass when serving. I quite like the rustic, throw it together look. I also find the dish is a great pick me up if you are feeling a little under the weather. The ginger, turmeric, garlic, spinach and chilli really flood the body with so much goodness that a sense of wellbeing hits you almost immediately.

IMG_0856

I would love you to give it a try and please let me know how you get on. Butternut squash (uncooked) last for weeks so I always have one ready to use.

IMG_0846

Butternut Squash, Lemongrass, Coconut and Spinach Curry

Serves 4-6

3 tbsp ground nut oil

3 banana shallots (or 2 medium onions), finely sliced

1 tsp salt

2 lemongrass, outer leaves taken off and both ends and then bashed gently with a rolling pin

1 heaped tsp of ginger paste

1 heaped tsp of garlic paste

2 small red chillies, thinly sliced

3 kaffir lime leaves (optional)

1 tsp ground turmeric

200g chopped fresh tomatoes

1 butternut squash, peeled and cut into 3cm cubes

500 ml of vegetable stock

1x 400ml can of coconut milk (I find Pride is nice and creamy)

1 tbsp Thai fish sauce

1 fresh corn on the cob, corn sliced off the cob

200g fresh spinach

handful of fresh coriander, to serve (optional)

handful of fresh mint, to serve (optional)

1/4 fresh lime per portion

1.  Finely slice the banana shallots and then heat the oil in a large deep pan. When it is hot add the shallots and turn the heat down. Add the salt and stir into the shallots. Allow the shallots to soften, which will take a few minutes.

2. Add the garlic and ginger paste and stir into the shallots. Then add the chillies, lemongrass, ground turmeric and kaffir lime leaves. After a further minute add the fresh tomato and stir once again. Add the butternut squash and stir into all the other ingredients.

3. Add the stock, Thai fish sauce and the coconut milk and simmer gently for around 20 minutes, by which time the butternut squash will have nicely softened. If it needs a couple more minutes to soften adequately, carefully monitor as you do not want to over cook as mushy butternut squash is not so appealing. Add the sweetcorn 5 minutes before you wish to serve as it will take no time to cook.

4. Turn off the heat and add the fresh spinach and gently submerge in the sauce, which will wilt it perfectly.

5. Serve hot in bowls either with some jasmine rice or noodles. Add fresh coriander, mint and lime to suit individual tastes.

IMG_0840

If you click on the comments button below you will also see the option to like. I know it’s a little hidden away but have a look and don’t forget to click the *LIKE* button and if you are feeling extra brave do leave a comment as I love to hear from readers.


Red Thai Tofu, Aubergine and Egg Curry

IMG_9119

Over the past couple of weeks I’ve been cooking loads of Indian food – recipe testing mainly. I  had been sent a fabulous hamper from Natco foods as part of the Curry4Change competition that I’m taking part in –  details on this will follow in June as YOU too can get involved.

I am now craving food from a different region and a rather delicious vegetarian Thai dish caught my attention recently, cooked by John Torode as part of one of the invention tests in the 2014 Masterchef series. I find the series completely addictive and a pleasure to watch. The invention test in particular is always rather exciting as it really demonstrates how much flair and knowledge of cooking the contestant really has. Basically the contestants get two boxes to chose from, one savoury and the other sweet – no prizes for guessing which I would always choose! After electing a box they have to create a dish using some of the ingredients within the box as well as a few staple ingredients that they are all given. Before the contestants dive in John has a go at choosing one of the boxes (away from the contestants), typically he too always chooses the savoury box. This time he created a red Thai aubergine, tofu, egg curry, which I thought looked delicious, spicy and relatively light – a dish that was beckoning me to cook.

Here is my version of the dish inspired from the John Tororde’s creation. I have a feeling that John may have included red peppers in his paste but I opted to not put them in – I leave it to you to decide.

IMG_9135

Red Thai Tofu, Aubergine and Egg Curry

The proportions below will allow you to cook this dish a few times – freeze the paste left over.

To make the paste

5cm fresh galangal

5cm fresh ginger

3 cloves of garlic

13 small shallots (half that if they are larger in size)

3 small piece kaffir lime peel

4 large dried red chilli, soak for 10 mins in warm water to soften

2 fresh small red chillies

2 lemongrass sticks

1 tsp shrimp paste

1. If you have a gas hob, simply place all the ingredients, aside for the shrimp paste, on a rack and place over the flame so that the ingredients char slightly. This will give the paste a lovely smokey flavour. I did exactly the same thing when I was in Vietnam and made Pho – see here.

2. If you do not have a gas hob, simply place them into a pan (do not add oil) and let them heat and char this way.

3. Once the ingredients have charred and cooled, place into a blender and add the shrimp paste. Blend until you can get it as smooth as you can.

IMG_9087

IMG_9100

***************

To make the curry itself

Serves 4

5 tbsp vegetable oil

800g firm tofu, cut into 3 cm cubes

4 tsp homemade curry paste

300g aubergine – if using baby aubergines cut into quarters, otherwise cut into 7x2cm matchsticks

400ml creamy coconut milk (1 tin)

4 eggs

1 tbsp caster sugar

1 tsp salt

3 pak choi

100ml water

1/2 lime, juice only

1. Firstly make sure the tofu is completely dry as it will then fry a lot better. I usually take the tofu out its packet a couple of hours before using and then place on kitchen roll so that it soaks up all the excess water.

2. Using a non-stick pan place a couple of tablespoons of vegetable oil into the pan and when it is hot carefully add the tofu cubes. Fry on a low heat so that the tofu bronzes delicately. This should not take much more than 10 minutes.

3. Meanwhile on a low heat, in a wok or karahi, add a couple more tablespoons of vegetable oil and add the thai paste. Stir around in the oil and add the aubergine and coat in the paste. You may find you need to add another tablespoon of oil at this stage as the aubergines do need quite a bit to cook.

4. As the aubergines begin to soften add the creamy coconut milk and the eggs in their shells. They will become hard boiled from cooking gently in the coconut milk.

5. Add the caste sugar and salt to taste.

6. Add the lime juice and then five minutes before serving add the pak choi and a little extra water. Remove the shells from the eggs and cut in half.

7. Serve in a bowl with a small bowl of rice on the side. John added roasted sesame seeds in his, which is a nice touch.

NB: My local Thai grocers said that they do not use fresh chillies in their red thai paste, but I decided to add a couple of help with the heat and colour.

IMG_9115


PS: I realise I’ve been cooking rather a lot of  dishes that include aubergine/eggplant lately. I do apologise if you can’t stand the vegetable. I don’t actively come up with recipes that include it but realise this is the third recipe that includes aubergines that I’ve cooked in the last month or so.  I promise there will be no aubergines for a while as you are probably being polite and are actually really sick of them ;o).


Indian Aubergine/Eggplant, Peanut and Tomato Curry

IMG_8109

Have you ever been a little ambivalent about aubergine/eggplant? On the one hand loving their smooth, shiny plum coloured exterior but never really in raptures about the taste. Well my other half, Mr B, tended to fall into this category, so a while ago I set out to prove him wrong.

IMG_8072

After mutterings of ‘you know aubergine is my least favourite vegetable, I prefer greens’, he tasted one mouthful and that completely shut him up. Murmurs of approval were given between mouthfuls and a 9/10 score (yes we regularly mark our food – is that unusual?). RESULT. Surprisingly my eldest child also adored it, surprising as it does have a fair amount of chilli in it! If you don’t like chilli, but like spice, just reduce or take out the chilli in the recipe below.

IMG_8093

The combination of aubergine, peanuts and sesame seeds works ridiculously well together so much so that you will have to restrain yourself from wanting to guzzle up the whole dish. Combine that with a spiced onion and tomato sauce and you have yourself a winning dish.  So put your assumptions to one side for a moment and give this recipe a whirl and I can assure you you will be more than pleasantly surprised.  I couldn’t resist the bijou aubergines on sale at my local market but a regular sized aubergine will work equally well. Just slice the aubergine into chunky chip sized pieces, keeping the skin on of course.

IMG_8097

Indian Aubergine/Eggplant, Peanut and Tomato Curry

450g baby aubergine/eggplant (normal size is fine too), sliced lengthways or chunky chip sized if using a regular aubergine

cooking oil, enough to deep fry the aubergine

2 tbsp olive oil

1 tsp black mustard seeds

1 tsp cumin seeds

2 dried red chillies

1 small green chilli, finely chopped (optional)

5 curry leaves (fresh or dried)

1 tsp turmeric powder

1 tsp of garlic paste

1 tsp ginger paste

1 white onion, finely chopped

200g chopped fresh tomatoes

1 tsp coriander powder

1 tsp cumin powder

1/2 tsp Kashmiri chilli powder

2 tbsp salted peanuts

1 tbsp sesame seeds

150ml water

1 tsp salt (to taste)

1. If using baby aubergine/eggplant slice lengthways removing the stalk. If using a regular sized aubergine slice into chunky chip sized, again removing the stalk. Once sliced, immediately place in a pan of boiling oil to sizzle away and bronze. This should take no longer than ten minutes.

2. Remove the aubergine with a straining spoon and place on some kitchen roll whilst you prepare the next steps.

3. In a new large pan add the olive oil and when hot add the mustard and cumin seeds. They will begin to pop immediately so move them gently around the pan for 15 seconds before adding the dried red chilli, fresh small green chilli (optional), curry leaves (fresh or dried), turmeric, garlic, ginger paste and onion. Continue to cook on a medium heat for around 7 minutes by which time the onion should have nicely softened, but not bronzed.

4. Add the chopped tomatoes, coriander, cumin and Kashmiri chilli powder and simmer for a further 5 minutes, by which time the tomatoes will have totally softened and blended into the sauce. Return the aubergines to the pan and fold gently into the sauce.

5. In a small pan dry roast the peanuts and sesame seeds for a couple of minutes, making sure to constantly move them around the pan so that the heat is evenly distributed and they do not burn. They will begin to bronze at which point you need to remove them from the pan.

6. Using a spice grinder (definitely one of my most useful items I own in my kitchen) – this is the one I use – see here – grind the peanuts and sesame seeds together to form a paste.

7. Add the peanut sesame paste to the pan and stir into the curry, adding more water if necessary. As I used salted peanuts I only needed to add a little more salt. Simmer for a few minutes and serve. If cooking ahead and leaving to rest you will have to add a little more water when heating up.

Serve with rice or Indian bread and you have yourself a vegetarian – in fact vegan – treat. Try it and leave a comment below.

IMG_8116


Indian Eggy Toast

IMG_7795

If you ever feel a little lethargic/hungover/sleepy (delete as appropriate), in the mornings, my Indian take on French toast will sharpen up your senses and give you that necessary skip in your step to take on the day ahead. Drinking coffee has never rocked my boat, although I do love the smell of freshly ground coffee and would so love to love drinking it, however, I find that a burst of chilli for breakfast – yes for breakfast – does awaken the endorphins rather well.

IMG_7804

I also thought that it may give you some ideas on what to feed the masses if you have a number of guests staying over for Christmas. We often decamp down to my parents for part of the Christmas break and as there is ten of us we all help with the share of the cooking. This recipe is so quick that by the time someone else has laid the table you have already made a pile of these delicious beauties ready for the taking. It’s quick to rustle up more should they be a hit so its a win win – stress free and super quick.

I have added two chillies below, but by all means add only one if you want a more subtle approach

Indian Eggy Toast

produces 6/7 toasts

2 tbsp of vegetable oil

sourdough bread, sliced

4 eggs

2 chillies, finely chopped (1 if you prefer it less hot)

a small handful of fresh coriander, chopped

1 tomato, finely chopped

pinch of rock salt

optional: 1 inch fresh ginger, finely grated

1. In a large bowl whisk the eggs and then add the chilli, fresh coriander, tomato, rock salt and fresh ginger (if using).

2. Slice the sourdough bread and then soak the bread in the egg mixture on both sides.

3. Heat the oil in a frying pan and when it is hot place the soaked sourdough into the pan. Leave to bronze on one side for a couple of minutes before turning for a further couple of minutes on the other side.

4. Serve immediately with some Sriracha chilli sauce or my chipotle sauce if you have some already made up. Both work a treat.


Lamb and Spinach Curry – a warming curry for cold winter nights

IMG_7698

Given the recent drop in temperature my cravings for comforting meat dishes grows. Lamb works so well in curries that through the winter months I am always digging into my recipe library (see above) to cook either my lamb keema, my rezala, which is heavenly if you haven’t tried it already, or my goat curry, which you can cook with lamb instead.

With a lamb and spinach curry on my mind I set out to buy the ingredients – most of which I had at home, however the lamb and spinach needed to be procured. I picked up some halal lamb from my local butcher, so much better priced than supermarkets I might add, which was mostly off the bone. Personally I rather like meat on the bone as it tastes so much better, but I know that it can put off some guests who are unaccustomed to eating meat in this way. After purchasing a few other sundries, I arrived home and realised that I had forgotten the fresh spinach.  I decided to improvise and use the frozen spinach that I always have a packet of in the freezer. It works really well so don’t stress if you too go down the route of frozen as opposed to fresh spinach.

IMG_7673

I have a propensity to always cook more food than one can eat in a single sitting so that I can stretch the meal over two days. So whilst the meat quantity looks a lot it can be eaten in one go if you have 4-6 guests or over two days if you are feeding 2-4. As is always  the case with my blog the amount of chilli you put in is up to your own individual taste. If it were just me and Mr B eating it I would spice it up a lot more than if we are sharing it amongst guests.

IMG_7694

Lamb and Spinach Curry

Serves 4-6

3 tbsp vegetable oil

2 white onions, sliced

4 bay leaves

2 inch fresh ginger, finely grated

5 garlic cloves, crushed

1.4 kg diced lamb (mainly off the bone)

5 cardamom pods, seeds taken out

1 tsp cumin seeds

1 finger sized piece of cinnamon bark, broken up

2 tsp Kashmiri red chilli powder

2 tsp ground coriander

1/2 tsp ground turmeric

salt and pepper to taste

400g tin of tomatoes

700g frozen spinach (or fresh if you remember!)

500ml water

1. Heat a large casserole dish (or any that you can use both on a hob and in an oven) and add the oil followed by the sliced onions and bay leaves. Keep on a low heat for 10 minutes so that they soften and begin to brown in colour. If they remain translucent, increase the heat for a couple of minutes, stirring to make sure they do not burn.

2. Whilst the onions are cooking prepare the spice mix of cardamom seeds, cinnamon bark and cumin seeds in either a spice grinder (one of my favourite kitchen tools) or pestle and mortar. Add the ground turmeric, coriander and red chilli powder and place to one side.

3. Add the ginger and garlic to the onions and give a good stir. Remove from the pan and place in a bowl, whilst you bronze the lamb.

4. On a medium heat add a little more oil to the pan, if needed, lightly brown the lamb in batches.  This should only take a few minutes per batch. Return the cooked onion, garlic, ginger to the pan and add the spice mix. Stir into the meat and onions before adding a little salt and pepper, tinned tomatoes, spinach and water. Heat on the stove for 10 minutes before transferring to a preheated oven set at 150 degrees ( if using a fan oven), ten degrees higher if not. Place a piece of parchment paper over the casserole dish followed by the lid and leave to cook slowly in the oven for 1hour 30mins hours, stirring a couple of times during cooking. Leave to rest for 10 minutes before serving.

5. Taste before serving to check the salt/chilli level and adjust if necessary. I find this curry is great to make ahead of time as it tends to taste even better once it has rested for a while. When you are ready to eat simply heat up gently on the hob.

Serve with rice or naan bread.

What hearty, warming curries do you like to make and eat as the winter evenings draw in? Are there any curries you would like to see me make on this blog? Leave a comment below and let me know….don’t be shy now ;o)


Cha Ca La Vong – Vietnamese Fish with Turmeric, Ginger and Dill

IMG_7485

The melodic sounding ‘Cha Ca La Vong’ is one of Hanoi’s famous dishes consisting of white fish (often Vietnamese Snakehead fish) along with fresh turmeric, galangal, ginger, the pungent smelling Vietnamese shrimp paste, spring onions, rice noodles and a generous helping of fresh dill, coriander and mint and a scattering of peanuts.

My version is all of the above except no galangal (unless I happen to chance upon it), turmeric powder instead of fresh turmeric and no Vietnamese shrimp paste. I also find cod or tilapia work best for me, but basically you can use any thick white fish that has been filleted and does not have a propensity to fall apart.

IMG_7466

The flavour combinations work so well and I find it refreshing to give dill centre stage once in a while as I tend to find that it only ever gets partnered with salmon, trout and creme fraiche. The textures also really compliment each other, from the soft and yet delicately fried fish, to the crunchy nuts, the fresh flavoursome herbs and the filling noodles.  I like to accompany the dish with my sweet and sour nuoc cham dipping sauce – see here (at the bottom of the post).

IMG_7439

It’s one of those dishes which is perfect for guests to get stuck in and help themselves.  Part of the fun of it is to create the dish yourself, choosing the amounts of herbs that suit your requirements. I also find that when guests help themselves there is far less wastage as people, on the whole, tend to take what they are going to eat.  Both my daughters adore the dish and for my youngest I tend to make up a separate nuoc cham dipping sauce without fresh chilli.

*****************

Cha Ca La Vong – Vietnamese Fish with Turmeric, Ginger and Dill

Serves 4

600g cod or tilapia, cut into 2 inch chunks

1 tbsp fresh ginger, finely grated (equally you could use ginger paste)

2 garlic cloves, finely chopped (or as above)

1 tbsp fish sauce

1 tsp turmeric powder

1 tsp sugar

1 tbsp plain flour

3/4 tbsp of vegetable oil

6 spring onions, thinly cut on the diagonal

bunch of fresh dill

bunch of fresh coriander

bunch of fresh mint

1 generous handful of unsalted peanuts, slightly crushed

300g rice noodles

1. Place the fish chunks, turmeric, ginger, garlic, flour, sugar and fish sauce in a bowl and gently mix in together so that the fish is completely coated in the turmeric. Cover and leave to marinade in the fridge for a few hours or overnight.

2. Cook the rice noodles according to the packet (normally I boil them for 4 mins) and drain. Run cold water through them and place to one side. When ready to serve pour boiling water through it once, drain and place in a serving bowl.

4. In a different bowl place the fresh coriander and mint and in another place the peanuts.

5. Prepare the nuoc cham dipping sauce. For four people you will need to make two batches of this – see here.

6. In a frying pan add the oil and when it is hot add the fish in batches along with any remaining ginger and garlic from the marinade. Leave for a 2-3 minutes so they begin to crisp before turning over for another couple of minutes. Place the fish on kitchen roll whilst you are cooking the remaining fish chunks.

7. Once the fish has crisped up sufficiently add the dill and the spring onions for up to a minute before placing in a large serving bowl.

8. Allow guests to serve themselves, showing them how to layer up the dish by first placing the noodles in a bowl, followed by the fish, spring onions and dill, mint and coriander, peanuts and then a little nuoc cham dipping sauce over the top.


Miso Chicken, Slow Baked Tomatoes and Fresh Spinach Salad

IMG_6527

Here in the UK we are enjoying a flashback to the summer of 1976, apparently. I was only one at the time so have no recollection of the ‘great summer’ but we are now into weeks, not days, of glorious warm sunshine with temperatures climbing up to 33 degrees in west London. When the weather is hot I love to get creative with my salads and try out different flavour and ingredient combinations. This one I created awhile ago when a friend, who has certain culinary likes and dislikes was coming over to supper. I started with the miso chicken and spinach and then built from there, digging out interesting ingredients from my fridge and pantry along the way. The overall mix of flavours works really well to the extent that I have now cooked this salad multiple times and thought you would appreciate having it too. It’s great for a picnic, lunch or supper, is hugely versatile and if you keep the chilli oil marinade to one side for guests to help themselves, then the whole family can enjoy the dish.

Miso Chicken Slow Baked Tomatoes and Fresh Spinach Salad

Serves 4-6

 For the Chicken Marinade

500g chicken breasts

3 garlic cloves, grated

1 inch ginger, peeled and grated

2 tbsp sweet white miso paste

1 tbsp sesame oil

1 tbsp light soy sauce

*******

parchment paper

3 tbsp pine nuts, toasted

250g puy lentils

1 avocado, chopped

6 slow baked tomatoes marinated with chilli

chilli oil from the slow baked tomatoes (see above)

250g fresh spinach

1. First you need to flatten the chicken breasts as they will cook under the grill more evenly and quicker if they are thinner. Place a large strip of parchment paper underneath the chicken breasts and another similar sized piece on top. Then using a rolling pin gently hit the chicken pieces which will begin to flatten. Check to see how they are looking and if they need to be a little flatter continue to hit them with the rolling pin. If you overly bash them they will begin to break apart so flatten them to the extent that they still keep in tact.

2. Place the flattened chicken breasts into a freezer bag and then add the grated ginger, garlic, sweet white miso paste, soy sauce and sesame oil. Using your hands massage the ingredients thoroughly into the chicken pieces. Place in the fridge for 30 minutes or longer if you can.

3. Heat up a small frying pan and when it is hot add the pine nuts being careful not to burn them as they toast quickly. Keep them moving around the pan and after a minute they should have toasted nicely.  Place to one side.

4. Heat your grill (you could also use a griddle pan or BBQ!) to 200 degrees centigrade and place the marinated chicken directly onto your oven rack. Place some baking parchment/foil underneath to catch all the bits than fall through the rack – these will also taste great in the salad.  The breasts will need around 6 minutes each side. If they look a little undercooked leave them for a minute or two more and vice versa.

5. In a large mixing bowl add the spinach, chopped/sliced avocado, puy lentils – for speed I often use the Merchant Gourmet brand – see here, pine nuts and slow baked tomatoes marinated in chilli. Whilst you can of course slow bake your own and marinate them in chilli oil (which I will get around to doing so at some point – will make a great blog post) I opt for the Sacla brand – see here. Chop the tomatoes up slightly and then gently mix all the above ingredients together.

6. Once the chicken has cooled slightly slice into stripes and mix gently into the salad along with the bits that had fallen through the rack. Add a little of the chilli oil from the slow baked tomatoes and place extra in a small pouring jug.

7. Transfer the salad to a serving bowl and allow guests to serve themselves. I find it is best eaten at room temperature.

It is surprisingly filling and leftovers the next day taste equally good, so just refrigerate if you have some left over.

IMG_6544


Vietnamese Pho Bo – Beef Noodle Soup and finding the perfect cooking course in Hoi An

IMG_5336

Vietnamese cuisine is to put it simply, ‘heavenly’. After my first bite of a Banh Mi, from Banh Min 11, back in London, not that long ago, I knew that it was going to be a culinary love affair. Since arriving in the motherland it has not disappointed. Each meal we have eaten has been a multitude of delicate, fragrant flavours – spices that sing to you and dance on your tongue.

IMG_5119

Herbs feature heavily in most dishes and add real fragrant lift. I was sufficiently enthused that I am going to attempt to grow some of them back in London – for example Vietnamese mint (which I should have no problems growing!), Vietnamese basil, saw tooth coriander, Vietnamese lemon balm, garlic chives. There is a great explanation of Vietnamese herbs here.

IMG_5076

I was keen to attend a cooking course in the UNESCO World Heritage Site of Hoi An and so set about researching a course that best suited my needs. I was given a few recommendations, however, I decided that a course run by the very affable Van, who runs ‘Green Bamboo Cooking School’ suited my needs perfectly.

IMG_5197

The course run by Van offered a detailed tour of the fresh food markets, where we picked up our ingredients; convivial fellow pupils; personal touches by Van who runs the course in her own home; unhurried tutoring over seven hours; a generous range of recipes manifesting itself in a memorable group lunch and a souvenir goodie bag to take home. Throw in door to door service as Van kindly ferried us to and from our hotels, and it is no surprise that Trip Advisor has over 210 positive comments for this class with no dissenters.

IMG_5126

I am pleased to say that course surpassed even my high expectations. Van was charming, spoke excellent English and a was a natural teacher. She also converted me to Vietnamese coffee – the condensed milk being the key.

My fellow students were a really lovely bunch of enthusiastic foodies – three Australians, two Norwegians and two Swiss and all of us had huge grins on our faces all day, clearly revelling in the fact that we had chosen such a perfect course. Here are few photos of the day. Scroll down.

I elected to cook the unofficial national dish of Vietnam – pho bo, beef noodle soup (pronounced ‘fur’). You can find pho stalls on most streets in Vietnam, but to cook it well is the tricky part. I was keen to understand how to cook it from scratch and to make that perfect pho broth. First stop was the market to buy the beef, which was as fresh as it gets as the cow had been slaughtered that very morning. We bought the beef fillet and 1kg of beef bones. Normally Van would have bought the spine, but there had been a run on spine bones that morning from a hotel restaurant, which had bought the lot. So instead we had a range of other beef bones and some shin to add to the flavour.

IMG_5104

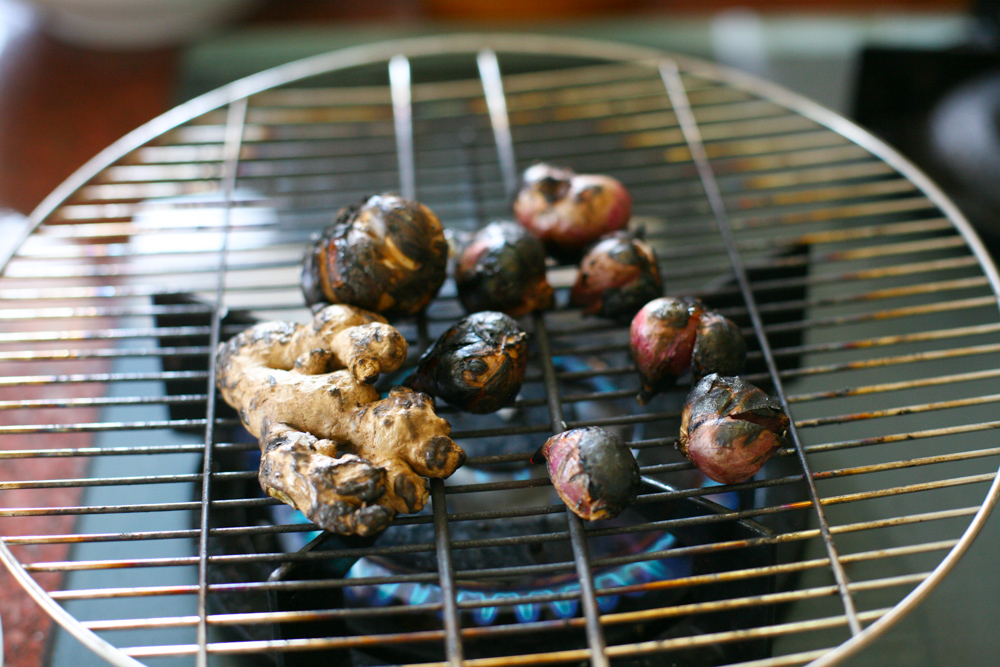
Back at Van’s house the first trick I learnt was to gently char the skin of some ginger, shallots and garlic over a flame as this would give the broth a deep smokey flavour.

IMG_5133

It takes no more than a couple of minutes on each side.

IMG_5145

I then removed most of the skin of the ginger, using that back of a teaspoon and also the skin from the shallots and garlic, which is very easy at this stage as they virtually pop out.

After properly cleaning the beef bones, place them in a large pan of boiling water so as to get rid of any scum from the bones before cooking. Submerge them in boiling water for under a minute and then place them into a second large saucepan, which has also has boiling water in it. Discard the water from the first saucepan. You then need to add the charred ginger, garlic and shallots

Continue to add the following ingredients to the pan: 2 chillies, stick of cinnamon, 1 large white onion, 5 star anise, 5 Chinese apples. I had not come across Chinese apples before, but they tasted delicious. As they may be difficult to source for some people, dates work equally well. Add some sugar and salt and if you fancy, some beef stock as well (I decided to omit the beef stock, to see how it would taste in its natural state).

IMG_5146

Place a lid on the top and leave to boil away gently for a further 2 to 3 hours. Add more seasoning to taste and beef stock if necessary.

IMG_5154

Meanwhile, very finely slice the beef fillet and leave in the fridge until ready to use.

IMG_5279

Before serving have individual bowls of bean sprouts and fresh pho noodles/rice noodles, (the noodles you have submerged into boiling water for 30 seconds and drained) at the ready. In a large ladle add a little of the raw beef and submerge it into the pho broth so that the broth fills the ladle. Using a fork or chop sticks, move the beef around in the boiling stock in your ladle for 30 seconds (that magic number) so that it cooks through and ladle it over one of the bowls of noodles that you have prepared.

Add a generous amount of fresh herbs, including Asian basil, coriander, spring onions along with a quarter of a lime and chilli sauce to taste. You can also have a small bowl of soy sauce on the side, should you wish to add a little, as well as some sliced green papaya and fresh sliced chilli.

IMG_5283

IMG_5284

I was delighted by the results and despite having eaten a ridiculous amount of the tastiest Vietnamese food, cooked by my fellow foodies, I managed to see off a bowl of my pho bo.

IMG_5289

Eight happy and well fed people were then deposited back to their hotels, along with a goodie bag provided by Van.

I hope that you too will try this tasty version of pho. Watch this space for more Vietnamese recipes over the coming months.

Pho Bo (Beef Noodle Soup)

Adapted from Van’s recipe, who runs Green Bamboo Cooking School

Serves at least 8

500g fresh pho noodles/rice noodles

300g beef fillet

1 kg beef bones – ideally spine bones or shin

5 litres boiling water

1 tbsp beef stock

******************

5 star anise

1 large stick of cinnamon

1 roasted fresh ginger

5 roasted shallots

1 large roasted bulb of garlic

5 dried Chinese apples/dates

1 whole white onion, peeled

2 red chillies, left whole or chopped in two

2 tsp salt and pepper

1 tbsp raw sugar

**********

50g fresh bean sprouts

50g fresh Asian basil

50g fresh coriander

50g spring onion, finely sliced

2 limes, cut into quarters

green papaya, finely sliced

chilli paste to taste

soy sauce, to taste (optional)

2 fresh chillies, sliced (optional)

1. Wash the beef bones under a tap and then place to one side. Meanwhile bring two large pans of water to the boil. In the first add the beef bones and submerge them for just under a minute and then transfer them to the second saucepan. Discard the water from the first saucepan.

2. Over a gas flame place the garlic, shallots and ginger on a metal grill directly above the flame, allowing them to char/roast. After a couple of minutes turn them over so that both sides are equally charred. Using the back of a teaspoon, peel off a little of the skin of the ginger.

3. Add them to the bones and boiling water, along with the onion, chillies, dried Chinese apples/dates, cinnamon stick and star anise. Add the salt, sugar, pepper and beef stock it you wish and place a lid on the pan and let  it boil gently for 2-3 hours.

4. Meanwhile, very finely slice the beef fillet and return it to the fridge.

5. Before serving, warm the noodles by placing them on a slotted spoon and submerging them in boling water for 30 seconds. Drain and place in individual bowls. Add the bean sprouts to each of the bowls.

6. In a large ladle add a little of the thinly sliced beef fillet and submerge into the pho broth so that the ladle is completely full and the beef is submerged. With a fork or chop sticks move the beef around in the ladle so that it ‘cooks’ through properly.  Pour over the noodles. Please note the pho broth needs to be boiling/bubbling away at this stage so that the beef fillet is cooked properly. 

7. Add the fresh herbs, lime, spring onions, green papaya and chilli paste/soy sauce/fresh chillies to taste.

8. Serve immediately and enjoy piping hot.