EXCITING NEWS: MY COOKBOOK IS AVAILABLE TO PRE-ORDER WORLDWIDE

I have been ever so quiet on my blog now for a long time. I do apologise to those who have waited patiently for a post. It’s not that I haven’t wanted to blog, but more a case as I have been focusing all my energy and attention on my cookbook, which is launching late November this year. It is all very EXCITING.

I hope you love the cover above. I wanted something striking and beautiful and I think my publishers have excelled.

As the title states this book is really for anyone who wants to learn how to cook delicious, healthy, Indian home cooking. These are authentic recipes you will see being cooked in households across India. The recipes are very accessible with all of the ingredients being readily available. Since Lockdown I have been teaching a number of Zoom classes with people who in many cases are new to Indian cookery. These recipes have been tried and tested by the uninitiated and work efficiently. The book features recipes I have learned from my Indian family (my husband is of Indian descent) and from my travels to India and Sri Lanka over the last 23 years. There are 106 recipes in total. 70 are vegan (or can be easily adapted to be) and the remaining 36 have meat and/or fish/shellfish.

To give you a snapshot of some of the recipes photographed see the slideshow below.

This slideshow requires JavaScript.


I’ll show you a sneak peek of the back of the book too, which I absolutely love. It’s a photo I took of my magnificent guide when I was staying in the Aravalli Hills in Rajasthan. I don’t think I have seen a more splendid attire for a sunrise walk.

So the exciting thing for you is that you can pre-order  the book now. For the first 100 folks to order through me, who have seen this post,  I will also send a little gift as a thank you with each order. All you need to do is go to www.chilliandmintcookbook.com it’s that easy. Pop a comment below too if you have time.

If you are based outside the UK OR are wanting to send the book overseas then the best way for you to order is through Book Depository . I won’t be able to send the extra gift this way, but at least you get a copy of the book.

So please share on all your social media platforms to spread the word. Pre-orders are immensely helpful as they are a good early indicator of a book’s success, and can lead to retailers increasing their initial orders, it really is that simply.

Thank you so much in advance for your loyal support.

Torie


Butter Chicken

After quite a number of requests, I bring you my butter chicken recipe this week. It’s definitely a crowd pleaser, liked by all ages, owing to its creamy tomato flavour. As the name suggest it contains butter – quite a lot if I’m honest – and cream, so perhaps this is one that you cook once in a while as opposed to each week. It’s delicately spiced as opposed to spicy so by default appeals to most palates. It is the one curry that using the breast meat works well. Typically I would always suggest using chicken thigh or the whole chicken cut into pieces by your butcher, but for butter chicken breast meat is perfect.

Whilst it is super straightforward to make there are a few stages to consider. You need to marinate the meat – minimum an hour or even overnight if you are really organised. After this you then char the chicken in a pan (grill also works well). Using the same pan you lightly bronze the onion and blitz that into a smooth paste. Next step is to create a buttery, creamy tomato sauce before adding the onion and meat and allowing it to simmer and infuse together. It can be cooked in advance so is certainly a good one if you are entertaining. I think you are going to like it. If you are on instagram and you make please tag me @chilliandmint #chilliandmint

Have a good week everyone.

Butter Chicken

Serves 6 (if serving with other dishes)

750g chicken breast or thigh (boneless), cut into bite sized pieces

marinade

3 tbsp full fat natural yoghurt

1 tsp turmeric powder

1 tsp Kashmiri chilli powder

1 tsp garam masala powder

1 tsp coriander powder

juice from half a lemon

1 tsp salt


onion puree

1 tbsp ghee (clarified butter) or regular butter

2 tbsp oil

2 white onions, roughly chopped


creamy tomato sauce

75g salted butter

400g passata (or fresh tomatoes)

1 tsp garam masala

1 tsp Kashmiri chilli powder

1 tsp jaggery/brown sugar

1 tsp salt

pinch freshly ground black pepper

150ml double cream

1 tbsp dried methi/fenugreek leaves


  1. First you need to marinate the chicken. Mix all the marinade together and then cover tightly with cling film/foil and place in the fridge for an hour – to overnight.
  2. Once you have marinated the chicken sufficiently heat the ghee/butter in a frying pan.  Add the pieces of chicken so that they sealed and charred on both sides. This takes about 3-4 minutes on each side. They won’t be completely cooked at this stage so don’t try and nibble a piece quite yet! You will need to char the chicken in batches so that it does not overcrowd the pan. You do not want to steam it so don’t overcrowd the chicken or put a lid on the pan.
  3. Once all the chicken pieces have been charred, place in a bowl and keep to one side.
  4. In the same pan add the ghee and gently fry the onion so that it begins to bronze – this will take around 6 minutes. Remove from the pan, with all the charred scrapings from the bottom and blitz into a smooth paste using a small blender.
  5. In a deep pan/karahi, add the butter. When it is melted add the spices followed by the passata, black pepper, salt and jaggery/sugar. (If you are using fresh tomatoes, cook for 5 minutes in the pan and then blitz these too into a smooth paste and then return to the pan to follow the next steps.) Allow to simmer on a gentle heat for 7 minutes, by which time the sauce will have thickened sufficiently.
  6. Add the double cream, onion puree, chicken and dried fenugreek. Simmer gently for 15-20 minutes on a low heat. Taste test and add more salt (and butter if you fancy) if needed.

To serve add a pinch more dried fenugreek and a drizzle of double cream. Equally fresh coriander on top would work well to serve.

It is delicious eaten with naan or rice. Accompanying dishes that would work well would be my chana dal and I will be eating mine with my tindora/ivy gourd curry.


Indian Panch Phoron Damson Achaar

After chatting on instagram with my friend Harriet, aka ‘The Nutritional Bean’ about damsons and what to do them – damson wine or chutney was my go-to response, my mother independently called me moments later to ask if I wanted any. Seeing it as a sign, I said yes and she arrived later that day with said damsons, as well as a bounty of other fruits and veg from the garden. Juicy sweet yellow plums, pears and some runner beans and tomatoes. The damsons were so ripe that they were about to turn and go off, so I felt an Indian achaar (chutney) would be a good way to work with them quickly. Indian achaar is different from those made with vinegar, which allows them to keep for a month or two. An achaar is often made and eaten on the same day with dal, rice and/or curry. Whatever fruit or vegetable that needs eating you can make into an achaar. This is my mango  achaar recipe.  They are always deliciously tangy, spicy, sweet and sour and work so well with Indian and Sri Lankan food.

The magic ingredient, which I have spoken about many times over the last nine years of writing this blog, is the Bengali five spice known as ‘panch phoron’. It is often used in achaar in West Bengal. You can either make your own – by reading this post – or you can pick up panch phoron at any Asian grocers and I have even seen some of the large supermarkets stock it. When it comes to de-stoning the damson you can either do it the long way (which was my option) by cutting it half and then scoping out the stone or invest in a cherry and olive pitter, which will also fit damsons. It’s definitely on my Christmas wish list.


Like all chutneys it does involve adding a good measure of sugar to counterbalance the acidity. As you will only be eating one or two spoonfuls per person per sitting, it ends up balancing itself out, but be aware that it does seem quite a lot at first glance. Taste test as you go and if you find your damsons are not too acidic then you can add less sugar.

Whilst you can eat the chutney with Indian snacks, curries or dal, the achaar also works really well with cheese. It lasts in the fridge for 3-4 days. Have you had any damsons this year? If so how are you using them? I would love to know.


Indian Panch Phoron Damson Achaar

Makes a small bowl full

1 tbsp vegetable oil

2 small dried red chillies

1 tsp panch phoron/Bengali five spice

1/2 tsp turmeric powder

655g (or thereabouts) damsons, stone removed

2 tbsp raisins, optional

1 tsp grated ginger

3-4 tbsp sugar (you can use caster or brown)

salt, to taste


  1. In a deep pan heat the oil and then add the 2 dried chillies. Allow them to begin to darken – it may make you cough a little – this is normal.
  2. Next add the panch phoron (fenugreek, nigella, fennel, black mustard, cumin seeds) and allow them to begin to splutter.
  3. Next add the turmeric quickly followed by the damsons. Give a good stir then add the fresh ginger and raisins.
  4. Add the sugar, a little at a time and taste as you go. Depending on the acidity of the damsons depends on how much you will require.
  5. Allow to bubble away on a low heat for 15 minutes. Add a little salt if required.
  6. Allow to cool and serve with Indian food or cheese, it works really well with both – just probably not together.


Goan Pork Curry for Sunday Supper

On Sundays we tend to have our ‘main’ meal now in the early evening, where we can all sit down and break bread together. We eat very little meat in the week these days, but on Sunday we like to indulge and have a roast or perhaps a curry. This evening we will be having a Goan pork curry, which is deliciously spiced – not chilli hot as my youngest daughter is 9 years old. It’s a great one you can make advance, either the day before or in the morning of the day you are making it.

I’ll be accompanying it with some plain basmati rice and my beetroot curry.

Do you have a main family meal on Sundays? Do you go for the traditional English roast or something more exotic?

Let me know in the comments below.


Goan Pork Curry

Serves 4

2 tsp cumin seeds

1 tsp peppercorns

1 tsp cardamom seeds, remove seeds from the pod

4cm stick of cinnamon bark

2 tsp black mustard seeds

2 dried red chillies (4 if you want more chilli heat)

1tsp fenugreek seeds

1 tsp cardamom seeds, remove seeds from the pod

2 inch fresh ginger, peeled and finely grated

1 whole head of garlic, all cloves peeled

2 white onions, peeled and chopped

1 tsp salt

4 tbsp white wine vinegar

4 tbsp of vegetable oil

750g of boneless pork, cut into bite sized cubes

1 tsp light brown sugar

2 tsp ground coriander

1 tsp of turmeric

250ml water

********

1.  Dice the pork into bite sized mouthfuls and set aside in a bowl.

2. Heat a frying pan and add the cumin seeds, red chillies, peppercorns, cinnamon bark, black mustard seeds and fenugreek seeds. Move around the pan so that the aromas are released but they do not burn. This will take under 1 minute. Place them into a small bowl to cool. Add the cardamom seeds to the bowl.

3. After a few minutes, place them into a spice grinder to create a masala. Return the powdered masala into the small bowl.

4. In the same frying pan, fry the onions until they begin to bronze. This will take around 10 minutes.

5. Whilst the onions are bronzing, peel the garlic and the fresh ginger (use the back of a teaspoon to do this – it is really easy this way), and grate the fresh ginger. Place in a hand blender, add a splash of water and blend to form a smooth paste. Place in a small bowl and place to one side.

6. Once the onions have bronzed transfer them to the same hand blender and blend until smooth. Add the vinegar to make the consistency smooth. The reason for putting vinegar in this recipe is to help soften the pork when cooking.

7. In the same frying pan, heat half the oil and gently fry the pork cubes so that they too begin to bronze. Remove with a slotted spoon.

8. In a new deeper pan, add  the remaining oil and add the ginger-garlic paste you have created. Add the turmeric and coriander powder and then return the pork to the pan along with the onion puree and masala blend. Fold all the spices into the pork. Add the water and cook on a low heat for 45-55 mins, stirring intermittently.

I like to serve this with a simple plain basmati rice and a vegetable curry as a side dish.


Aloo Matar – Potato and Pea Curry

Increasingly I am eating more and more vegetarian dishes (and fish) throughout the week. Has anyone else found that their meat/veg ratio has changed quite a lot in the last couple of years? I do still eat meat, but certainly not every day. I find it immensely helpful to have a number of go-to vegetarian recipes up my sleeve, so thought I would share this one with you. It’s a good one for the whole family as it is spiced but not spicy. Invariably I always have potatoes, tomatoes and frozen peas in my house, so this recipes is an easy one to whip together at a moments notice. It’s very similar to a dish that I started cooking way back at university, and in many respects laid the foundation stones for my future Indian cooking exploits.

I know that potatoes seem not to be so in vogue as they once were, like bread, but I still love to eat both potatoes and bread – especially sourdough – in many different guises. Do you have a potato recipe they you always fall back on time and time again? Do let me and my readers know in the comments section below.


Also if you cook this dish please share it on instagram and tag me @chilliandmint so that I can see.


Aloo Matar (Potato and Pea curry)

serves 4 

3 tomatoes, roughly chopped

2 inch piece of fresh ginger, finely grated

2 tbsp vegetable oil

1 red onion, finely chopped

1 tsp cumin seeds

1 tsp coriander powder

½ tsp turmeric powder

½ chilli powder

1 tsp salt

400ml water

3 medium/large potatoes, chopped into 1.5inch pieces (approx)

100g peas

½ tsp garam masala

2 tbsp kasoori methi (dried fenugreek)

1 tbsp fresh coriander

  1. Place the tomatoes and ginger in a hand blender and blend to a smooth puree. Place to one side.
  2. Heat some oil in a pan and add the cumin seeds, they will begin to sizzle almost immediately. After 15 seconds add the red onion.
  3. Gently saute for 5 minutes before adding the coriander, turmeric and chilli powders.
  4. After a minute, add the tomato and ginger puree followed by the potatoes and cover with the water.
  5. Place a lid on the pan and simmer for 15 minutes or until the potato has softened.
  6. Add the peas after 8 minutes.
  7. Just before serving scatter the kasoori methi and garam masala and fold into the potatoes.
  8. Serve with a sprinkling of fresh coriander.


Indian Spiced Okra

Have you tried okra before? As am sure you know, they are also called ‘ladies fingers’. Less well known is the vegetable called ‘gentleman’s toes’ – I kid you not! They are also known as ‘tindora’ or ‘ivy gourds’ – check out my recipe here if you interested – it’s actually super tasty. Anyway back to okra. I’ve been eating them a fair amount on my recent travels so thought I would continue to include them in our diet now that we are back home in London.

Thankfully I live near loads of Asian grocers so sourcing them is very easy. I had a lot of positive feedback on instagram about sharing the recipe with you when I put it onto my instastories.


My friend, Harriet aka @thenutritionalbean who is a Registered Nutritional Therapist, Nutritionist and Health Coach, based in Bruton, kindly shared some nutritional facts on okra with me that I thought you would benefit from reading too.

“Overall, okra appears to be a nutritional powerhouse and particularly useful for diabetics and those with digestive complaints. It delivers carotene (vitamin A), folate, vitamins B1, B3, B5, B6, C, E and K needed for our immune system, energy production and cardiovascular health, plus amino acids for growth and repair. Okra is packed with minerals and antioxidant-rich phytochemicals (the plant’s natural defence system that also help keep our cells protected from damage). Not only nutritionally replete, okra is used for its wide-ranging medicinal qualities. As you may know, once cooked, these ladies’ fingers become mucilaginous and for this reason are used, like marshmallow, for soothing an inflamed and irritated digestive tract. Okra may also stop Helicobacter Pylori, a wide-ranging and often nasty bacteria that can lead to ulcers, from adhering to the stomach lining. The specific fibre content is shown to help keep our blood sugar levels stable, keep inflammation in check and improve triglyceride and lipid profiles. Studies on Type 2 Diabetic rats are finding that their condition improves after eating okra.”

Makes you want to start including it in your diet fairly regularly right?

Some people are put off with the texture, but I find if you dry the okra properly after washing then the gooeyness is minimal. I have another similar recipe for okra here which uses less ingredients and has a slightly different taste. If you want to make the dish more Middle Eastern then try this one, which includes tomatoes and butterbeans.


Indian Spiced Okra

500g okra

2 tbsp vegetable oil

10 fresh curry leaves

1 tsp black mustard seeds

1 red onion, finely chopped

1 tsp garam masala

1 tsp coriander powder

1 tsp cumin powder

1/2 tsp turmeric powder

1/2 tsp Kashmiri chilli powder (optional)

2 small green chillies, sliced lengthways

5 garlic cloves, thinly sliced

1 tsp salt

  1. First wash the okra and then lay them out on a tea towel and cover with kitchen roll so that they become dry completely.
  2. Slice off the end of the okra and discard and then slice them, width ways, to one inch pieces, or you can slice on the diagonal, about three times per okra.
  3. In a deep frying pan or wok, add the oil and when it is hot add the mustard seeds and curry leaves for 20 seconds before adding the onion. Keep on a medium heat and move the onion around the pan for about 5 minutes, so that the onion begins to colour.
  4. Stir in the spices and then add the garlic, chilli, followed by the okra.
  5. Add the salt and gently fry for 10-15 minutes, moving the okra around the pan until it softens.
  6. This is a dry dish so do not expect there to be much of a sauce. The spices will coat the okra.


Indian Scotch Eggs

On my first trip to Kolkata – 13 years ago – I was introduced to my new extended Indian family, going from home to home, meeting a bevy of smiles and warmth behind each door. Every household we visited offered food in great abundance – either a full meal or some delicious snacks. I struggled a little with the sweet treats, not having a sweet tooth, but the savoury snacks were something else.

As we normally saw three or four different families on average each day I had to be diplomatic when it came to eating. Not eating would be disrespectful, so I had to pace myself. One of life’s more pleasing conundrums. One snack that really stood out was Indian Scotch eggs, which were just so heavenly. Unlike your traditional Scotch egg which has sausage meat covering the egg, this one has spiced potato and has half a boiled egg per ball.

I have been trying to replicate the recipe ever since and I think I am pretty close so I wanted to share it with you all today.


Indian Scotch Eggs

makes 6 

5 medium potatoes, peel and boiled then mashed

1 tsp cumin seeds

1 tsp garam masala

1/2 tsp turmeric

1 tsp garlic-ginger paste

1 tsp salt, to taste

2 small fresh green chillies, finely chopped

handful of fresh curry leaves, finely chopped – optional

4 eggs

breadcrumbs – either freshly made, panko or bought

4 tbsp sunflower/vegetable oil for frying


  1. First peel and boil the potatoes until they are soft. This usually take around 10-12 minutes. Drain and then mash until smooth. Do not add any butter or milk. They must not be too wet.
  2. Meanwhile boil 3 of the eggs by placing them in a pan of cold water and then once it is simmering, turn it down and leave to cook for a further 8 minutes so that they are completely hard. Once cooked drain and immediately put in a bowl with ice and cold water – this will allow you to peel the egg really easily. Leave the eggs to sit for a few minutes before peeling them and leaving them to rest on a plate
  3. Add the spices, garlic-ginger paste, chillies, fresh curry leaves if using, salt and mix in thoroughly. Allow to cool before handling the potato.
  4. In a shallow bowl add the remaining egg and whisk.
  5. In a separate bowl add some breadcrumbs.
  6. Halve the eggs, lengthwise. Take a small amount of spiced mashed potato into your hand and place the egg, yolk side down, onto the mashed potato. Gently cover the whole egg with the potato to create a ball. Place to one side whilst you do the same to the remaining eggs.
  7. Now take one potato ball at a time and gently roll it in the whisked egg followed by the breadcrumbs then place on a plate. Complete the rest.
  8. Heat the oil and when it is hot gently fry each potato ball, a couple at a time, turning at intervals so that the breadcrumb coat bronzes nicely. Place to one side, whilst you complete the rest.
  9. They are wonderful eaten hot, but equally you can serve them at room temperature – perhaps perfect for a train journey.

I like to eat them with a chutney. My tamarind and date chutney works really well.


‘Masala Mamas’ Dill Stew

I feel it’s been a while since I posted any Indian recipes. That is not to say I’ve not been cooking any Indian food at home. For those who have been following me for a while, or have read my bio, will know my husband is Indian so cooking Indian food is part of our regular diet – but some of the recipes I’ve been cooking are already on my blog. These are always family favourites that I have been cooking:

DalsBengali red split lentil dal, channa dal, toor dal

CurriesBengali chicken, speedy salmon, Bengali prawn, Laal Maas (when I want a seriously hot one!) or Chettinad Chicken, 

Sri Lankan tuna curry, mild cod curry

Vegetarian curries  – cauliflower with fenugreek, ginger and turmeric okra, chickpea curry, butternut squash and lemongrass (more Asian influenced than Indian, but a great recipe)

Not so long I was contacted by a Elana Sztokman, an anthropologist and award-winning writer specialising in women from traditional societies. She has written an Indian cookbook, which tells the inspiring story of a group of sixteen Indian women from the Kalwa slum in Mumbai, changing their communities through food and love. The slum is home to over 200,000 people where clean water and electricity are hard to find. These harsh conditions often prevent children going to school, with many being sent out to work to make a few rupees so that they will have something to eat.

These women are changing all this by making sure the children eat and learn, and consequently changing their otherwise inevitable destiny. Each morning the women rise early to prepare a host of delicious, nutritious vegetarian food for the children. In one year alone they cook 257,400 meals. They deliver the food to the Love2Learn school, run by the the NGO Gabriel Project Mumbai, where the children know that if they show up to learn, they will eat. It’s a win win. The children learn, have nutritious food and thus begin to end the cycle of poverty they are trapped in. The women feel inspired and thrive and thus the children and communities thrive around them.

The book that Elana has sent to me – ‘Masala Mamas’ incorporates recipes and stories from all these Indian women. It’s a joy to read, hearing about the rural villages the women have originally come from and how they came to the sprawling metropolis of Mumbai in the hope of giving their children an education, which most of them lacked. The group has provided kinship, connections and a purpose, which is motivating them every day. All the proceeds from the sale of the cookbook go directly to the women of the Masala Mamas cooperative. You can order a copy for yourself here.

I thought it would be interesting for you to see a typical menu for the children:

On Mondays the children eat poha – rice flakes with vegetables.
On Tuesdays –  dal khichdi – lentil and rice stew.
On Wednesdays – chana dal – black bean curry.
On Thursdays – veg pulav – a pilaf made with mixed vegetables.
On Fridays – soya pulav – a stew made from soya chunks, an affordable and simple source of protein.

And on Saturdays, as a special treat, the children eat sheet – a kind of sweet semolina pudding that they particularly love.
And for special occasions and holidays, the women prepare special holiday fare like shankarpali and modaks.

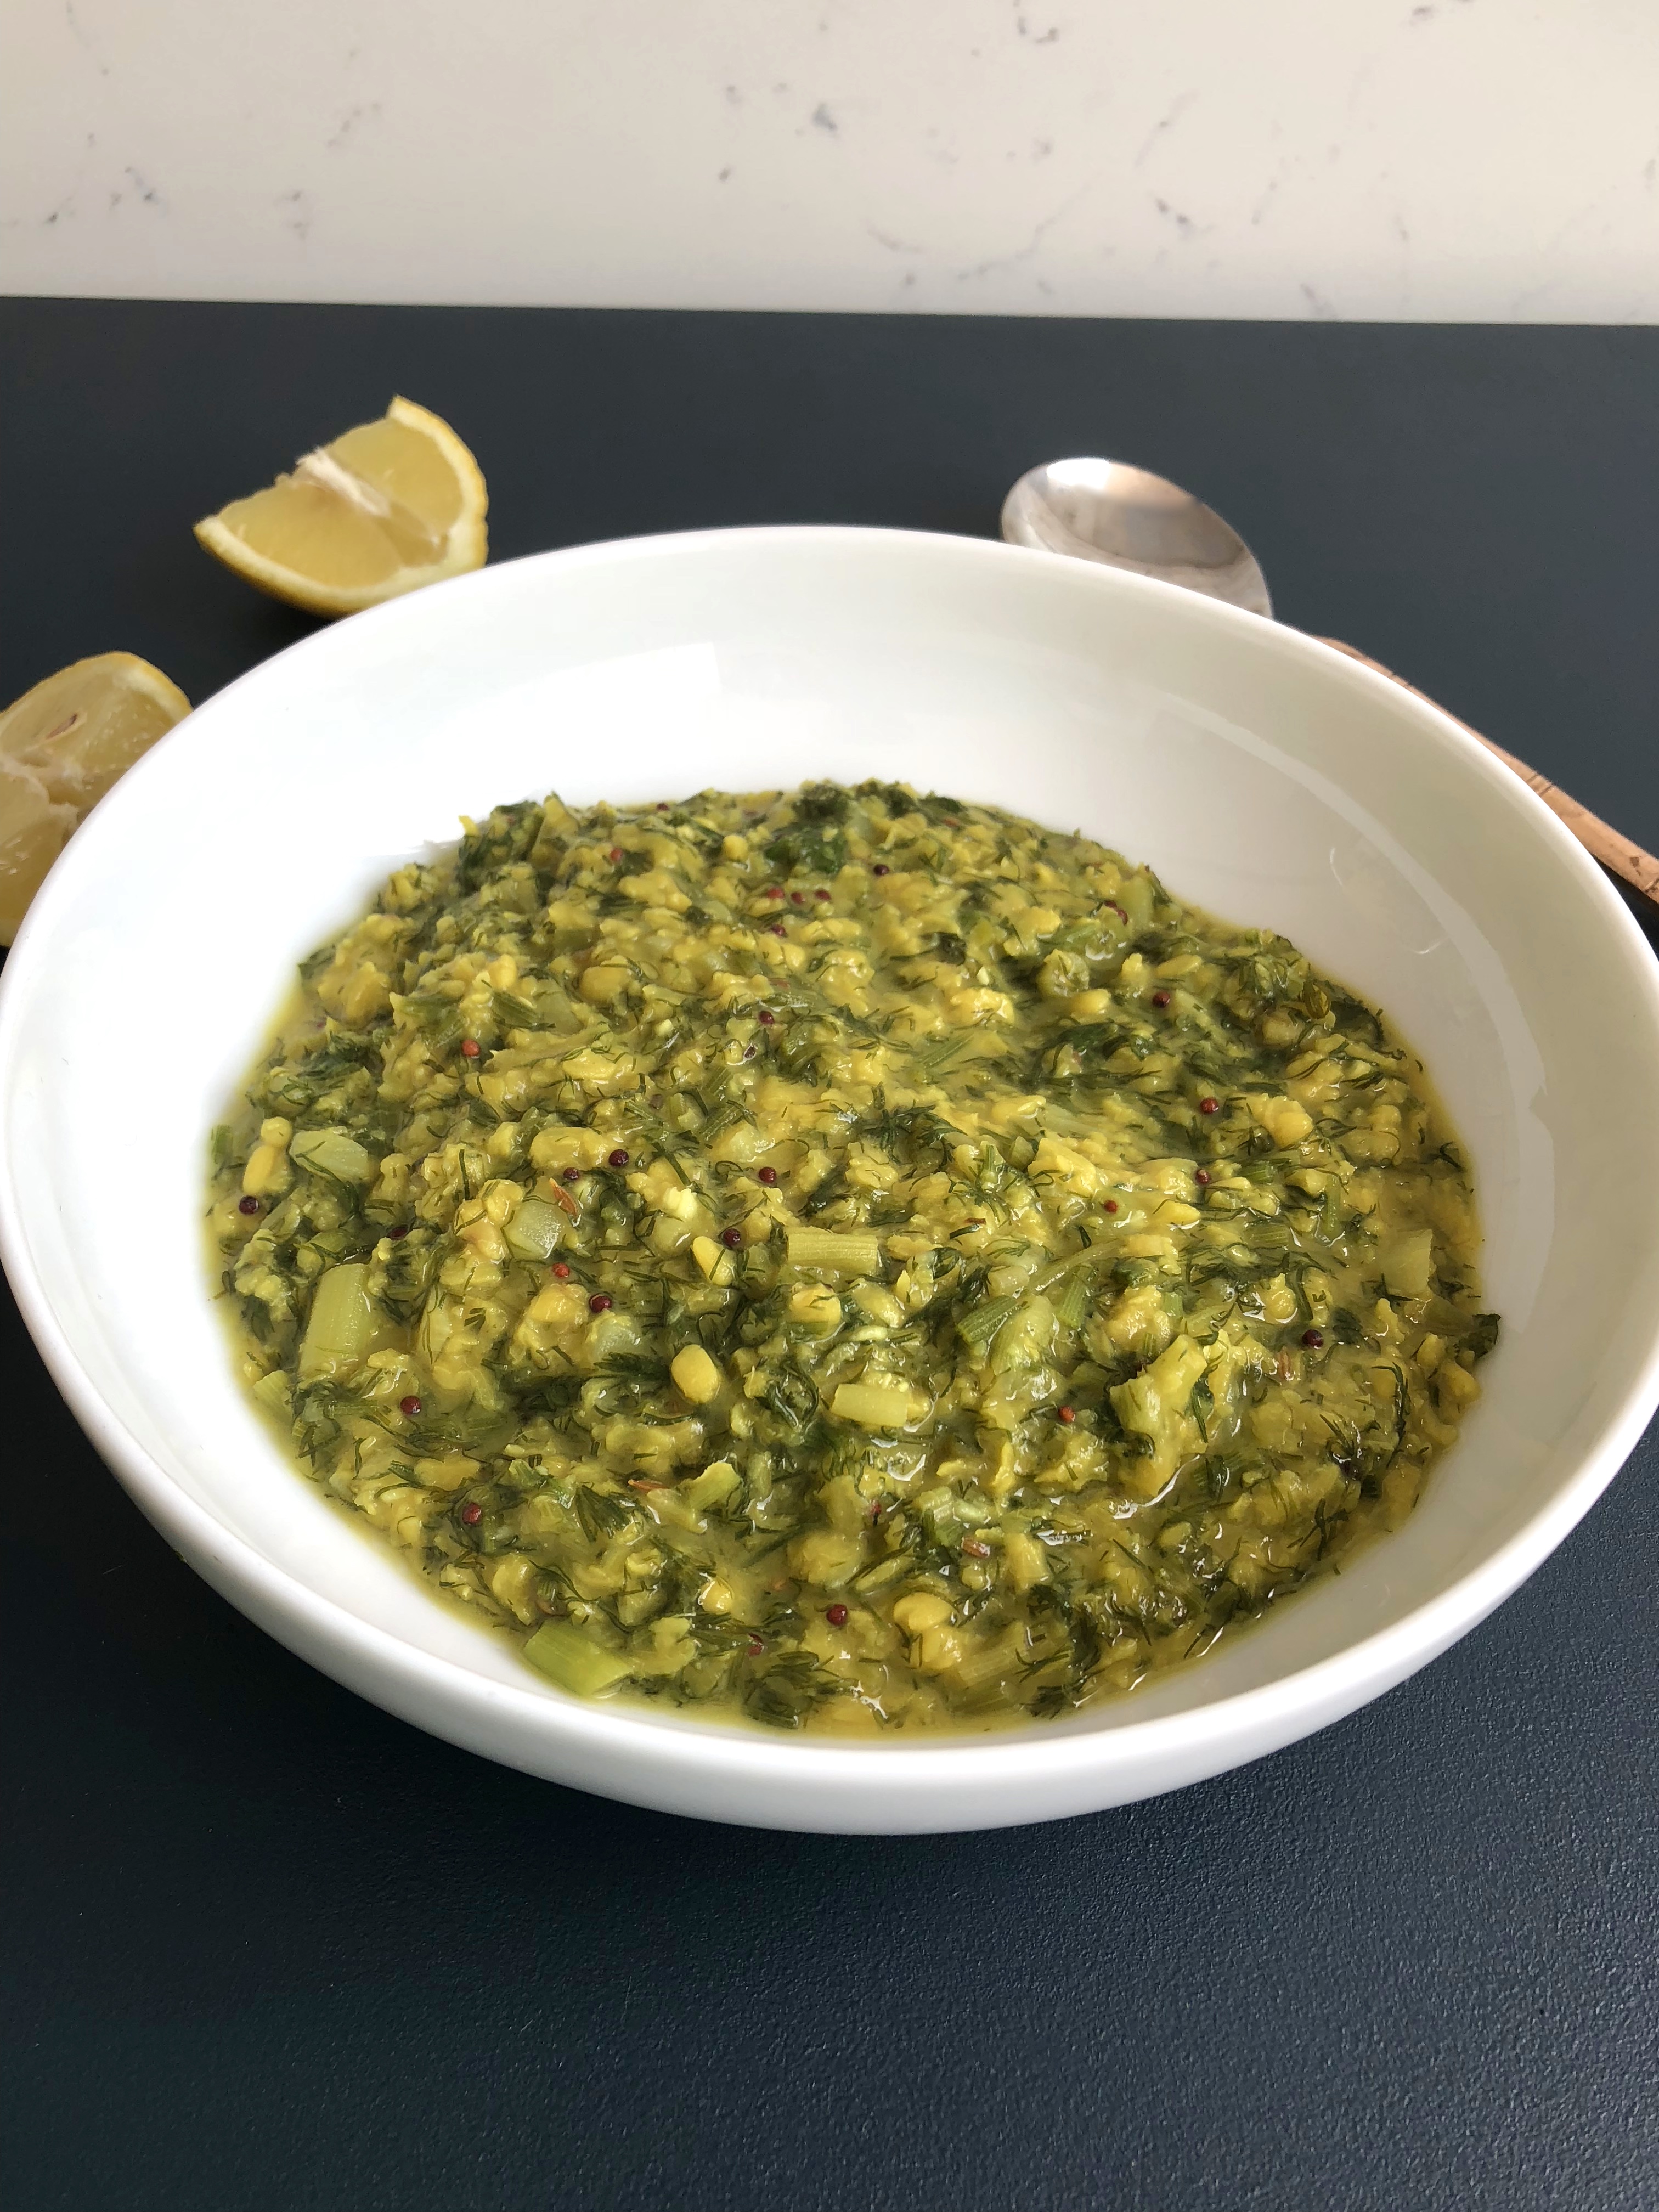
After a lot of pondering on which recipe to show you  I ended up gravitating towards the ‘Dill Stew’ or ‘Shepu Bhaju’ by Jayshree Chavdry. It’s basically a dal, and you know how much I adore dals and could quite happily eat a different one every day. I also liked the fact that it contained dill, a herb that I do not usually associate with Indian food. It’s also super straightforward, requires no unfamiliar ingredients and is perfect for a light meal on a summers day. The result – it tasted really really good and I will now be including it in my Indian culinary arsenal for sure. Give it a go and if you are on instagram, don’t forget to tag me #chilliandmint so that I can see how you got on.


Dill Stew

1 cup/240ml yellow moong dahl (lentils)

1 tbsp/15ml oil

1 tsp/5ml mustard seeds

1/2 (half) tsp/2.5ml cumin seeds

1 medium onion, finely chopped

3 small green chillies, finely chopped

1 tsp/5ml turmeric powder

2 cups/1/2 litre water

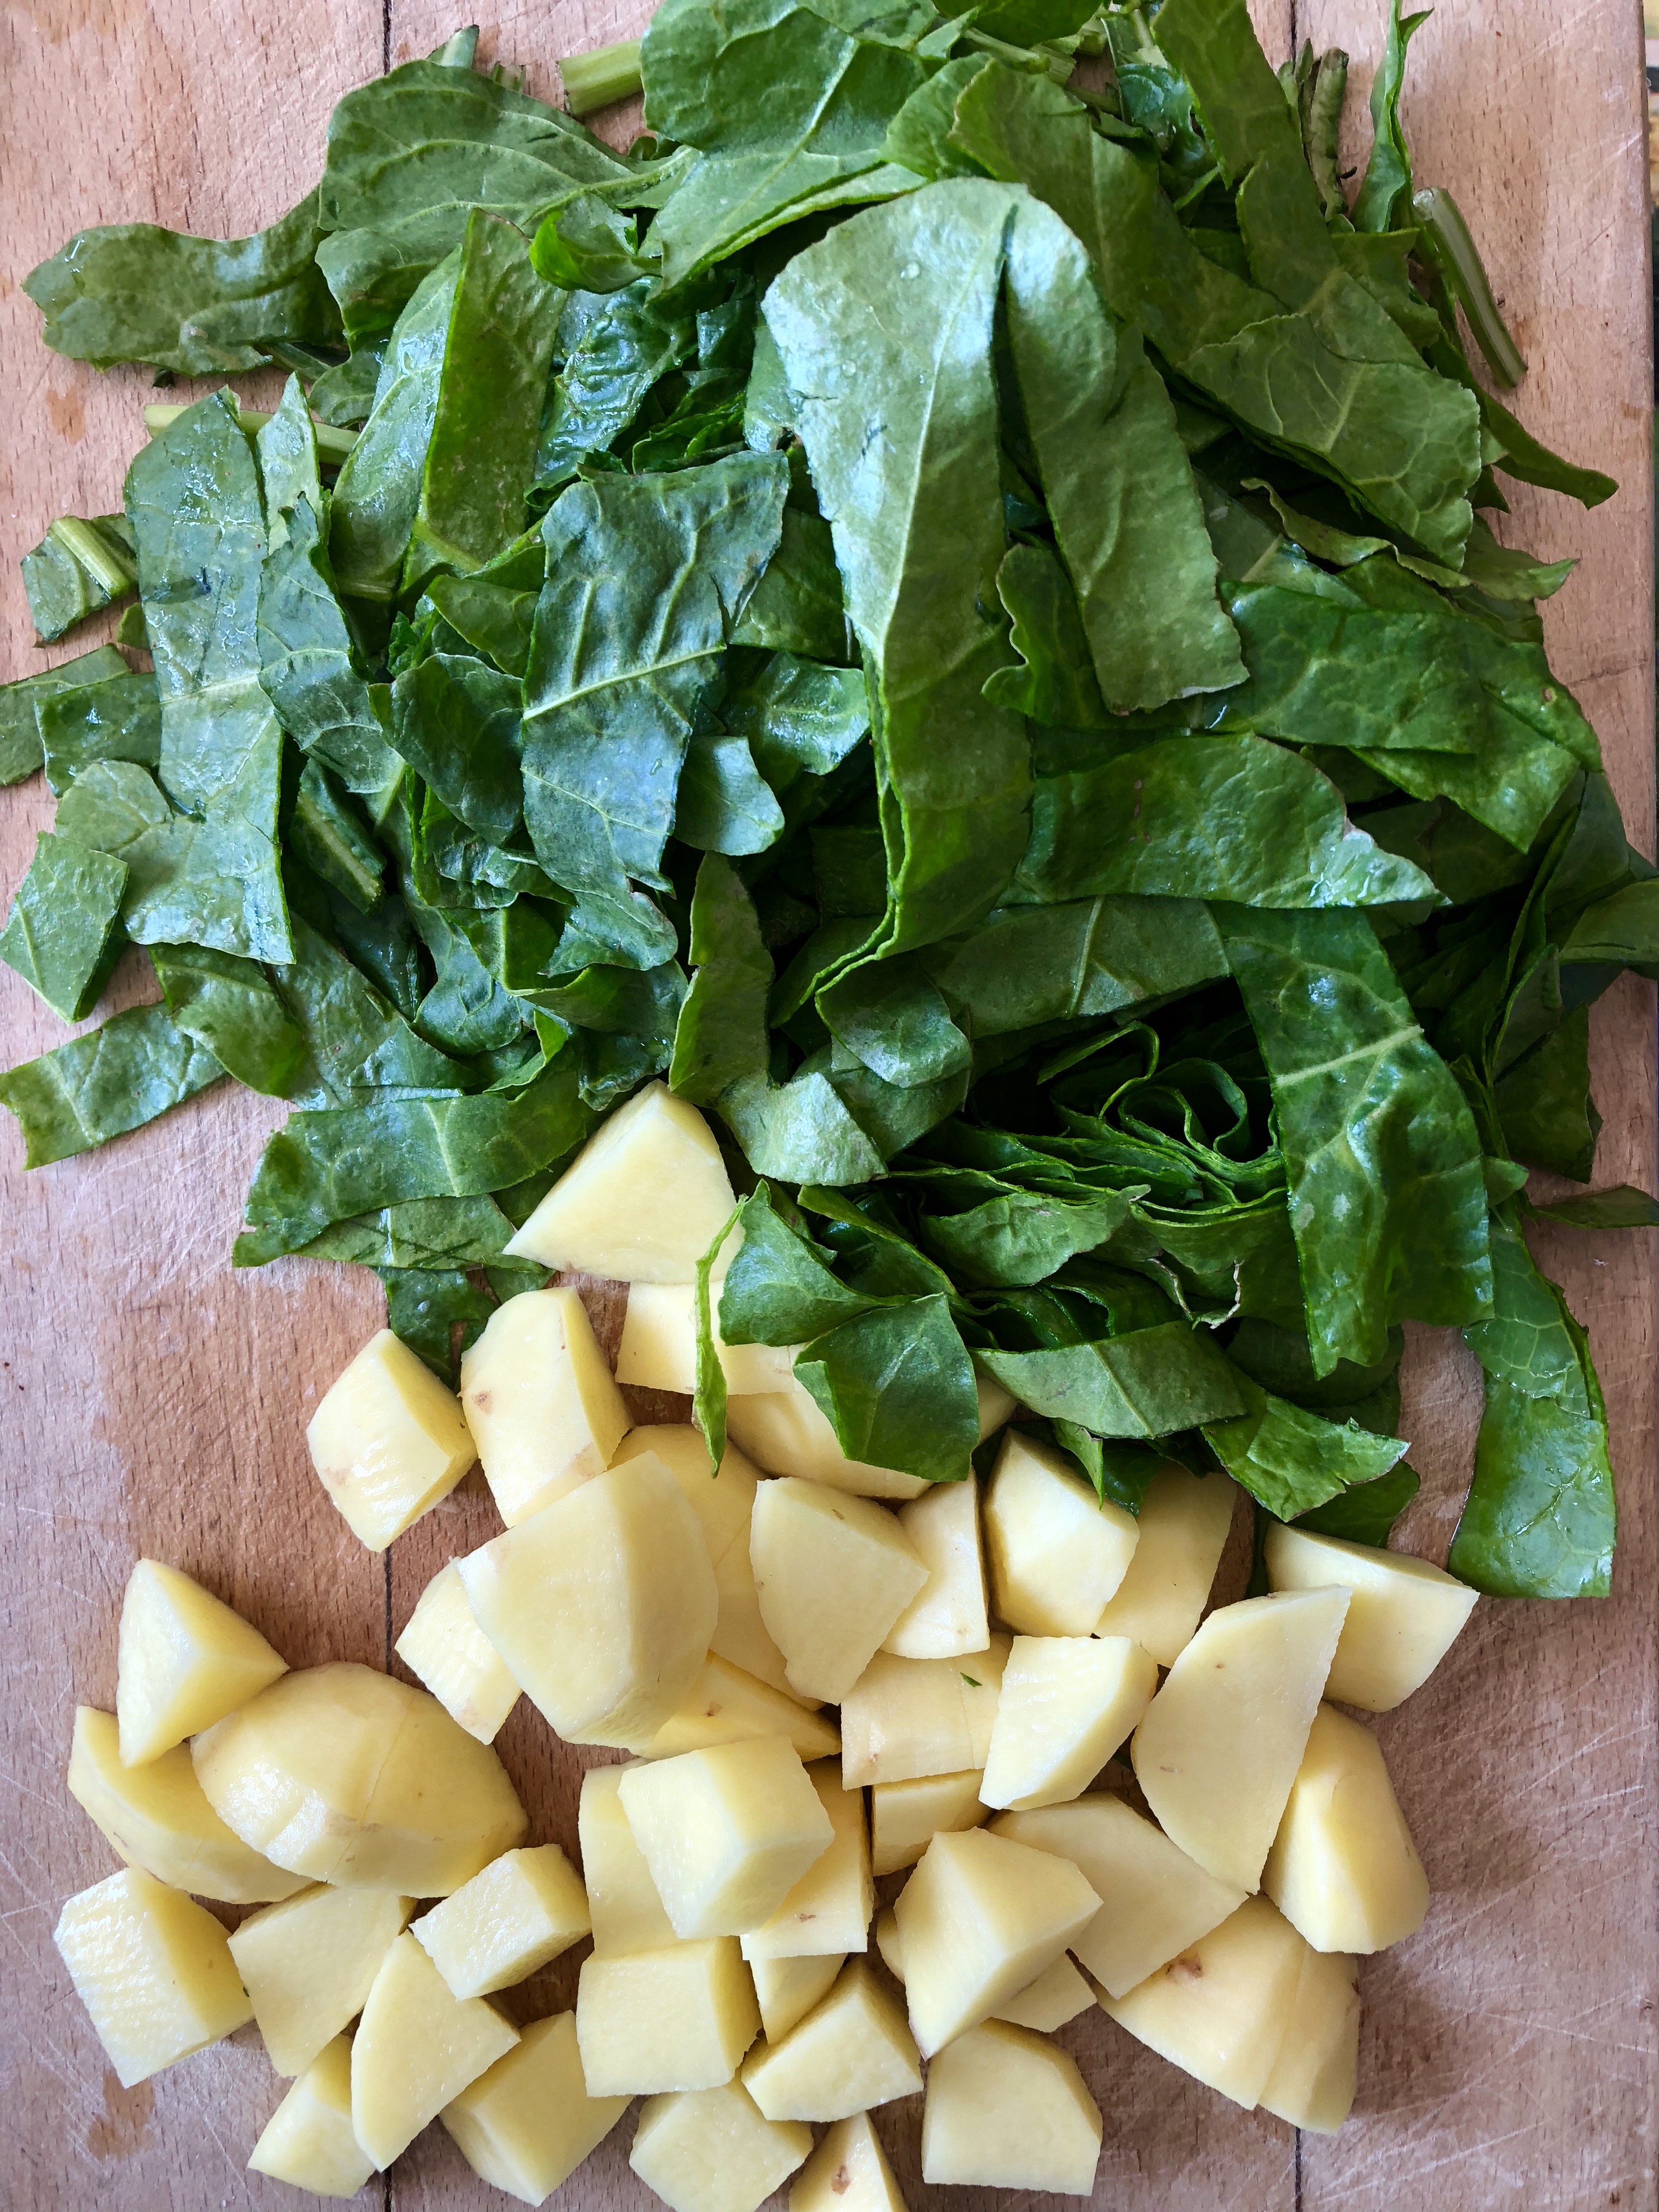
1 cup/240ml finely chopped dill

3 cloves garlic, crushed

salt to taste

  1. Soak the dahl in water for 20-30 minutes. Then rinse well.
  2. Heat the oil in a pan on a medium heat and add the mustard seeds. They will begin to crackle almost immediately. Add the cumin seeds followed by the onions. Mix well and let them cook for 2 minutes before adding the chillies and cooking for a further 2 minutes.
  3. Drain and rinse the presoaked moong dal and add to the pan along with the turmeric powder. Add the water and mix well together. Cover and allow the dal to cook for 10-15 minutes or until it is fully cooked and softened. Be careful not to burn the dal and add more water if necessary.
  4. Add the dill, garlic and salt to taste. Cook covered for another 5-10 minutes
  5. Serve hot with rice or puris/lunchi or simple in a bowl on its own. Divine.

If you are making it earlier in the day to eat later you may find you need to add a little water when reheating it. 


SaveSave

SaveSave

SaveSave

SaveSave

SaveSave

SaveSave

SaveSave

SaveSave

SaveSave

SaveSave


Sea Beet and Potato Curry

Recently I went on a lovely coastal walk on Mersea Island, which is off the Essex coast (it’s reached by a tidal causeway). I hadn’t planned to go foraging but when I came across sea beet growing in large clusters, it made sense to gather up two large handfuls to take home and cook into something interesting.

I do love to forage from time to time – not mushrooms mind you as they can be tricky to identify unless you are with an expert. Somethings are easier to recognise and sea beet is one of those. Disclaimer: If you are going to try to find some yourself please consult the internet for other sources to check on identification. John Wright’s book ‘Edible Seashore’ may also be a good book to take on your walks to help identify. It’s best to check with a few sources to be sure.

I thought the sea beet would lend itself well to a ‘sag aloo’ type dish (spinach and potato curry). It’s more robust than spinach and has a lovely earthy taste to it. It is in fact the wild ancestor to the beetroot, sugar beet and swiss chard and is called a host of names including sea beet, sea spinach, wild beet and wild spinach. In ancient times, the leaves and root of the sea beet were used to treat several diseases, particularly tumours. The juice is even good for treating ulcers apparently!

When you forage you need to wash and clean your ‘treasure’ properly in cold water. I rinsed the leaves three times to be on the safe side. I then roughly chopped the leaves and prepared the potatoes. This curry is a lovely way to include sea beet into your diet, but if you are not going near any coastal areas you can always use spinach instead.

I would love to hear from any of you who may have used this ingredient before? How did you cook it? Leave a comment in the comment box below.

Sea Beet and Potato Curry

1 tbsp oil

2 dried red chilli

1 tsp cumin seeds

1/2 tsp turmeric powder

pinch of asafoetida/hing (optional)

2 medium potatoes, peeled and cut roughly into 2 inch cubes

1 tsp salt to taste

2 large handfuls of foraged sea beet or around 260g of fresh spinach

2 tbsp water

  1. Heat the oil and then add the dried red chillies. Move around the pan for 10 seconds before adding the cumin seeds. Let the seeds begin to fizzle and then add the turmeric powder and asafoetida (if using).
  2. Add the potatoes and cover them in seeds and spices and cook gently on a medium to low heat, stirring every now and then. Add the salt.
  3. After about 8-10 minutes, add the washed sea beet and fold in gently to the potatoes.
  4. Add 1 tbsp of water and allow the sea beet to wilt and the potato to soften completely. To check the potato has soften stick a sharp knife into it, if it goes in easily then they are ready. You may need to place a lid on the pan to help steam it, if the potato needs more time to soften,  which will speed up the softening. Add the remaining water if need.

Serve immediately with a dollop of yogurt and a wedge of lemon on the side. It also works really well if you cook my chana dal to eat along side it.

SaveSave


Indian Chana Dal – Sweet and Salty

As some of you may know I am a BIG dal fan. Huge in fact, I love the stuff, and I am always trying to convert the uninitiated. Dal is an Indian lentil soup, or porridge of sorts, that can vary in consistency depending on personal preference. There are so many varieties, using a wide range of lentils, that there is at least one to appeal to every palate. For the most part (some need soaking) they are quick and very easy to make. Once you have bought a few staple ingredients for your pantry, you will find that cooking dal is a very economical meal to cook and, for many in the Indian subcontinent, an essential source of inexpensive protein.

Chana dal, also known as cholar or yellow split lentil, is one of my personal favourites. It is absolutely delicious with delicate sweet undertones coming from the coconut and sultanas. I use desiccated coconut, however in India as coconuts are more readily available, they often use shavings of freshly fried coconut. I eat it for lunch or dinner, although out in India it is even served up for breakfast!

Unlike the red split lentil dal, which I spoke about in an earlier blog, you need to think a little ahead for this dal as the yellow split lentils need to soak for a number of hours. I always soak them over night, but if you check on the packet you will probably find that you can soak them in the morning and they will be ready to cook by the afternoon/evening.

Chana Dal

Serves 4-6

300g of chana dal, soak overnight

1 tbsp of oil

1 tsp panch phoron

3 bay leaves

1/2 tsp turmeric

1/2 tsp chilli powder (more if you prefer it hot)

sultanas, handful

1 tsp of ghee/butter (optional)

1 tsp of sugar

1 tsp salt

2 tsp of desiccated coconut

  1. Before cooking soak the lentils overnight ideally or at least for a few hours.
  2. After soaking, remove the water and refresh with more water. Boil on a low heat, until soft, approx. 20 mins (45mins + if not soaked). You will know they are soft when you are able to squeeze them easily between your fore finger and thumb. If they are still a little hard, leave them to boil for longer.
  3. In a new pan heat a tablespoon of oil on a low heat. Add the panch phoron, bay leaves, turmeric, chilli powder, sultanas, salt and sugar.
  4. Move around the pan for 20 seconds max, so that it does not burn, and add a couple of spoonfuls of chana dal and stir into the pan. Then transfer all of the contents of the pan into the original pan. Add more salt if necessary.
  5. Add the ghee/butter if using. Sprinkle the desiccated coconut over the top of the dal and let it simmer for a few minutes.

Other additions to this dal is to add fresh green or dried red chillies instead of chilli powder. If you have fresh coconut to hand then thinly slice it into pieces (no more than a handful) and bronze initially in a little ghee, remove and place to one side. Scatter on top at the end instead of the desiccated coconut.

SaveSave

SaveSave

SaveSave

SaveSave

SaveSave

SaveSave

SaveSave