Spiced Masala Paneer Skewers, Coriander/Mint Chutney and Bejewelled Couscous

IMG_1395

I was recently approached by the the UK’s number 1 tableware provider, Denby Pottery to come up with an exciting vegetarian BBQ recipe for their blog. They kindly provided me with some of their china from the  ‘Imperial Blue’ range, to present the food. I ended up creating spiced masala paneer skewers, coriander and mint chutney and bejewelled couscous. As well as cooking the paneer skewers on the BBQ they can equally be cooked on a griddle pan or under the grill so are super versatile.

Take a look at my recipe and post here and I would love it if you can share it through your social channels.

Hope you are all having a wonderful summer (winter if you are in the southern hemisphere).

IMG_1408


Indian Inspired Peach Chutney

IMG_1299

Gloriously ripe and deliciously sweet juicy peaches are in season right now. They are great to eat fresh or in a salad perhaps with some mozzarella, parma ham and some fresh basil with a little olive oil and black pepper flecks sprinkled on top. I sometimes like to transform them into an Indian inspired chutney that is so versatile and delicious that you’ll be making pots of it in no time at all.

IMG_1313


As well as eating this chutney as a condiment to Indian dishes I also love it in sandwiches, with some cold or hot meats, fish, halloumi or any nice stinky and smelly cheese come to think of it. It’s perfect to take along on a summers day picnic – the sweet chilli notes adding that necessary kick to cheese baguette perhaps!

IMG_1309

If your peaches are beginning to turn, then this is another great way to use them up. If you like this recipe try making my mango and tomato one which all require the Bengali five spice known as ‘panch phoron’. You can find it in your local Asian grocers or you can easily make your own and store it in a sealed jar for months – here is my recipe.


Peach Chutney

1 tbsp groundnut oil (or equivalent)

1 tsp panch phoron – Bengali five spice

1 large dried chilli, broken into 2 or 3 pieces

1/2 tsp turmeric

5 large juicy peaches, stone removed and cut up roughly into 2 cm cubes

2 tbsp plain flour

50ml cold water

1 tsp salt

1 tbsp caster sugar

1 large storage jar

1) Heat the oil and then add the panch phoron, dried chilli pieces and turmeric. Move them around the pan for 20 seconds before adding the juicy peach pieces. Stir into the ingredients and simmer gently.

2) In a small bowl add the flour and cold water and stir until smooth. Add to the peaches in the pan.

3) Add the salt and sugar and continue to simmer until the peach chutney has thickened. This will take no longer than 6 minutes. If you require it thicker add a little more flour.

4) If eating on the same day, allow to cool completely before serving. If eating at a later date sterilise your jar by washing it thoroughly and then placing in a warm oven for 15 minutes. Add the chutney and once it has cooled it can be kept in the fridge for a couple of weeks.


Simple Chicken Curry – when your spice cupboard is bare

IMG_1252

If you are starting out cooking curries or if you are running low on spices, then this is the curry for you as it only requires chilli powder – I tend to opt for the Kashmiri chilli powder for it’s deep red colour and its subtle heat. It also includes onions, ginger, garlic, tomatoes and chillies, which are pretty much fridge staples for me and I’m guessing you too! So it is ridiculously straightforward to make with minimum fuss.

IMG_1232

I like to use boneless and skinless chicken thighs for this curry, but breast meat is fine too – it’s really up to you. Like with most curries it can be cooked well in advance and then slowly reheated adding a little water if necessary. You can reduce the amount of fresh chillies if you want it less hot, but I find adding two fresh green chillies is fine for my 9 year old – I would cook a separate curry however for my 5 year old.

IMG_1246

Simple Chicken Curry

Serves 4

9 garlic cloves, roughly chopped

2 red onions, roughly chopped

2 inch piece of ginger, skin removed and roughly chopped

2 fresh chillies, roughly chopped

4 medium sized tomatoes roughly chopped

1 tsp of Kashmiri chilli powder

2tbsp water

*****

2 tsp groundnut oil

800g boneless and skinless chicken thigh, chopped into bite sized pieces

1 tsp salt

coriander to garnish (optional)

1. Using a blender add the garlic, onions, chillies, tomatoes, ginger and chilli powder. Depending on how juicy your tomatoes are you may need to add a little water to make the paste smooth.

2. Heat the groundnut oil in a pan and add the chicken. Move it around the pan for a couple of minutes so that it whitens. Remove from the pan with a slotted spoon and place to one side.

3. Using the same pan add the paste and gently fry for 45 minutes so that it thickens and allows the flavours to come through.

4. Return the chicken to the pan and add the salt. Simmer gently for a further 7 minutes, coating the chicken in the spiced tomato sauce.

5. Serve with a coriander garnish with either rice or flat bread.

IMG_1247


The Tastiest Spiced Chickpea Curry Ever

IMG_1186

The humble chickpea can provide the most satisfying of meals if it is mixed with a little magic, and in this case spices. The final note of adding chaat masala raises the game of this dish into one bursting with flavour that is both salty and sour. For those who have not come across chaat masala before it’s a spice mix that is commonly used in India, Pakistan and Bangladesh and normally includes many of the following: mango powder, black salt, asafoetida, pomegranate seeds, nutmeg, mint leaf, chilli powder, black pepper, salt, cumin, coriander and dried ginger. You can pick up sachet’s or packets at your local Asian grocers or any of the large supermarkets.  If you are feeling really adventurous you could make your own. Have a look at this lovely lady showing you how to do so .


Like many of the dishes on my blog this is very straightforward, filling, nutritious, tasty and kind on the wallet. My eldest daughter loves it (she just avoids swallowing the green chillies that I simply cut in half so are easy to spot) and my youngest….well she tells me she prefers ‘English’ food. I asked her like what and she answered ‘Like udon noodles, chicken, spring onions and soy sauce’. Oh dear!

IMG_1182

If you are UK based chances are that you’ll be on half term next week – if you have children that is. This dish ticks so many boxes and is perfect for an adult, or more sophisticated child eater. Next time your are in the shopping aisles of your local supermarket – think Chaat Masala, seriously you won’t regret it. A little bit of searching will reward you royally.

You heard it here first.

IMG_1174

 Spiced Chickpea Curry

2 tbsp groundnut/rapeseed oil

10 fresh curry leaves

1/2 red onion, finely chopped

1 tsp salt

2 tsp garlic paste

1 tsp ginger paste

2 small green chillies

1 tsp cumin powder

3 medium sized tomatoes, diced

500g chickpeas (tinned is fine)

1 tbsp yoghurt

1 tbsp tomato puree

150ml juice from chickpea tin/boiling water

125g fresh spinach

1 tsp chat masala

1/2 lemon, juice only

handful of fresh coriander to serve

1. Gently heat the oil in a deep frying pan and then add the curry leaves. After 20 seconds add the onion and salt and lower the heat to allow the onions to soften and not burn. After 5 minutes add the garlic and ginger paste along with the green chillies and stir into the existing ingredients.

2. Add the cumin powder and then add the fresh tomatoes and allow them to soften slightly before adding the chickpeas.

3. Add the yoghurt and tomato puree and stir into the chickpeas.

4. Add the chickpea juice and/or boiling water and leave until the liquid has reduced. This will take around 10-15 minutes.

5. Stir in the spinach, which will wilt almost immediately.

6. Take the pan off the heat and add the chaat masala and lemon juice and stir into the curry. Add a little fresh coriander on the top of each serving.

Relax, sit back and enjoy a very satisfying bowl of chickpea curry.

SaveSave


South Indian Sardine Curry

IMG_1033

Don’t you just love those recipes that require minimal effort to achieve a very satisfying and tasty result? This south Indian sardine curry is one of those dishes.

Sardines are great fish to have in your diet as they are packed with essential nutrients, including omega 3 fats, vitamin B12 and vitamin D. They are also very reasonable to buy and therefore are within everyones budget. The bones too are so small that you can easily eat them along with the flesh, providing you with calcium.

IMG_1068

I sometimes like to keep the sardines whole and at others times have them filleted. This recipe works equally well, whichever way you like to prepare them.  If you are going to get them filleted your fishmonger can easily do this for you to save time.

You could also add tamarind paste (no more than a teaspoonful) to this dish to give it a different twist. If you do decide to do this add the tamarind at the same time that you add the tomatoes.

IMG_1056

South Indian Sardine Curry

1 tbsp coconut oil

1 tsp mustard seeds

10 fresh curry leaves

1 banana shallot, finely sliced

1 tsp salt

5 garlic cloves, finely chopped

1 heaped tsp of ginger paste

2 fresh chilli, sliced lengthways

1/2 tsp turmeric powder

1 tsp coriander powder

200g fresh tomatoes, quartered

200ml water

450g sardines, cleaned and filleted

1. Heat the coconut oil and then add the mustard seeds moving them around the pan for 15 seconds before adding the curry leaves. After a further 10 seconds add the shallots and salt.

2. Allow the shallots to soften slightly on a medium low heat for 4-5 minutes before adding the garlic, ginger and chilli, followed by the turmeric and coriander powder. Cook for a further couple of minutes.

3. Add the tomatoes and stir into the other ingredients. Place a lid on the pan and cook for around 5 minutes to allow the tomatoes to soften.

4. Add some of the water and stir into the ingredients to create a sauce and then add the sardines and cook on a low heat for around 5-7 minutes with the lid on the pan. Do add more water if you require more of a sauce.

5. Careful not to over stir as the sardines will break up.

IMG_1050


Kakrol Curry – for those who like to try new things

IMG_1156

For the next month or so if you happen to be living near or in an Asian neighboured, or passing by an Asian grocery store, you might just chance upon a wonderful Asian vegetable known in Bengal as kakrol, or you may have heard it referred to as kantola. Then again you may have never heard or seen this Asian vegetable before as it’s pretty unique and is it’s only in season for a month or two.

IMG_1105

It’s a type of Indian gourd that does not have a bitterness like it’s cousin the korola. It’s seriously delicious and actually reminds me pool, which I equally love. It’s in season NOW so seize this opportunity and seek it out. I love the bright vivid greenness of its skin. It’s so inviting it just wants to be eaten!

IMG_1109

You need to half it lengthways and then half it again and then quarter it. Similar to the ones that I have in the photo above. You do not need to peel the skin, simply cut off either end of the gourd.

IMG_1119

The brightness from the turmeric, Kashmiri chilli and the vegetable itself makes for some colourful cooking – just don’t wear a white shirt when cooking.

IMG_1143

I tend to accompany mine with some dal such as red split lentil or cholar and serve it with some freshly prepared chapatis. It’s absolute heaven and the perfect vegetarian/vegan meal. If you do manage to find them and cook this please let me know as I love to hear feedback from readers.

Have a lovely weekend.

Kakrol and Potato Curry

2 tbsp groundnut/olive oil

1 tsp cumin seeds

2 potatoes, halved lengthways and then quartered

5 kakrol/kantola, halved lengthways and then quartered (see photographs above)

1 tsp turmeric powder

1/2 tsp of Kashmiri chilli powder

1 tsp coriander powder

1 tsp cumin powder

1 tsp salt

a few tbsp of water to help soften the kakrol

1/2 tsp garam masala

1 tbsp ghee

1. Heat the oil in the pan and when it is hot add the cumin seeds and move them around the pan for 20 seconds before adding the chopped potato pieces. Turn the heat down and let the potatoes begin to bronze slightly. This will take around 4/5 minutes.

2. Add the kakrol along with the turmeric, chilli powder, salt, cumin powder and coriander powder. Use a spoon to cover the kakrol and potato in the spices.

3. You may need to add a little water to begin with to help the kakrol to soften. Place a lid on the pan to help steam and soften it. Turn gently at intervals and add a little more water if necessary. Cook on a low heat for 25-30 minutes, by which time the kakrol and potato will both be softened.

4. Before serving add the ghee and garam masala, stir into the curry and serve with hot chapatis or other Indian flat bread.

IMG_1165


Fiery Chettinad Chicken

IMG_0969

Chettinad is a region in the southern eastern state of Tamil Nadu in India. The cuisine is commonly regarded as one of the most fiery and aromatic.

IMG_0932

It is famous for its dry masalas that use a wide array of spices including, rather surprisingly, star anise, as well as more commonly used Indian spices such as cumin, cloves, black peppercorns, cinnamon, cardamom, coriander seeds, fennel seeds and whole red chillies. Similarly to the rest of southern India, coconut and tamarind are also often used in cooking.

IMG_0946

The Chettinad people have always been successful traders, travelling far afield throughout Asia. This can be seen in their cuisine as they use a wide range of spices and techniques, clearly influenced by their travelling merchant ancestors.

IMG_0971

My recipe is perfect if you crave some spice. For those at the korma end of the spectrum probably ought to give this a wide birth, but for those who like a flavoursome kick THIS is the curry for YOU. My kids definitely would not eat it, but Mr B and I are big fans and I hope that some of you out there will be also. If you prepare it in the morning ready to eat in the evening it works a treat. You could also cook it a day in advance if you are feeling super organised.

If any of you cook this please let me know what you think. It really isn’t that hot if you are used to eating spice, so be brave and give it a go. It would be great on a hot summer’s eve with a cold beer – check out my brother’s beer here or a chilled lassi such as this one.

Chettinad Chicken

Serves 4-6

800g chicken thighs, cut into bite sized pieces

1 tsp turmeric powder

1/2 lemon, juice only

****

Masala

2 tbsp coriander seeds

1 tbsp cumin seeds

1 tbsp black peppercorns

2 tsp fennel seeds

1 cinnamon stick

3 cardamom pods, seeds only

6 dried red chilli

6 cloves

4 fresh or dried bay leaves

2 star anise

60g desiccated coconut

100ml cold water

****

3 tbsp ground nut oil

14 fresh curry leaves

2 red onions, finely sliced

2 tsp salt

2 tsp garlic paste (or fresh garlic made into a paste)

2 tsp ginger paste (as above)

3 fresh tomatoes, chopped

75-100ml cold water

****

fresh ginger batons to serve

****

1. First cut the chicken thighs into bite sized pieces and cover with the turmeric and lemon juice. Mix in thoroughly and then place to one side whilst you make the masala.

2. Heat up a non stick pan and when it is hot add all the spices (but not the desiccated coconut) and move them around the pan for just over a minute so as to lightly toast them and release the flavours.

3. Place them in a spice grinder. I have this one which is excellent and Debenhams is selling it at the moment for £18. Best investment ever. (I am not on commission to say that!)

4. Whizz them around the spice grinder and then take out half the powder and then add the desiccated coconut or as much of it as you can. Whizz again and remove some more powder and put the remaining coconut in the spice grinder. Transfer to a bowl and add 100ml of cold water to create a thick paste.

5. In the same non stick pan add the ground nut oil and when it is hot add the fresh curry leaves, red onions and salt and gently fry for 8-10 minutes. Add the garlic and ginger paste and move around the pan so that it does not spit.

6. Add the tomatoes and continue to cook for a couple more minutes before adding the masala paste.

7. Add the turmeric lemon chicken and cover fully with the masala paste. Add the remaining water and leave to simmer for 45 minutes, or until the liquid has become virtually dry. Stir at intervals.

To serve place a few fresh ginger batons on top of the curry. It goes really well with rice or Indian breads. It is always good to have a bowl of fresh yoghurt on the side as this dish is renowned for being fiery.


Tomato and Garlic Red Lentil Dal

IMG_0701


This recipe is for all of you lovely people out there who claim you don’t have time to cook. It is super quick, satisfying and great for cold winter nights. It literally takes no longer than 15 minutes to cook from beginning to end. To be fair it is very similar to this dal of mine although it differs in that it has a tin of tomatoes in it, loads of fresh whole garlic (great for ridding those horrible colds and coughs we pick up in winter), and a sprinkling of cumin powder.

IMG_0702

I had a bunch of friends over for lunch the other day and as well as cooking some tasty winter salads had a huge pot of this on the stove. It seemed to go down a treat as there was very little left over once they had gone, another sign that it’s worth giving it a go.

IMG_0700

I like to add a splash of lemon juice liberally at the end, but it’s up to you. Like with all dals they can be made more soupy or firmer depending on personal choice. For this dal I like to make it more soupy so that I can spoon it out of a bowl. If you are cooking it with rice and another dish then maybe you want to add less water. I never really measure the water that goes into it. I always go on how it looks, so my advice is to put in enough water so that it covers the dal by half an inch and then keep adding more boiling water once  the water has soaked up. It’s a winner and so simple. Give it a go and leave me a comment below.

IMG_0697


Tomato and Garlic Red Lentil Dal

Serves 4-6 (4 as a main 6 as a side dish)

300g red split lentil

water, enough to cover the red lentil

1 tbsp groundnut oil

5 (or more) garlic cloves, gently crushed but kept whole

1 tsp panch phoron

1 tsp turmeric powder

1/2 tsp cumin powder

1 tsp salt (to taste)

400g tin of tomatoes

1 lemon, quartered – optional to serve

1. In a deep pan place the red lentils and cover with cold water. Gently wash the lentils using your hand and pour out the murky water. Repeat three times.

2. Add boiling water to the red lentils and cover so that all the lentils are submerged by 1/2 inch. You can add more boiling water once this has soaked up if need be. Boil on a gently heat, skimming off any white residue that comes to the surface. Stir at intervals so that all the lentils cook through and turn from orange to a more yellow colour. Add more boiling water if you prefer it to have a more soupy consistency.

3. In a separate pan heat up the oil and then add the panch phoron. Once they start sizzling add the garlic and move around the pan. After a minute add the turmeric and cumin powder. Keep on a low heat, making sure the garlic and spices do not burn.

4. Add a spoonful of the now yellow lentils to the panch phoron and stir into the spices. Pour the contents of this pan into the pan with lentils and stir in thoroughly. Add a little water to the saucepan to make sure the spices pan is now clear of spices.

5. Add salt to taste and the tin of tomatoes and cook on a low heat for 5 minutes, or until the garlic has softened.

Voila. That simple. Enjoy.


Tamarind and Date Chutney

IMG_0385

I promised you a delicious chutney and here it is. This tamarind and date chutney is perfect with samosas, pakoras, popadoms you name it, it’s great with pretty much everything. It takes no time to prepare and is the perfect accompaniment with an Indian snack.

IMG_0369

It’s simply a case of putting all the ingredients together in a blender and whizzing together to form a smooth chutney. Check that you like the taste and add more lemon, chilli, salt or sugar as you see fit. It’s literally that simple.

IMG_0388

I hope you all have a really wonderful Christmas. If you are hosting or feeding the crowds cooking an Indian meal on the days after Christmas will come as a welcome surprise for everyone. This pork and onion curry is quick to assemble and good at feeding a large number or perhaps this vegetarian spicy black bean curry. If you go to my ‘Recipe Library’ you will find lots of alternative recipes to choose from.

Merry Christmas

IMG_0392


Tamarind and Date Chutney

23 dates, stoned and chopped in half

150 ml water

1/2 tsp Kashmiri chilli powder

1/2 lemon, juice only

1 tsp salt

1 tsp sugar

2tsp tamarind concentrate

  1. Place the dates into a magimix/blender and blend to break up the dates. After they have been broken up add the water and whizz again in the blender.
  1. Add the chilli powder, lemon juice, salt, sugar and tamarind concentrate and whizz until the chutney becomes as smooth as possible, which will be around a minute.

Store in the fridge until ready to use. Can store in an airtight container for over a week.


Baked Spiced Beetroot and Feta Samosas

IMG_0331

For as long as I can remember I have enjoyed devouring vegetable samosas. They are basically the Indian vegetarian version of the Cornish pasty and are a great all day snack. At university I would regularly eat one for breakfast before heading off to lectures. Filling and wonderfully spicy, they were a great way to warm the belly and the soul.


IMG_0310

I often make them the ‘traditional’ way with potatoes, peas, carrots, spices and chilli, but sometimes for a change I like to make them with a twist. Beetroot works really well and if you combine it with feta, cumin seeds, chilli and fresh coriander then you have yourself a really tasty little treat. I thought they seemed quite festive and would make the perfect little starter/snack over the Christmas season.

IMG_0317


Making the filo parcels is a lot easier than you would imagine. If you look at the photographs below you will get the picture of how straightforward they really are to prepare.


IMG_0320


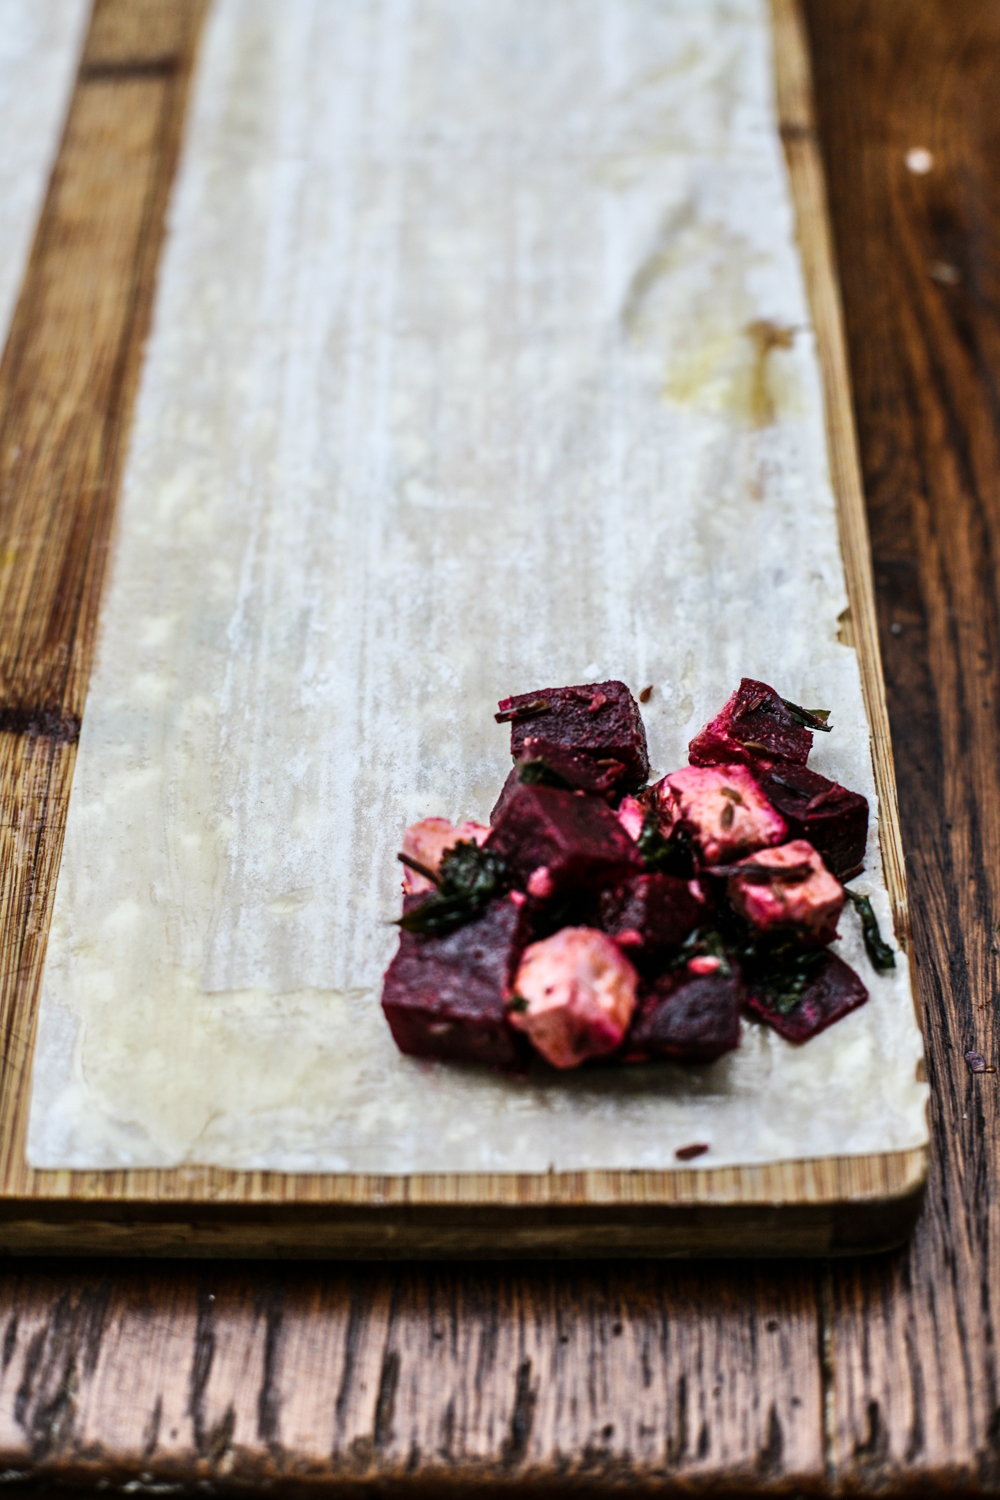
First you start by placing a tablespoonful of the cooked spiced beetroot and feta in the bottom right hand corner. You then need to glaze gently the sides of the filo pastry with melted butter so that the samosa sticks together well.


IMG_0321

By bringing the bottom right hand corner up to the left hand side you create the first triangle. Should it break at all at this stage do not panic as it will all be hidden as you go on folding the triangles.

IMG_0323


Keep folding the triangle over so that it alternates from side, upwards and then side again until you reach the top. Then add a little more melted butter to the top of the filo pastry and fold over one last time.


IMG_0326

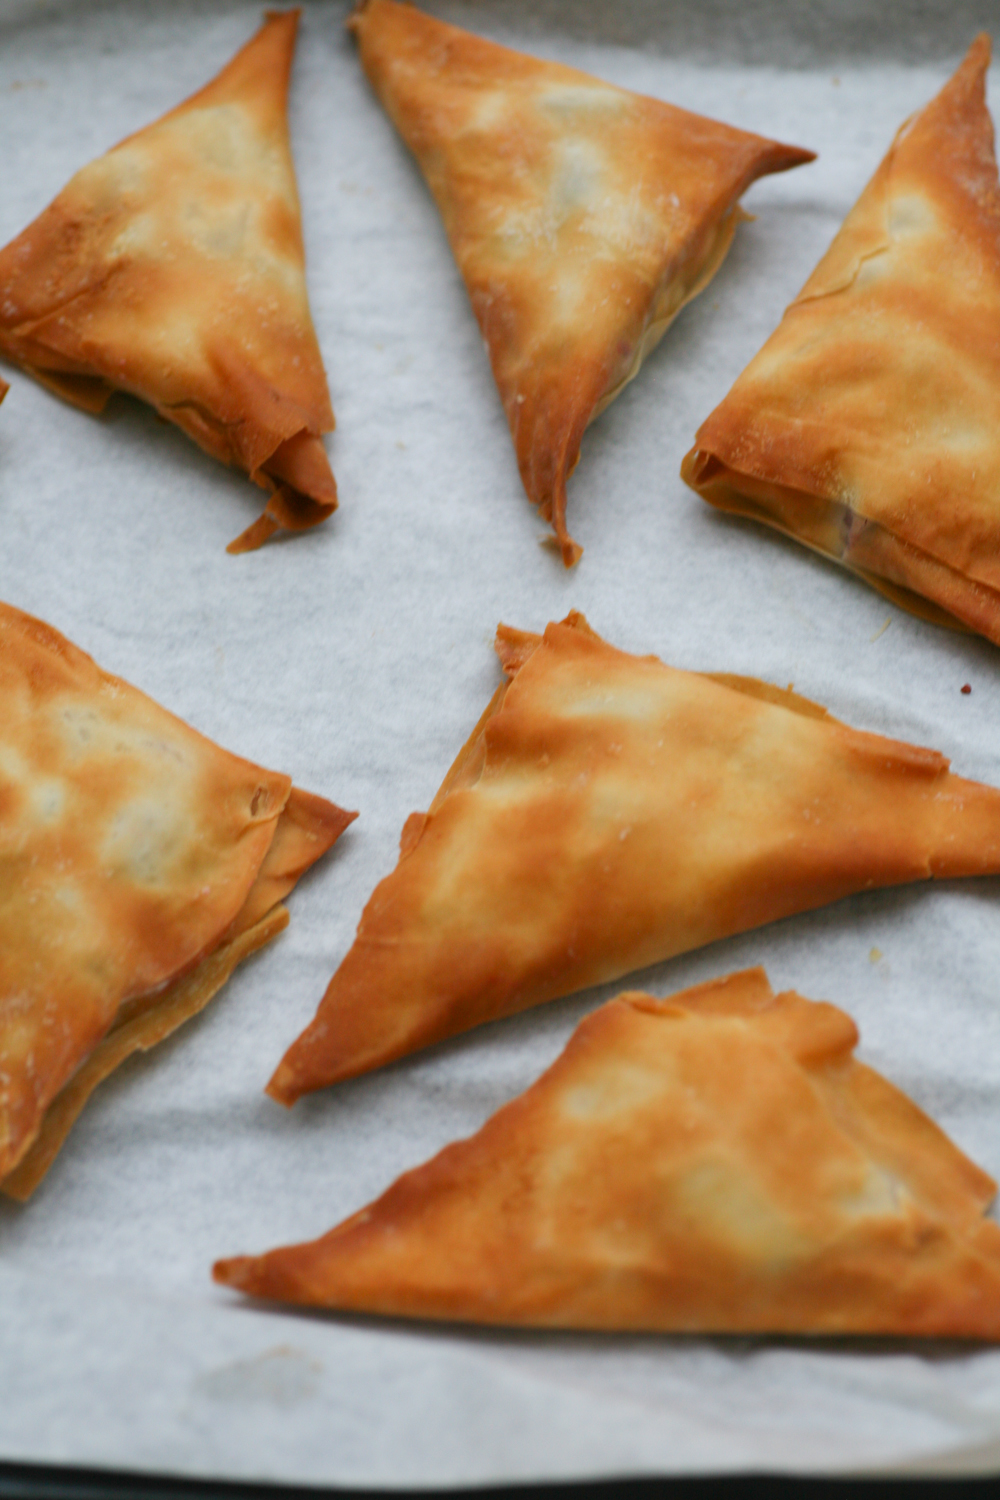
Viola. Now you need to give the topside a melted butter glaze and then place on a baking tray lined with baking paper.

IMG_0329


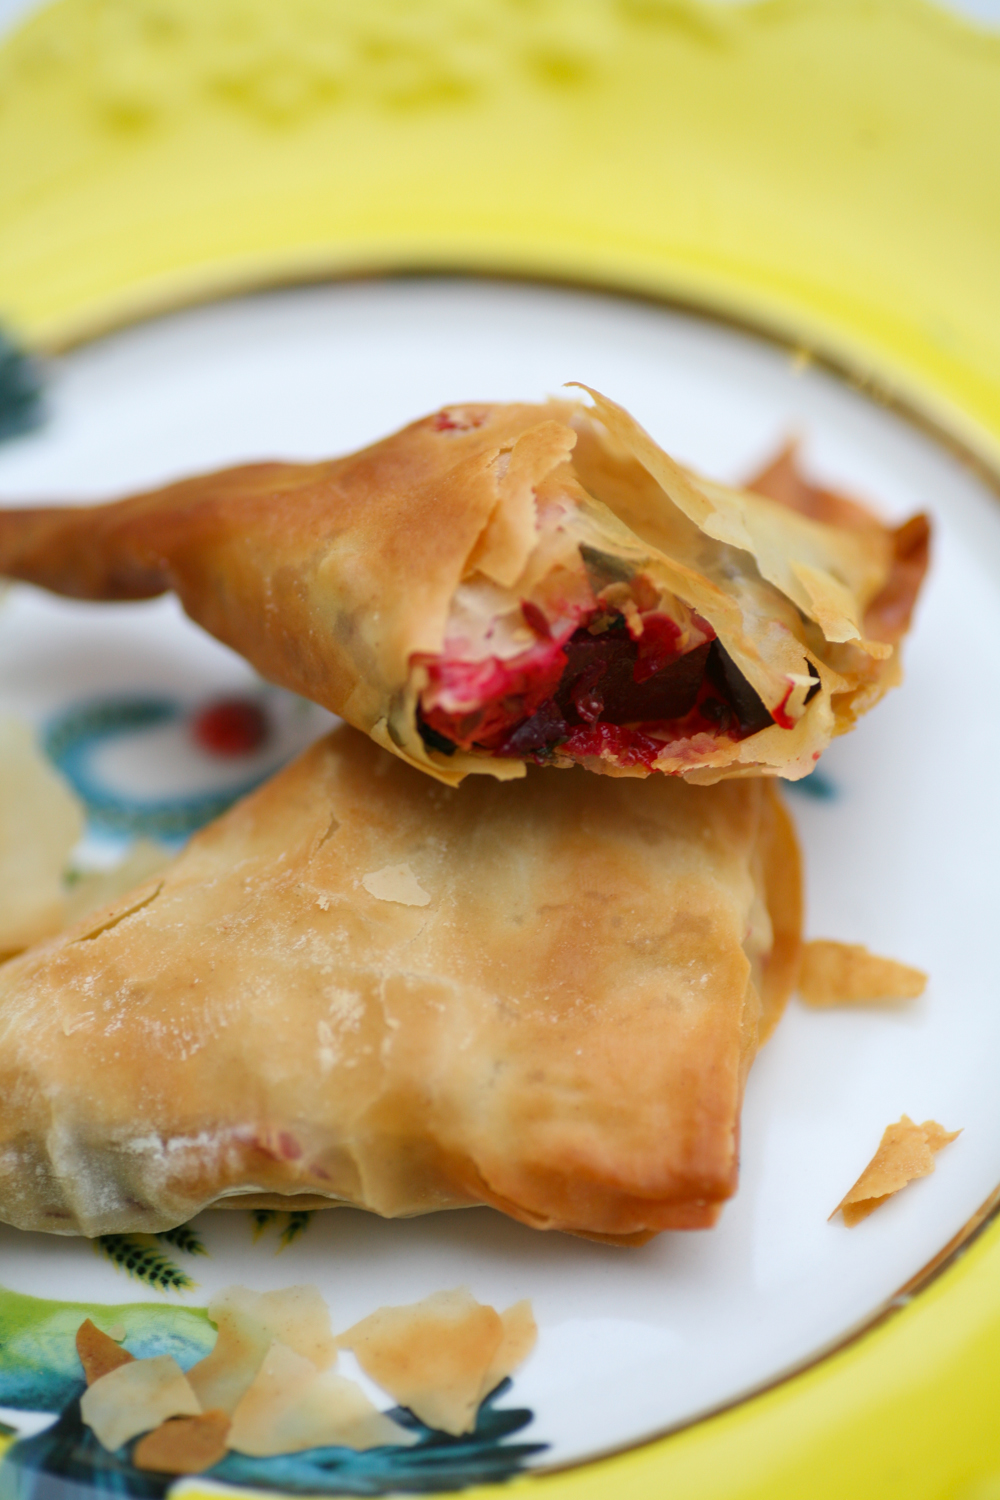
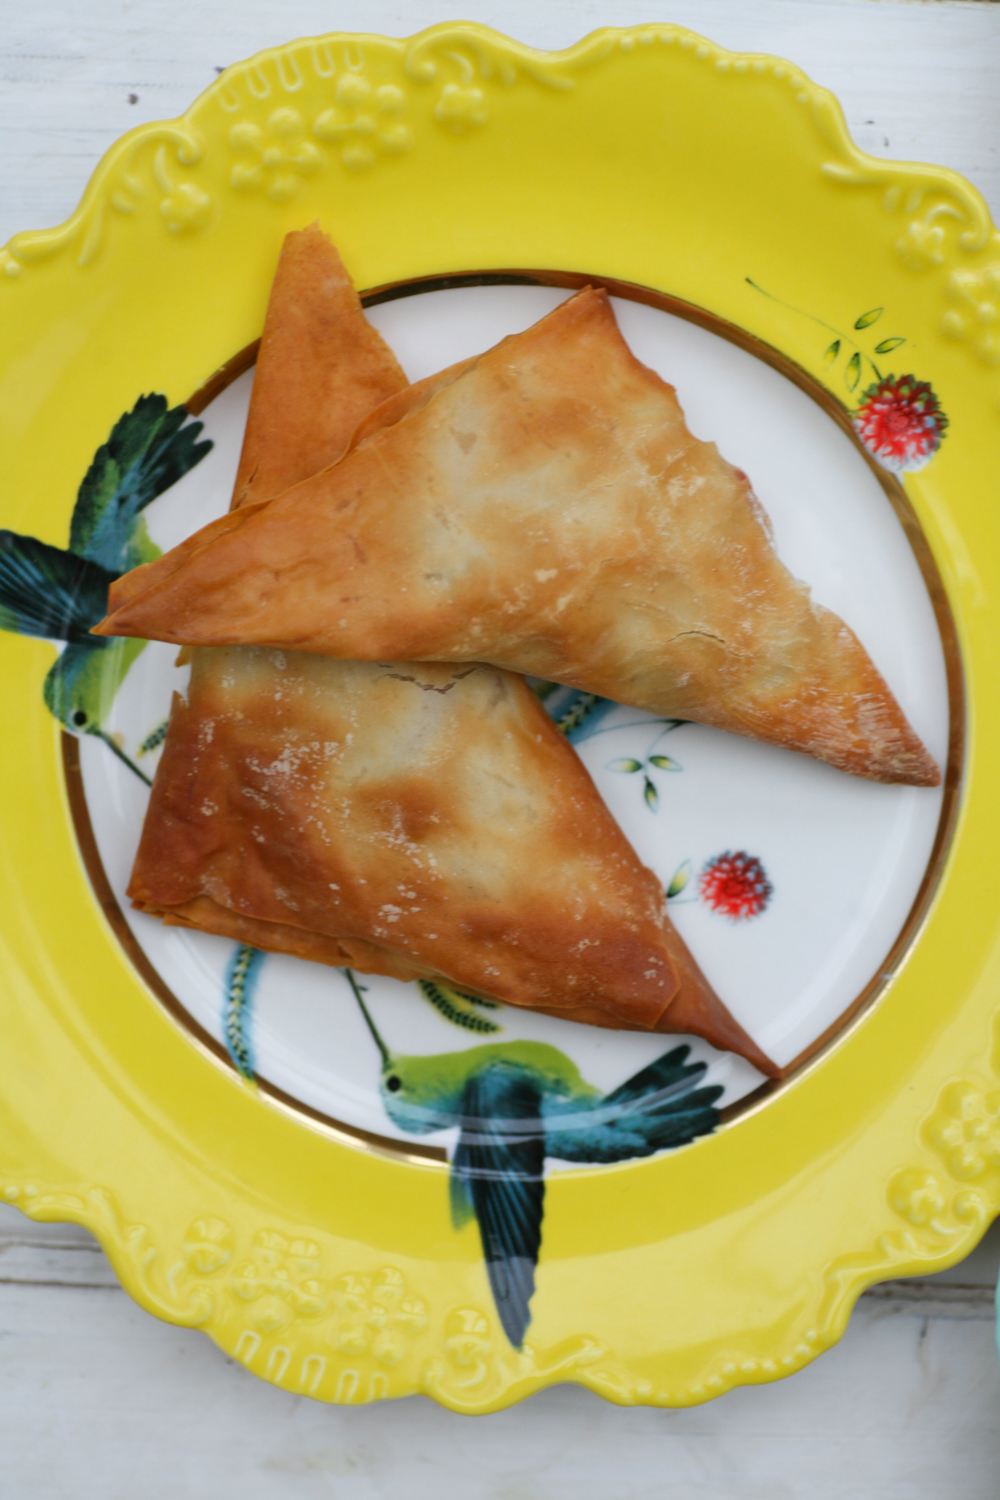
After twenty minutes in the oven at 180 degrees you have beautiful bronzed samosas ready for eating. Eat immediately – or once they have cooled slightly.


IMG_0342


I often serve them as a starter/snack before serving a curry such as lamb curry, Indian greens and a tasty dal and spiced rice.


IMG_0336

They are also an irresistible after school snack (just remember to reduce the chilli if your children are not used to chilli).

IMG_0338


Baked Spiced Beetroot and Feta Samosas

350g beetroot

2 tbsp vegetable oil

1-2 heaped tsp cumin seeds

1 small fresh green chilli, finely sliced (1/2 if you prefer it less hot)

150g feta, diced

1/2 sweet paprika

handful of fresh coriander

8 filo pastry sheets (will make 16 samosas)

butter, for glazing

1. Wash the beetroot and leave the skins on at this stage. Cut the stems so they are short.  Boil in a pan of boiling water for around 20-30 minutes so that they have softened. Test with a sharp knife, if it goes in easily then they are done. The skins will also be able to come away easily when they are ready.

2. Chop into small cubes and place to one side. In a frying pan add the vegetable oil and when it is hot add the cumin seeds and fresh chilli. After 30 seconds add the beetroot and stir well so that they begin to be coated in the cumin seeds and chilli.

3. Add the paprika, fresh coriander and leave on a low heat for 5 minutes.

4. Add the feta and gently fold into the beetroot and spices. Leave for a minute before taking off the heat to cool. Leave to cool for 15 minutes.

5. Preheat the oven to 180 degrees.

6.Place one sheet of filo pastry on a chopping board and cut it in half lengthwise. Using the first pasty strip, lightly brush the pastry with melted butter around the edges and place a tablespoonful of the filling in the bottom right hand corner. Bring the corner up to the left hand side of the pastry therefore making a triangle shape. Then bring the triangle straight up to create another triangle before folding over once again so that the triangle folds over to the right hand side of the pastry once again. (See photos above)

7. Continue all the way to the top. With the final edge brush with melted butter and fold over neatly. Turn over and place on a baking tray lined with baking paper. Brush the exposed side of the samosas with melted butter.  Repeat until you have completed the process.

8. Place in the oven for 20 minutes or until the samosas has bronzed nicely. Serve immediately with  a chutney or two on the side.

Come back to my blog in a weeks time to get a fab chutney recipe.

Note: You can prepare them (pre cooking) and then freeze them. When you are ready to eat them simply glaze them with melted butter and place them in the oven for 20-25 mins until bronzed.