Homemade Gravlax with a Dill, Mustard and Lemon Dressing and Pickled Cucumbers

With Christmas fast approaching I thought a homemade gravlax recipe might come in rather useful. Smoked salmon always makes an appearance on Christmas day, but I think a homemade gravlax might make a welcome change. This Nordic dish is very simple to prepare as ultimately you are simply curing the salmon in salt, sugar, fresh dill and gin (or vodka/schnapps).

I tend to use the container that the salmon comes in to cure it, which makes it all very straight forward and fuss free. If you want to add a pink hue to the gravlax, simply add a small grated beetroot when you add the fresh dill to begin with. Sometimes I also like to add juniper berries, which I crush and add to the curing ingredients (no more than 2 tsp). I like to cure the salmon for 48 hours, by which time it has hardened and taken on the wonderful flavours it has been curing in.

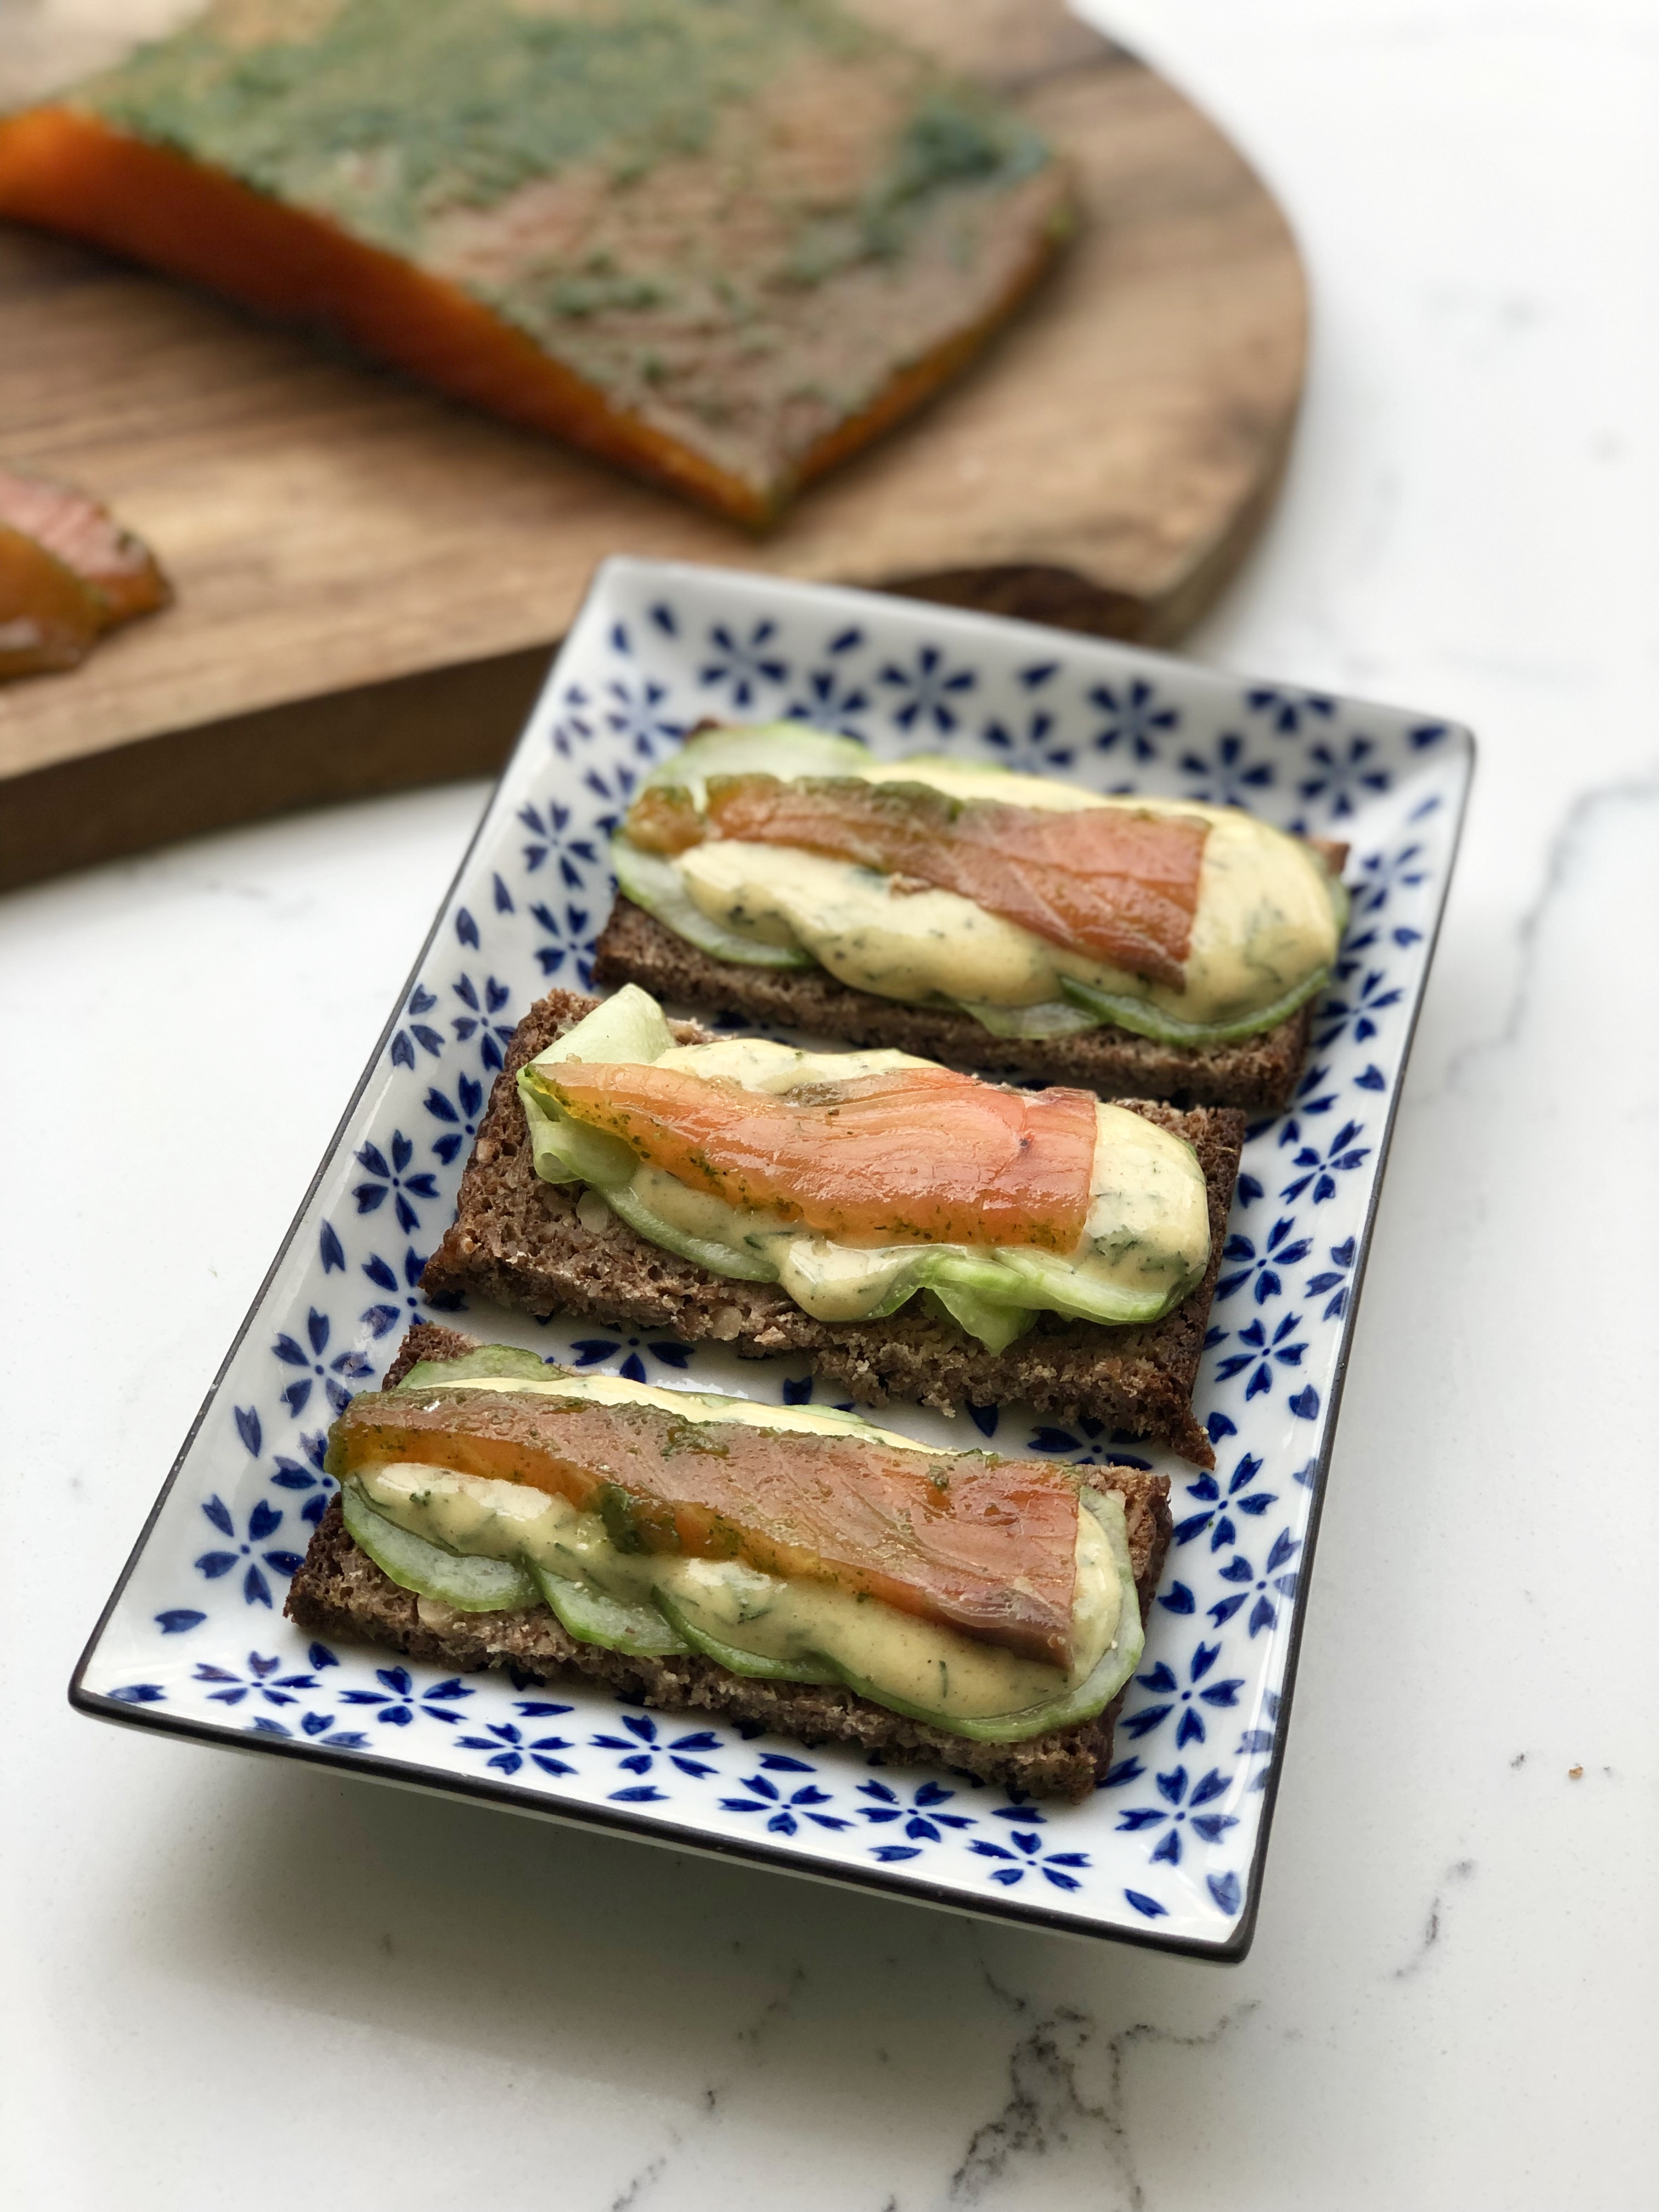
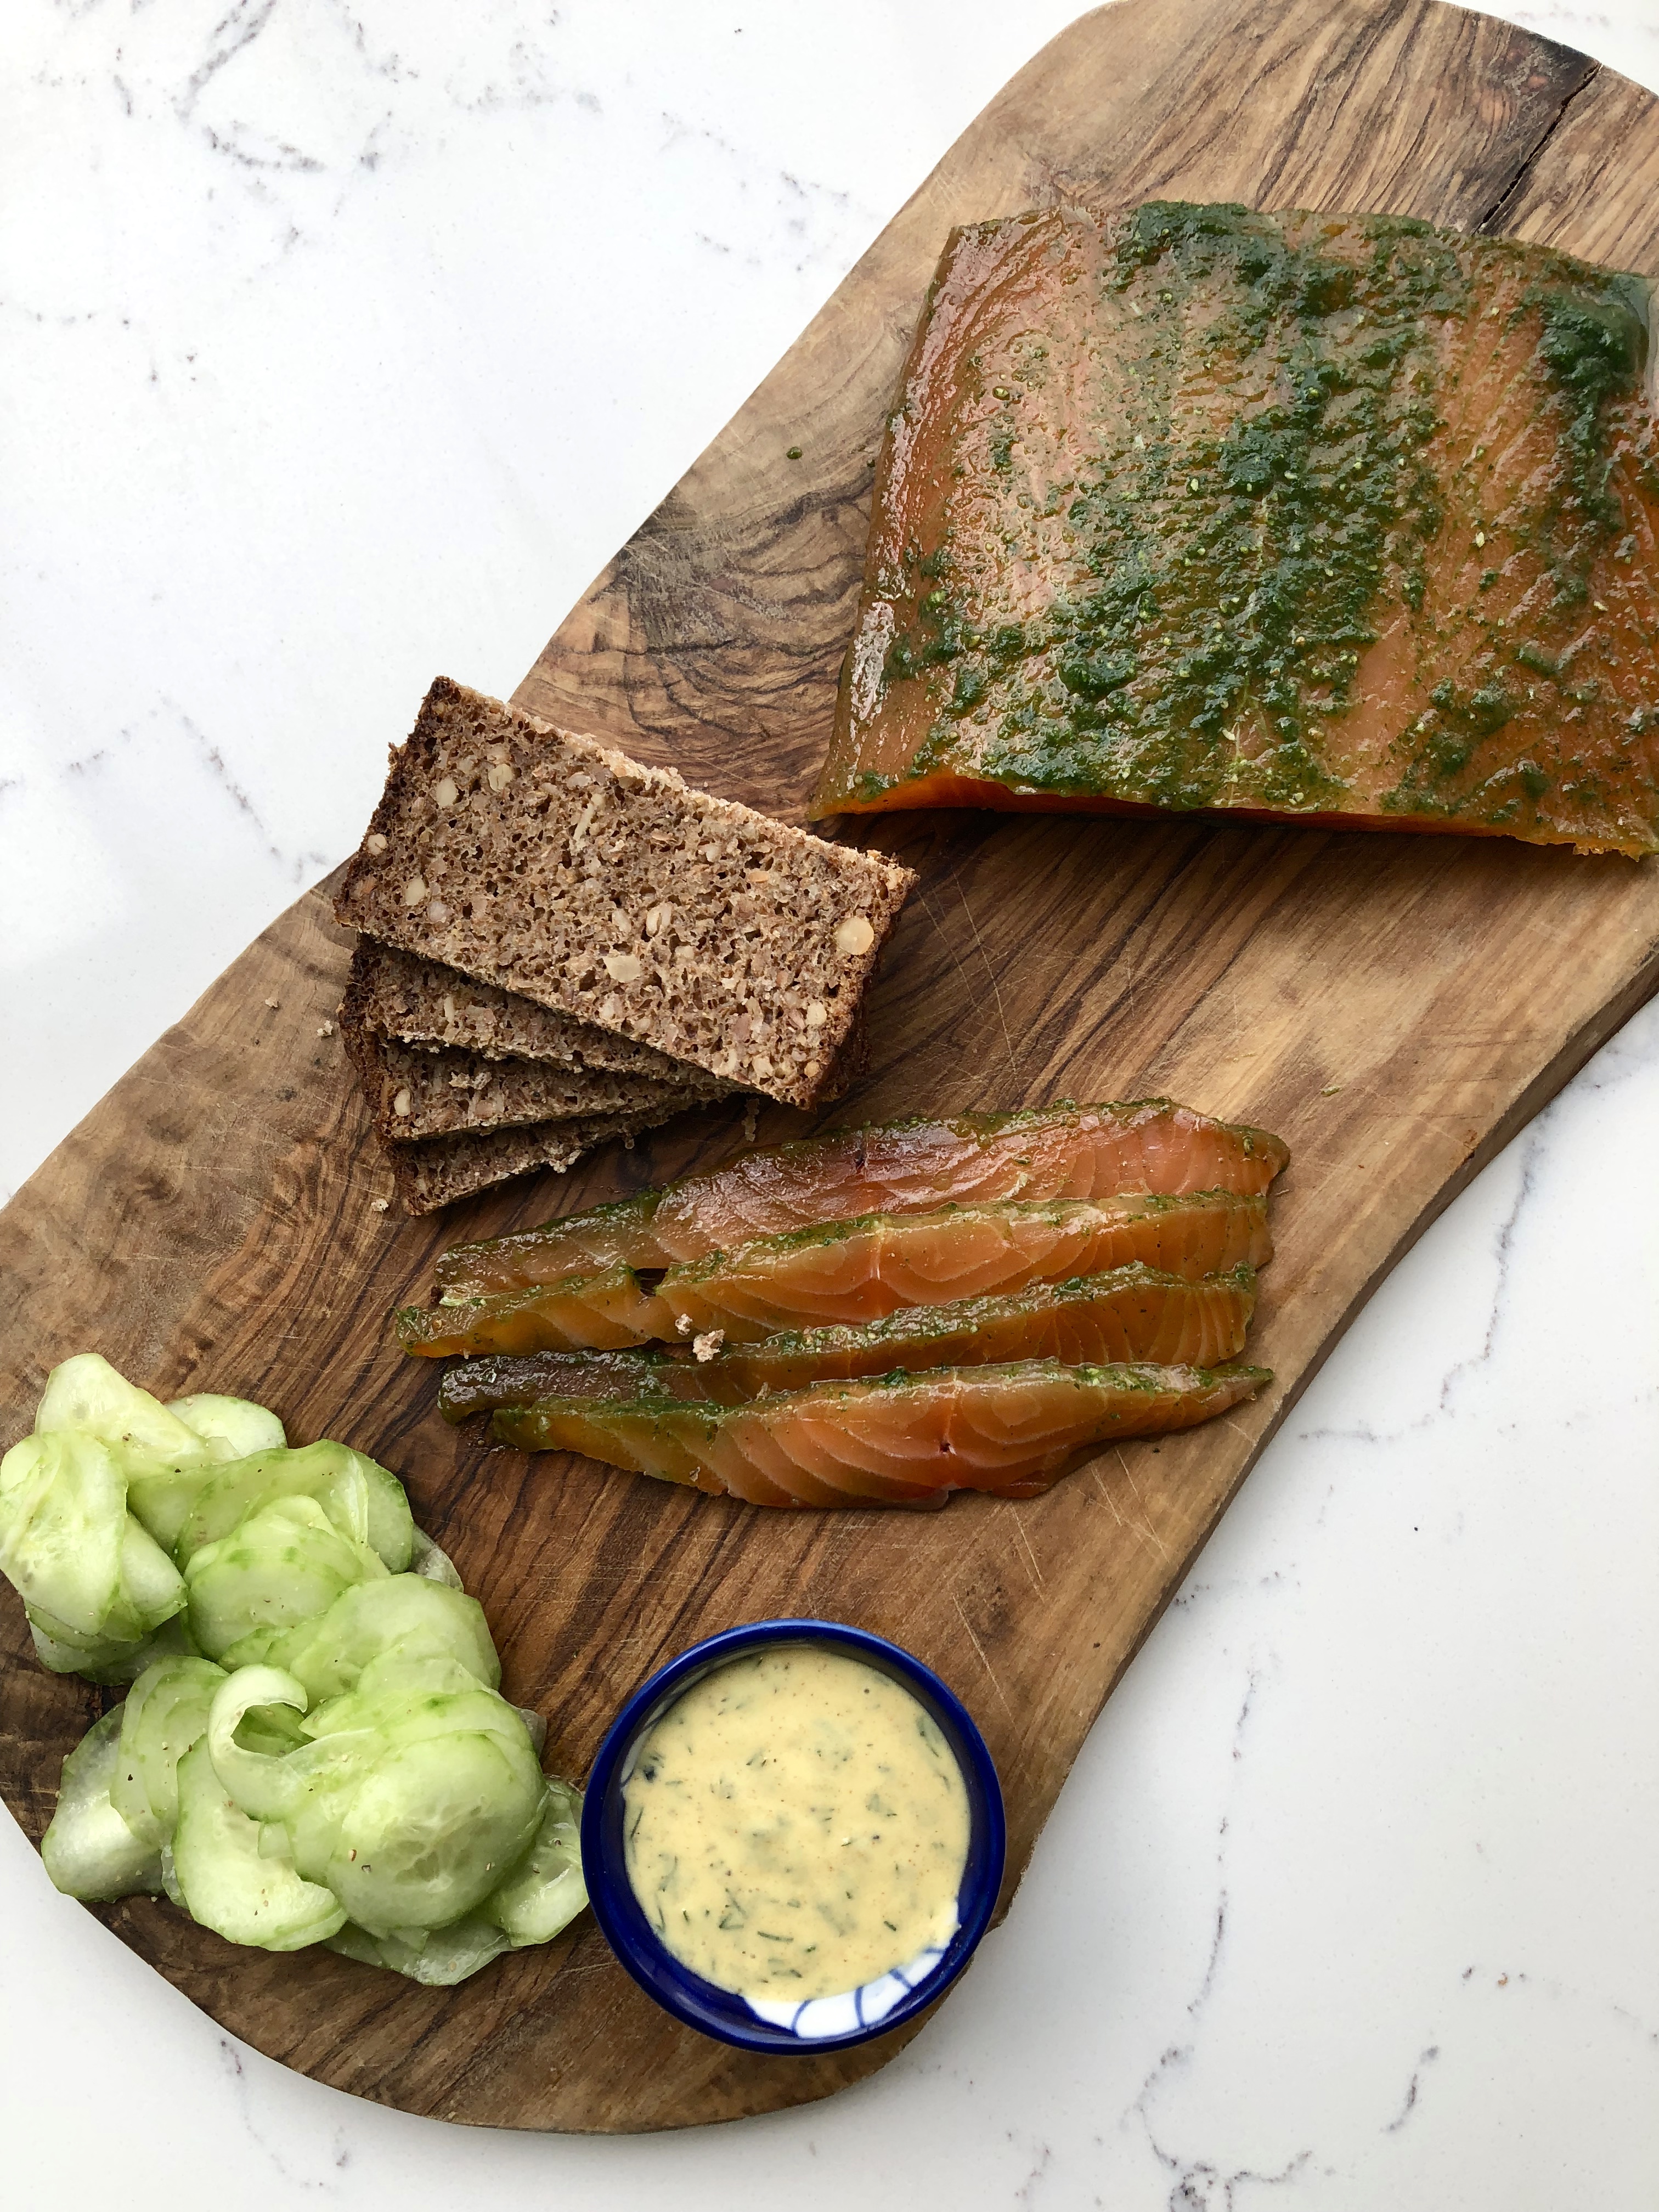
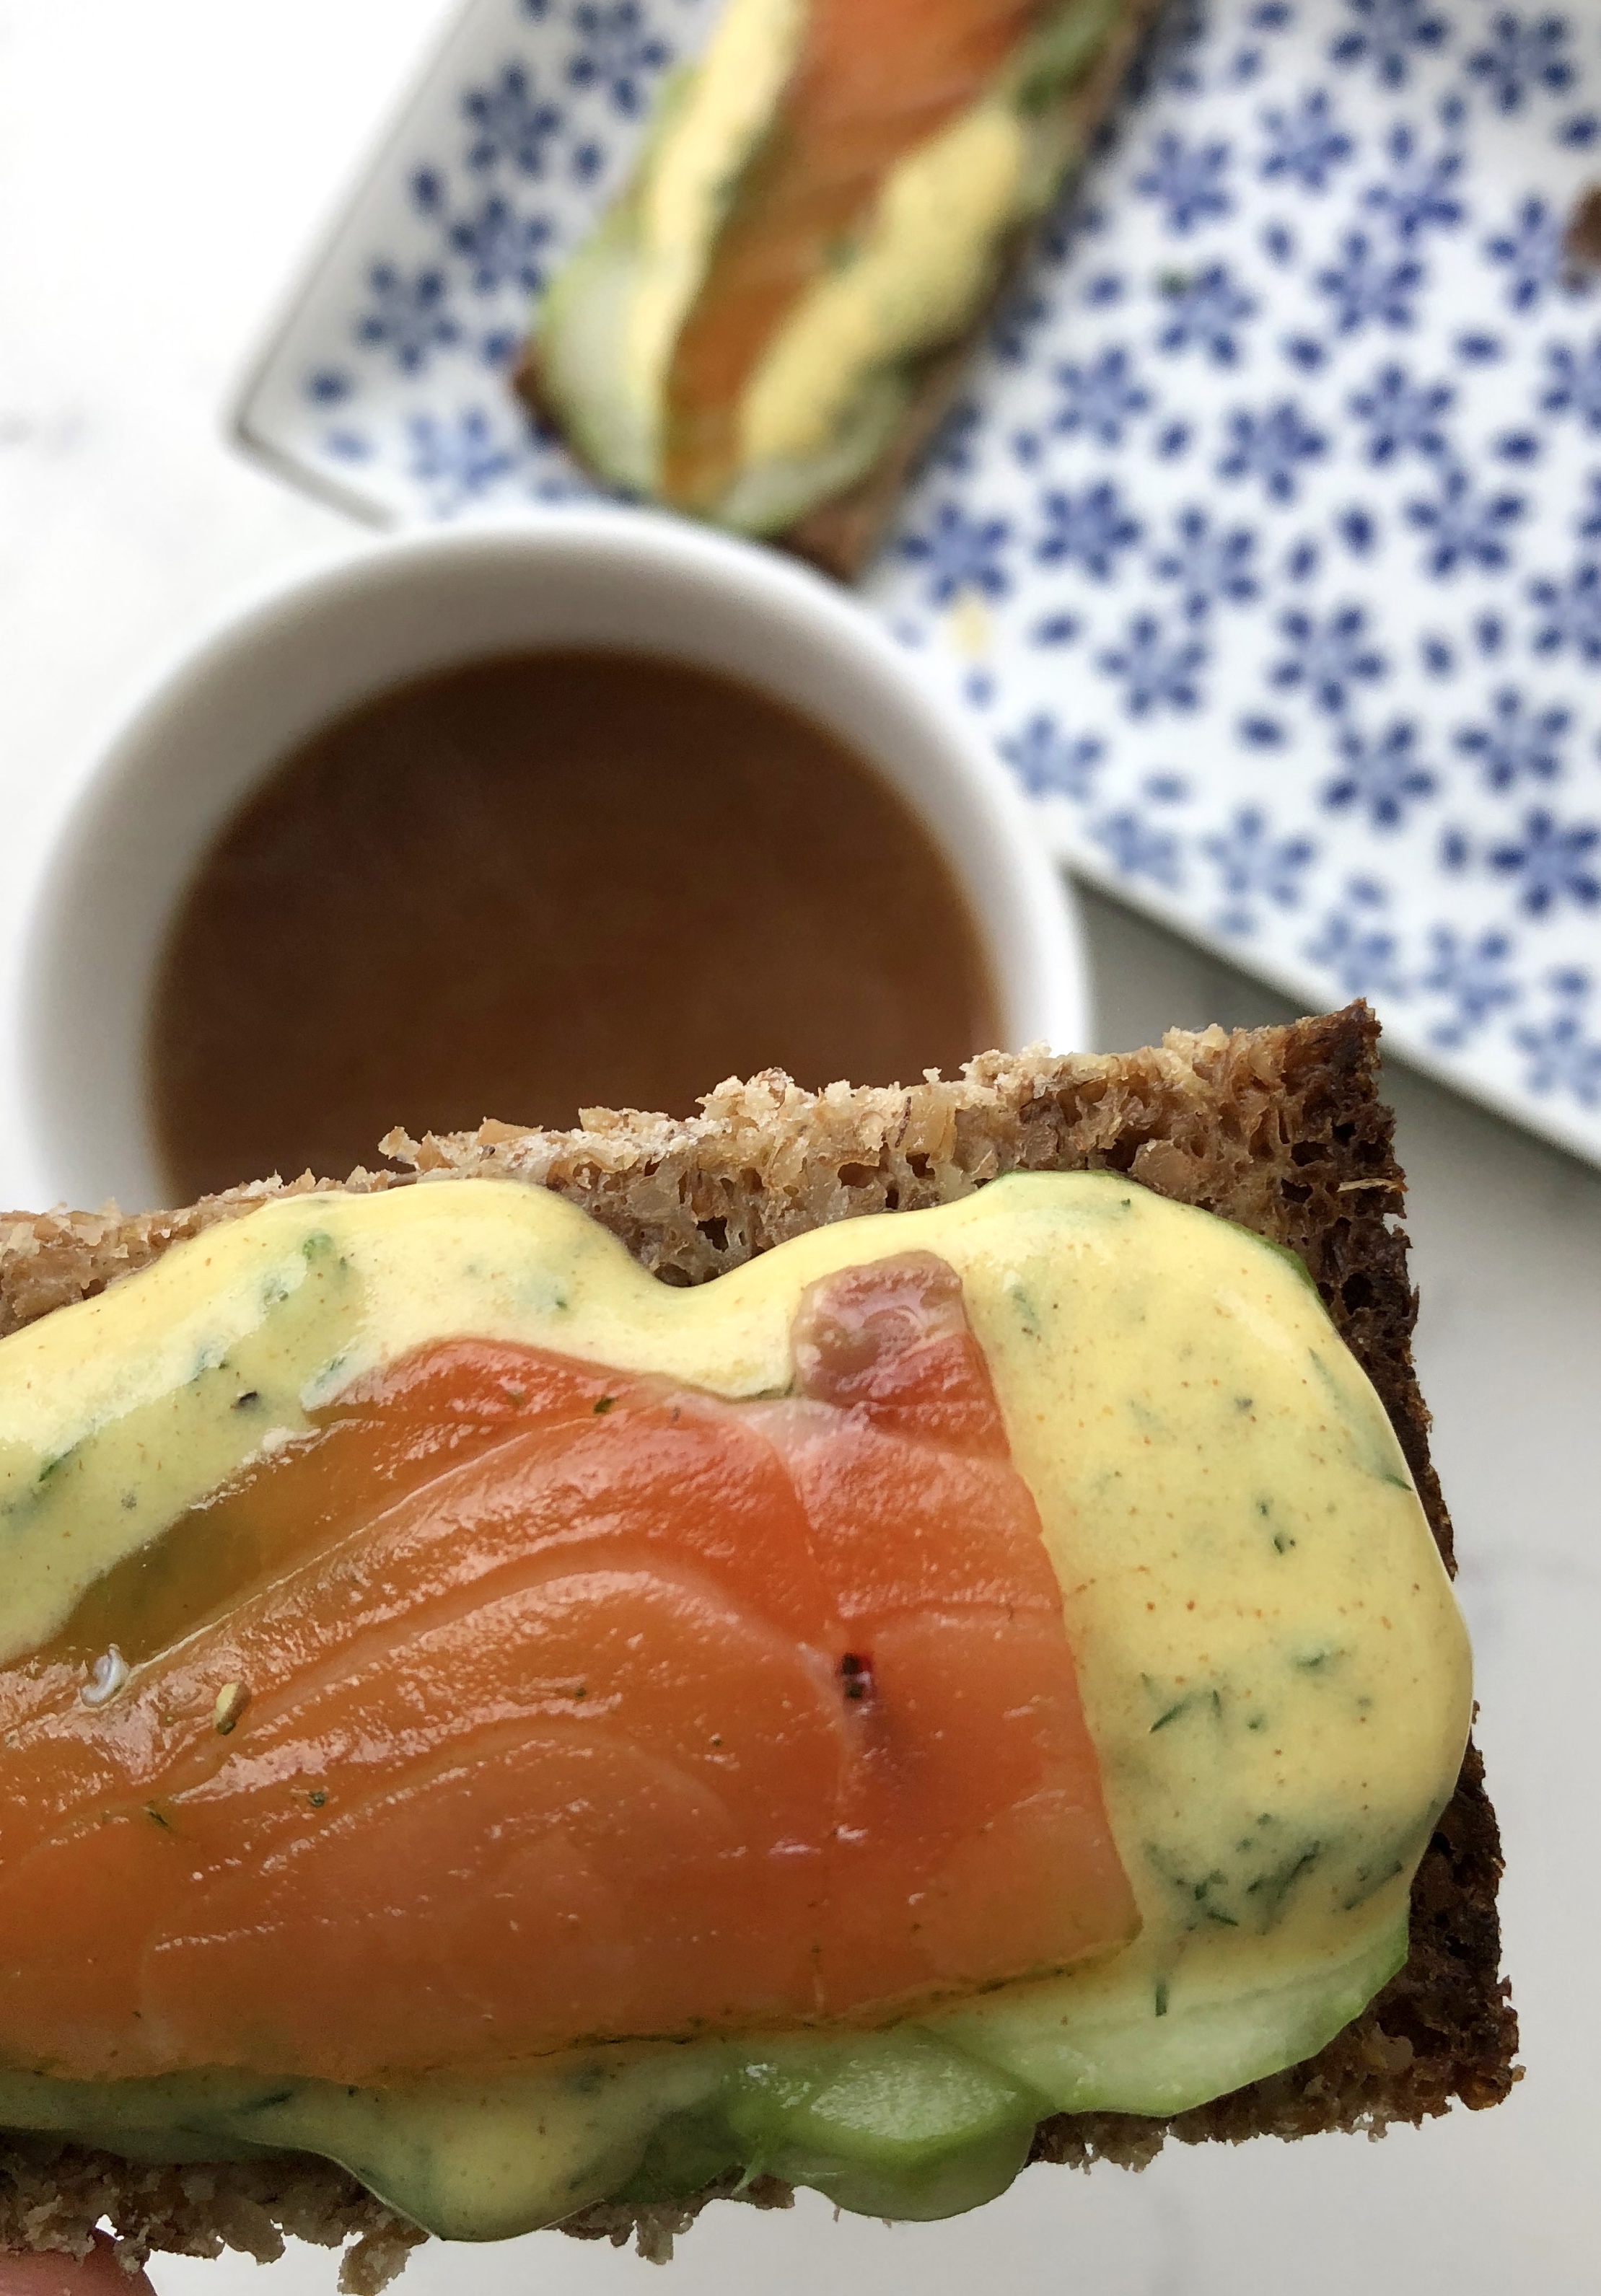
The end result can be made into canapés, of presented as a starter in the middle of the table. I like to make a lemony, mustard and dill dressing and for some crunch pickled cucumbers works a treat.

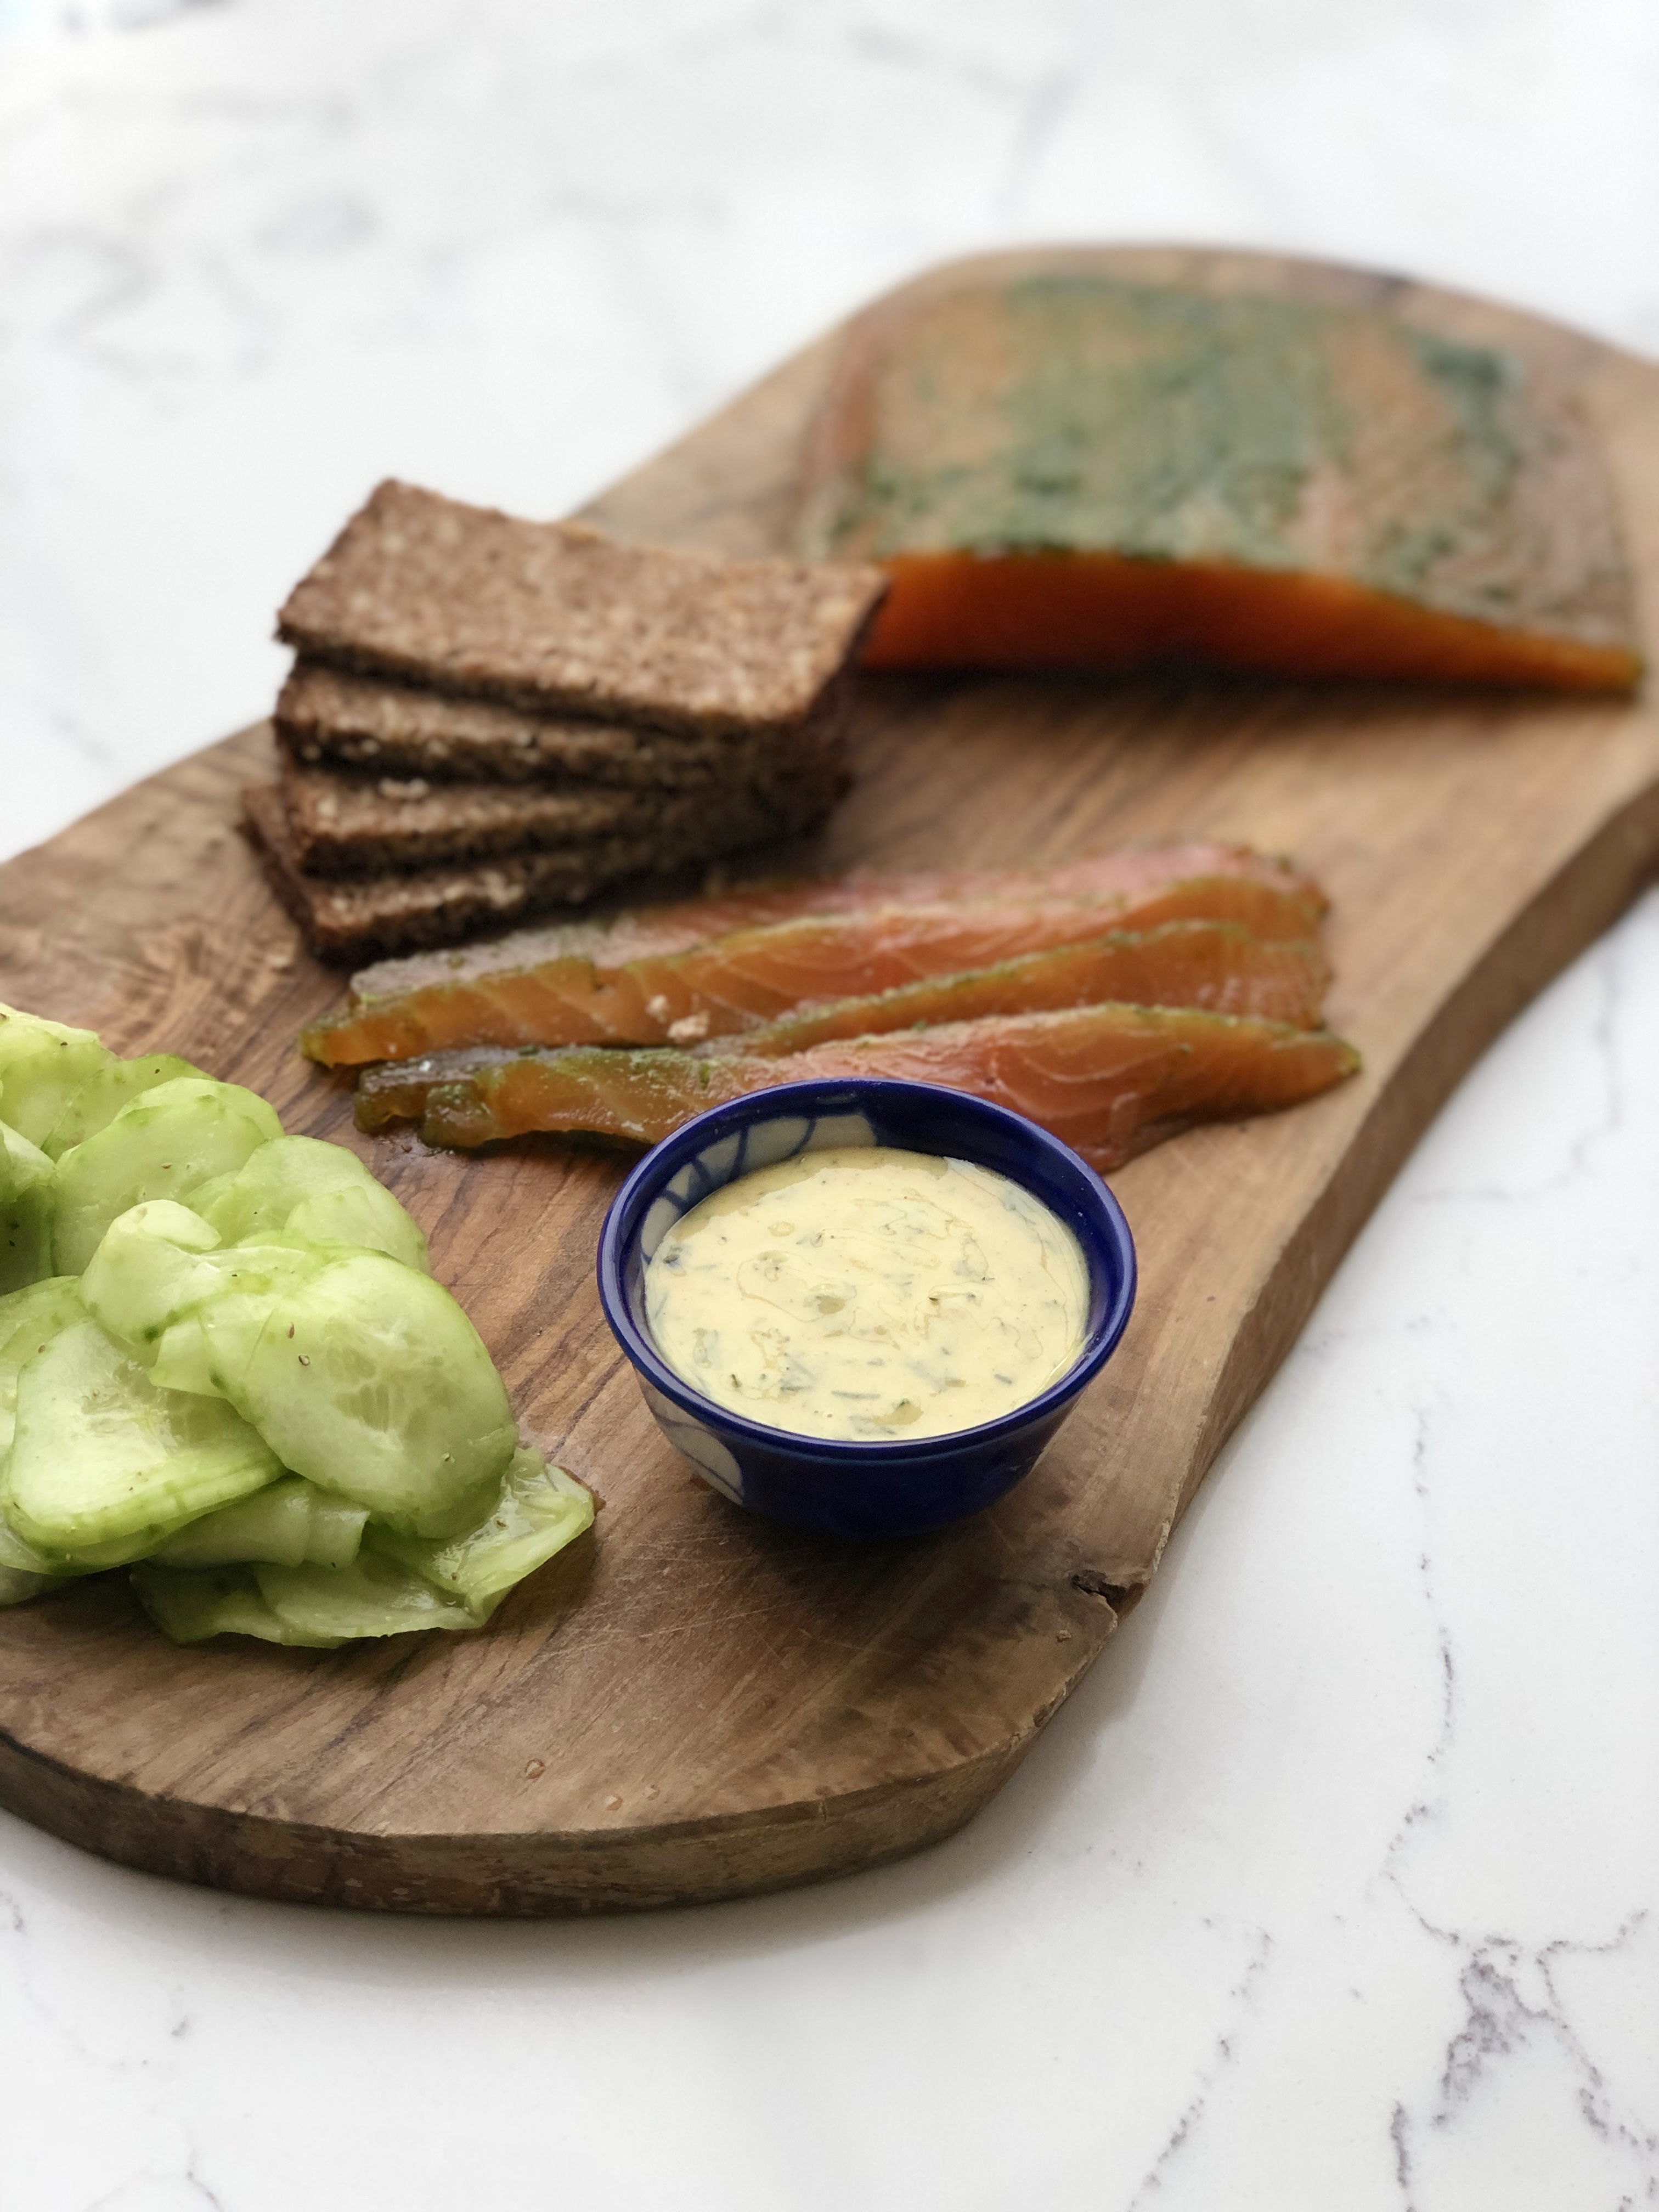
Above gives you an idea on how it would look as a table centre piece for a starter and below as a canapé, or in my case, lunch with a mug of miso soup.


Homemade Gravlax

Serves 4-6 as canapés or starter

500g salmon fillet, skin on (bones removed) this one is perfect

100g fresh dill, finely chopped, leaves and stalks

2 tsp freshly ground white pepper

2 tbsp gin (or vodka or schnapps)

70g flakey sea salt

80g caster sugar

2 tsp freshly ground juniper berries, optional

1 small beetroot, peeled and grated, optional

  1. Using a hand blender (or by hand) other than the salmon, mix all the ingredients together to form a green sugary salty rub.
  2. Using the container that the salmon has come in, or a container that the salmon comfortably fits, add half the rub. Place the salmon on top – flesh side down – and then cover with the remaining rub. Make sure the salmon is completely covered. Cover with a lid or cling film and place back in the fridge for 48 hours, turning a couple of times throughout this period.
  3. Before serving, remove most of the rub by gently running it under some cold water. Pat dry with kitchen paper. You want some of the dill to remain on the salmon.


**********


Thirty minutes before serving you need to make the pickled cucumbers.

Pickled Cucumbers

1 whole cucumber, peeled and thinly sliced (a mandolin is great for this)

1 tbsp white wine vinegar

1 tsp flakey sea salt

1 tbsp caster sugar

1/2 tsp coriander seeds, optional


  1. Place all the ingredients in a bowl and leave in the fridge for 30 minutes.
  2. Squeeze out the excess moisture (there will be quite a lot), and then place in a serving bowl or on the serving platter.

**********


Whilst the cucumber is pickling, clean out an old jam jar with a lid.

Mustard and Lemon Dressing

2 tbsp Dijon mustard

1 small lemon, juice only (I like it quite lemony, so perhaps add 1/2 juice of a lemon first and add more once it is all mixed together)

1 tbsp caster sugar

pinch of flakey sea salt

50g finely freshly chopped dill

2 tbsp sunflower/olive oil


  1. Place all the ingredients in your jar, secure the lid and mix thoroughly. Taste test and add more salt/sugar/lemon to taste.
  2. Place in a bowl ready to accompany the gravlax and pickled cucumber.
  3. Store in the fridge if made ahead of time. It will last for well over a week in the fridge.


Sweet Potato, Albacore Tuna, White Bean, Avocado and Rocket Salad

IMG_7629

Salads in winter are a revelation. Whilst I adore and encourage wonderful winter warming stews and curries, I also love to have light salads on occasion. I crave fresh spinach and rocket and am also rather partial to consuming an avocado. This salad I literally threw together one lunch time last week and had not planned to create a blog post around it – hence the one photo I took on my iPhone quickly before devouring  the meal.

This salad I literally used up things that needed eating in my fridge and the result was heavenly. It got a number of instagram likes so thought I would share it here too. It’s more a case of assembling than anything else, but I hope I can encourage you to try it. I often tend to roast extra sweet potatoes so that I can use the leftovers in a salad a day or two later – hence the ones I used here.

Sweet Potato, Albacore Tuna, White Bean, Avocado and Rocket Salad 

serves 2

2 roasted sweet potato, cut into bite sized pieces

1 avocado, cubed

4 tbsp white beans

1/2 jar of Albacore tuna in olive oil

2 large handfuls of fresh rocket

salt and pepper, to taste

*****

Lemon and Basil Oil Dressing

juice of half a lemon

2 tbsp basil infused olive oil

*****

  1. Assemble all of the ingredients into a mixing bowl, gently mix and then plate up.
  2. Scatter each salad with a little basil infused olive oil and fresh lemon juice.

Enjoy.


Tamarind and Date Chutney

IMG_0385

I promised you a delicious chutney and here it is. This tamarind and date chutney is perfect with samosas, pakoras, popadoms you name it, it’s great with pretty much everything. It takes no time to prepare and is the perfect accompaniment with an Indian snack.

IMG_0369

It’s simply a case of putting all the ingredients together in a blender and whizzing together to form a smooth chutney. Check that you like the taste and add more lemon, chilli, salt or sugar as you see fit. It’s literally that simple.

IMG_0388

I hope you all have a really wonderful Christmas. If you are hosting or feeding the crowds cooking an Indian meal on the days after Christmas will come as a welcome surprise for everyone. This pork and onion curry is quick to assemble and good at feeding a large number or perhaps this vegetarian spicy black bean curry. If you go to my ‘Recipe Library’ you will find lots of alternative recipes to choose from.

Merry Christmas

IMG_0392


Tamarind and Date Chutney

23 dates, stoned and chopped in half

150 ml water

1/2 tsp Kashmiri chilli powder

1/2 lemon, juice only

1 tsp salt

1 tsp sugar

2tsp tamarind concentrate

  1. Place the dates into a magimix/blender and blend to break up the dates. After they have been broken up add the water and whizz again in the blender.
  1. Add the chilli powder, lemon juice, salt, sugar and tamarind concentrate and whizz until the chutney becomes as smooth as possible, which will be around a minute.

Store in the fridge until ready to use. Can store in an airtight container for over a week.


Panch Phoron – Bengali Five Spice and Red Split Lentil Dal

IMG_7307

From top right going clockwise: fenugreek, nigella, fennel, black mustard, cumin seeds

We’ve all heard, and no doubt use, Chinese Five Spice, but the Indian equivalent, Panch Phoron, for some reason is not given as much PR and voice in the West and yet across Bengal, it is a spice mix that is commonly used in every home and very much cherished.

When I launched my blog way back in 2011 one of the first recipes that I posted was my absolute comfort food – red split lentil dal. I cook it often as it is ridiculously easy and provides me with a quick-fix nourishing meal. You can choose whatever vegetable, if any, you need to use up, giving the dal a different twist every time you prepare it. A key seasoning to the dal, which imparts the unmistakable flavour, is panch phoron and whilst I am able to source it from a local Indian supermarket, I know that for some people getting their hands on this magic ingredient could be harder.

IMG_7292

So I wanted to show you how to make your own panch poron. Panch in Bengali is five and phoron is spices and these five spices are: nigella seeds (other wise known as black onion seeds, Kalonji or kalo jeera), fennel seeds (mouri or saunf), fenugreek seeds (methi), black (brown or yellow) mustard seeds (rai) and cumin seeds (jeera). The aromatic spices working together provide a  considerable depth of flavour to any dish and especially to dal.

IMG_7312

Unlike most spice mixes these are not ground to a powder but are cooked whole, either dry roasted in pan or placed in a little oil until they begin to pop and release their flavours – this is known as tempering. There are significant health benefits from eating the spices. In short: cumin aids digestion, fennel contains vitamin a, e and c as well as anti-oxidants, fenugreek aids metabolism, mustard seeds contains omega 3 fatty acids as well as being a good source of selenium and magnesium, nigella seeds balance the hormonal system and have healing qualities.

They store for months in an air tight container so if you make up a batch that should last you for some time as you only need a teaspoon or two every time you use it in a dish.

IMG_7321

There are a couple of lentils that do not require soaking over night and take a very short time to cook. Masoor dal or red split lentils, as they are more commonly known, are a staple in my store cupboard. From cleaning thoroughly to cooking, the dal takes no longer than 20 minutes to prepare – and that’s being generous – on average it’s a 15 minute meal to prepare and cook. Oooh Jamie Oliver would be so proud!

IMG_7322

Red split lentils are also very reasonable to buy so all in all this dish is healthy, speedy and economically friendly. A win win surely!

IMG_7358

I eat this dish all year round and like to change the consistency from a more runny, soupy dish to a thicker dal that may be eaten the Indian way, with your hands, accompanied by some rice or naan.  When the months turn colder I tend to gravitate more and more towards dals and soups to warm me up so this really is the perfect autumn meal to give me that inner glow.

Panch Phoron – Bengali Five Spice

Makes enough to last you for months

3 tbsp cumin seeds

3 tbsp fennel seeds

3 tbsp fenugreek seeds

3 tbsp mustard seeds (I tend to use black, but brown/yellow is also fine)

3 tbsp nigella seeds (black onion seeds)

1. In a bowl mix all the seeds together thoroughly and place in an air tight container.

********************************

Red Split Lentil Dal

Serves 2

200g red split lentils (masoor dal)

500ml of water, add more if you would like it a thinner consistency

1 tbsp oil (mustard,vegetable or sun flower oil)

1.5 tsp panch phoron

2 fresh chilli (red or green), chopped in half

1 tsp turmeric

1 tsp salt

5 cherry tomatoes (or carrots, courgette, marrow, peas etc)

optional

fresh coriander, to serve

lemon wedge, to serve

1. Boil the kettle and meanwhile rinse the red split lentils under the tap so as to fully clean them. Then place the boiling water in the pan with the lentils. Boil for about 10 minutes on a low heat, the lentils will become less orange in colour during the boiling.  If you are going to add a carrot you need to add it to the lentils at this stage so that they are soft in time. Please note you may need to add more water if the water is completely soaked up by the lentils.

2. In a frying pan warm the oil and when it is hot add the panch phoron, fresh chilli and turmeric. Once the panch phoron begins to pop and release the flavours – this will be around 15 seconds, give it a quick stir and then add a ladleful of the watery dal into the frying pan and mix the ingredients together.

3. Now place the contents of the frying pan back into the main pot with the red split lentil and stir.

4. Add the quartered tomatoes (or peas, courgette, marrow, spinach) at this stage and simmer gently for a few minutes.  Add salt to taste.  If you want it more soupy, add more water and if you want it thicker, let it simmer for longer.


Foraging for Samphire on the British Coast

IMG_6645

June, July and August are the months to forage for marsh samphire, not to be mistaken for rock samphire, which grows on rocks on land and tastes completely different, I am told. Marsh samphire can be found in abundance in salt marshes and tidal mud flats on the British coast. You may have also come across it by one of it’s other names:  glasswort (its name of old alluding to a time when it was used in making glass and soap); sea asparagus; Saint Peter’s herb (the Patron Saint of Fisherman) or it’s rather grand sounding Latin name ‘salicornia europaea’. I particularly like its less well known name of ‘Mermaid’s kiss’.

IMG_0176

A few years back marsh samphire was not so easy to source in the shops, other than the fishmonger who would grace their fish displays with the vegetable from time to time. Recently I have seen it in the larger supermarkets in the UK being sold in packets on their fish counters. It’s relatively expensive for the amount you get, so if you happen to be on the British coast in the summer, it is well worth having a forage for the vegetable.

IMG_0174

I’ve been spending the last week or so on the borders of Suffolk and Essex, which is perfect hunting ground. I initially came across some growing on the mudflats on Mersea Island and immediately gathered a small amount to prepare for when I returned home. The following day we were passing by the picturesque and historical village of Orford in Suffolk – well worth a detour on many levels – Richardson’s smokehouse, the great Pump Street Bakery, some fine pubs, a small castle, a grade I listed church with Norman remains and a sailing club – all civilised places have a sailing club don’t you find? I had read that Orford was the perfect place to forage for marsh samphire, so bucket and scissors in hand Big A, Mr B and I went a foraging.

IMG_0178

It was not long before we spotted the easily identifiable marsh samphire sprouting up through the tidal mudflats. They almost look like miniature cacti, without any spines or sharp bits. When foraging though you need to be very careful not to pull out the whole plant as it will prevent it from growing further. Simply pinch off the top parts or use a pair of scissors, so that the fibrous stems and roots remain intact. You will find that the the samphire needs to be thoroughly washed a couple of times so that the mud, grit and general nasties are disposed of.

IMG_0179

Whilst it can be eaten raw, I like to cook samphire – boil or steam for a couple of minutes, and then eat with a dollop of melting butter and a squeeze of fresh lemon juice. Absolutely no salt is needed as they taste of the sea so are more than sufficiently salty. They are rich in Vitamins A, C and D and taste  similar to asparagus, albeit more salty!

IMG_6590

They are also a perfect accompaniment for fresh fish and also lamb, although I rather like the way that this blogger has prepared their samphire – see here – Poached Eggs with Samphire and Honey Harissa. How good does that sound?

Are you able to forage samphire near you? Does it grown in your country? How do you eat it? I would love to know so write a comment below for us all to see.

IMG_0185

Fresh Marsh Samphire with Butter and Lemon

A handful of fresh marsh samphire per person

 knob of butter

lemon wedges

1. Trim and wash the marsh samphire a couple of times so that all the mud, grit and stray seaweed is discarded.

2. Boil a large pan of water and place the samphire directly in the water (if steaming put into the steamer). Boil gently for 3 minutes and drain immediately.

3. Plate up and add a knob of butter to each serving and a lemon wedge on the side. Equally you can pre-melt the butter and pour it over the samphire. Both ways work equally well.

Eat immediately when it is hot and enjoy.

Remember no salt is needed. 


Spicy Virgin Mary with Rosemary Spiced Walnuts

IMG_6440-2

For as long as I can remember I have adored drinking a Spicy Virgin Mary and time and time again I have been a little disappointed by what some pubs pass off as a Virgin Mary here in the UK. Tomato juice with a little tabasco just really doesn’t pass muster, so it’s not unheard of me asking for the necessary ingredients and making my own. Cheeky I know, but hey! In my old life working as a headhunter in the city I would spend a fair amount of time in hotels around London and other European cities meeting up with candidates who wished to remain incognito. I am not a coffee drinker, other than iced coffee and in particular Vietnamese –  for the recipe click here, and there are only so many cups of teas, water and ginger ales you can drink in a day, so my drink of choice, come the afternoon, would be a Virgin Mary.

IMG_6425

The quality of these Virgin Mary cocktails on the whole were excellent, as you would expect from a five * hotel, however, I recall the ones served to me at Browns Hotel, London and The Four Seasons, Canary Wharf – London and Milan were ahead of the pack. They often came accompanied by some little bar snack – nuts, olives or vegetable crisps, which worked so well with the spicy drink.

IMG_6428

So alongside my recipe of a Spicy Virgin Mary I have found the perfect munchy, Rosemary Spiced Walnuts, which is easy to prepare and guaranteed to please those you hand the bowl to. In fact I have prepared it so many times since stumbling across it on fellow food blogger ‘Gastrogeek’s‘ site that it will definitely be imprinted on my mind as the snack for 2013.

IMG_6458

Spicy Virgin Mary

Makes 1 jug around 6 glasses

1 litre of tomato juice

4 tsp Worcestershire sauce

2 tsp tabasco

juice from half a lemon

2 tbsp horseradish

pinch of celery salt (or normal rock salt)

freshly ground black pepper

fresh celery sticks

extra lemon juice for rim of glass

1. Add all the ingredients together and taste. I do like my horseradish so perhaps add one tablespoonful then taste before adding the second.

2. To decorate the glasses first squeeze the extra lemon juice on a saucer and the freshly ground black pepper on another. Place the glasses first on to the saucer with the lemon juice followed by the saucer with the black pepper.

3. Add the Spicy Virgin Mary followed by a stick of celery in each glass and a slice of lemon and some ice.

If you want to ‘bloody’ the drink then just add vodka!

***********

IMG_6477-4

Summer is the season for having friends around for a BBQ and generally chillaxing so I hope you get to try this fab drink/snack combo. What homemade snacks do you like to serve up when friends come over?

IMG_6479

Rosemary Spiced Walnuts

Adapted from the lovely Rejina over at Gastrogeek, who in turn sourced it from Lawrence Keogh, Head Chef at the Wolseley

1 tbsp butter if eating immediately OR a splash of olive oil if cooking ahead of munching

150g walnuts

1-2 tsp light brown sugar

4 springs of fresh rosemary, chopped into small pieces

splash of water

1 generous pinch rock salt

pinch of ground black pepper

1/2 tsp chilli powder (or you could try smoked/hot paprika/cayenne powder)

1. Heat the butter/oil in a saucepan and add the walnuts. Cover the walnuts in the butter/oil and keep them gently moving around the pan allowing the natural oils to resonate.

2. After a couple of minutes add the sugar and allow the nuts to begin to caramalise.

3. Add the chilli powder (I also sometimes make these with smoked paprika), fresh rosemary, rock salt and black pepper. Continue to stir and shake the nuts around, making sure that they do not burn.

4. After a couple of minutes pour into a serving bowl and sprinkle some rock salt on top.

Perfect with a Spicy Virgin Mary.

IMG_6487-6


Broad beans, lemon zest ricotta, fresh mint oil, parma ham with pink peppercorns

IMG_5822

I have been meaning to a write blog post on this recipe for sometime now as I seem to be averaging eating it once a week in the last month or so. It’s one of those recipes that once you’ve prepared it you want to dive in and eat it so I needed to be speedy with the camera work, hence the lack of lots of photos.  It is absolutely perfect for a lunch either by yourself or if you have a few friends coming over. The bright greens and the complimenting flavours of lemon, broad beans, mint, olive oil, garlic, ricotta, parmesan, parma ham and pink peppercorns really appeal to me. The pink peppercorns I managed to source in Turkey last year and they have the most wonderful flavour. Whilst I imagine a quick trip to Turkey may not be realistic you’ll be glad to hear that you can find them at most supermarkets – they are definitely worth seeking out as they have a very distinct flavour – very different from the black variety.

I stumbled across this recipe years ago in Skye Gyngells book ‘A Year in My Kitchen’ and as far as I’m concerned it’s a winning recipe. The only slightly time consuming part is taking the skins off the broad beans – which to be fair does not really take that long, especially if you have a friend to chat to whilst you are sharing the podding together.

IMG_5769

Other than this time, I always prepare the dish with fresh broad beans but for some reason the two places that normally stock them this morning had run out, so I had to suffice with frozen. They tasted equally good, although they were a slightly smaller in size, which made peeling them take a little longer. I reckon if you have a glorious sunny day with friends coming over for lunch this is the perfect dish. To accompany it, a glass of Riesling or ginger cordial would always go down a treat. A great wine merchant called Symposium, based in the picturesque town of Lewes in East Sussex, I always find comes up trumps with recommending great drinkable wines. I’m based in London and they always seem happy to deliver a case or two to me when I am needing to stock up. If you are interested send Henry an email henry@symposium-finewine.co.uk and he’ll send you their wine list.

Broad beans, lemon zest ricotta, fresh mint oil, parma ham with pink peppercorns

Adapted from Skye Gyngell’s book ‘A year in my kitchen’

Serves 4

1kg of fresh broad beans in their pods (or 500g podded/frozen)

250g fresh ricotta

50g parmesan, finely grated

1 lemon, zest and juice

8 slices of parma ham

1 garlic clove

handful of fresh mint

75ml olive oil

pinch of pink peppercorns per serving

sour dough bread (or ciabatta)

1. If using fresh broad beans, take them out of their pods and place into a pan of boiling water for under 1 minute. If you are using frozen broad beans you need to leave them in the boiling water for 3 minutes. Strain and run under cold water immediately and then peel off  the outer shell of the broad beans and discard.

2. Take a large handful of fresh mint and finely chop up all of it bar a few leafs that you will sprinkle over the top at the end. Place the finely chopped mint leaves in a bowl with 75ml of olive oil and leave to infuse for 15 minutes or longer.

3. Place the ricotta into a bowl and add the finely grated parmesan. Stir together and then add most of the zest from one lemon – the remaining zest you will sprinkle on the dish at the end. Add the juice from half a lemon.  Stir in all together and leave to one side.

4. In a preheated oven – 180 degrees – place the parma ham on baking parchment with a drizzle of olive oil and black pepper. Leave to crisp up in the oven for 10 minutes.

5. Slice some sourdough bread and place in the toaster or under a grill for it to become golden. Once toasted cover with a little olive oil and fresh garlic.  Place on a serving plate.

6. Add a spoonful or two of the  lemony ricotta/parmesan to the toast. Add a scattering of broad beans followed by some mint drizzle and then lay two slices of parma ham over the creation followed by some of the remaining lemon zest, fresh mint leaves and a good pinch or two of pink peppercorns. I find that no salt is necessary as the parma ham and parmesan more than make up for the lack of salt.

Eat at room temperature.

IMG_5820


Musakhan – Palestinian Roasted Chicken with Sumac

I wanted to introduce you to a wonderful bold spice that is probably unfamiliar to some of you.

Step forward, Sumac. 

This wonderfully flavoursome spice derives from the berry of a plant called ‘Rhus Coriaria’ that ranges from bright red to plum in colour and is grown wild throughout the Middle East and some parts of the Mediterranean. Whilst you can buy the berry whole, it is more often purchased dried coarsely or finely ground. The Romans used it as a souring agent as it has similarities to lemons in its tangy, tart taste.

Whilst ambling around the spice market in Turkey this summer, I purchased some to last me for quite some time.  However, like most things these days it is also available closer to home and can be purchased at most supermarkets or Middle Eastern food stores.

So as to appreciate fully the qualities of the spice I thought a straightforward version of the ubiquitous Palestinian dish,  Musakhan, would be a great place to start. The ingredients are simple and yet make a most appetising meal that can be enjoyed by all the family. It’s definitely a meal that you have to roll your sleeves up and get stuck in, so as to speak, and it requires you to eat it ideally with your fingers – far more satisfying. A number of the recipes for this dish talk about the  sumac chicken and onions (and sometimes also allspice and saffron!) on a flat bread that then gets toasted and scattered with toasted pine nuts, but I thought I would create the dish in a wrap form to make it easier to pick up and eat. I leave it to you to consume in either the flat or rolled form, both will be equally delicious I assure you.

Musakhan

Adapted from moodfoodblog.com

1 whole chicken

75g sumac

6 onions (mix of red and white ideally), thinly sliced

3 tbsp olive oil

juice of 1 lemon

100ml chicken stock

salt and pepper

10-12 Middle Eastern flat bread

1. Place the half the sumac, 1 tablespoon of olive oil, lemon juice, salt and pepper over the chicken and leave to marinade for a few hours or overnight

2. Preheat an oven to 180 degree and roast the chicken for 1 hour or until cooked

3. Meanwhile, place the rest of the olive oil in a pan and gently fry the onions along with the rest of the sumac until the onions are  soft

4. Add the chicken stock to the onions and stir in thoroughly for a couple of minutes

5. When the roast chicken is cooked leave to cool slightly and then shred the chicken, using a fork, from the carcass. There will be lots of juices from the chicken and sumac so place these into a dish with the shredded chicken.

If you want to keep the remains of the carcass you could make this chicken soup.

6. On the Middle Eastern flat breads place the shredded chicken, soft juicy onions and wrap tightly and place back into the oven for a couple of minutes to heat through. Then serve immediately with a quarter of lemon on the side.

As an alternative you could serve the shredded chicken hot and warm up the flat breads and let your guests serve themselves and create their own wraps, in the same way that you would make your own duck spring roll!

I served mine with a green salad which was full of olives, gherkins and tomatoes. A garlicky yoghurt or raita would also work exceptionally well.

Smother the uncooked chicken with the sumac, olive oil, lemon, pepper and salt and leave to marinade for a couple of hours or if you are really well planned, overnight! I love the bright redness of the spice.

Shred the roasted chicken and mix it with all the juices that have come from the roasting. The taste is divine.

Be careful not to overfill or you will find it hard to warp and then hold and eat.

The finished product. Roasted chicken with sumac, lemon and onion wrap. They are totally addictive and I assure you it is easy to polish off quite a few.


Mung Bean and Cumin Dal and Durga Puja Festivities

This past weekend has been one of celebration as it was Durga Puja. For Bengali Hindus (my husband’s side of the family) Durga Puja is the biggest religious festival in the Hindu calender. In Kolkata, which is the heart of Bengal, I am told it is taken to another level altogether, when families feast, dance and pray to the goddess Durga – the conquerer of good over evil and the mother of the universe, as well as her children: Ganesh, Saraswati, Lakshmi and Kartik. Schools close and everyone takes time off work to celebrate.

The statue of goddess Durga on her lion fighting the demon Mahishasura in the Hounslow Pandal

Tooting Goddess Durga 

The making of the statues is a hugely lucrative business in India and at the end of the six day festival the statues are ceremoniously carried to the Ganges and left to drift away and be reabsorbed into the Ganges. The statutes themselves are made of straw and mud from the Ganges and then glazed with paint to give them that glossy shine; the craftsmanship and detail never ceases to impress me.

There are thousands of Durga Puja pandals, which are basically huge structures housing the goddess and her children, erected all over the different Kolkata neighbourhoods. It’s all hugely competitive and each pandal competes for attention in beauty and innovation. I visited two different ones in London – one in Tooting and the other in Hounslow and both were very spectacular in terms of colour and design, the latter I know had been shipped from Kolkata.

Ganesh – one of Durga’s offspring in the Hounslow Pandal

The banging of the drums, the blowing of the conch shell, the incense, the chanting of the prays and hustle and bustle of people coming and going really transports you to India. It’s all rather frenetic and yet very warm and inviting at the same time. In the Hounslow pandal alone thousands of visitors came and went over the course of a few days. Catering for that number must be rather daunting but I was very impressed by the taste and quality of the food and the fact that it was all hot. It was the longest queue for food I have ever witnessed, but it moved quickly and before long we were given a plate of tasty vegetarian food.

Some vegetarian cuisine given to those who attended the Hounslow puja in London

Back at home I have been cooking an endless amount of Indian dishes from: methi and pomegranate pork curry to amma’s chicken curry, red lentil dal with spinach, yellow dal with courgette, Bengali fish curry and mung bean and cumin dal.

It is the mung bean dal recipe that I wanted to share with you all today. Unlike red split lentil and some yellow dal it does require a little more forward planning as it needs to be soaked, ideally overnight.

It’s delicious, nutritious, cheap to make and other than the soaking of the mung beans, is very straightforward. My mother-in-law makes a completely different tasting mung bean dal, which I will post another time, but to get you started try this one and let me know how you get on. It’s perfect for a week night vegetarian supper.

Mung Bean and Cumin Dal

Serves 4

250g mung beans (also referred to as moong bean), soaked overnight

3 tbsp mustard oil

1 white onion, finely chopped

1 tsp cumin seeds

1 tsp turmeric

half tsp red chilli powder

half tsp garam masala powder

half tsp cumin powder

1 tsp salt

juice of half a lemon

fresh coriander to serve

1. Place the pre soaked mung beans in a pan and cover with water and gently simmer until softened. This will take around 40 minutes.

2. Meanwhile, place the oil in a pan and gently fry the cumin seeds for a minute or so until they begin to bronze. Immediately add the onion and mix together with the cumin seeds.

3. When the onions have softened and become translucent add the cumin powder, red chilli powder, turmeric and garam masala and stir together.

4. Drain the mung beans and then transfer them to the pan with the onions and fold in thoroughly. Add the salt and lemon juice and simmer together for a further 5-10 minutes. You may need to add a little more water at this stage.

Whilst it is delicious to eat on its own or with a chapati it is also great to accompany it with a fish, meat or vegetarian curry (see my recipe library) if you wish to make a more substantial Indian feast.

Mung beans soaked overnight

Step 3 above


The Perfect Steamed Lemon Chicken

I have always been massively underwhelmed when ordering lemon chicken at Chinese restaurants to the extent that I never order it anymore as I don’t want to have further disappointments. It’s always far too sweet and the chicken looks too white and unappealing. So you can guess how delighted I was when I recently tried Neil Perry’s ‘Steamed Lemon Chicken’ recipe that actually tasted really good. I am a HUGE fan of the Australian chef  and his beautifully presented book ‘Balance and Harmony’. It was in his book that I found this recipe that is now one of my absolute favourites.

The beauty of Perry’s ‘Steamed Lemon Chicken’ is that it is really really easy. Seriously it is definitely going to become one of my ‘go to’ recipes that I can rustle up really quickly and yet can also be perfect to offer guests coming around for dinner.  Steaming the chicken really retains the flavour and tenderness through the use of steam and is one of the most healthy forms of cooking. It’s a win win.

The key with a good lemon chicken is to buy thighs and not breast meat folks as it is so much more tasty and tender. Seriously, do not think about buying breast meat for this recipe as it really won’t taste half as good. Trust me on this one.

The only alterations I have made to Perry’s recipe are:

1) As I did not have peanut oil to hand I used ground nut oil as an alternative.

2) Neil Perry’s recipe uses 350g of chicken and I have used 550g so my chicken needed more steaming time. He suggested 25 minutes but mine needed closer to 40 minutes.

Steamed Lemon Chicken

Serves 2-3

550g free-range or organic chicken thigh fillets, skin on (if possible), each cut into 3 pieces

1 1/2 (one and a half) lemons, quartered lengthways

a pinch of freshly ground white pepper

2 spring onions (scallions), cut into julienne

Marinade

1 tbsp shaoxing

1 1/2 tbsp light soy sauce

1 1/2 tbsp oyster sauce

2 tsp sesame oil

1 tbsp peanut/ground nut oil

2 tsp sea salt

1 tbsp sugar

 1. Place the chicken thighs in a shallow heatproof bowl and squeeze the lemon juice over the chicken and add the lemon skins to the bowl.

2. Prepare the marinade and add to the bowl of chicken and mix thoroughly using your hands and leave for at least 30 minutes so that the marinade can infuse the chicken with it’s wonderful flavours.

3. Firmly cover the bowl with foil and place into a large bamboo steamer (you can also use a steam oven if you do not have a bamboo steamer – both work equally well).

4. Place the bamboo steamer on a rack over a pot/wok of rapidly boiling water – you will need to place a couple of  inches of water into the pot. Put the lid on and steam the chicken for 40 minutes.  You will need to turn the chicken once during cooking so be careful when removing the lid and foil as the steam will be very hot. To check the chicken is cooked sufficiently make a small incision into the flesh to see that it is fully cooked and not pink! If it is not quite done, continue to steam for a further few minutes. If you cook with a smaller amount of meat – 350g – steam for 25 minutes.

5. Carefully remove the bowl from the steamer and place the chicken onto plates, or a warmed central plate and sprinkle with ground white pepper and spring onions.  Serve with rice.