Spiced Aubergine, Cavolo Nero and Mushroom Spring Rolls

IMG_8913

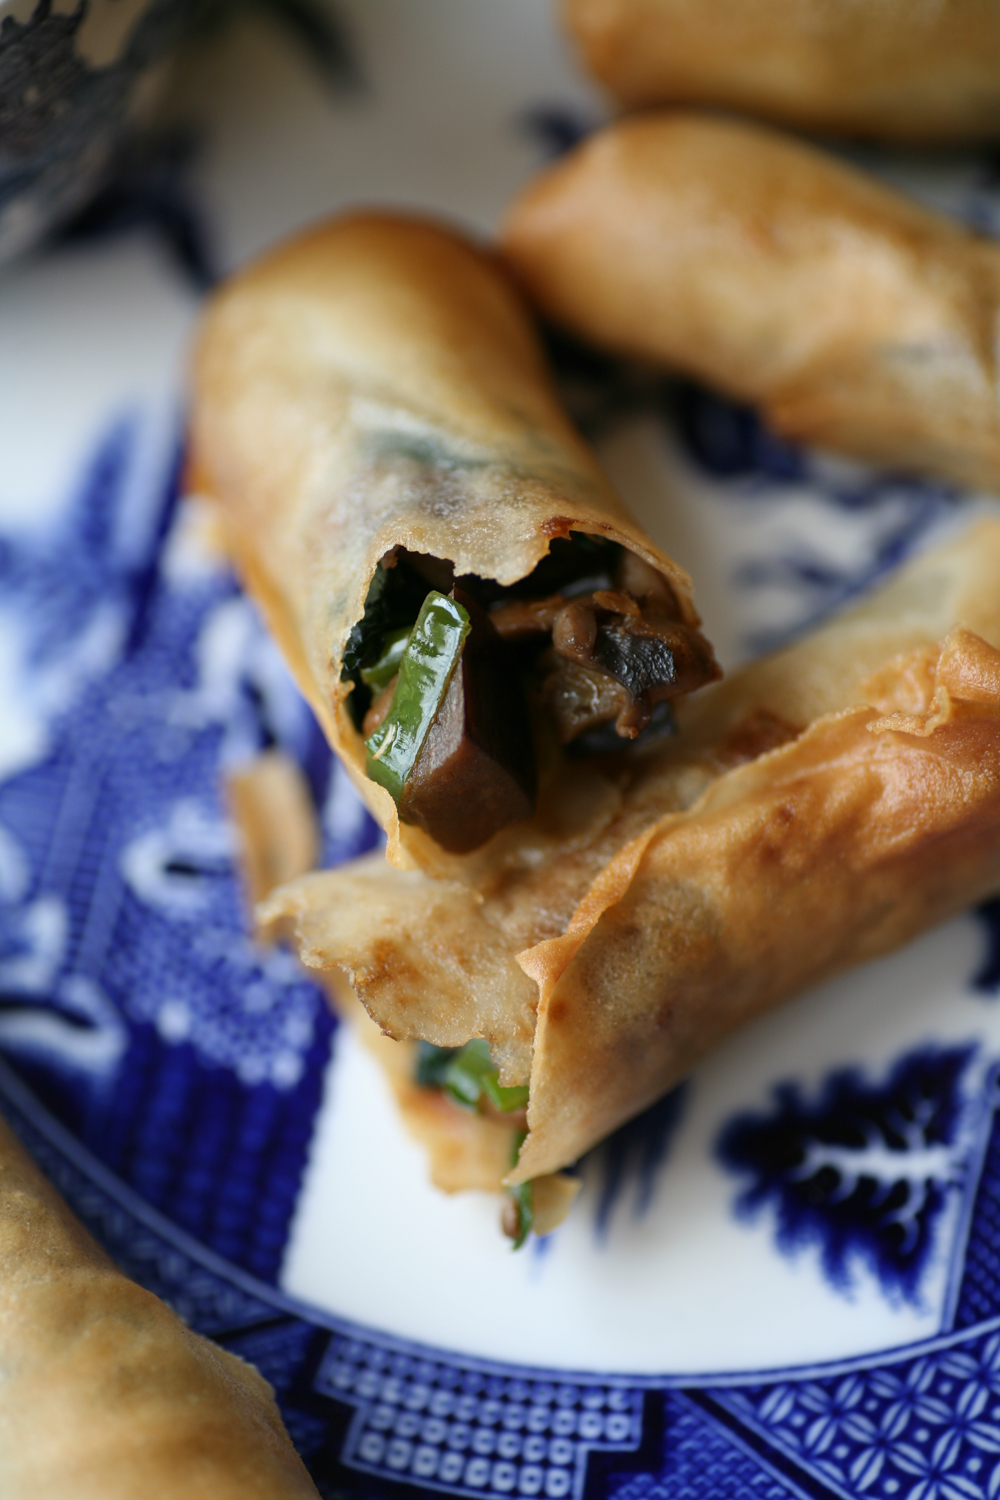
It’s the Easter holidays so my daughters have some wonderful leisured weeks ahead of them. They love to cook too so we decided to make these spiced aubergine, cavolo nero and mushroom spring rolls together. Rolling spring rolls is a great communal activity and actually rather calming and therapeutic. It is very satisfying to make a tightly rolled and neat spring roll – seriously you’ll know what I mean when you give this recipe a go.

IMG_8940

I hope that it gets a big thumbs up from all my vegetarian and vegan followers. The filling is deliciously tasty and even if you do like your meat I think you will be pleasantly surprised by how tasty these little spring rolls actually are.

IMG_8881

Once the filling has been prepared  and roasted the actually filling of the spring rolls is relatively quick. You can make them ahead of time and then leave them in the fridge until you are ready to fry them. Equally you could freeze them to use in the future – they are pretty versatile. IMG_8886

I adore cavolo nero and added to the aubergine, mushrooms and the spiced sauce, it makes for a very tasty filling.

IMG_8901

The trick to rolling spring rolls is to keep the rolls tight and well folded so that none of the filling escapes when frying. Don’t overfill or you may find the rolls cannot be rolled tight enough – I know it’s tempting but do restrain yourself ;o)

IMG_8912

Frying takes a couple of minutes and I tend to do a few at a time. Once they have bronzed, remove from the oil and place on some kitchen roll to cool and to soak up any excess fat. Diving in too quickly will burn your mouth, so let them rest for a short while before feasting. I like to dip them in tamarind chutney or some chilli sauce – the recipe for the former is noted below.

IMG_8925

Spiced Aubergine, Cavolo Nero and Mushroom Spring Rolls

Inspired by a similar recipe from Wild Garlic, Gooseberries and Me by Denis Cotter

Makes 22 rolls

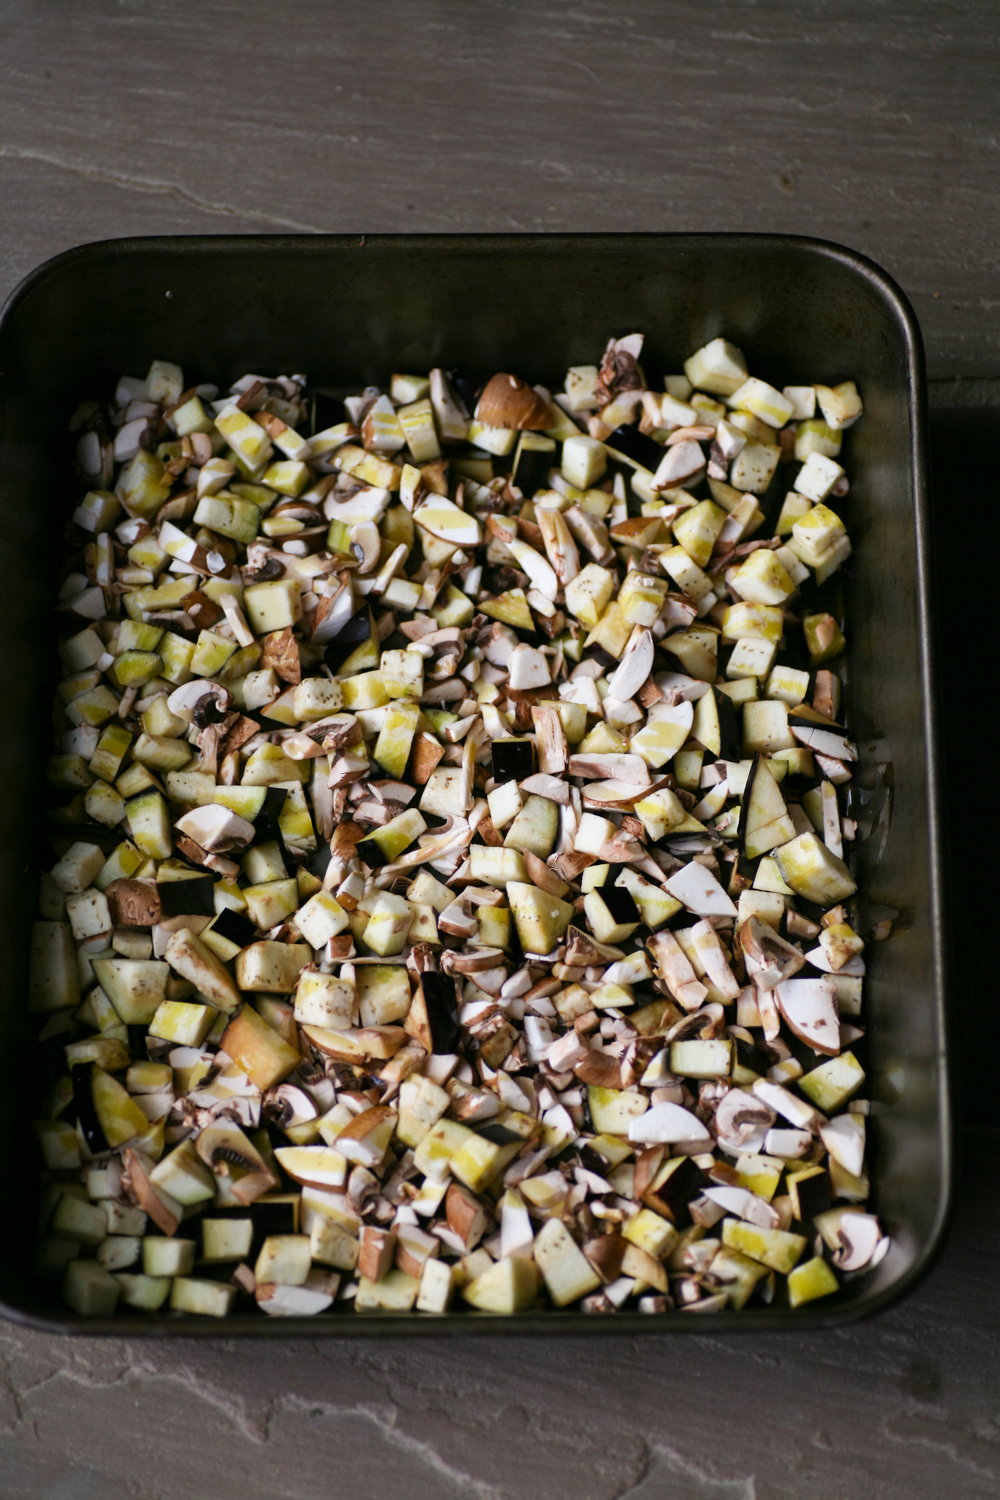
1 aubergine (weighing 300g), diced

200g cavolo nero (black kale), chopped  and stalks removed

100g mushrooms, roughly chopped

1 tbsp olive oil

1 tsp tomato puree

2 tsp light soy sauce

1/2 tsp caster sugar

2 spring onions, thinly sliced

1/2 large red chilli, deseeded and finely sliced

1 tbsp coriander seeds

4 cloves

pinch of fresh nutmeg

22 spring roll pastry sheets

vegetable/sunflower oil for frying

1. In a roasting tray layout the aubergine and mushrooms and scatter with a little olive oil. Roast in oven for 15 minutes, tossing at intervals so that all the ingredients cook and soften.

2. Whilst the aubergine and mushroom are roasting, heat a pan of boiling water and submerge the cavolo nero within it. Cook for 1 minute before straining under cold water and squeezing out the excess water from the cavolo nero. Place to one side on some kitchen paper to dry out thoroughly.

3. Mix the soy sauce, light soy sauce and caster sugar together and when the aubergine and mushrooms are sufficiently cooked transfer them to a bowl and mix in the sauce using a spoon.

4. Using a spice mix or pestle and mortar grind the coriander seeds and cloves together and add the nutmeg. Transfer these and the sliced spring onions and finely sliced red chilli also to the bowl along with the now dry cavolo nero.

5. Lay out a spring role pastry sheet and using your finger or a brush lightly wet the sides of the square. Add a tablespoonful of the aubergine, mushroom and cavolo nero mix towards the bottom of the sheet and then fold over tightly once and then fold in both ends   so that the roll is tightly packaged and then roll until the sheet has been used up. The water that you place on the end will sufficiently hold the spring roll together when cooking.

6. Once all the filling has been used up, heat a deep pan with sunflower/vegetable oil and when it is hot (drop a pinch of flour into it and if it fizzles it is ready) add a couple of the spring rolls at a time. They should take around 2 minutes each to cook. Once they have lightly bronzed place on a plate with kitchen roll to soak up any excess oil.

*************

Tamarind Chutney

Makes half a ramekin full

1 tsp roasted cumin seeds, ground

1 tbsp vegetable oil

2 tsp tamarind concentrate

500ml boiling water

45g palm sugar

1 tsp salt

1. In a pan dry roast the cumin seeds for 30 seconds so that the aromas are released. Place in a pestle and mortar or spice grinder and grind to a powder.

2. In a deep pan add the oil and when it is hot add the ground cumin and move around the pan.

3. Add the tamarind concentrate and boiling water and stir so that the concentrate is dissolved. Keep on a medium heat.

3. Add the palm sugar and salt and allow to dissolve into the liquid.

4. Simmer for 25 minutes by which time the liquid will have thickened, although it will still be relatively runny. As it cools it will begin to harden.

5. Store in the fridge in a sealed container for up to two weeks if not consuming immediately.


Hearty Venison Casserole with Star Anise, Nutmeg and Pink Peppercorns

IMG_7260

Our desire for comfort food begins to kick in around Autumn. For me this is a time to start cooking stews and casseroles – meals that are warming after a long walk in the fresh air. The game season is upon us so it is easy to pick up grouse, partridge, pheasant, snipe, rabbit and also venison. Game is extremely lean and surprising good value, so there tends not to be a week that goes by when my family do not eat some form of game over the Autumn/Winter months.  I’ll be putting up some more game recipes with a spiced twist over the coming weeks to give you some ideas on how to cook it.

IMG_7258

Unlike other game, venison doesn’t actually taste particularly ‘gamey’ and approximates beef. It is however far leaner and has more protein than any other red meat and is packed full of vitamin B’s.  So from a health perspective, it’s a great red meat to include in your diet. Now is the time to buy wild venison as they are are in good shape from their summer feeding, however, farmed venison is available year round.

IMG_7274

This recipe is a homegrown and has a delicious taste to it resonating from the star anise, nutmeg and pink peppercorns that work so well with the venison, mushrooms and red wine gravy. It’s different for sure but surprisingly works really well, so it has become a household staple recipe for us. Eaten warm,with crusty bread and a glass of red wine by a roaring fire, ok maybe I’m getting carried away but you get the picture, and you too will feel a warm happy glow as it nourishes your body. So try it and let me now what you think. If you have never tried venison before give it a go, you will be very pleasantly surprised by how good and lean it is. Just get those Bambi thoughts out of your head!

IMG_7286

Hearty Venison Casserole with Star Anise, Nutmeg and Pink Peppercorns

Serves 4

1 tbsp olive oil

1 tbsp butter

3 star anise

2 onions, finely chopped

1kg venison, diced

3 carrots, chopped into 1 inch pieces

3 turnips, cut into 1 inch pieces

1/2 tsp nutmeg

1tsp heaped pink peppercorns and a few extra to garnish

175ml red wine (1 small glass)

175ml vegetable stock

200g mushrooms, quartered

crusty loaf, to serve

1. Place the olive oil and butter in a casserole pot. When it is hot add the star anise and after 20 seconds add the onions and lower the heat slightly so they do not burn.

2. When the onions have softened add the venison, carrots, turnips* nutmeg and pink peppercorns and give a good stir. Leave to brown for a few 5 minutes, stirring and turning the meat over at intervals.

3. Add the red wine and vegetable stock and turn the heat up for 10 minutes, before reducing the heat to a simmer for a further 40 minutes or until the carrots have softened and the venison is cooked. In the last ten minutes add the mushrooms and stir into the casserole.

4. Serve warm in bowls with an extra scattering of pink peppercorns, crusty bread on the side and a glass of red wine.

-The reason for adding 1 tbsp of butter is to help keep the venison moist. As it is such a lean meat without a little help from fat it will dry out!

*I have added turnip since I have made this version and I find it works really well. 

-You can also add potatoes to the pot if you want to avoid crusty bread.

-Best to avoid eating the thistle!


No more cold cuts please – Turkey, Ham and Leek Pie

I hope you all had a wonderful Christmas with your family and loved ones and that it was not too stressful if you were the one in charge of feeding the masses. We always end up with loads of turkey and ham/gammon leftovers and whilst cold cuts are delicious for maybe one or two sittings, any more than that and one craves for variety. I felt a good old fashioned pie would be the perfect way to use up some of the leftovers and fill the bellies of my guests. It was polished off in one sitting so I guess you could say that it was hit.

Turkey, Ham and Leek Pie

serves 8

4 leeks, chopped

2 celery sticks, chopped

100g mushrooms, chopped

450g turkey, (or chicken) cut into small sized chunks

350g ham/gammon, cut into small sized chunks

1 heaped tbsp wholegrain mustard

1-1.5 litres of turkey stock (you could also use a tin of Campbell’s Cream of Chicken Soup or a combination of the two)

2 tsp of cornflour (if using stock add cornflour, you won’t need to if you add the chicken soup)

3tbsp cold water

pinch of salt

black pepper

400g of shortcrust pastry or ready made

1 egg, lightly beaten

1. Preheat the oven to 180 degrees fan.

2. Evenly chop the celery, leeks and mushrooms and place most of them on the bottom of the pie dish. (The dish I used was 35cm length by 24cm width). This will allow the vegetables to cook properly through when they are in the oven.

3. Cut the turkey and ham into small sized chunks and scatter over the vegetables along with the remainder of the vegetables that you put to one side. Add the wholegrain mustard and mix into the vegetables and meat.

4. If you have any turkey stock left over use that, otherwise, use chicken stock cubes, such as knorr or Campbell’s cream of chicken soup works really well. I also had some juices left from the ham so I managed to combine these into the stock as well giving it a really delicious taste. Add approximately 1.5 litres of stock to the pan and warm it through completely. Place 2 teaspoons of cornflour into a small bowl along with a couple of tablespoons of cold water. Stir until the cornflour is smooth and watery and add to the stock to thicken it.

5. Add the stock over the meat and vegetables and using your hands try and make sure all the pieces are covered to some degree in the stock. Add salt and pepper to season.

Easy Shortcrust Pastry

400g plain flour

200g butter, cubed

2-3 tbsp of cold water

6. To make your own pastry, simply place the plain flour into a large mixing bowl along with the cubed butter (room temperature is best). Using your finger tips gently mix the butter and flour together so that it begins to crumble. Using a knife stir in a little water into the dough so that it binds together. If you put in too much water just add a little extra flour. Once the dough has come together, form a ball and cover with clingfilm and place in the fridge for 15 minutes.

7. Roll the pastry out onto a cold floured surface. Once it is larger than your pie dish gently place it over the top of your filling making sure the extra pastry hangs over the sides. I find it is best to use the rolling pin to place it gently on top. Press down at the edges using your finger and thumb so that the pastry is completely secure. Using a knife cut the extra pastry that is hanging over the sides. You can then get creative on the top of your pie using the left over pastry.

8. To help give your pie the perfect brown glow, gently brush the top of the pie with your beaten egg.

9. Using a fork place a few fork marks over the top of your pastry so that it can let out the air within the body of the pie when cooking.

10. Place in the oven for 30-40 minutes, checking to see that it does not brown too much. Serve immediately with peas and new potatoes.