Broad beans, lemon zest ricotta, fresh mint oil, parma ham with pink peppercorns

IMG_5822

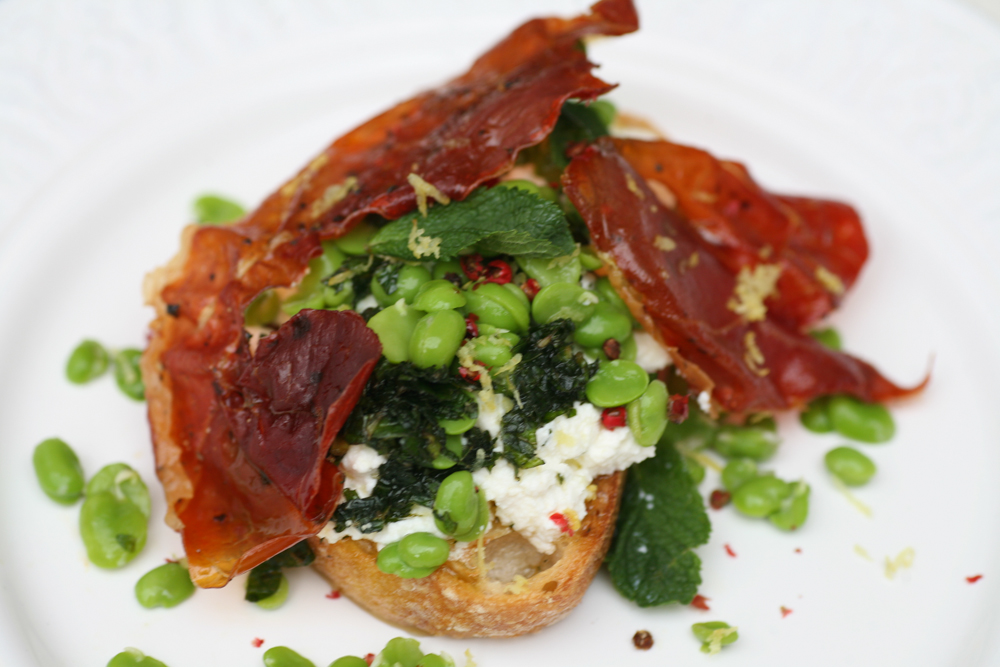
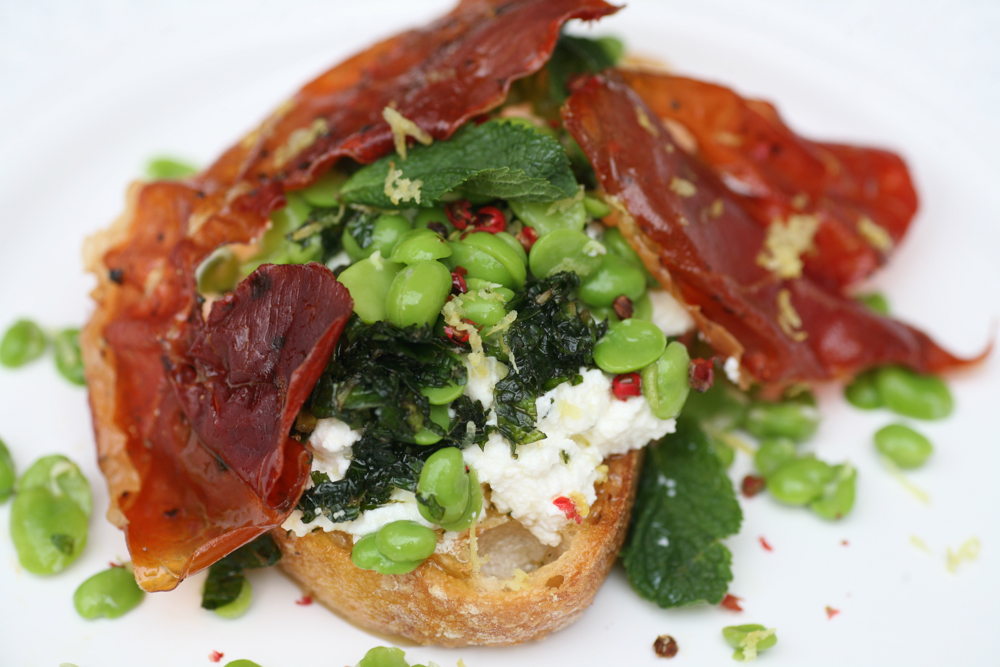
I have been meaning to a write blog post on this recipe for sometime now as I seem to be averaging eating it once a week in the last month or so. It’s one of those recipes that once you’ve prepared it you want to dive in and eat it so I needed to be speedy with the camera work, hence the lack of lots of photos.  It is absolutely perfect for a lunch either by yourself or if you have a few friends coming over. The bright greens and the complimenting flavours of lemon, broad beans, mint, olive oil, garlic, ricotta, parmesan, parma ham and pink peppercorns really appeal to me. The pink peppercorns I managed to source in Turkey last year and they have the most wonderful flavour. Whilst I imagine a quick trip to Turkey may not be realistic you’ll be glad to hear that you can find them at most supermarkets – they are definitely worth seeking out as they have a very distinct flavour – very different from the black variety.

I stumbled across this recipe years ago in Skye Gyngells book ‘A Year in My Kitchen’ and as far as I’m concerned it’s a winning recipe. The only slightly time consuming part is taking the skins off the broad beans – which to be fair does not really take that long, especially if you have a friend to chat to whilst you are sharing the podding together.

IMG_5769

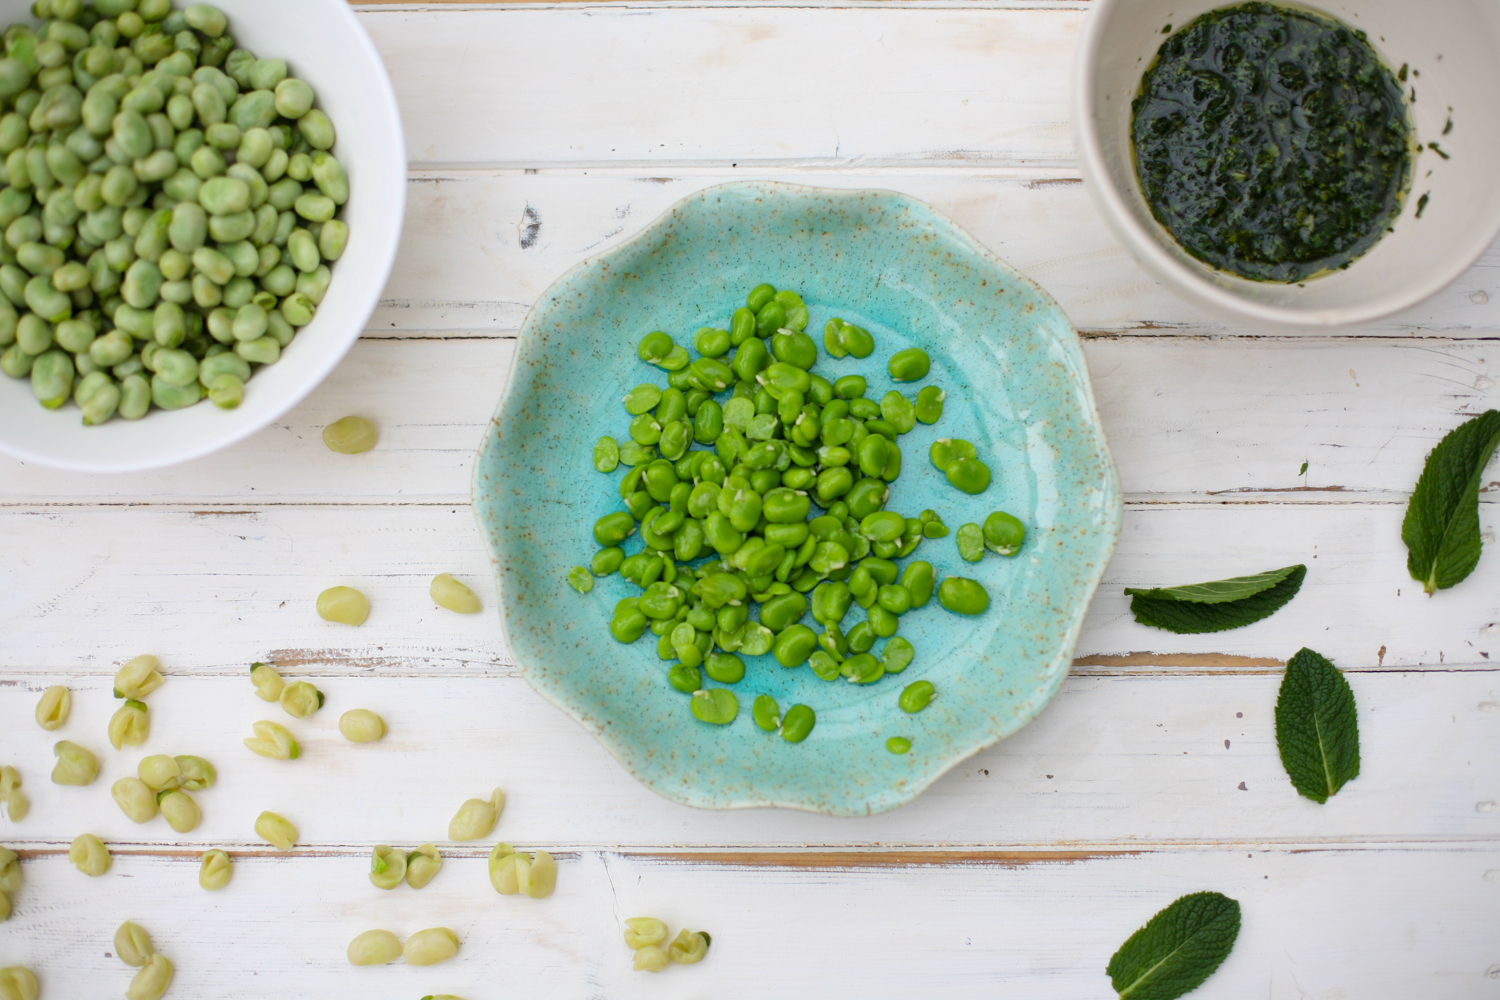
Other than this time, I always prepare the dish with fresh broad beans but for some reason the two places that normally stock them this morning had run out, so I had to suffice with frozen. They tasted equally good, although they were a slightly smaller in size, which made peeling them take a little longer. I reckon if you have a glorious sunny day with friends coming over for lunch this is the perfect dish. To accompany it, a glass of Riesling or ginger cordial would always go down a treat. A great wine merchant called Symposium, based in the picturesque town of Lewes in East Sussex, I always find comes up trumps with recommending great drinkable wines. I’m based in London and they always seem happy to deliver a case or two to me when I am needing to stock up. If you are interested send Henry an email henry@symposium-finewine.co.uk and he’ll send you their wine list.

Broad beans, lemon zest ricotta, fresh mint oil, parma ham with pink peppercorns

Adapted from Skye Gyngell’s book ‘A year in my kitchen’

Serves 4

1kg of fresh broad beans in their pods (or 500g podded/frozen)

250g fresh ricotta

50g parmesan, finely grated

1 lemon, zest and juice

8 slices of parma ham

1 garlic clove

handful of fresh mint

75ml olive oil

pinch of pink peppercorns per serving

sour dough bread (or ciabatta)

1. If using fresh broad beans, take them out of their pods and place into a pan of boiling water for under 1 minute. If you are using frozen broad beans you need to leave them in the boiling water for 3 minutes. Strain and run under cold water immediately and then peel off  the outer shell of the broad beans and discard.

2. Take a large handful of fresh mint and finely chop up all of it bar a few leafs that you will sprinkle over the top at the end. Place the finely chopped mint leaves in a bowl with 75ml of olive oil and leave to infuse for 15 minutes or longer.

3. Place the ricotta into a bowl and add the finely grated parmesan. Stir together and then add most of the zest from one lemon – the remaining zest you will sprinkle on the dish at the end. Add the juice from half a lemon.  Stir in all together and leave to one side.

4. In a preheated oven – 180 degrees – place the parma ham on baking parchment with a drizzle of olive oil and black pepper. Leave to crisp up in the oven for 10 minutes.

5. Slice some sourdough bread and place in the toaster or under a grill for it to become golden. Once toasted cover with a little olive oil and fresh garlic.  Place on a serving plate.

6. Add a spoonful or two of the  lemony ricotta/parmesan to the toast. Add a scattering of broad beans followed by some mint drizzle and then lay two slices of parma ham over the creation followed by some of the remaining lemon zest, fresh mint leaves and a good pinch or two of pink peppercorns. I find that no salt is necessary as the parma ham and parmesan more than make up for the lack of salt.

Eat at room temperature.

IMG_5820


Chicken, Mango and Avocado Salad

IMG_4273

Grey days deserve brightening up and there is no better way to lift ones mood, than to indulge in a rather bright and summery looking salad….. in winter. I recently had this salad at a cheery little deli/restaurant on the Kings Road (they have two branches now at differing ends of the Kings Road) called Megan’s, where the staff are attentive and cheerful and there is a constant flow of customers coming in to have breakfast, lunch or to indulge in tea and cake, either to-go or to linger for a while in the warm haven of the restaurant. There is a positive buzz, not least because the food is fresh and inviting and made on the premises. It’s casual, unstuffy eating where you queue in line at the salad and hot bar and take your pick.

What initially attracted me to the chicken, mango and avocado salad was the colour – the bold yellow balancing beautifully with the reddish pink of the radish and the green from the salad leaves and coriander. The blend of flavours and textures complimented each other so well and I like the fact that the chicken had been delicately romancing with the dressing.

I took a mental note of what was in the salad and swore to conjure up a similar one in my home and then to share with you all when I had got it right. Of course it works brilliantly in the summer months, but I think a splash of colour and a healthy salad in the winter is fabulously refreshing. You can choose to have your grilled chicken warm or at room temperature, both work equally well so it is up to your personal preference.

What recipes do you cook when you need to brighten up your day?

IMG_4256

Chicken, Mango and Avocado Salad

serves 4

Romaine lettuce, chopped

300g chicken breasts

1 avocado

1 mango

bunch of coriander, roughly chopped

approximately 6 radishes, sliced

salt and pepper

dressing

1 tsp dijon mustard

1/2 tsp whole grain mustard

3 tbsp olive oil

1 tbsp white wine vinegar

1 clove of garlic, crushed

1. Preheat the grill to 180 degrees and cook the chicken for around 20 minutes, turning half way through.

2. Slice, cut and chop the remaining salad ingredients and place in a large bowl.

3. Mix the dressing ingredients together and place to one side.

4. When the chicken is cooked, slice the chicken breasts into strips of edible bites and place into the large bowl.

5. Add a little of the dressing and then gently toss together with all the salad ingredients.

6. Place in a serving platter for guests to serve themselves, with a small jug with the remaining dressing on the side.


Baba Ganoush – it definitely has a ring to it!

I have to admit that it was initially the name of this wonderfully smokey aubergine (eggplant) dip/appetizer that caught my attention. I know you probably think I’m mad and just another one of those English eccentrics, but seriously saying ‘Baba Ganoush’ out loud has a wonderful ring to it – give it a try and you’ll see what I mean. You’ll want to keep saying it again and again, I promise you it’s rather addictive sounding. Coupled with the smokey undertones of this pureed roasted aubergine with tahini (sesame paste), lemon, garlic and olive oil and you have a perfect little dish. The name itself means ‘father pampered or spoiled’ in other words, it’s a dish that will please and delight and give great joy to those who feast upon it. It will bring smiles, rest assured!

It is common place in Lebanon, Israel, Turkey, all the Arab countries and North Africa, with each region taking their own spin on the  added extra ingredients. For example, in Palestine, yoghurt is often added to the mix, whilst in Lebanon pomegranate juice is sometimes added instead of the tahini and in Iran tomatoes, onion and turmeric is added. Some people like it to add cumin but I find that the perfect dish is one that is not too over complicated with different ingredients. The simplicity of it adds to it’s appeal.

We ate it on a number of occasions this summer in Turkey, cooked outside on an open fire. It tasted delicious and I made a note to myself there and then to share this recipe with you all. My recipe is very similar tasting to the one that I used to buy in those Middle Eastern supper markets around the Edgware Road in London. I acquired a taste for that style of Baba Ganoush, so when I started making my own homemade version the one I wanted to replicate was the one I used to eat in my youth – or perhaps I ought to say  early 20’s!

There is no hard and fast rule to making Baba Ganoush, so experiment and get creative and see which type really works for you. What I will say however, is that if you like it smokey – which is kind of the point of the dish – it is important to really burn the outside of the aubergine. Using tongs I roast them initially over a gas flame on my hob before putting them in the oven for 25 mins to soften them completely. If you don’t have a gas flame, placing them under a high grill so that the skins blacken and burn slightly, will have a similar smokey effect, but don’t forget to turn them regularly if you do this!

Baba Ganoush

Serves 4

3 large aubergine/eggplant

3 tbsp tahini (sesame paste)

juice of one and a half lemons

1 large tsp rock salt (or to taste)

3 garlic cloves, crushed

2 tbsp olive oil

1 pinch chilli powder

1 pinch sweet paprika

1 small handful of chopped flat leaf parsley

1. Preheat an oven to 180 degrees. Using tongs hold the aubergine over a gas flame so as to burn and blacken the skin. The more the skin burns the more smokey your Baba Ganoush will be. The skin should be sufficiently burned from between 6-10 minutes.

2. Place the aubergines on a baking tray and place in the oven for 25 minutes or until the aubergine is completely soft.

3. Leave to cool and then peal off the aubergine skin and discard the skin.

4. In a blender add the smoked aubergine flesh, tahini, lemon juice, chilli powder, salt and  half the olive oil and blend to a pulp. Taste and add more lemon juice/tahini/salt if required.

5. Place in a dish and add a pinch of sweet paprika, flat leaf parsley and the remaining olive oil and serve with toasted pitta bread, chapati or middle eastern bread.

It stores well in the fridge for a few days so great to cook in advance.

As you gently singe the skin of the aubergine the lovely smokey smells will come through.

After 25 minutes in the oven the aubergines will be very soft. Leave to cool before peeling off the skin, which should come away really easily. If they are at all hard in places, leave to cook for a further 5 minutes before checking again with a sharp knife. If the knife easily pierces the skin and goes through the aubergine then it is ready.

Into the blender goes the smoked and oven baked flesh of the aubergine, tahini, garlic, pinch of chilli powder, lemon juice, salt and olive oil.

I couldn’t resist a photo of my recent antique find – a c.1860 French steel and rosewood handle herb chopper, with the chopped flat leaf parsley ready to go on the top of the baba ganoush.


Turkish Delights and Coban Salatasi

I have just returned from two glorious weeks spent exploring Turkey’s ancient Lycian Peninsula, which is in the south west of the country, by the warm azure waters of the Mediterranean.

The area is steeped in history with numerous ruins and tombs dating back over 2000 years. I couldn’t help thinking when I was exploring  and clambering all over these ruins (no health and saftey in Turkey!) that our Stonehenge is well, how can I put this delicately, a little underwhelming, if you compare it to all the ancient Lycian ruins. In the cooler months (April and October) guided walks are on offer through Lycia taking in the ruins of lost civilizations, the flora and fauna of the mountain passes and ambling through the charming Turkish villages, many of which seemed to have stood still in time. Perhaps not an adventure to take on with small children but definitely on my to do list for the future.

Ruins of Patara 

We did however, get the chance to soak up the ruins of: Letoon, which was the main religious centre of Lycia, Xanthos – the captial city of Lycia in the late Hellenistic and Roman times, Patara – an ancient city party submerged (ready to be truly discovered) under 12km of sand dunes, Tlos with its spectacular rock tombs carved out of the rock face and Kekova – the sunken city from 2000 years ago. At Kekova you are forbidden to swim and snorkel as the treasures from the old town are there for you to see clearly from a glass bottom boat or canoe. It was quite easy to see the  pots as we sailed gently passed.


Patara’s impressive amphitheatre

Tlos amphitheatre beneath the Taurus mountains

In a bid to absorb ourselves in authentic Turkey as opposed to full on ‘tourist Turkey’, we based ourselves slightly in land, firstly in the Kaya valley and the following week high up in the Taurus mountains. Both locations where a stones thrown from the glorious beaches but far enough away so that we were able to sample another calmer, slower side to Turkey.

Cooler breezes gave us welcome respite from the coast and we enjoyed seeing how the locals pass their days.

our neighbour with her goat

On a couple of days we managed to hire a boat for the day (complete with on-board cook – result!) so that we could see the coast line from the waters and swim in sheltered bays only reachable by boat.

Pretty harbour at Ucagiz

I was amused to see a local selling ice cream from his boat, similar to the one I had seen a few weeks previously on the south coast in England. Clearly all the rage around the world!!

The absolute highlight of our time on the water was when Big A and Little Z both caught rather large fish at the same time. We were all so thrilled by this, even the Captain was impressed as I think he did not think they would catch anything using the hand held real as opposed to a rod. We took them to the local town where they gutted and grilled them for us so that we could have them for lunch. It was great for the girls to see the full cycle of catching a fish and then having it washed, cleaned and gutted before being grilled and then eaten, all within a couple of hours of being caught. Wonderfully fresh and we all agreed, very tasty. We weren’t too sure what the fish were exactly but they tasted delicious and the girls were delighted at being such able fisherwomen. Definitely a life long memory.

The morning’s catch!

When abroad I always enjoy discovering the different local foods and dishes on offer, as well as the spices and herbs that are commonplace.

At the spice market I bought: pink peppercorns, sumac, pul biber  (dried flaked pepper), dried mint tea, a marinade for fish

Turkey is bountiful with wonderful fruit trees bursting with offerings, some ready now – such as figs, grapes, peaches and cactus fruit (prickly pears) and others not quite ready for a month or two – namely pomegranate. I discovered the carob fruit that was completely new to me but I immediately took a liking to its sweet chewy undertones.

Carob fruit in centre of photo – they look like large vanilla pods.

I discovered that it has been cultivated for over 4000 years and that is also known as ‘St John’s bread’ or ‘locust bean’ as the pods were mistaking thought to be the ‘locusts’ eaten by John the Baptiste in the wilderness – although this was proved to be wrong as he ate migratory locusts. It has a honey taste to it and is in fact used as a substitute to sugar. I am certainly going to seek out the powder form and try baking with it this autumn – watch this space. Another interesting fact is that the beans are ground down to make a cocoa substitute, that although slightly different tasting, has a lot less calories and virtually fat free. It is also packed with vitamins (A, B, B2, B3, D). Check out this website which will tell you in more details about the carob fruit’s benefits. I also like John’s youtube summary of the fruit. I would love to grow a carob tree here in the UK, but I fear that our sporadic sun shine may not help it thrive like the ones in the Mediterranean and in California.

The girls discovered a new treat known as ‘gozleme’, which is basically Turkey’s answer to an Italian calzone. The dough is rolled out on a round surface and then half of it is stuffed with a contents of your choice – we liked spinach, feta and potatoes and then folded over to create a crescent. This is then put onto a hot circular surface that is heated underneath by an open fire. The whole process was mesmerizing to watch and the finished snack was polished off in no time at all.

Preparing our gozleme

As the weather was ridiculously hot, salads became a staple at meal times. The most popular salad in Lycia seemed to be ‘Coban Salasti’ otherwise known as ‘Shepherd’s Salad’. It appeared on every menu and is ridiculously easy to make and perfect in hot weather. The trick is to cut the vegetables up  really small – far smaller than I would normally when making a salad.

Coban Salatasi – Shepherd’s Salad

Serves 4

2 large tomatoes (or 3 small), finely chopped

3 Turkish green peppers (the long thin ones), finely chopped

2 small cucumbers, finely chopped

1/2 (half) a white onion

1 large handful of fresh flat leaf parsley, chopped

2 tbsp olive oil

2 tbsp lemon juice

salt and pepper to taste

1. Finely chop all the ingredients into a large bowl and gently mix together.

2. Add the olive oil and lemon juice and season to taste and serve.

So what have you been up to this summer? Any food foraging or discoveries in foreign lands? Don’t be shy and leave a message below, I’d love to hear from you.


Baked Sweet Potato Paprika Chips with a Creme Fraiche, Chive and Lemon Dip

It’s been half term and after thinking that we had all managed to get through the winter months with no illnesses, Little Z and Big A both come down with a bug, which is then passed on to my fit and healthy mother. I’m just waiting to be knocked for six myself but am trying not to dwell on the possibility. So instead of being out and about  this week we have been hibernating inside and keeping cosy. With everyone on the mend and appetites returned I made a batch of these delicious morsels to cheer up my loved ones. They were gone in a blink of an eye, so I felt that I must share this simple recipe with you.

Baked sweet potatoes are a delicious addition to any dish, whether it be accompanying, fish, meat or other vegetables. They are also great as pre dinner nibbles if you have guests coming over or if you just simply fancy spoiling yourself or your family. With very little effort you can create these baked paprika chips with a creme fraiche dip and I assure you they are totally addictive.

I am a huge fan of  Santo Domingo Hot Spanish Smoked Paprika which you can buy here, as it has a real kick. As the girls adore them, I bake a batch without paprika or the less hot variety, so they can devour them as well. As an alternative way to serve them as nibbles, I make little paper cones and line each cone with baking parchment, so that the chips do not get stained with newspaper ink. The velvety creme fraiche is a great accompaniment and I like to add chives, as Big A is a big fan, a good splash of lemon juice and a sprinkling of rock salt. Simple and delicious.

Baked Paprika Chips 

Serves 4 -6

900g sweet potatoes, chopped into wedges

1 heaped tsp paprika

2 tbsp olive oil

1 tsp of rock salt

Creme Fraiche, Chive and Lemon Dip

200g creme fraiche,

1 tbsp of fresh chives, chopped finely

1/4 lemon, juice only

pinch of rock salt

1. Wash the sweet potatoes, but do not bother to peal them as the skins taste great when cooked. Chop them into chip/wedge size chunks and place in a large mixing bowl. Add the olive oil, rock salt and hot paprika and mix thoroughly with your hands so that all the pieces are completely covered.

2. In a preheated oven – 180 degree fan oven – place the sweet potatoes on baking/greaseproof paper on top of a baking tray and bake for 30-40 minutes or until they are soft.

3. When the sweet potatoes are baking prepare the dip by mixing all the ingredients together and taste and add more seasoning if necessary.

4. Serve immediately with the dip on the side.


Red Camargue and Wild Rice Salad with Miso Dressing

I know it’s winter and there is snow on the ground but I’ve been trying out some new exciting salad recipes recently, ones which really make you sit up and take note of what you are eating and have the definite wow factor. I like to eat salad during my weekday lunches with a bowl of piping hot soup, even in winter. I make a decent amount so I can eat it over a few days.  Dressings are certainly important and give salads a certain edge. For your average green salad I always like to make my Asian vinaigrette, it’s fail proof and  can easily store in the fridge for a number of weeks.

This red camargue and wild rice salad with a miso dressing is seriously divine and unlike any salad I have tried before, I really urge you to try it. I recently spotted it on fellow food blogger Sara Forte’s site sproutedkitchen.com. I have made a few changes, the most obvious one being that I used red camargue rice as well as wild rice so as to get that rich red colour. I’m rather partial to tofu these days, well ever since I discovered this recipe, which has become one of my favourites.

So this is what you need to make this winning salad recipe.


  Red Camargue and Wild Rice Salad with Miso Dressing

sourced from the talented Sara Forte from Sprouted Kitchen

150g rice (check packet to see cooking instructions)

400g block of firm tofu

2 tsp coconut or olive oil

2 tsp soy sauce

freshly ground pepper

2 carrots, thinly sliced

200g frozen edamame/soya beans

3 tbsp toasted sesame seeds

handful of chopped coriander/cilantro

and for the Miso Dressing you will need:

2 tbsp of white miso

2 tbsp agave nectar

1 tbsp sesame oil

2 1/2 tbsp rice vinegar

1 shallot, minced

juice of half an orange

1. Heat up a small frying pan and when it is hot add the sesame seeds and shake them in the pan for around 30 seconds. They burn really easily so as soon as they begin to turn a light brown take them off the heat and place to one side.

2. Rinse the rice and cook according to the instructions on the packet. If you are using red camargue or wild rice please note that cooking takes a lot longer than white rice. It will take up to 40 minutes before the water has been absorbed and the rice is ready.

3. Drain the tofu, being careful not to break the block. Pat it dry with a kitchen towel and then cut into even bite sized cubes. In a cast iron pan, if you have one, or a normal frying pan if you don’t, gently heat up the coconut oil; I didn’t manage to find any so used olive oil. When the pan is sufficiently hot add the tofu and saute for around five minutes, being careful not to burn the tofu. Next add the soy sauce and a few grinds of black pepper and continue to saute for a few more minutes, turning the tofu so that it is evenly cooked on all sides. Once it is cooked turn off the heat and place to one side.

4. In a mixing bowl add all the miso dressing ingredients together.

5. In a separate bowl combine the rice, tofu, sliced carrots and edamame.

6. Combine the salad with the dressing and add the toasted sesame seeds and coriander/cilantro. Serve at room temperature or chilled.