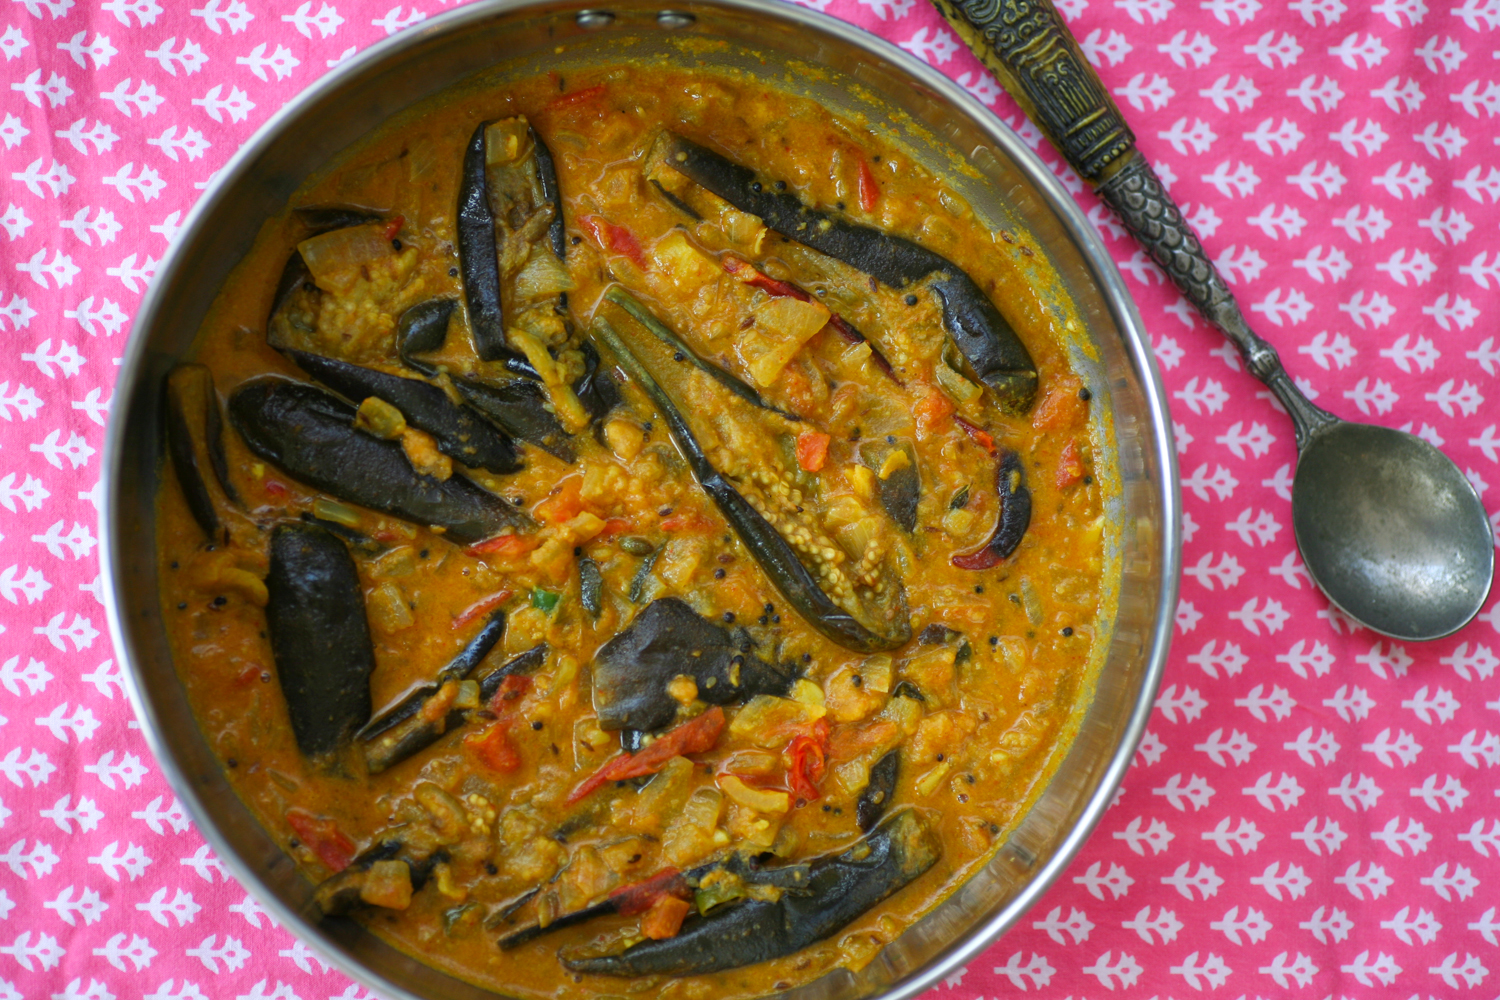
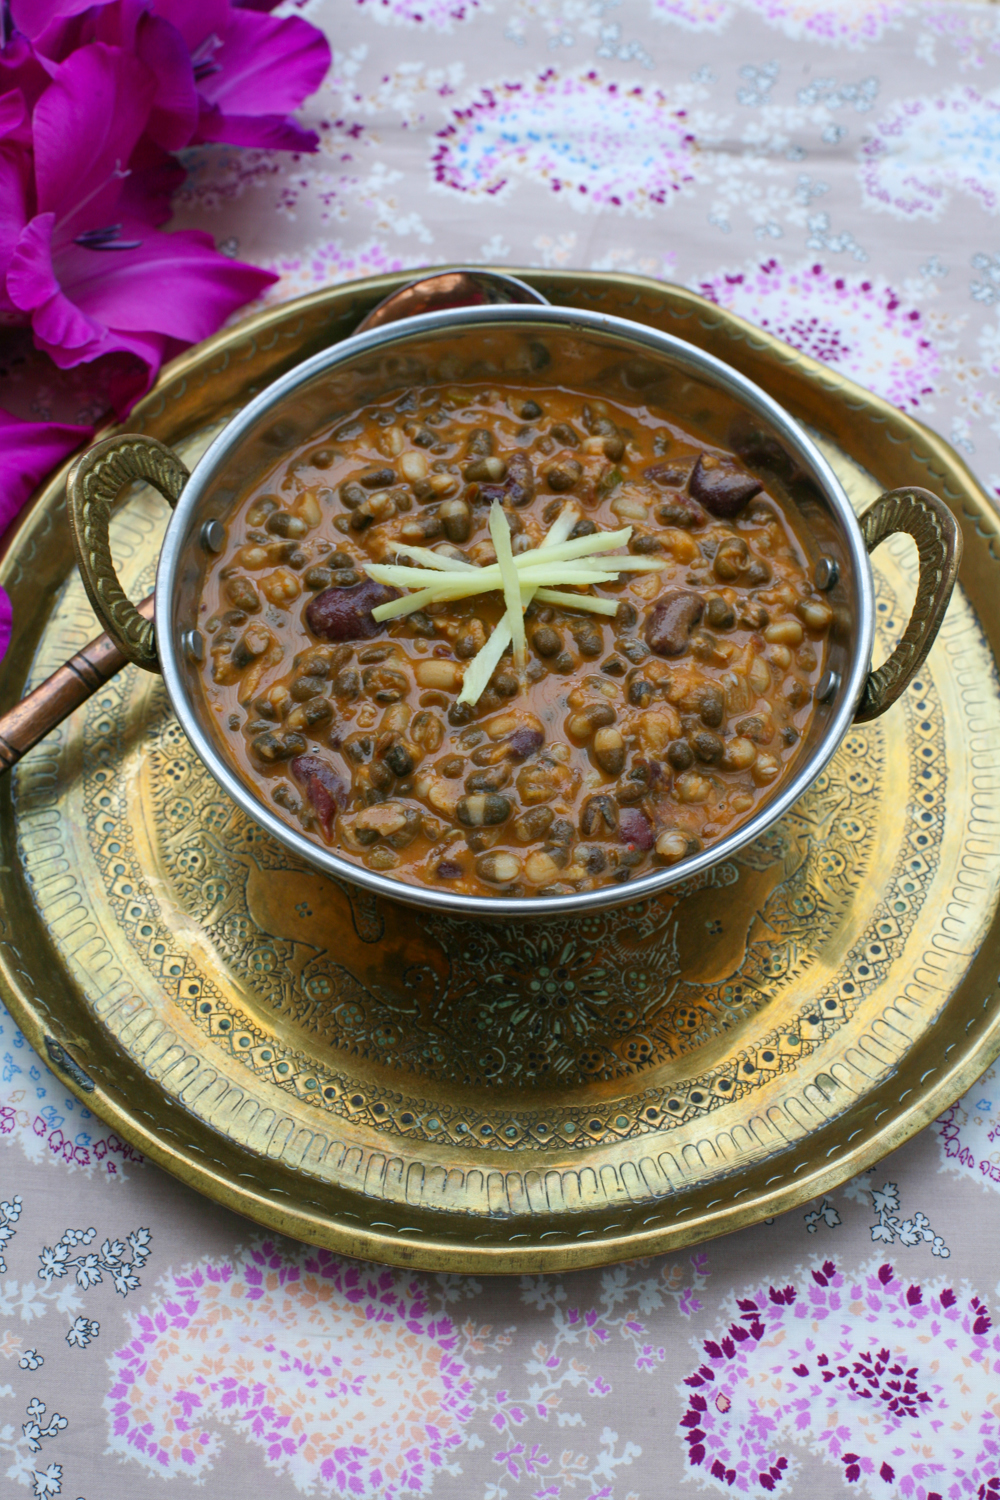
Strawberry, Black Pepper and Spinach Salad with a Red Onion Balsamic Dressing

IMG_9687


I’ve been meaning to post this glorious recipe for ages. It is seriously good and takes no time to whip together. If the truth be told I’ve been eating it all summer, but each time I forget to photograph the food until it’s too late. Today I was ready with my camera to take a few snaps before gorging on this delicious lunch.

IMG_9680

It’s perfect if you want to impress friends as it’s probably a flavour combination they’ve not eaten before so it will take them by surprise…..in a good way.

IMG_9682

It would also work really well for BBQ gatherings or as a starter for a dinner with friends. The flavour combinations of freshly ground black pepper and strawberries is a surprising winner. The dish in itself is sweet, salty and full of umami – read my article here to learn more about umami.

IMG_9697

If you are not able to get hold of fresh spinach, rocket also works really well.

IMG_9673


I originally came across a similar recipe in fellow  food blogger Heidi Swanson’s book ‘Super Natural Everyday‘, which I adore to dip into from time to time.


Here is my version of the recipe. Let me know how you get on by leaving a comment below. I love to hear from my readers.


Strawberry, Black Pepper and Spinach Salad with a Red Onion Balsamic Dressing

Serves 4

3 tbsp balsamic vinegar

1 small red onion or shallot, finely chopped

1/2 tsp salt

1/4 tsp freshly ground black pepper

2 tbsp extra virgin olive oil

90g fresh spinach or rocket

300g fresh strawberries, hulled and finely sliced

30g slivered almonds, toasted

15g parmesan, shaved in curls

1. In a small bowl add the balsamic vinegar, red onion/shallot, salt and pepper. Leave to stand for 10 minutes before adding the oil and whisking gently together. Leave to one side.

2. Place the slivered almonds into a large frying pan to toast. They brown really quickly so do not leave the pan. Use a spatula to move the almonds around the heat to help them bronze evenly. This will not take more than a couple of minutes.

3. In a large bowl add the spinach or rocket, strawberries, slivered almonds and parmesan shavings. To make the curls I use a regular vegetable peeler.  Then add the dressing and gently toss so that the dressing is evenly distributed.

Serve immediately.

If you are preparing ahead of time do not add the dressing until your guests have arrived. The dressing can easily be made in advance.


Spiced Aubergine, Cavolo Nero and Mushroom Spring Rolls

IMG_8913

It’s the Easter holidays so my daughters have some wonderful leisured weeks ahead of them. They love to cook too so we decided to make these spiced aubergine, cavolo nero and mushroom spring rolls together. Rolling spring rolls is a great communal activity and actually rather calming and therapeutic. It is very satisfying to make a tightly rolled and neat spring roll – seriously you’ll know what I mean when you give this recipe a go.

IMG_8940

I hope that it gets a big thumbs up from all my vegetarian and vegan followers. The filling is deliciously tasty and even if you do like your meat I think you will be pleasantly surprised by how tasty these little spring rolls actually are.

IMG_8881

Once the filling has been prepared  and roasted the actually filling of the spring rolls is relatively quick. You can make them ahead of time and then leave them in the fridge until you are ready to fry them. Equally you could freeze them to use in the future – they are pretty versatile. IMG_8886

I adore cavolo nero and added to the aubergine, mushrooms and the spiced sauce, it makes for a very tasty filling.

IMG_8901

The trick to rolling spring rolls is to keep the rolls tight and well folded so that none of the filling escapes when frying. Don’t overfill or you may find the rolls cannot be rolled tight enough – I know it’s tempting but do restrain yourself ;o)

IMG_8912

Frying takes a couple of minutes and I tend to do a few at a time. Once they have bronzed, remove from the oil and place on some kitchen roll to cool and to soak up any excess fat. Diving in too quickly will burn your mouth, so let them rest for a short while before feasting. I like to dip them in tamarind chutney or some chilli sauce – the recipe for the former is noted below.

IMG_8925

Spiced Aubergine, Cavolo Nero and Mushroom Spring Rolls

Inspired by a similar recipe from Wild Garlic, Gooseberries and Me by Denis Cotter

Makes 22 rolls

1 aubergine (weighing 300g), diced

200g cavolo nero (black kale), chopped  and stalks removed

100g mushrooms, roughly chopped

1 tbsp olive oil

1 tsp tomato puree

2 tsp light soy sauce

1/2 tsp caster sugar

2 spring onions, thinly sliced

1/2 large red chilli, deseeded and finely sliced

1 tbsp coriander seeds

4 cloves

pinch of fresh nutmeg

22 spring roll pastry sheets

vegetable/sunflower oil for frying

1. In a roasting tray layout the aubergine and mushrooms and scatter with a little olive oil. Roast in oven for 15 minutes, tossing at intervals so that all the ingredients cook and soften.

2. Whilst the aubergine and mushroom are roasting, heat a pan of boiling water and submerge the cavolo nero within it. Cook for 1 minute before straining under cold water and squeezing out the excess water from the cavolo nero. Place to one side on some kitchen paper to dry out thoroughly.

3. Mix the soy sauce, light soy sauce and caster sugar together and when the aubergine and mushrooms are sufficiently cooked transfer them to a bowl and mix in the sauce using a spoon.

4. Using a spice mix or pestle and mortar grind the coriander seeds and cloves together and add the nutmeg. Transfer these and the sliced spring onions and finely sliced red chilli also to the bowl along with the now dry cavolo nero.

5. Lay out a spring role pastry sheet and using your finger or a brush lightly wet the sides of the square. Add a tablespoonful of the aubergine, mushroom and cavolo nero mix towards the bottom of the sheet and then fold over tightly once and then fold in both ends   so that the roll is tightly packaged and then roll until the sheet has been used up. The water that you place on the end will sufficiently hold the spring roll together when cooking.

6. Once all the filling has been used up, heat a deep pan with sunflower/vegetable oil and when it is hot (drop a pinch of flour into it and if it fizzles it is ready) add a couple of the spring rolls at a time. They should take around 2 minutes each to cook. Once they have lightly bronzed place on a plate with kitchen roll to soak up any excess oil.

*************

Tamarind Chutney

Makes half a ramekin full

1 tsp roasted cumin seeds, ground

1 tbsp vegetable oil

2 tsp tamarind concentrate

500ml boiling water

45g palm sugar

1 tsp salt

1. In a pan dry roast the cumin seeds for 30 seconds so that the aromas are released. Place in a pestle and mortar or spice grinder and grind to a powder.

2. In a deep pan add the oil and when it is hot add the ground cumin and move around the pan.

3. Add the tamarind concentrate and boiling water and stir so that the concentrate is dissolved. Keep on a medium heat.

3. Add the palm sugar and salt and allow to dissolve into the liquid.

4. Simmer for 25 minutes by which time the liquid will have thickened, although it will still be relatively runny. As it cools it will begin to harden.

5. Store in the fridge in a sealed container for up to two weeks if not consuming immediately.


Chana Masala at L’atelier des Chefs by St Paul’s Cathedral

IMG_8345

A stone’s throw away from the iconic St Paul’s Cathedral in the heart of the city of London you will find Foster Lane and nestled down it at number 10, the cookery school and cook shop, ‘L’atelier des Chefs‘. This is one of two – the other is in Wigmore Street – soon to be three locations of the cooking school, with a further 17 across the water in France.

IMG_8368

Originally set up by two French brothers, Nicolas and Francois Bergerault who wanted to bridge the gap between chefs and the day to day cook. The ethos of the company was to bring people back in the kitchen, around the table and share the love of cooking. The brothers have hired passionate and skilled chefs to teach cooking classes to budding food enthusiasts. Classes range from half an hour, whereby you cook one dish over a lunch time or after work, to a four hour ‘chefs masterclass’, therefore appealing to those of all standards and budget. Class sizes also range from small intimate groups to larger corporate events/team bonding; there is even a class for kids so everyone is included and encouraged.

IMG_8367

I headed down there earlier this week with my mother in tow. I enlisted the pair of us on the Indian cooking session. Whilst I am very comfortable around the spice rack and cooking Indian food, my mother, who is a fabulous cook, is slightly less comfortable cooking a curry. I was keen to see if the session would appeal to both of us.

IMG_8310

We were greeted by friendly staff who offered us teas and coffees before class began. There were seven of us in our class and we were introduced to chef Daniel Stevens who has just returned from an extended visit to Kochi in Kerala, India, where he has been working closely with Lily Vanilli and Atul Kochhar in their new joint venture, Bloomsburys Cafe, which focuses on celebrating Kerala flavour in Western style patisserie.

IMG_8290

Introductions over we rolled up our sleeves, washed our hands and began slicing, dicing and chopping away. Over the course of the morning we all helped to prepare a lamb rogan josh (lamb curry), chana masala (chickpea curry), vegetable pakoras (similar to an onion bhaji) with a tamarind chutney and saag aloo (potato and spinach curry). We all took turns with stirring and adding ingredients and all tasted for spiciness and saltiness along the way. I liked how Daniel allowed the class to decide if more salt, spice, sourness or sweetness was required in a particular dish. After all Indian cooking is not an exact science like baking where exact measurements are integral to the success of the cake or bread. Indian cooking allows you to be a little flexible with measurements and a more ‘go with the flow approach’ to creating a dish – something that definitely appeals to my style of cooking.

Time raced by and after two hours we had prepared all the dishes. We all sat down on a long table, admired the curries we had created and dived in before anything got cold. We all agreed that the morning had been a real success. We had all picked up new tricks and skills and unanimously agreed that we would all be able to replicate the same dishes again in the comforts of our own home kitchens. Would we return? Most definitely. In fact a couple of my class mates were already on their third return visit and if that isn’t the seal of approval on a fun and informative cooking school, I don’t know what is.

After squeezing in second helpings we were given goodie bags to take home some more. We said our goodbyes and headed out into the rain with a glow in our bellies and a spring in our step.

Chana Masala

Adapted from the L’atelier des Chefs recipe.

Serves 4-6

250g tinned chickpeas

2 tbsp vegetable oil

3 whole cloves

1 whole cinnamon stick

3 green cardamom pods, split open

2 medium sized white onion, finely sliced

1 tsp turmeric

1 tsp red chilli powder

2 tsp ground coriander

2 inch fresh ginger, peeled and finely grated

2 whole garlic, finely grated

4 tomatoes, chopped into small bits

150ml vegetable stock

1 handful of fresh coriander

2 tsp rock salt

1 lemon, juice

1. Heat a saucepan and add the vegetable oil. When it is hot add the cloves, cardamom pods and cinnamon stick and allow the aromas to be released. After a minute add the onion to the pan and cook on a medium heat for around five minutes until it begins to soften and brown.

2. Now add the turmeric, chilli powder and ground coriander and give a good stir. Add the garlic and ginger and stir to make sure they do not burn at the bottom of the pan. Adding a very little water helps to prevent burning!

3. Add the tomatoes and allow them to soften for a few minutes before adding the vegetable stock and chickpeas and allowing the curry to simmer and soften gently. Allow the juice to soak up and if it becomes too dry then just add a little more water.

4. After ten minutes add some salt to taste and then turn off the heat and scatter the fresh coriander on top. Before serving add some lemon juice

Chilli and Mint was a guest of L’atelier des Chefs. You can find more details about the course and other courses on offer here.


Indian Aubergine/Eggplant, Peanut and Tomato Curry

IMG_8109

Have you ever been a little ambivalent about aubergine/eggplant? On the one hand loving their smooth, shiny plum coloured exterior but never really in raptures about the taste. Well my other half, Mr B, tended to fall into this category, so a while ago I set out to prove him wrong.

IMG_8072

After mutterings of ‘you know aubergine is my least favourite vegetable, I prefer greens’, he tasted one mouthful and that completely shut him up. Murmurs of approval were given between mouthfuls and a 9/10 score (yes we regularly mark our food – is that unusual?). RESULT. Surprisingly my eldest child also adored it, surprising as it does have a fair amount of chilli in it! If you don’t like chilli, but like spice, just reduce or take out the chilli in the recipe below.

IMG_8093

The combination of aubergine, peanuts and sesame seeds works ridiculously well together so much so that you will have to restrain yourself from wanting to guzzle up the whole dish. Combine that with a spiced onion and tomato sauce and you have yourself a winning dish.  So put your assumptions to one side for a moment and give this recipe a whirl and I can assure you you will be more than pleasantly surprised.  I couldn’t resist the bijou aubergines on sale at my local market but a regular sized aubergine will work equally well. Just slice the aubergine into chunky chip sized pieces, keeping the skin on of course.

IMG_8097

Indian Aubergine/Eggplant, Peanut and Tomato Curry

450g baby aubergine/eggplant (normal size is fine too), sliced lengthways or chunky chip sized if using a regular aubergine

cooking oil, enough to deep fry the aubergine

2 tbsp olive oil

1 tsp black mustard seeds

1 tsp cumin seeds

2 dried red chillies

1 small green chilli, finely chopped (optional)

5 curry leaves (fresh or dried)

1 tsp turmeric powder

1 tsp of garlic paste

1 tsp ginger paste

1 white onion, finely chopped

200g chopped fresh tomatoes

1 tsp coriander powder

1 tsp cumin powder

1/2 tsp Kashmiri chilli powder

2 tbsp salted peanuts

1 tbsp sesame seeds

150ml water

1 tsp salt (to taste)

1. If using baby aubergine/eggplant slice lengthways removing the stalk. If using a regular sized aubergine slice into chunky chip sized, again removing the stalk. Once sliced, immediately place in a pan of boiling oil to sizzle away and bronze. This should take no longer than ten minutes.

2. Remove the aubergine with a straining spoon and place on some kitchen roll whilst you prepare the next steps.

3. In a new large pan add the olive oil and when hot add the mustard and cumin seeds. They will begin to pop immediately so move them gently around the pan for 15 seconds before adding the dried red chilli, fresh small green chilli (optional), curry leaves (fresh or dried), turmeric, garlic, ginger paste and onion. Continue to cook on a medium heat for around 7 minutes by which time the onion should have nicely softened, but not bronzed.

4. Add the chopped tomatoes, coriander, cumin and Kashmiri chilli powder and simmer for a further 5 minutes, by which time the tomatoes will have totally softened and blended into the sauce. Return the aubergines to the pan and fold gently into the sauce.

5. In a small pan dry roast the peanuts and sesame seeds for a couple of minutes, making sure to constantly move them around the pan so that the heat is evenly distributed and they do not burn. They will begin to bronze at which point you need to remove them from the pan.

6. Using a spice grinder (definitely one of my most useful items I own in my kitchen) – this is the one I use – see here – grind the peanuts and sesame seeds together to form a paste.

7. Add the peanut sesame paste to the pan and stir into the curry, adding more water if necessary. As I used salted peanuts I only needed to add a little more salt. Simmer for a few minutes and serve. If cooking ahead and leaving to rest you will have to add a little more water when heating up.

Serve with rice or Indian bread and you have yourself a vegetarian – in fact vegan – treat. Try it and leave a comment below.

IMG_8116


Ivy Gourd Curry – also known as Gentleman’s Toes

IMG_7967

We all know that lady’s fingers is okra right? But gentleman’s toes? I had no idea there was a vegetable with such an unappealing name, I mean seriously who wants to eat a gentleman’s toe?

IMG_7931

My Bengali mother-in-law introduced them to me only recently and since then I have become hooked. They look similar, and taste not dissimilar in fact, to gherkins which we are huge eaters of in my household – seriously we get through jars of them, even my four year old has a weakness for them. Gentleman’s fingers is also more commonly known as ivy gourd or in Bengal they are known as kundri. Baby watermelon or little gourd are two other names by which they are known.

IMG_7952

Granted, you are unlikely to find them at the big supermarkets but head to any Indian subcontinent grocers and you’ll stumble across these fabulous little vegetables. I know for a fact that you can source them in Tooting and I imagine the same goes for Brick Lane, Southall, Hounslow etc. They are commonly eaten in India and are a great source of vitamin A and C. Eaten alongside a dal and you’ll have a very filling and tasty vegetarian supper.

IMG_7976

Ivy Gourd Curry

Serves 4

550g ivy gourds/kundri/gentleman’s fingers, halved lengthways

4 tbsp olive oil

1 green chilli, halved

1 tsp nigella seeds

1 tsp turmeric powder

1 tsp chilli powder

 2 tsp cumin powder

1 tsp coriander powder

2 tsp salt (to taste)

2 tsp sugar (to taste)

2 tbsp water

1. Heat a large pan with the olive oil and when hot add the nigella seeds followed by the green chilli. After  20 seconds add the ivy gourds and stir into the oils and nigella seeds. Leave to cook on a low heat for 5 minutes.

2. Add all the other ingredients and give a good stir and then place a lid on the pan and leave to simmer, stirring a couple of times, for 20 minutes or until the ivy gourd is soft but not mushy!

So simple and yet ridiculously satisfying.

I hope you get to stumble across these little beauties before too long.


Broccoli, White Beans and Lemons with Red Pepper Flakes

IMG_7917A very HAPPY NEW YEAR to you all. I hope that you saw in the new year in style. I tend to opt for more relaxed, low key affairs on New Years eve so that I can wake feeling as fresh as daisy on the first of January. I am always impressed by those who are able to take part in the Hyde Park New Year’s Day run or those who decide to enter the freezing waters surrounding Britain, which is becoming increasingly more popular as the years roll by. Typically my family go on a good long ramble and play board games in front of the fire. This year we’ll be playing a lot of ‘Pucket’, which was given to me this Christmas. It’s hugely addictive and really good fun and I’ve turned into a little demon playing it, much to the annoyance of my siblings. You can purchase your very own board here.

IMG_7916

As is often the way we all start the year with many good intentions, whether that be to exercise more, drink less, eat more healthily, read more, achieve more (* delete as appropriate) but as the months go by some of our good intentions begin to wane. I thought that I would lend a hand however on the eat more healthily part. I can bet that we’ll be seeing numerous detox diets and health programmes in the papers and magazines this coming weekend. I do think it is good idea to cleanse the body but to bear in mind that it is January and it is cold and therefore we do need those hearty dishes now and again to fill our bellies. Pulses, vegetables and fish is a great way to start off the year and to only eat meat products a couple of times a week – avoiding too much diary is also a sensible way to crack on with the year.

IMG_7922

I thought this recipe would be a great one to kick off the year with as you may already have all the ingredients in your kitchen waiting to be thrown together. It’s incredibly quick to prepare and can be eaten hot or cold, on its own or accompanied by some white fish or a crab cake perhaps. Tasty and packed with goodness, it’s definitely a feel good dish. Helen who runs the website ‘Well-Being Secrets’ has written an in-depth piece on the benefits of broccoli here, which is both fascinating and highly informative, so have a read. I also like Joey Bruno’s, founder of Thrive Cuisine, article here.

For those who had a ridiculously large night and are feeling a little worse for wear, might I suggest the health regime starts tomorrow and you tuck into some of these little beauties instead – see here.

Broccoli, White Beans and Lemons with Red Pepper Flakes

adapted from the December 2013 issue of Bon Appetit Magazine

Serves 4

3 large tbsp of olive oil

4 garlic cloves, finely sliced

3 anchovy fillets packed in oil

1 lemon, washed and finely sliced (pips removed)

225g broccoli, chopped into small florets

5 stems of fresh thyme

2x400g tins of cannellini beans, rinsed

200ml water

salt and pepper

generous pinch of red pepper flakes

2 tbsp parmesan, finely grated (plus a little extra for grating on top)

1. Gently heat the oil in a large deep pan and then add the garlic, lemons and anchovies, stirring occasionally to help break up the anchovies. Cook for 5 minutes before adding the broccoli florets and thyme and stirring into the juices from the lemon.

2. After a further 5 minutes add the cannellini beans and water and stir into the other ingredients. Season with salt and pepper, bring to the boil and then reduce the heat to a simmer allowing the flavours to blend together for a further 5 minutes.

3. Add the parmesan and stir into the ingredients and place a lid on the pan and take off the heat.

4. Turn out onto a serving dish and sprinkle with red pepper flakes (chilli flakes could also be an option here in fact) and an extra scattering of fresh parmesan.

IMG_7891

SaveSave


Indian Toor Dal with Tamarind and Ginger

IMG_7774

After the excesses of weekend feasting Monday nights in my household are vegetarian and usually include a dal of some sorts. This past weekend has been a whirl of celebration with my eldest daughter’s birthday sleepover followed by a large family lunch to celebrate, as well as squeezing in a celebration dinner in honour of our talented artist friend, Adele Henderson (you heard it hear first folks) who was displaying some of her charcoal paintings at the prestigious Mall Galleries in London.

IMG_7780

Like soups, which I am a huge fan of, dal is the ultimate homely and warming comfort food. There are hundreds of varieties from all over India, Pakistan and Bangladesh and each week I try and cook a different one from the week before. Some require soaking, and others you can cook straight away. This week I have used toor dal (similar looking but smaller in size to channa dal), which I try to soak if I have the time (either overnight if you are very organized or simply for 20 mins). This simply makes the cooking time quicker, but is not essential to the cooking process. My usual routine is to soak the lentils on Sunday night and then to cook the dal on Monday morning. The whole cooking and preparation time takes no longer than 45 minutes (if you have not soaked and less if you have) so can easily be done prior to leaving the house, or returning later in the day.

This dal contains some wonderful flavours that work so well together. Asafoetida, or hing as it is also known, should be used with caution as it has a pungent smell, but adding a good pinch really adds a depth of flavour, which keeps you coming back for more. If you can use fresh curry leaves then use them, otherwise dried is fine. Fresh curry leaves are wonderfully fragrant and again really add great flavours to the dish. Then there is the sweet and sourness from the tamarind. I tend to opt for concentrate as it is easier to come by in regular grocery shops, however if you have some tamarind you can soak it and then strain it and add the tamarind pulp that is strained through the sieve.

IMG_7739

I tend to cook a generous amount of dal so that I can hopefully have some leftover to eat on Tuesday along with a fish curry; one less thing to prepare is always a bonus.

IMG_7742

Indian Toor Dal with Tamarind and Ginger

400g toor dal

3 tbsp vegetable/sunflower oil

1 tsp of fenugreek/methi seeds

1 tsp cumin seeds

1 tsp black mustard seeds

10 fresh curry leaves

2 inches fresh ginger, finely grated/chopped

a good pinch asafoetida/hing powder

2 small chillies, chopped into three

2 tomatoes, chopped

1/2 tsp chilli powder

2 tsp turmeric powder

1 tsp tamarind concentrate

100ml water

2 tsp salt

1. Soak the toor dal in a bowl of water for 20 minutes or overnight if you are well organized. This simply makes the cooking time a little quicker but is not essential (unlike some lentils which you have to soak over night – red kidney beans and green mung beans for example). Make sure the water is sufficiently above the level of the dal. You rinse it through after so the exact amount is irrelevant.

2. Once the 20 minutes soaking are up, rinse the dal through a sieve and place in a large pan and cover with boiling water. This time the water should only be a little bit above the dal.  Gently cook the dal so that it softens, this will take around 20-35minutes (more of you have not soaked). You may need to add more water if it gets soaked up whilst softening. It’s not an exact science so don’t worry too much on water amounts – sometimes I have it more ‘soupy’ in consistency than others. Remove the scum from the top of the pan, which occurs when  cooking the dal.  When it has softened, leave to rest whilst you finish off preparing the rest of the ingredients. To test it has softened squeeze a lentil between your thumb and forefinger. If it soft it is ready for the next stage, however, if the lentil remains hard you will need to boil it a little longer.

3. In a large karahi or frying pan heat up the oil and then add the fenugreek/methi, cumin and black mustard seeds. They will begin to pop so make sure you keep the heat low. Move them around the pan for 30 seconds before adding the curry leaves and give a good stir.

3. After three minutes cooking time add the chillies, fresh tomatoes and asafoetida/hing,  fresh ginger, chilli powder and turmeric and mix in well together.

4. Once the tomatoes have softened – this will take a few minutes, add the tamarind concentrate and water and stir.  You now want to deposit the pan with the toor dal into your karahi/frying pan with the other ingredients, or vice versa, depending on which pan is larger.  Stir in well together and add a little extra boiling water to clean the pan and then turn that water into the main pan.

5. Add the salt to taste and leave to simmer for a further 5 minutes.

Serve with rice or Indian bread or simply on its own. I often like to squeeze in a little fresh lemon or lime as well.

IMG_7736Cumin seeds top right, black mustard seeds bottom and fenugreek seeds top left.


Mung Bean and Cumin Dal and Durga Puja Festivities

This past weekend has been one of celebration as it was Durga Puja. For Bengali Hindus (my husband’s side of the family) Durga Puja is the biggest religious festival in the Hindu calender. In Kolkata, which is the heart of Bengal, I am told it is taken to another level altogether, when families feast, dance and pray to the goddess Durga – the conquerer of good over evil and the mother of the universe, as well as her children: Ganesh, Saraswati, Lakshmi and Kartik. Schools close and everyone takes time off work to celebrate.

The statue of goddess Durga on her lion fighting the demon Mahishasura in the Hounslow Pandal

Tooting Goddess Durga 

The making of the statues is a hugely lucrative business in India and at the end of the six day festival the statues are ceremoniously carried to the Ganges and left to drift away and be reabsorbed into the Ganges. The statutes themselves are made of straw and mud from the Ganges and then glazed with paint to give them that glossy shine; the craftsmanship and detail never ceases to impress me.

There are thousands of Durga Puja pandals, which are basically huge structures housing the goddess and her children, erected all over the different Kolkata neighbourhoods. It’s all hugely competitive and each pandal competes for attention in beauty and innovation. I visited two different ones in London – one in Tooting and the other in Hounslow and both were very spectacular in terms of colour and design, the latter I know had been shipped from Kolkata.

Ganesh – one of Durga’s offspring in the Hounslow Pandal

The banging of the drums, the blowing of the conch shell, the incense, the chanting of the prays and hustle and bustle of people coming and going really transports you to India. It’s all rather frenetic and yet very warm and inviting at the same time. In the Hounslow pandal alone thousands of visitors came and went over the course of a few days. Catering for that number must be rather daunting but I was very impressed by the taste and quality of the food and the fact that it was all hot. It was the longest queue for food I have ever witnessed, but it moved quickly and before long we were given a plate of tasty vegetarian food.

Some vegetarian cuisine given to those who attended the Hounslow puja in London

Back at home I have been cooking an endless amount of Indian dishes from: methi and pomegranate pork curry to amma’s chicken curry, red lentil dal with spinach, yellow dal with courgette, Bengali fish curry and mung bean and cumin dal.

It is the mung bean dal recipe that I wanted to share with you all today. Unlike red split lentil and some yellow dal it does require a little more forward planning as it needs to be soaked, ideally overnight.

It’s delicious, nutritious, cheap to make and other than the soaking of the mung beans, is very straightforward. My mother-in-law makes a completely different tasting mung bean dal, which I will post another time, but to get you started try this one and let me know how you get on. It’s perfect for a week night vegetarian supper.

Mung Bean and Cumin Dal

Serves 4

250g mung beans (also referred to as moong bean), soaked overnight

3 tbsp mustard oil

1 white onion, finely chopped

1 tsp cumin seeds

1 tsp turmeric

half tsp red chilli powder

half tsp garam masala powder

half tsp cumin powder

1 tsp salt

juice of half a lemon

fresh coriander to serve

1. Place the pre soaked mung beans in a pan and cover with water and gently simmer until softened. This will take around 40 minutes.

2. Meanwhile, place the oil in a pan and gently fry the cumin seeds for a minute or so until they begin to bronze. Immediately add the onion and mix together with the cumin seeds.

3. When the onions have softened and become translucent add the cumin powder, red chilli powder, turmeric and garam masala and stir together.

4. Drain the mung beans and then transfer them to the pan with the onions and fold in thoroughly. Add the salt and lemon juice and simmer together for a further 5-10 minutes. You may need to add a little more water at this stage.

Whilst it is delicious to eat on its own or with a chapati it is also great to accompany it with a fish, meat or vegetarian curry (see my recipe library) if you wish to make a more substantial Indian feast.

Mung beans soaked overnight

Step 3 above