A tasty breakfast treat – spiced semolina (Upma)

IMG_1731

Semolina and I did not start out on a good footing.

For a few years when I was young I attended a convent – not as a nun, but as a pupil, and the nuns had a habit of being very strict. You had to eat every morsel on your plate and were not allowed to leave the table until your plate was clean.

IMG_1724

The food in the early 80’s was not something you would particularly blog about and the puddings that were dished up to us were well, how can I put this politely, not that appetising. The gruel that I particularly disliked was sloppy semolina with a dollop of sweet jam. I found it so hard to eat that on one occasion after the dining hall had emptied and I was sitting all alone and the minutes were ticking by I decided that when Sister was not looking I would deposit the contents of my bowl into my pocket. I did it like a stealth ninja and no one found out, other than my mother, who is such a sweetie she didn’t seem to make much of a fuss.

IMG_1714

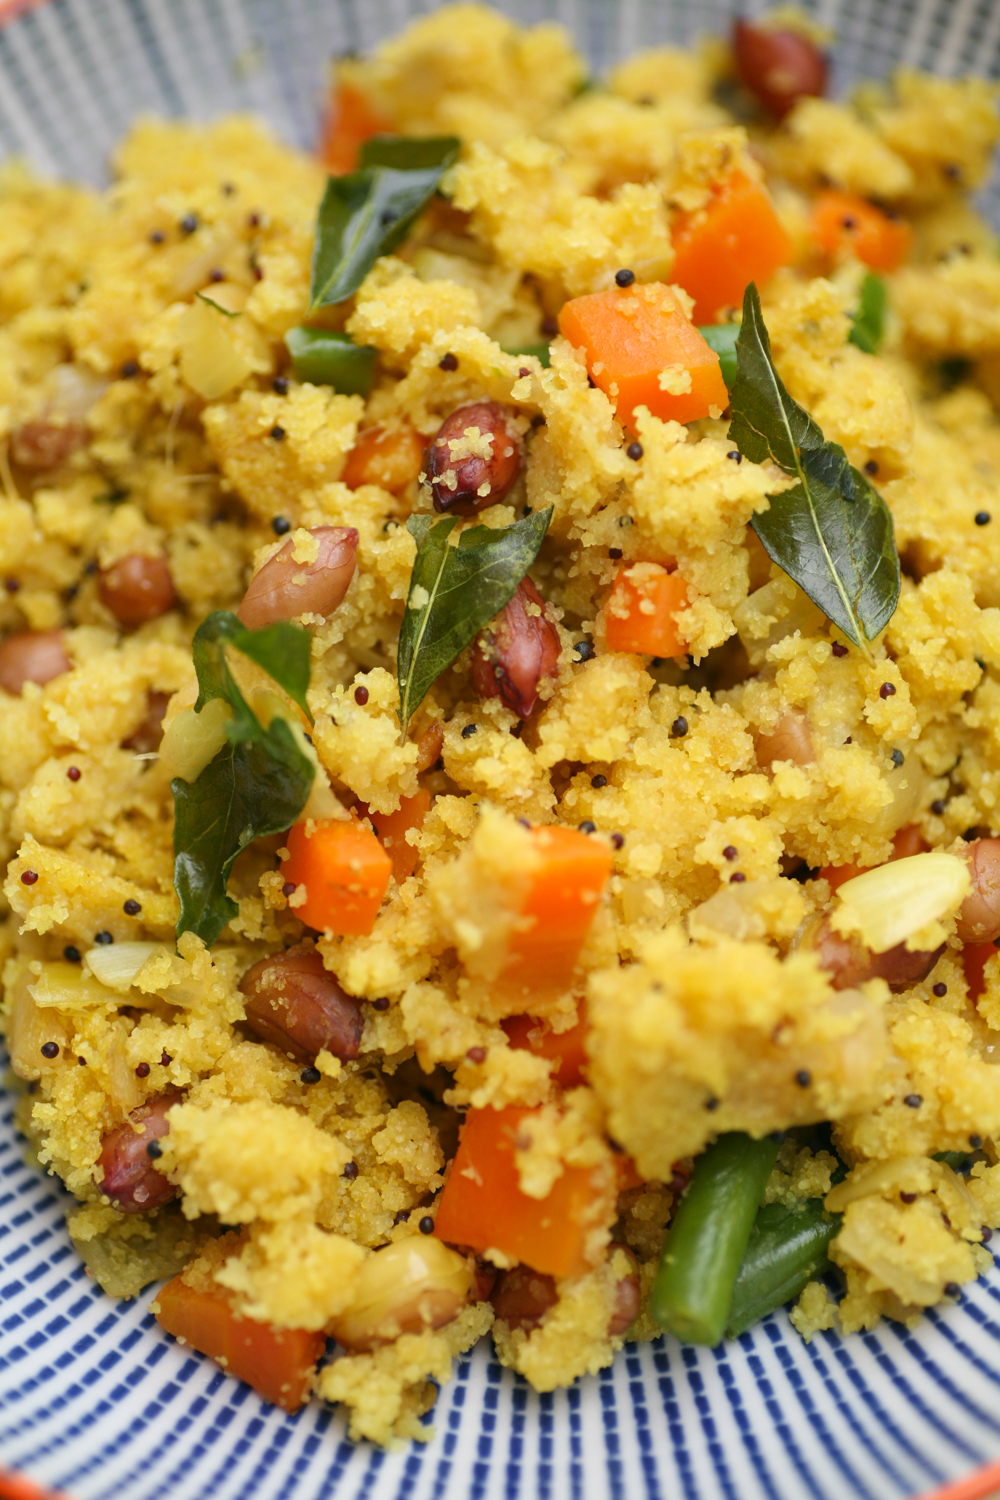
Fast forward 34 years and I now love semolina – but only if I eat it the savoury way. In India a hugely popular breakfast snack is spiced semolina known as ‘Upma’. It is so quick and easy to put together it takes minutes to create a really warming bowl of goodness. I eat it at any time of day in all honesty – breakfast, snack, lunch, supper – you name it, it is super versatile. You can also add whatever vegetables need to be used up in the fridge, so it’s a win win in my book.

IMG_1742

Spiced Savoury Semolina – Upma

Serves 2-3 (or for 4 if eating as a snack)

2 tbsp vegetable oil

1 tsp black mustard seeds

12 fresh curry leaves

1 fresh green chilli finely chopped

1 banana shallot or small onion, finely chopped

1 tsp salt

20g fresh ginger, finely grated

1/4 tsp turmeric powder

1 carrot, finely cubed

60g green beans chopped in half

40g red peanuts

150g course semolina (sooji)

275ml water

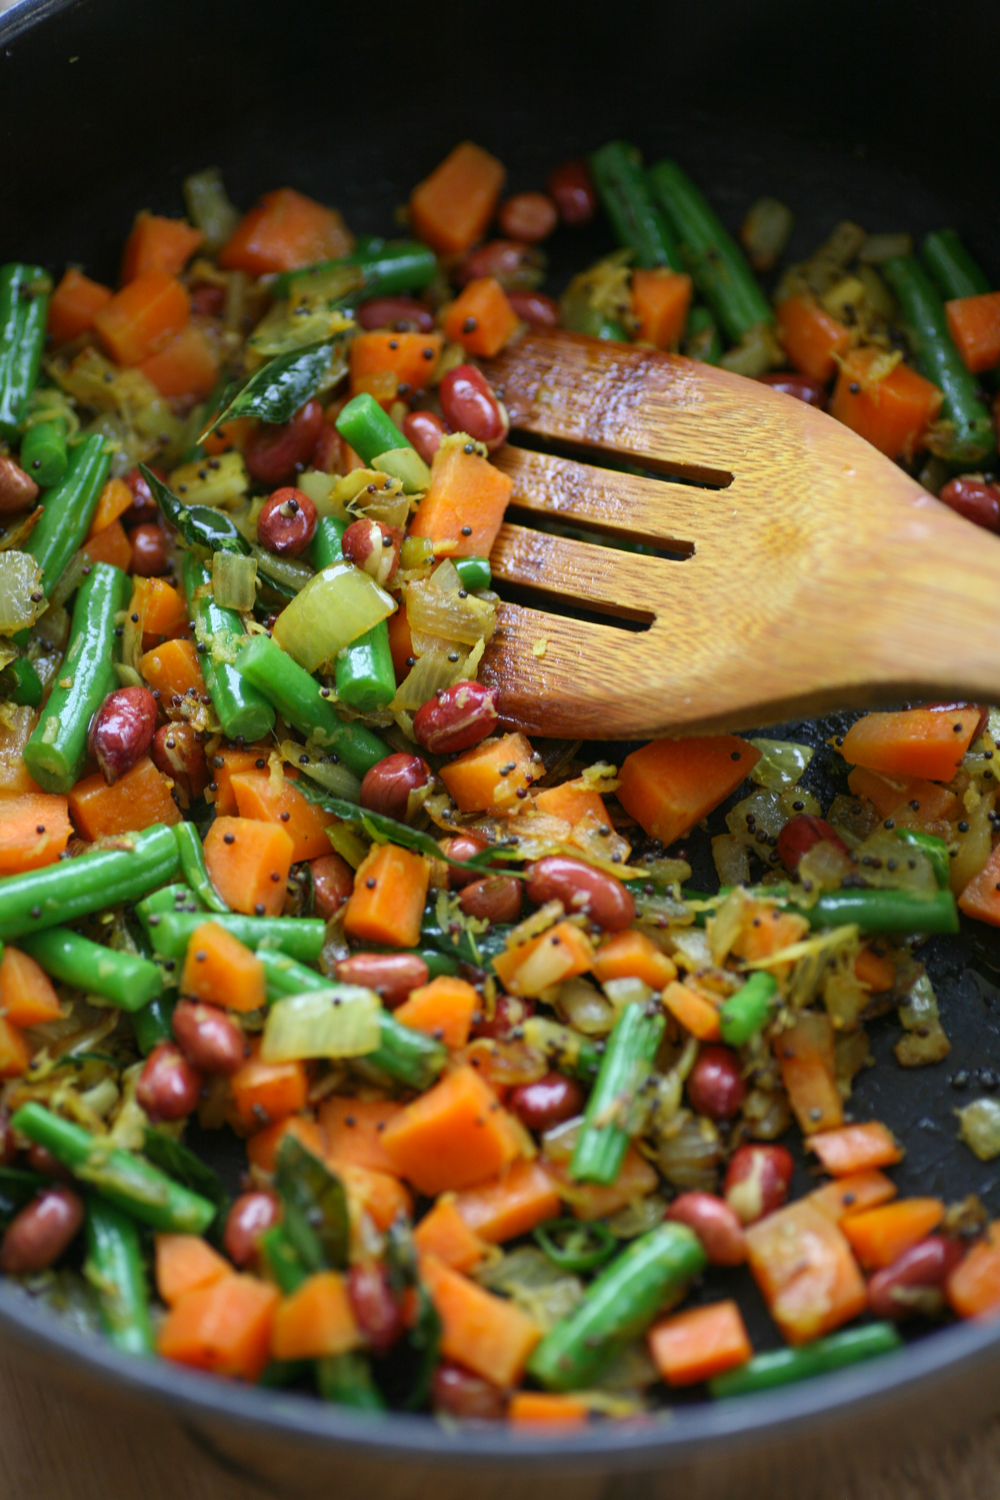
  1. Heat a pan with the oil and when it is hot add the mustard seeds, curry leaves and fresh chilli. The mustard seeds will begin to splutter after 20-30 seconds so then add the shallot/onion and salt and lower the heat. Allow the shallot to soften for around 5 minutes.
  2. Add the fresh ginger and turmeric and stir gently.
  3. Now add the carrot and beans or another vegetable that needs using up along with the red peanuts.  After 1 minute add the water and leave to simmer for up to 5 minutes or when the vegetables have softened.
  4. Add the semolina gradually and stir constantly so that it does not clump together too much. Once it has soaked up the water – you can add a little more water if needed at this stage – place a lid on the pan and switch off the heat so that it can steam for a few minutes before serving.

Toasted Cumin and Cinnamon Cauliflower

IMG_7116

I often think that cauliflower gets a little overlooked as a vegetable, unlike its more ‘superfood’ cousin, the broccoli. Boiling it can be bland, like most things, but roast it and add a little spice and textures then you have a truly delicious treat. I wrote a piece a few years ago on the merits of the humble cauliflower here so do check it out.

IMG_7114

This recipe is quick, extremely tasty (ok I know I am biased), full of goodness and great as a lunch to take to work in a tupperware or as an evening meal. It can be eaten hot or cold so is hugely versatile. A slight chill is now in the air in London, although I am still hopeful for an Indian summer, so the warming cumin and cinnamon gives the dish autumnal comforting notes. The sweetness come from the cinnamon and the saltiness from the feta so no extra salt is necessary.

Toasted Cumin and Cinnamon Cauliflower

serves 2 or 4 if serving with another dish 

1 cauliflower, chopped into florets and greenery removed

1 tsp cumin powder

1/2 tsp cinnamon

5 tbsp extra virgin olive oil

30g pine nuts, toasted

30g raisins or sultanas

1 small handful of fresh coriander

30g feta, crumbled

  1. Preheat the oven to 200 degrees (if using fan). In a large mixing bowl add the cauliflower florets and add the cumin and cinnamon powder along with the extra virgin olive oil. Mix gently with your hands so that the florets are evenly coated.
  2. Place on a baking tray in the oven for 20 minutes, so that the edges are nicely charred.
  3. Meanwhile heat a heavy frying pan and toast the pine nuts so that they begin to bronze. They bronze quickly so keep an eye on this. Add the raisins/sultanas to warm them and allow them to become soft. Place to one side in a bowl.
  4. Once the cauliflower is cooked add to a new mixing bowl and add the pine nuts, sultanas, coriander and crumbled feta. Toss gently and either plate up or leave to cool before adding to your lunch container.

I have also made this with prunes instead of raisins/sultanas, which works really well. Dates would also be another option.

IMG_1703


Spiced Masala Paneer Skewers, Coriander/Mint Chutney and Bejewelled Couscous

IMG_1395

I was recently approached by the the UK’s number 1 tableware provider, Denby Pottery to come up with an exciting vegetarian BBQ recipe for their blog. They kindly provided me with some of their china from the  ‘Imperial Blue’ range, to present the food. I ended up creating spiced masala paneer skewers, coriander and mint chutney and bejewelled couscous. As well as cooking the paneer skewers on the BBQ they can equally be cooked on a griddle pan or under the grill so are super versatile.

Take a look at my recipe and post here and I would love it if you can share it through your social channels.

Hope you are all having a wonderful summer (winter if you are in the southern hemisphere).

IMG_1408


Cold Spiced Soba and Cucumber Noodles

IMG_1340

When it’s hot I like nothing more than a bowl of spiced cold noodles. If you have only ever eaten them hot before you are going to have to trust me when I say that cold noodles are seriously good. The whole meal takes 10 minutes max to prepare, which is even better when the sun is shining and you don’t really fancy spending too long over the stove.
IMG_1350

The crunch of the cucumber noodles and nuts (from the crunchy peanut butter) really compliment this dish. I decided to use dragons back chillies which you can purchase from World of Zing here. The chilli gave the dish a kick without being too overpowering. The spring onion and garlic also adds other wonderful flavours running through this dish. The star of the sauce in my mind is chinkiang vinegar, which is also known as Chinese black vinegar. I adore the stuff and if you love Chinese cooking it is an absolute must for your store cupboard. You can easily pick is up in any Asian food store.

IMG_1341

The sauce is salty, sour and sweet and mixed through the noodles it is absolutely heavenly. It’s a perfect meal to take to work as it is easily transportable and can be prepared the morning or night before and then stored in a fridge until lunch. Remember to take it out of the fridge around 30 minutes before eating so that it has reached room temperature.

IMG_1354Cold Spiced Soba and Cucumber Noodles 

Serves 2 or (1 if you are feeling a little piggy)

85g soba noodles

1/2 cucumber, noodles if you have this or thinly chopped into sticks if not

2 spring onions, sliced at an angle

1 dragons back chilli, halved or quartered

2 garlic cloves, finely chopped

1 tbsp chinkiang vinegar

1 tbsp light soy sauce

1 tbsp chilli oil

1 tsp sesame oil

1 tsp crunchy peanut butter

1 tsp caster sugar

1 tsp black sesame seeds

1 tsp salt – optional

1. Place the soba noodles in boiling water and boil for around 5 minutes or according to the packet. Drain and run under cold water so that the noodles are completely cold. Place to one side.

2. Mix the chinkiang vinegar, light soy sauce, chilli oil, sesame oil, chopped garlic*, sugar and crunchy peanut butter in a bowl and stir to form a dressing. Taste and add salt if required.

3. Prepare the cucumber noodles or chop the cucumber into thick sticks.

4. Heat a small pan and when it is hot add the dragons back chilli or other dried chilli so that it darkens slightly in colour. I keep all the seeds, but if you like it less hot you can reduce these. Then add 1/2 tsp of chilli oil and add the spring onions for a minute. Take off the heat.

5. In a mixing bowl add the cold soba noodles, the cucumber noodles, the dressing and the dried chilli and spring onions.  Gently fold in together and place in two bowls. Sprinkle some black sesame seeds on top.

* if you prefer to cook the garlic add it to the pan with the spring onions so that it softens slightly.

IMG_1355


Gnocchi with Butternut Squash, Garlic, Broad Beans and Crispy Sage and Kale

IMG_1319

The summer hols have started in my house. My daughters have weeks ahead to relax, explore, learn and grow. It’s a time to unwind and go at a more leisurely pace, no 6.30am wake up calls until September *does happy dance*. New additions to our family have arrived – two mini lop bunnies, so rabbit is firmly off the menu from henceforth.

IMG_1333

Picnics are wonderful but sometimes more of a proper meal at lunch time is required. This recipe is straightforward and although there are a couple of parts to bring together it really does not take long. I also love the bright summer colours of this meal, you can’t help but be happy when eating it. If you want to make it a morning activity though and involve your children/friends/partner then making your own gnocchi is really good fun. Here is my recipe.IMG_1335

I like to make kale crisps to add to this meal. Eleven minutes in a low oven and hey presto you have kale crisps. You can get creative as well and add cayenne pepper, soy, chaat masala, whatever takes your fancy. For this dish I have simply added a sprinkling of rock salt. By all means you can have the kale crisps in a bowl on the side, but I rather like the crisp aspect to the whole dish. It’s comfort food with a twist and they work well with the crispy sage. Broad beans are in season right now and I love to throw them in so many dishes. I prefer to shell them but I leave that to you to decide.
IMG_1324

Gnocchi with Butternut Squash, Garlic, Broad Beans and Crispy Sage and Kale

1/2 of a small butternut squash, skin removed and cubed to the size of the gnocchi

100g chopped kale

1 tbsp extra virgin olive oil

3 garlic cloves, roughly chopped

1 tbsp butter

40g shelled broad beans

350g potato gnocchi

salt and pepper to taste

handful of grated parmesan, optional

1. First cube the butternut squash into the size of the gnocchi. Boil in a pan of water along with the broad beans for around 10 minutes, or until soft but not mushy.  Rinse under cold water and leave to one side. If you need to shell the broad beans then do so at this stage.

2. Preheat an oven to 140 degrees fahrenheit. Meanwhile separate any stems from the kale and discard. Place the kale on a baking try and add the olive oil. Massage the oil into the kale and make sure that the kale is spread out evenly over the tray. Place in the oven for 11 minutes, by which time the kale will be crisp. If it is not then leave it for a minute or two longer. Keep a watchful eye over it as they can burn quickly. These kale crisps are a great snack but also rather lovely in this dish.

3. In a frying pan add the butter and when it is melted add the garlic. Move around the pan before adding the sage leaves. Allow them to cook on a low heat so that they begin to crisp.

4. Add the butternut squash and broad beans and coat them in the butter, garlic and sage.

5. Place the gnocchi in the pan and boil away for 1 minute or according to instructions. If you fancy making your own – here is my recipe.

6. Strain the gnocchi and add the pan with the other ingredients. Stir together for a minute, season to taste and plate immediately.

7. Sprinkle crispy kale over each serving with a scattering of parmesan as desired.


The Tastiest Spiced Chickpea Curry Ever

IMG_1186

The humble chickpea can provide the most satisfying of meals if it is mixed with a little magic, and in this case spices. The final note of adding chaat masala raises the game of this dish into one bursting with flavour that is both salty and sour. For those who have not come across chaat masala before it’s a spice mix that is commonly used in India, Pakistan and Bangladesh and normally includes many of the following: mango powder, black salt, asafoetida, pomegranate seeds, nutmeg, mint leaf, chilli powder, black pepper, salt, cumin, coriander and dried ginger. You can pick up sachet’s or packets at your local Asian grocers or any of the large supermarkets.  If you are feeling really adventurous you could make your own. Have a look at this lovely lady showing you how to do so .


Like many of the dishes on my blog this is very straightforward, filling, nutritious, tasty and kind on the wallet. My eldest daughter loves it (she just avoids swallowing the green chillies that I simply cut in half so are easy to spot) and my youngest….well she tells me she prefers ‘English’ food. I asked her like what and she answered ‘Like udon noodles, chicken, spring onions and soy sauce’. Oh dear!

IMG_1182

If you are UK based chances are that you’ll be on half term next week – if you have children that is. This dish ticks so many boxes and is perfect for an adult, or more sophisticated child eater. Next time your are in the shopping aisles of your local supermarket – think Chaat Masala, seriously you won’t regret it. A little bit of searching will reward you royally.

You heard it here first.

IMG_1174

 Spiced Chickpea Curry

2 tbsp groundnut/rapeseed oil

10 fresh curry leaves

1/2 red onion, finely chopped

1 tsp salt

2 tsp garlic paste

1 tsp ginger paste

2 small green chillies

1 tsp cumin powder

3 medium sized tomatoes, diced

500g chickpeas (tinned is fine)

1 tbsp yoghurt

1 tbsp tomato puree

150ml juice from chickpea tin/boiling water

125g fresh spinach

1 tsp chat masala

1/2 lemon, juice only

handful of fresh coriander to serve

1. Gently heat the oil in a deep frying pan and then add the curry leaves. After 20 seconds add the onion and salt and lower the heat to allow the onions to soften and not burn. After 5 minutes add the garlic and ginger paste along with the green chillies and stir into the existing ingredients.

2. Add the cumin powder and then add the fresh tomatoes and allow them to soften slightly before adding the chickpeas.

3. Add the yoghurt and tomato puree and stir into the chickpeas.

4. Add the chickpea juice and/or boiling water and leave until the liquid has reduced. This will take around 10-15 minutes.

5. Stir in the spinach, which will wilt almost immediately.

6. Take the pan off the heat and add the chaat masala and lemon juice and stir into the curry. Add a little fresh coriander on the top of each serving.

Relax, sit back and enjoy a very satisfying bowl of chickpea curry.

SaveSave


Kakrol Curry – for those who like to try new things

IMG_1156

For the next month or so if you happen to be living near or in an Asian neighboured, or passing by an Asian grocery store, you might just chance upon a wonderful Asian vegetable known in Bengal as kakrol, or you may have heard it referred to as kantola. Then again you may have never heard or seen this Asian vegetable before as it’s pretty unique and is it’s only in season for a month or two.

IMG_1105

It’s a type of Indian gourd that does not have a bitterness like it’s cousin the korola. It’s seriously delicious and actually reminds me pool, which I equally love. It’s in season NOW so seize this opportunity and seek it out. I love the bright vivid greenness of its skin. It’s so inviting it just wants to be eaten!

IMG_1109

You need to half it lengthways and then half it again and then quarter it. Similar to the ones that I have in the photo above. You do not need to peel the skin, simply cut off either end of the gourd.

IMG_1119

The brightness from the turmeric, Kashmiri chilli and the vegetable itself makes for some colourful cooking – just don’t wear a white shirt when cooking.

IMG_1143

I tend to accompany mine with some dal such as red split lentil or cholar and serve it with some freshly prepared chapatis. It’s absolute heaven and the perfect vegetarian/vegan meal. If you do manage to find them and cook this please let me know as I love to hear feedback from readers.

Have a lovely weekend.

Kakrol and Potato Curry

2 tbsp groundnut/olive oil

1 tsp cumin seeds

2 potatoes, halved lengthways and then quartered

5 kakrol/kantola, halved lengthways and then quartered (see photographs above)

1 tsp turmeric powder

1/2 tsp of Kashmiri chilli powder

1 tsp coriander powder

1 tsp cumin powder

1 tsp salt

a few tbsp of water to help soften the kakrol

1/2 tsp garam masala

1 tbsp ghee

1. Heat the oil in the pan and when it is hot add the cumin seeds and move them around the pan for 20 seconds before adding the chopped potato pieces. Turn the heat down and let the potatoes begin to bronze slightly. This will take around 4/5 minutes.

2. Add the kakrol along with the turmeric, chilli powder, salt, cumin powder and coriander powder. Use a spoon to cover the kakrol and potato in the spices.

3. You may need to add a little water to begin with to help the kakrol to soften. Place a lid on the pan to help steam and soften it. Turn gently at intervals and add a little more water if necessary. Cook on a low heat for 25-30 minutes, by which time the kakrol and potato will both be softened.

4. Before serving add the ghee and garam masala, stir into the curry and serve with hot chapatis or other Indian flat bread.

IMG_1165


Sardinian Fregula with Courgette, Mint, Lemon, Parmesan and Pine Nuts

IMG_1025

Surprise! I have given my blog a new lease of life by making it a little fresher, with bigger food photographs – to tempt you into making my recipes of course. How do you like it? I’ll probably tweek it here and there as it is not exactly how I want it but it will do for the mean time. It’s also probably at it’s best looked at on a computer as opposed to a mobile or iPad but any device will do. Leave a comment below once you have had a little look around.

Now back to the important stuff…. the recipe. This week I want to tempt you into making this wonderful dish that can be eaten hot or at room temperature, perhaps for a picnic. It requires a little effort in as far as locating the wonderful fregula, but once you have done that making the recipe is a doddle.

IMG_0991

So what on earth is fregula I hear you all ask? Well in a nutshell it’s a Sardinian pasta, which is similar to couscous in appearance, and comes in a variety of sizes. It’s made from rubbing semolina and water to create a crumbly texture that is then rolled into balls. It is then sun dried and toasted briefly in the oven.IMG_0990

This process allows the fregula to have that ‘al dente’ texture giving it a slightly nutty taste. I am not suggesting you make the fregula from scratch, far from it. You’ll find it most Italian delicatessen and I wouldn’t be surprised if some of the larger supermarkets may well stock it. If they don’t then I am sure they will very soon.

IMG_1002

The overall dish is healthy, takes under quarter of an hour to prep and cook and is really delicious. The flavours are fresh and cleansing, coming from the mint and lemon and this combined with nutty fregula and pine nuts, umami parmesan (check out my article on umami here) and the bright green courgette. It’s a winning recipe if you are entertaining and want no fuss with cooking as it can all be prepped before guests arrive, aside from the boiling of the fregula and courgettes.

For those who like shell fish I will be doing another fregula recipe again in the next few weeks – that leaves you more than enough time to hunt down a packet from your local Italian deli.

IMG_1010

Sardinian Fregula with Courgette, Mint, Lemon, Parmesan and Pine Nuts 

Serves 3

225g fregula (75g per person)

3 courgettes, cut into thin half moons (1 courgette per person)

1 lemon, juice and zest (to taste)

4 stems of fresh mint leaves, finely chopped

60g parmesan

1 large handful of pine nuts

salt and pepper

1. Place the fregula in boiling water so that it is completely covered for 12 minutes.

2. Prepare all the other ingredients, whilst you wait for the fregula to cook. After 12 minutes add the half moon courgettes, adding more boiling water if necessary, and cook for 2 more minutes.

3. Drain the courgettes and fregole and place in a large mixing bowl.

4. Add half the lemon juice and zest, most of the parmesan, the mint leaves, pine nuts and season with salt and pepper. Taste and add more lemon juice and zest to taste.

5. Serve in one large bowl/platter and allow everyone to serve themselves.

Sprinkle with the remaining parmesan.


Umami Rich Portabella Mushrooms, Sun Dried Tomato and Black Garlic Pesto

IMG_0891

Recently I was asked to create my own version of one of the vegan dishes offered on the menus of ‘The Wynn Resort‘ in Las Vegas. The hotel has recently teamed up with famous vegan chef Tal Ronnen so I was eager to bring my own twist to the menu.

IMG_0888

I decided to alter his version of ‘royal trumpet mushrooms with a soy reduction’ at the Lakeside Restaurant and create my own umami rich mushroom dish. Mushrooms, tomatoes and black garlic are all ingredients that are bursting with umami. I wrote an article for Country & Townhouse Magazine on umami which you can read here. My ingredient that brings depth of flavour and an interesting twist though is black garlic – see another article here. It is now becoming increasingly easy to get hold of and can be sourced at some of the large supermarkets here in the UK. I can only imagine the same can be said for the US. If not there is a business opportunity out there for someone as this is a seriously magic ingredient.

IMG_0874

It is so straight forward and quick to prepare and bake that these can be easily rustled up in no time at all. I find them hugely satisfying and perfect if you want a vegetarian flavoursome meal.

IMG_0880

I like to sit the mushrooms on a bed of steamed spinach with a sprinkling of dried chilli flakes and a splash of lemon juice. So Tal if you are reading this how about adding this to the menu? Do let me know if you do.

IMG_0895

Portabella Mushrooms, Sun Dried Tomato and Black Garlic Pesto and Steamed Spinach

Serves 2

2-4 large portabella mushrooms (depending how hungry you are)

70g sun dried tomatoes

3 black garlic bulbs

20ml sun dried tomato oil

200g fresh spinach

1 tsp dried chilli flakes

fresh lemon, quartered to serve

1. Preheat the oven to 180 degrees.

2. Cut the stork of the mushroom if it is protruding and place in a hand blender. Add the sun dried tomatoes, black garlic bulbs and sun dried tomato oil. Blitz so that it forms a pesto like consistency.

3. Spoon the tomato pesto onto the mushrooms evenly and place in an oven proof dish. Bake in the oven for 12 minutes.

4. Steam the spinach or simply place the spinach in a pan with 1 tsp of cold water which will make it wilt. Move it around the pan for a minute so that it is all wilted. Add the chilli flakes and serve on to a plate.

5. Place the hot stuffed mushrooms onto the spinach and serve with fresh lemon on the side.

Please note you will not need to add any salt to this dish as the umami flavours more than make up for flavour and depth. 


Butternut Squash, Lemongrass, Coconut and Spinach Curry

IMG_0868

Increasingly more and more people are balancing their diet with vegetarian food and cutting out meat completely on some days of the week #meatfreemondays. Whilst I do eat meat and fish I am consciously eating less meat and more fish and vegetables. A balanced diet is important and I do enjoy eating meat but I am in the camp that it is unnecessary to eat it everyday.

IMG_0856

My recipe here ‘Butternut Squash, Lemongrass, Coconut and Spinach Curry’ will hopefully convert even the meat lovers amongst you. It is packed with so much goodness and tastes really good, with a lovely chilli kick reverberating through the dish. For those who claim they can’t cook, seriously try this one. It is very easy to make and you can cook it in under 30 minutes. The hardest part is peeling the butternut squash. *Inventors* out there I would love you to come up with a device that makes it quick and easy to peel any type of squash or pumpkin. I use my regular peeler and knife and whilst it does not take long I know it can be done faster.

IMG_0824

This recipe shouts SPRING to me, although that maybe because I put daffodils in the photo shoot. The bright yellow orange hue coming from the butternut squash and turmeric sings to me and makes it wonderfully appetising to look at and eat. I also love the burst of green from the spinach, fresh herbs and lime.

IMG_0830

I have used fresh ginger paste and garlic paste, as I always have pots to hand in the fridge and for speed they are wonderfully helpful, but by all means use fresh ginger and garlic and then simply finely grate them so they become more paste like.

IMG_0836

The sweetcorn adds a lovely crunch and texture to the dish alongside the soft butternut squash and spinach. I have added kaffir lime leaves as I often have some in my fridge/freezer. They freeze well and you can pick them up at the big supermarkets.

IMG_0842

I don’t bother to take out the kaffir lime leaves or lemongrass when serving. I quite like the rustic, throw it together look. I also find the dish is a great pick me up if you are feeling a little under the weather. The ginger, turmeric, garlic, spinach and chilli really flood the body with so much goodness that a sense of wellbeing hits you almost immediately.

IMG_0856

I would love you to give it a try and please let me know how you get on. Butternut squash (uncooked) last for weeks so I always have one ready to use.

IMG_0846

Butternut Squash, Lemongrass, Coconut and Spinach Curry

Serves 4-6

3 tbsp ground nut oil

3 banana shallots (or 2 medium onions), finely sliced

1 tsp salt

2 lemongrass, outer leaves taken off and both ends and then bashed gently with a rolling pin

1 heaped tsp of ginger paste

1 heaped tsp of garlic paste

2 small red chillies, thinly sliced

3 kaffir lime leaves (optional)

1 tsp ground turmeric

200g chopped fresh tomatoes

1 butternut squash, peeled and cut into 3cm cubes

500 ml of vegetable stock

1x 400ml can of coconut milk (I find Pride is nice and creamy)

1 tbsp Thai fish sauce

1 fresh corn on the cob, corn sliced off the cob

200g fresh spinach

handful of fresh coriander, to serve (optional)

handful of fresh mint, to serve (optional)

1/4 fresh lime per portion

1.  Finely slice the banana shallots and then heat the oil in a large deep pan. When it is hot add the shallots and turn the heat down. Add the salt and stir into the shallots. Allow the shallots to soften, which will take a few minutes.

2. Add the garlic and ginger paste and stir into the shallots. Then add the chillies, lemongrass, ground turmeric and kaffir lime leaves. After a further minute add the fresh tomato and stir once again. Add the butternut squash and stir into all the other ingredients.

3. Add the stock, Thai fish sauce and the coconut milk and simmer gently for around 20 minutes, by which time the butternut squash will have nicely softened. If it needs a couple more minutes to soften adequately, carefully monitor as you do not want to over cook as mushy butternut squash is not so appealing. Add the sweetcorn 5 minutes before you wish to serve as it will take no time to cook.

4. Turn off the heat and add the fresh spinach and gently submerge in the sauce, which will wilt it perfectly.

5. Serve hot in bowls either with some jasmine rice or noodles. Add fresh coriander, mint and lime to suit individual tastes.

IMG_0840

If you click on the comments button below you will also see the option to like. I know it’s a little hidden away but have a look and don’t forget to click the *LIKE* button and if you are feeling extra brave do leave a comment as I love to hear from readers.