Embracing Autumn and Chutney Making

Autumn has definitely arrived here in England and I for one LOVE the season.

10 reasons to embrace autumn:

1) The dramatic burnt orange, golden and red leaves on the trees is breathtakingly beautiful and it always manages to impress me with its vibrant hue.

2) Kicking the crisp fallen leaves as you walk gives us all – old and young alike – that inner thrill.

3) Roaring fires to warm up by whilst drinking hot chocolate or warm apple cider.

4) Big warm jumpers to keep us roasty toasty. Everyone looks great in autumn fashion.

5) Harvest Festival, Bonfire Night, Halloween and everything that is associated with them.

6) Hearty comfort food such as casserole, stews and soups become regular staples.

7) The smell of woodsmoke – it has to be one of my all time favourite smells.

8) Foraging for blackberries, crab apples, rose hips, elderberries

9) Eating all the foods that are now in season: the above as well as, apples (cox, gala, spartan, egremont, russet), celery, endive, mussels, kale, fennel, spinach, beans, leeks, beetroot, swede, pumpkin, spring onions, carrots, turnips, cauliflower, squash cabbage (autumn, red, spring green, winter white and savoy), marrow, potatoes and parsnips

10) Making chutneys, pickles and preserves.

What do you like most about autumn? Don’t be shy, leave a message below.

Photo sourced by PicoCool 

Last year I cooked a huge batch of Kashmir chutney and sweet piccalill which made great little christmas gifts and recently I decided to make some pickled peach and chilli chutney. They were selling huge batches of peaches at the market so I thought that they would be perfect for this chutney. I tend to make double the portions of the amounts below as they last for up to 6 months so are easy to keep and store.

Pickled Peach and Chilli Chutney

Sourced from the Complete Book of Preserves & Pickles by Catherine Atkinson and Maggie Mayhew

Makes about 450g/1lb

475ml cups cider vinegar

275g light brown muscovado sugar

225g dried pitted dates, finely chopped

1 tsp ground allspice

1 tsp ground mace

450g ripe peaches, stoned and cut into small pieces

3 onions, thinly sliced

4 fresh red chillies, seeded and finely chopped

4 garlic cloves, crushed

5cm/2inches fresh root ginger, peeled and finely grated

1 tsp salt

1.  In a large pan place the vinegar, dates, sugar, allspice and mace and gently heat. Stir with a wooden spoon until the sugar is completely dissolved.

2. Bring to the boil and then add the peaches, sliced onion, chopped chillies, crushed garlic, grated ginger and salt continuing to stir occasionally.

3. Reduce the heat and simmer for 40-50 minutes – by which time the chutney should have thickened.

4. Spoon the hot chutney in steralised jars – either by boiling them in water first or putting them in the dishwasher. I place a waxed disc on top – waxed side down and then place the lid on top.

You need to store them in a cool, dark place where the chutney can mature for at least 2 weeks before eating. They will last up to 6 months.

Another great way to eat the chutney is with grilled chicken served in warm wraps or with ricotta or goats cheese and some crusty bread.

Taken just after point 2) above and before it has been cooking for 40-50 mins


Black Pepper Tofu

For those of you who are unaccustomed to eating tofu, I really urge you to give it try. Some people simply right it off as being rather bland tasting, but the fact is tofu has a fabulous melt in the mouth texture and absorbs some of the other flavours that you cook it with. Its a great vegetarian option to meat and is hugely versatile. This is my third recipe using tofu on my blog – the other two, Ma Po Tofu and Soba Noodles with Tofu I incorporate fairly regularly in our diet. This recipe is also heavenly and reminds me in fact of one of my favourite dishes of all time – black peppercorn crab – that I ate in Singapore last year at Red House  on Robertson Quay. This recipe is sourced from the Yotam Ottolenghi’s  book ‘Plenty,’ which focuses exclusively on vegetarian recipes.

The recipe itself is fairly straight forward, however, as there is a fair amount of chopping, slicing, crushing it does take a little bit of time on the preparation part. The finished dish though is totally worth the effort you put in to the preparation. I have made a number of alterations to the original as I found that when I followed his quantities exactly the pepper was too overpowering and I did not need quite as many chillies or spring onions. So it is a little toned down but see how you get on and if you prefer it with more pepper just add an extra 2 tablespoons to the 3 that I suggest below and throw in a few extra chillies.

Black Pepper Tofu

A Yotam Ottolenghi recipe adapted from his book Plenty (p44-45)

Serves 4

700g firm tofu

vegetable oil

cornflour to dust the tofu

100g butter

10 small shallots, thinly sliced

4 fresh red chillies (fairly mild ones), thinly sliced (seeds removed)

10 garlic cloves, finely grated/chopped

3 tbsp fresh root ginger, finely grated

3 tbsp sweet soy sauce (kecap manis)

3 tbsp light soy sauce

4 tsp dark soy sauce

2 tbsp caster sugar

3 tbsp coarsely crushed black peppercorns

5 small and thin spring onions, cut into 3cm segments

1. Carefully remove the tofu from its pack and cut it into large cubes, around 3 x 2cm, being careful not to break it.

2. Sieve a little cornflower over the tofu so that it delicately coats the cubes.

3. Heat  a little oil in a deep frying pan and add the tofu in small batches so that the tofu is evenly golden. Place on kitchen roll whilst you prepare the next batch.

4. Clean the pan thoroughly before adding the butter. Once it is melted add the shallots, chillies, garlic and ginger and saute on a low heat for 15 minutes so that the ingredients have softened and darkened slightly. Stir occasionally.

5. Add the soy sauces, sugar and crushed peppercorns and mix into the other ingredients.

6. Place the tofu in the pan and coat in the sauce, being careful not to break up the tofu cubes. After a minute or so add the spring onions and stir into the ingredients.

7. Serve immediately with steamed or boiled rice.

Do you have any wonderful tofu recipes that you would like to share with me? Leave a message below and let me know.


Turkish Delights and Coban Salatasi

I have just returned from two glorious weeks spent exploring Turkey’s ancient Lycian Peninsula, which is in the south west of the country, by the warm azure waters of the Mediterranean.

The area is steeped in history with numerous ruins and tombs dating back over 2000 years. I couldn’t help thinking when I was exploring  and clambering all over these ruins (no health and saftey in Turkey!) that our Stonehenge is well, how can I put this delicately, a little underwhelming, if you compare it to all the ancient Lycian ruins. In the cooler months (April and October) guided walks are on offer through Lycia taking in the ruins of lost civilizations, the flora and fauna of the mountain passes and ambling through the charming Turkish villages, many of which seemed to have stood still in time. Perhaps not an adventure to take on with small children but definitely on my to do list for the future.

Ruins of Patara 

We did however, get the chance to soak up the ruins of: Letoon, which was the main religious centre of Lycia, Xanthos – the captial city of Lycia in the late Hellenistic and Roman times, Patara – an ancient city party submerged (ready to be truly discovered) under 12km of sand dunes, Tlos with its spectacular rock tombs carved out of the rock face and Kekova – the sunken city from 2000 years ago. At Kekova you are forbidden to swim and snorkel as the treasures from the old town are there for you to see clearly from a glass bottom boat or canoe. It was quite easy to see the  pots as we sailed gently passed.


Patara’s impressive amphitheatre

Tlos amphitheatre beneath the Taurus mountains

In a bid to absorb ourselves in authentic Turkey as opposed to full on ‘tourist Turkey’, we based ourselves slightly in land, firstly in the Kaya valley and the following week high up in the Taurus mountains. Both locations where a stones thrown from the glorious beaches but far enough away so that we were able to sample another calmer, slower side to Turkey.

Cooler breezes gave us welcome respite from the coast and we enjoyed seeing how the locals pass their days.

our neighbour with her goat

On a couple of days we managed to hire a boat for the day (complete with on-board cook – result!) so that we could see the coast line from the waters and swim in sheltered bays only reachable by boat.

Pretty harbour at Ucagiz

I was amused to see a local selling ice cream from his boat, similar to the one I had seen a few weeks previously on the south coast in England. Clearly all the rage around the world!!

The absolute highlight of our time on the water was when Big A and Little Z both caught rather large fish at the same time. We were all so thrilled by this, even the Captain was impressed as I think he did not think they would catch anything using the hand held real as opposed to a rod. We took them to the local town where they gutted and grilled them for us so that we could have them for lunch. It was great for the girls to see the full cycle of catching a fish and then having it washed, cleaned and gutted before being grilled and then eaten, all within a couple of hours of being caught. Wonderfully fresh and we all agreed, very tasty. We weren’t too sure what the fish were exactly but they tasted delicious and the girls were delighted at being such able fisherwomen. Definitely a life long memory.

The morning’s catch!

When abroad I always enjoy discovering the different local foods and dishes on offer, as well as the spices and herbs that are commonplace.

At the spice market I bought: pink peppercorns, sumac, pul biber  (dried flaked pepper), dried mint tea, a marinade for fish

Turkey is bountiful with wonderful fruit trees bursting with offerings, some ready now – such as figs, grapes, peaches and cactus fruit (prickly pears) and others not quite ready for a month or two – namely pomegranate. I discovered the carob fruit that was completely new to me but I immediately took a liking to its sweet chewy undertones.

Carob fruit in centre of photo – they look like large vanilla pods.

I discovered that it has been cultivated for over 4000 years and that is also known as ‘St John’s bread’ or ‘locust bean’ as the pods were mistaking thought to be the ‘locusts’ eaten by John the Baptiste in the wilderness – although this was proved to be wrong as he ate migratory locusts. It has a honey taste to it and is in fact used as a substitute to sugar. I am certainly going to seek out the powder form and try baking with it this autumn – watch this space. Another interesting fact is that the beans are ground down to make a cocoa substitute, that although slightly different tasting, has a lot less calories and virtually fat free. It is also packed with vitamins (A, B, B2, B3, D). Check out this website which will tell you in more details about the carob fruit’s benefits. I also like John’s youtube summary of the fruit. I would love to grow a carob tree here in the UK, but I fear that our sporadic sun shine may not help it thrive like the ones in the Mediterranean and in California.

The girls discovered a new treat known as ‘gozleme’, which is basically Turkey’s answer to an Italian calzone. The dough is rolled out on a round surface and then half of it is stuffed with a contents of your choice – we liked spinach, feta and potatoes and then folded over to create a crescent. This is then put onto a hot circular surface that is heated underneath by an open fire. The whole process was mesmerizing to watch and the finished snack was polished off in no time at all.

Preparing our gozleme

As the weather was ridiculously hot, salads became a staple at meal times. The most popular salad in Lycia seemed to be ‘Coban Salasti’ otherwise known as ‘Shepherd’s Salad’. It appeared on every menu and is ridiculously easy to make and perfect in hot weather. The trick is to cut the vegetables up  really small – far smaller than I would normally when making a salad.

Coban Salatasi – Shepherd’s Salad

Serves 4

2 large tomatoes (or 3 small), finely chopped

3 Turkish green peppers (the long thin ones), finely chopped

2 small cucumbers, finely chopped

1/2 (half) a white onion

1 large handful of fresh flat leaf parsley, chopped

2 tbsp olive oil

2 tbsp lemon juice

salt and pepper to taste

1. Finely chop all the ingredients into a large bowl and gently mix together.

2. Add the olive oil and lemon juice and season to taste and serve.

So what have you been up to this summer? Any food foraging or discoveries in foreign lands? Don’t be shy and leave a message below, I’d love to hear from you.


Bavani’s Cinnamon and Ginger Dal (Parripu)

Very recently I was served this comforting and fragrant dal by my Sri Lankan friend, Bavani. It tasted so darn good that I immediately asked her what she put in her red split lentil dal and proceeded to cook it the following night for the toughest of critics….my husband AND father-in-law. Yes I am definitely keen and eager when I come across a good recipe! They both gave it a definite thumbs up and declared it was unlike all the other dals they eat on a regular basis.

Don’t get me wrong I love my red split lentil dal, but this one tastes so completely different that I will definitely be cooking it from time to time. It’s not a true Sri Lankan dal or parripu, as it is known in Sri Lanka, but instead Bavani’s version of lentil soup for the Western diet. A true Sri Lankan dal would contain turmeric, green chilli mustard seeds, curry leaves, curry powder etc, but I think Bavani’s alternative will definitely appeal to a wide audience. It has a gentle chilli kick and subtle cinnamon and ginger undertones, very different from my red split lentil dal which has turmeric and panch phoron.

Red split lentils are the easiest of all lentils to cook as they are cooked in 10 minutes and do not need any soaking first – so perfect for a quick meal when you are tired and exhausted after a manic day. They are also really cheap and most importantly – healthy, so perfect for the bank balance and general well-being.

Bavani’s Cinnamon and Ginger Dal (Parripu)

Serves 4

400g red split lentils

2 tbsp mustard oil (or vegetable if you don’t have mustard)

1 whole garlic bulb, peeled and sliced

1 thai red chilli, thinly sliced

2 cinnamon bark sticks

half tsp of asafoetida

1 tsp cumin powder

2 inch of fresh ginger thickly sliced

2 carrots, sliced into small cubes

1 tsp salt

fresh coriander, chopped to serve

1. Place the red split lentils in a pan and run under cold water and wash through thoroughly, using your hands, a couple of times. This is to clean the lentils before cooking them.

2. Place boiling water into the pan with the red split lentils so that there is a good inch of water above the lentils. During the course of the cooking you may need to add more boiling water if all the water has been soaked up or if you prefer the dal to be more soup like in consistency! The lentils should be cooked after ten minutes – if you place one lentil between your forefinger and thumb it should be soft to touch; the colour will also have lightened.

3. In a large separate saucepan/wok heat the mustard oil and add the garlic and red chilli and gently cook for a couple of minutes before adding the carrots, cinnamon bark, cumin powder, asafoetida and the fresh ginger. (You want to keep the ginger fairly thickly sliced so that they are easy to identify and scoop out before serving). On a low heat mix the ingredients together for roughly 6 minutes.

4. Transfer a large spoonful of the cooked red split lentil dal to the saucepan and mix together and then place all the ingredients BACK into the saucepan with the dal. Stir in throughly and add the salt – to taste.

5. Let the dal simmer for a further five minutes or until the carrots are completely soft. You may find you need to add a little more boiling water at this stage. It is not an exact science but more one of personal taste. Add a little water at a time as you can always add a little more if necessary.

 6. Before serving scoop out the fresh ginger and cinnamon bark. Serve with fresh coriander and eat either on its own, with rice or a chapati.

It also works really well accompanying Speedy Salmon Curry,  Goan Hot and Sour Pork Curry, Chicken Liver Curry, Goat Curry


Soba Noodles with Tofu, Aubergine and Mango – it’s totally addictive BEWARE!

It’s always a joy cooking for a foodie friend who eats everything and shares a similar enthusiasm for exciting flavours, textures and foods. Said friend is off to pastures new in California so I wanted to prepare a simple and yet interesting lunch that he may not have tried before, but that he was hopefully going to remember fondly.

In the last couple of years my love for tofu has grown exponentially, on average I would say I eat it once a week as a main meal. One of my all time favourite recipes – Ma Po Tofu – I  sometimes cook without the pork mince and add loads of spinach to compliment the tofu instead. I would really recommend you give this dish a go if you haven’t already, it’s absolutely superb.

Another dish using tofu, which I discovered more recently, is the one that I want to share with you today. It’s a perfect spring/summer dish bursting with colour and if the truth be told, totally addictive. Between the two of us we almost saw off a portion which Yotam Ottolenghi says ‘serves 6’. I know, I know, it  makes us sound rather piggy. Look we were hungry and it is so delicious I bet you too would have seconds or maybe thirds ;o). I think that as a main dish it’s serving is better suited to 4 than 6, unless your guests have sparrow appetites that is!

 Don’t be shy, once you’ve cooked it do write a comment below to let me know how you got on and  that you too had seconds/thirds.

Soba Noodles with Tofu, Aubergine and Mango

Adapted  from Plenty by Yotam Ottolenghi

Serves 4-6

120 ml rice vinegar

40g caster sugar

1/2 tsp salt

2 garlic cloves, finely chopped

1/2 red chilli, finely chopped

1 tsp toasted sesame oil

1 lime, zest and juice

300ml sunflower oil

2 aubergines, cut into 1cm dice

396g firm tofu, cut into small cubes (a little more or less is fine so don’t worry about getting exact amount)

250g soba noodles

2 ripe mangoes, cut into strips or dice

small handful of Thai sweet basil, chopped

handful of fresh coriander, chopped

1 small red onion, finely sliced

1. To prepare the dressing warm the vinegar, sugar and salt in a pan for a minute so that the sugar dissolves. Remove from the heat and add the chilli, garlic and sesame oil and leave to cool. Once it is cool add the lime juice and zest.

2. In a frying pan heat up  half the sunflower oil and gently fry the aubergine in batches. To save time I cooked the aubergine in two frying pans cooking simultaneously. When they have bronzed place on kitchen paper to cool.

3. Using the remaining sunflower oil (if necessary – you may have enough left from cooking the aubergine!) gently heat up the tofu and cook until it has a crispy light brown appearance. This should take 6-8 minutes. Similar to the aubergine place on some kitchen paper to soak up some of the oil.

4. Heat a pan of boiling salted water and cook the soba noodles for around 5-8 minutes, stirring occasionally. Drain and rinse under cold water, shaking off as much excess water as possible. Place on a tea towel to dry.

5. In a mixing bowl toss the noodles with the dressing, mango, aubergine, herbs (save a few to scatter on top when serving),  red onion and tofu. Transfer to another serving plate/dish. You can eat immediately or set aside for a couple of hours.

The dressing resting whilst I prepare the rest of the ingredients (above)

The final result (below)

SaveSave


Garlic Roasted Butternut Squash, Lentil and Feta Salad

Butternut squash are one of those wonderful fresh ingredients that you can buy and store for a reasonable amount of time. I haven’t tested their longevity as such, but I know that they are fine for at least a month. (Any other educated guesses then let me know?)

If you can get past the fact that peeling them can be a bit labourous at times, you are treated to a sweet tasting, vibrant and versatile vegetable that generally passes muster with most people. It’s generally not one of those vegetables that people are known to turn their noses up at, unlike perhaps this, so it’s a great vegetable to feed the whole family. It’s bright, vivid colour is clealy a mood enhancer and with all this terrible weather we have been having lately, I welcolme it wholeheartedly into my cooking.  

I love all manner of lentils and pulses and cook with them most days in some capacity. This dish I cook in bulk and then eat over a few days. It stores well in the fridge, although I tend to keep the feta seperate until ready to serve, as I find it tends to crumble if I mix it in too early with the other ingredients. As with all my recipes if you are feeding it to your young children I omit the chilli.

The dish has some wonderful flavours going on, that combined together works really well. I sometimes add pomegranate seeds and had planned to put them in, but somehow managed to forget this time around. So if you fancy throwing in another bright colour to make the dish even more cheery and summery then add some pomegranate seeds.


 Garlic Roasted Butternut Squash, Lentil and Feta Salad

Serves 6

250g lentils

8 garlic cloves, chopped

1 butternut squash, peeled and cubed

3 tbsp olive oil

1 red chilli, finely chopped and deseeded

200g feta

1 small red onion, finely sliced

handful of fresh parsley

2 tbsp pomegranate seeds (optional)

2 tbsp red wine vinegar

2 tbsp sherry vinegar

1 tsp sugar

1. Preheat an oven to 180 degrees.

2. Peel a small/medium sized butternut squash and cut into bite sized cubes. Place on a baking/roasting tray along with the chopped garlic cloves. Using your hands cover the cubes and garlic with olive oil.

3. Place in the oven and leave to cook for 40 minutes.

4. Rinse the lentils in cold water to give them a good clean and then place them in a pan with cold water so that they are well covered and leave on a medium heat for 20-25 minutes (see packet for details). They should be nicely softened by this stage. Drain and leave to cool.

5. Finely slice a small red onion and red chilli (de-seeded if you prefer it less hot) and cut the feta cheese into small cubes.

6. In a small bowl mix the red wine vinegar, sherry vinegar and sugar and season to taste.

7. Gently mix all the ingredients, aside from the feta, together in a bowl first. Serve sprinked with feta cubes and a generous portion of chopped flat leaf parsley.

Serve at room temperature.

As the feta is so naturally salty you will probably find that you do not need to season with extra salt.


Chickpea Curry with Tomatoes, Spinach, Fresh Mint and Coriander

After a full on Monday there is nothing more exhausting than having to cook a long and complicated recipe for supper. So I always try to cook something healthy, tasty and speedy in equal measure. I have always loved the taste of chickpeas and find they compliment so many dishes, but for this dish they feature as the main ingredient. There are so many good chickpea curries I was in a quandary on which to show you first, but settled with this one as it can be prepared and cooked within 15 minutes. Seriously it is so fast you’ll impress even yourself. The fresh mint and coriander, whilst not usually paired together, compliment each other well in this dish as the mint gives a sweet undertone that balances really well with the bold coriander and all the other Indian spices.

I cook this curry using canned chickpeas (shock horror), which will save you having to soak them overnight and boil them for an hour or two. Whilst the curry is perfect to eat on it’s own, if you want to make more of a feast you could cook this delicious salmon curry, which also takes no time at all. I will be eating mine with some wholemeal pitta bread, a dollop of natural yoghurt and squeeze of lemon. Simple and yet satisfying, I hope you agree.

Chickpea Curry with Tomatoes, Spinach, Fresh Mint and Coriander

Serves 2 (as a main meal or up to 4 if having other dishes)

1 tin of drained chickpeas

2 tbsp ghee (or ground nut/mustard oil)

2 green chillies, chopped

1 onion, chopped

2 garlic cloves, chopped

1 tsp ground turmeric

1 tsp paprika

1 tsp garam masala

1 tsp ground cumin

1 tsp ground coriander

2 large tomatoes, chopped

1 handful chopped fresh mint

1 handful chopped fresh coriander

2 handfuls of fresh spinach

1 tsp salt

50ml boiled water

1. Heat the ghee/oil and when it is nicely hot add the chopped onion, garlic and chillies. After a few  minutes, when the onions are beginning to brown slightly, add the ground turmeric, ground cumin, ground coriander, paprika (I use this hot paprika one I mentioned in this blog post) and garam masala and stir into the onions, garlic and chillies. Leave to simmer gently for another minute.

2. Add the chopped tomatoes, mint and coriander and again stir into the other ingredients. The smells coming from your pan will be heavenly!

3. After draining the chickpeas add them to the curry and stir in thoroughly. As the curry will seem a little dry at this stage, add the boiled water and stir into the ingredients. Leave to simmer for a few minutes.

4. Add a couple of handfuls of fresh spinach and stir into the curry. Once it is wilted (this will only take a minute) leave the curry to simmer for a couple more minutes. If you think it is still a little dry just add a little more water. Add the salt and stir into the curry before letting it rest for a short while before eating. Equally you can cook it earlier in the day and simply reheat it when you are ready to eat in the evening, although you will have to add a little boiled water when you re-warm it.


Indian Style Tomato Chutney

I adore condiments with my food no matter what the origin of the food. Chutneys, mustards, jellies, pickles, dressings – you name it, I love to have the option of having them on my plate supporting the meats and/or vegetables and giving the dish that extra added dimension. So you can just imagine how in heaven I was when Mr B’s grandmother, known as Dida, cooked this simple tomato chutney for us when we visited her in Kolkata a while ago. We were all given a little bowl of the chutney to eat alongside our dal and vegetable dishes and it tasted sublime. The combination of hot and spicy with sweet undertones  made the chutney completely addictive.

Tomatoes are to me what I imagine chocolate is to many people. I could give up eating chocolate tomorrow, but tomatoes……well that would be seriously hard. In fact for Easter my parents gave me a tomato plant instead of a chocolate egg, knowing that I would get more enjoyment out of that than a chocolate egg.  I eat tomatoes pretty much everyday and without doubt they are my absolute favourite fruit as they are just so versatile and can completely transform dishes. If you have any tomato recipes that you think I would like please send me an email to chilliandmint@gmail.com as I would love to try them.

With this recipe you can keep it simple and just use tomatoes, but I like to add a little dried fruit so as to blend the flavours. You can add a couple of dried prunes, dates, apricots or mango. Experiment and see which you like to compliment with the tomato.

Dida cooks her chutney without the tomato skins on, however, for speed and because I don’t mind them, I have left the tomato skins on. If you prefer a smoother texture then simply boil the tomatoes in a pan of boiling water for five minutes and then strain them and you will find the tomato skins easily come away from the body of the tomato.

Indian Style Tomato Chutney

Makes 1 bowl, 4-6 servings

300g tomatoes, chopped in half if using cherry and quartered if using larger size

1 inch of ginger, grated or chopped finely

2 dried red chillies

1 tsp black mustard seeds

1 tbsp olive/mustard/nut oil

1/4 (quarter) tsp salt

4 tsp sugar (to taste)

3 slices of Aam Shatwa (dried mango), or dried apricots, dried prunes, dried dates – optional

1. Warm the oil in a pan and when it is hot place the two dried red chillies into the oil. You want to fry them until they turn black, which will take a few minutes. For those of you who have seen or made my homemade mango chutney you will remember that frying the dried chillies will make you cough. My mother-in-law assures me that it helps those with nasal congestion, so if you have any issues in this area get involved at this part of the recipe as it is sure to help your ailment!

2. When the dried red chillies have blackened add the remaining ingredients and stir. The tomatoes will release juice as they warm in the pan. Squash the tomatoes with the back of a fork so that they become limp. Taste the chutney and add extra sugar if required.

3. Leave to simmer for 5 minutes, or until the tomatoes have completely softened and then transfer into a bowl to cool. Serve at room temperature.

SaveSave


Coriander Leaf Fritters – Dhone Pata Bora

I know that coriander leaves (cilantro for my lovely US/Canadian readers, dhone pata for my equally lovely Bengali readers) divides opinion, but I for one admire the herb for it’s wonderful, bold and punchy flavour. I find it really adds the perfect kick to a dish and brings it alive.

For this dish, or perhaps that’s a little bit grand to call it a dish as it ‘s more of a tasty snack, has coriander as the main ingredient. It takes centre stage and while they might not look that exciting, they taste really good and are prefect nibbles if you have friends popping over or if you are feeling the need for an original snack.

We’ve been having a roller coaster of weather conditions over here in the UK, with sun-rain-hail-thunder-lightening-rainbows all in one day, so outside play action for big A and little Z has been only temporary. Inside the house we get creative in all manner of ways, and cooking little delights is something we enjoy doing together. These bite sized fritters are easy to prepare and the girls love to help me put them together. We make an extra batch for them, without the chilli, but for a more mature, adult palate I add lots of chilli.

So here are the main fresh ingredients you need to make the fritters:

Coriander Leaf Fritters – Dhone Pata Bora

serves 2-3 (double/triple for larger quantity)

large handful of fresh coriander leaves/cilantro leaves/dhone pata, chopped

1 shallot, finely chopped

1 inch ginger, grated or finely chopped

2 small green chilli, finely chopped

half tsp of salt

3 tbsp plain or gram flour

3 tbsp water

splash of oil (I use mustard oil)

1. Finely chop all the fresh ingredients and place in a bowl along with the flour (I simply used plain instead of gram this time), salt and water. Add the water a little at a time so that the fritters are not too moist. If they do become too moist simply add a little more flour to bind them together.

2. Mix well and roll into small balls in your hand and then gently press down so as to flatten them, so that they look like this:

3. Heat the oil in a pan and when it is hot gently place the fritters into the oil and fry on a medium to low heat for a few minutes. When the undersides have darkened turn them over and let the fritters cook throughly on the uncooked side. The cooking time should not take much more than 5 minutes.

4. Serve and eat immediately. They also word well with dal and rice if you want to make more of a meal out of them.


Lazy Florida days and a healthy option omelette

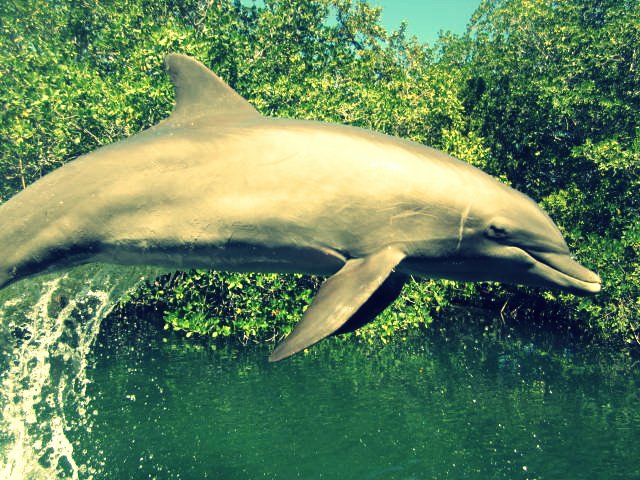
We have now returned from 10 blissful days in the Florida Keys and Miami. Nine hours on a plane transported us to the depths of summer where the sun shone and a gently cool breeze drifted off the Atlantic Ocean and the Gulf of Mexico, giving us a little respite from its warm rays . I’d been to Key West once before but had flown directly onto the island so had not fully grasped how spectacular the drive from the Everglades to the southern tip of Florida – Key West – actually was. There are over 1700 islands in the coral archipelago that makes up the Florida Keys, but only 43 are inhabited connected by bridges, the most spectacular being the seven mile long bridge. We stayed on the beautiful Islamorada and whiled away the days swimming, snorkeling, sea kayaking, seeing dolphins and fishing from the jetty.

A coral reef stretches to almost as far as the eye can see and this coupled by bath warm still waters provided the perfect sea for the whole family to feel safe from deep swells.

We spent a leisurely day driving up to the tip – Key West – and back to Islamorada. Key West seemed to have expanded  somewhat since I was last there 18 years ago, as you would expect, but step off the touristy Duval Street on to the side streets and you will find the the beautiful weather boarded houses covered with bougainvillaea which have remained the same since the days of Ernest Hemingway. The pace of life is slow and it doesn’t take long to feel the stresses of everyday life lift off you when you spend time in the place.

Being only 90 miles from Cuba, therefore closer to Cuba than Miami, the island definitely has more of a Caribbean than American air to it. Many Cubans moved permanently to Key West from the 1860’s  following the ‘Ten Year War’ and with the Cubans came the arrival of the rooster (due to their love of cockfighting), to the extent that today virtually every street has a rooster wandering down it. Cockfighting was outlawed in 1970 but the roosters have remained free to wander at their will around the streets.

Mr B and I ate one of the most delicious lunches whilst in the US at a place called Mangoes, a ‘Tuna, Crab and Avocado Tower’. It was absolutely divine, seriously off the charts. It consisted of  tuna tartar, blue crab, layered avocado, plum tomato, cucumber, field greens and arugula (or rocket for us Brits!) and finished with a tomato vinaigrette and scallion infused oil.  I am going to have to replicate a similar dish and put it here on my blog in the future. Fresh, healthy and delicious what more could I ask for !

Half way through our holiday we said our goodbyes to the Keys and headed to Miami, a city that none of us had visited before. I had high hopes for the place and was looking forward to seeing its art deco district, sample fresh healthy food and soak up the atmosphere on South Beach. I can honestly say that Miami totally lived up to our high expectations. OK, it’s not going to compare to the likes of Rome or Florence for history and culture, but for flamboyance, flair and basically great fun, it definitely rocks.


The pulse of the place is electric and it’s definitely a place that promotes healthy living. South beach is stunning and stretches for miles and all day there are joggers, cyclists, skate boarders, roller bladders and walkers using the board walk that runs parallel to the beach. The beach is exceptionally wide owing to the fact that the part nearest the board walk has concrete underneath with sand on top, which gives it an easier surface to jog for those who want to run on the beach. It’s appearance however, completely blends in naturally with the rest of the beach. I was rather taken by the stunningly painted (mostly pastel shades) life guard huts that are scattered down the beach. There are 125 life guards covering 8 miles of beach and every couple of hundred meters sits another beautiful hut for them to survey the waters and swimmers within their view.

Up until the 1980’s Miami was a no-go zone for tourists, in fact it supposedly had the highest murder rate in the whole of the US. The hit TV series ‘Miami Vice’ played it’s own part at bringing around the change from least desirable city to visit to the happening, tourist magnet it is today. The series put Miami on the map and with the help of the real life cops it cleaned up it’s act. I can honestly say that I was surprised by how safe Miami – well South Beach – actually felt. There was a police presence, but not a threatening in your face kind of presence.

Food wise we ate some delicious meals but there are a few observations I thought it might be interesting to raise here.

1. Portions in the US are SOOOOO BIG. Way bigger than here in the UK. On average I would say they are twice the size. I have a good appetite but even I found the portions to be far too large to be considered healthy for a grown adult. I realise that ‘doggy bags’ are common place in the US, less so here in the UK, and that most people like to take home the food they cannot eat. Just an idea, but why don’t restaurants serve smaller portions, charge less, and then the diners can finish all their plate without having to take home a ‘doggy bag’. Does everyone really like leftover brunch? As far as I could see there must be so much wasted food in the US. Also as the population is growing in girth it might be advisable for restaurants all over the US to join together and serve smaller portions so that the next generation do not have to deal with such first world problems as obesity.

2. Oranges come from Florida right? They even have them on their number plates, so you would expect that a fresh orange juice in a restaurant/diner would be pretty cheap. Oh no think again. Fresh orange and apple juice were so much more expensive than all the fizzy sodas that it is no wonder that people chose the unhealthy option if they are strapped for cash. We went to a few diners and they always seemed to have free refill for coke, lemonade etc, but never the healthy options such as fresh orange or apple juice. I found it rather off putting seeing grown adults drinking pint sized glasses of coke with their breakfast.  Also ordering a fruit salad for breakfast was always so much more expensive than ordering the unhealthy options.

3. Seeing Cops eating in diners was new for us. In the UK you would never see this. It’s not that they don’t eat when on duty – I am sure they do – but you never see a bunch of them chilling out for an hour or so eating a large fry up. I’m not saying this is a good or bad thing, just an observation we made.

4. Average steak size in the UK is 12/14oz. In the US it’s 22 oz. This tells you something right?

5. We had a fun brunch at ‘The Big Pink’ in South Beach, but a 5 egg omelette is just a little too much for one individual. A healthier option and one that was prepared for me when I was staying in Islamorada is the following and is without out doubt the tastiest and healthiest omelette ever. Seriously try it out and let me know what you think.

 Egg White Omelette with Fresh Spinach, Goats Cheese, Red Onion and Tomato

serves 1

3 egg whites, whisked

half a small red onion, chopped

half a medium sized tomato, chopped

small handful of fresh spinach

1 tbsp crumbled goats cheese/feta

olive oil

pinch of salt (optional)

1. Warm a pan/skillet and then add a little oil and the chopped red onion. Fry for 2-3 minutes before adding any other ingredients.

2. Add the tomatoes and spinach and after 10 seconds add the whisked egg whites, goat cheese and pinch of salt (optional).

3. Continue to whisk gently for up to a minute or just before the eggs set so as to make the omelette fluffy. Using a spatula press down lightly so as to bind the omelette together.

4. Gently fold over half the omelette using a spatula to create a half moon shape and again press down lightly for 20 seconds.

5. Tilt the pan/skillet and transfer omelette on to a plate.

6. Eat immediately, with a scattering of fresh spinach leaves on the side.