Som Saa – restaurant review

img_2947

I am not going to beat around the bush. If you love spice and heat – and let me just stress the latter, HEAT – then stop what you are doing right now, make an excuse that you have to leave whatever you are doing and get yourself down to Spitalfields  – 43A Commercial Road to be precise. At this address you will find a little white sign with black writing on it with the words Som Saa. Go in and if you find yourself there at lunch time, you might just be lucky enough not to have a wait before being shown to your table.

img_2946

This Thai restaurant, opened earlier this year by ex Masterchef 2009 finalist Andy Oliver, Mark Dobbie, chef from now closed Michelin starred Nahm restaurant in Knightsbridge and Pok Pok in New York and front of house, Tom George, will more than knock your socks off. I had gone with really high expectations after hearing all the hype and had half expected them to be crushed after my visit. It’s normally the case when a play/book/film/restaurant get’s over hyped you feel a real crushing blow that it really wasn’t that good, but with Som Saa it is a whole different story.

img_2944

The seed for Som Saa was planted a couple of years back when they ran a pop-up (of the same name) at Climpson’s Arch in London Fields. This ran for a year and began to get so much of a cult following that leveraging into a permeant bricks and mortar site was an obvious transition. They had had the chance to try out a range of dishes on punters and had leaned valuable lessons on what worked and what needed to be fine tuned. They raised their capital through crowdfunding raising a staggering £700k in 4 days.

img_2954

They wanted their new residence to have the same feeling and vibe of the old Climpson’s Arch and although I did not get to experience it, looking at the architecture it has the exposed brick arches, rustic, tables chairs and flooring that I can only imagine is not too far removed from their pop-up days. There is a small window looking onto the kitchen itself, with incredible smells wafting it’s way around the restaurant.

img_2950

Similar to another recent great find – Gunpowder – Som Saa’s lunchtime menu is short but perfectly formed. I much prefer short menus as the offering is always far superior and the food far fresher. My companion and I opted for the following:

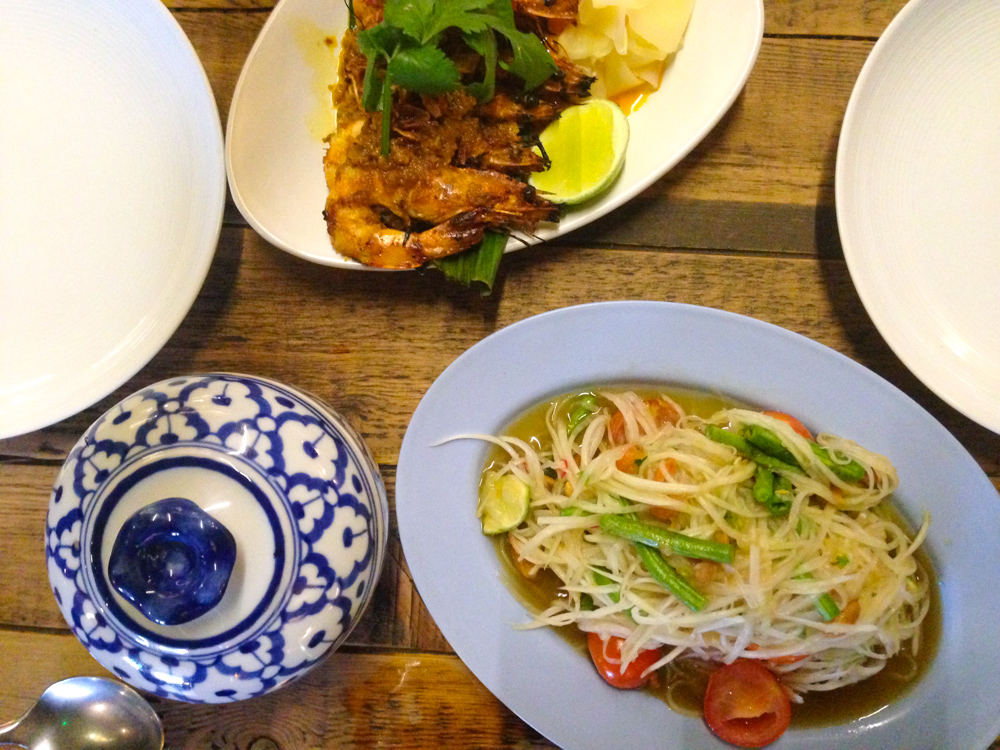
gung golae – grilled prawns in a southern style coconut marinade

som tam thai – Bangkok style green papaya salad with snake beans, dried shrimp, peanuts and cherry tomatoes (they can make this vegetarian if you wish)

gaeng hung lay – Burmese style curry of pork belly and shoulder with pickled garlic and fresh ginger

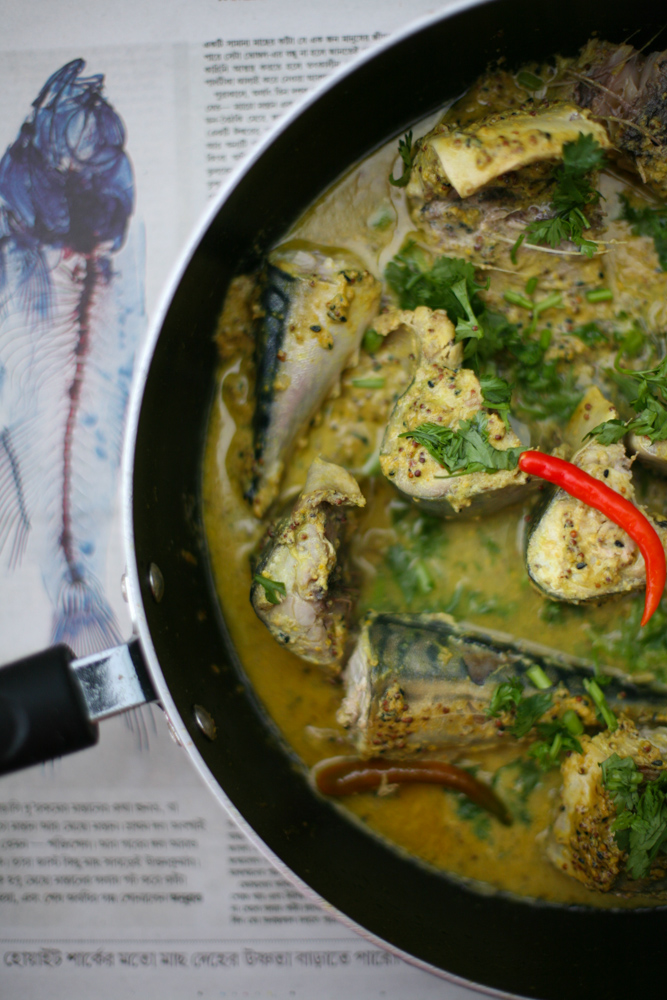
gaeng baa pla – jungle curry with family fish, thai aubergines, holy basil and wild ginger

khao hom mali – jasmine rice

It’s no exaggeration that every dish was punch-the-air fabulous. Seriously they did not even slip up on one dish. Papaya salad is always a good indicator of whether the restaurant will be any good and even that was delicately balanced with the necessary zing and heat.

I loved the look of all the menu, but felt that this was more than enough for a midweek lunch. Apparently the evening offering offers a few extra dishes, but I would go back in a heart beat and eat the same again and perhaps alternate with a new dish on every visit. I skipped dessert, as I invariably do, but I have been reprimanded by one of my instagram followers who insist I am missing out and that I must ‘give them a try’. I also didn’t take advantage of the interesting cocktails – ‘day by the pool (yes please ;o) – prosecco, jasmine tea, gin, creme de violate, lemongrass cordial, but with school runs to rush too I really couldn’t.

Som Saa is a rare Thai citrus fruit that has, apparently, an incredible flavour and can be found in old Thai recipes. Thompson describes it as a “metaphor for the restaurant” in that he wants to “introduce diners to new tastes”. It is time to move on from the dumb down version of Thai food that we have all grown up with and to experience a more authentic Thai experience.

Som Saa

43A Commercial Street

Spitalfields

London

E1 6BD

lunch: tue-fri: 12-2.30pm

dinner: mon-sun: 5-late (last orders 10.30pm and 10pm on Sunday)


Chermoula – North African Marinade

IMG_1855

Stuck for marinade or rub ideas? Or perhaps you simply want a tasty relish to go with some grilled or BBQ meat or fish. Chermoula is the answer, seriously it is sooooooo good you are going to be doing a happy dance once you’ve prepared and tasted it. Trust me.

IMG_1854

This tasty Moroccan herb spiced marinade can be prepared within minutes and adds so much flavour and exotic notes to a dish that I can guarantee you’ll be wanting to prepare it time and time again.

IMG_1856

Chermoula is used in cooking throughout North Africa, particularly in Morocco, Tunisia, Libya and Algeria. It includes fresh parsley and coriander alongside spices such as cumin seeds, sweet paprika, cayenne pepper, black pepper, salt, saffron. These are then mixed with garlic, lemon juice, fresh red chilli and extra virgin olive oil. It really is that simple. It’s also one of those marinades that you can marinade meat or fish an hour before you cook, or serve it in a bowl for people to serve themselves. Versatile and flexible, what’s not to love?

IMG_1857

You can make it super smooth, but personally I like to have it so that you can still see bits of garlic, parsley, coriander and chilli.

IMG_1858

North African Chermoula

Serves 4-6 (double up if you are catering for larger numbers)

1 tsp cumin seeds

3 garlic gloves, roughly chopped

1 tsp sweet paprika

1/4 tsp cayenne pepper

pinch of saffron (optional)

12g fresh coriander, finely chopped

12g fresh flat leaf parsley, finely chopped

1 red chilli, seeds removed and finely chopped

1/2 tsp freshly ground black pepper

salt to taste

juice from 1/2  lemon

5 tbsp extra virgin olive oil

  1. Dry roast the cumin seeds for around 20-30 seconds to release their smell and then place them in a hand blender *.
  2. To the same hand blender add the rest of the ingredients and 2 tbsp of extra virgin olive oil. Blitz briefly with the hand blender then add the rest of the olive oil. Blitz again briefly, unless you want it super smooth.
  3. Check the balance of salt and sour and add more salt or lemon if needed.
  4. Either place in a serving bowl, cover and leave in the fridge until ready to eat or add to your meat or fish for up to an hour before cooking.

I ate my chermoula with lamb chops and a salad on the side. Perfect summer out door dining.

*or mortar and pestle

IMG_1859


Moroccan Chicken with Olives and Lemons – one of my favourite dishes to feed a crowd

IMG_2661

Cooking for 6+ guests always requires a bit of thought and forward planning. You typically want something that is relatively fuss free, that you can pop in the oven and leave to cook. I have a very open planned kitchen so if I am prepping veg, talking and raising a glass at the same time it can become a little overwhelming. I prefer to plan ahead and then enjoy my guests company once they arrive without being frantic in the kitchen.

IMG_2605

Moroccan food is a great people pleaser and tasty all year round. It’s spices are delicate, fragrant but not hot spicy; think along the lines of cumin, coriander, turmeric, black pepper, saffron and paprika. They are perfect gently marinaded and cooked with some tender chicken thighs or even some lamb. Olives and preserved lemons are synonymous with Moroccan cuisine and are key for this recipe. I need to do a post on preserved lemons so those of you who live in places where preserved lemons are hard to source you can make your own and store them.

IMG_2613

The marinading can be overnight or in the fridge or for an hour or so if you are working to a tight deadline. The part that takes the longest is browning off the chicken thighs. You want to leave them for about 5 minutes each side so that both sides are nicely bronzed. Then you place them to one side on kitchen paper whilst you prepare and cook the onions. I cook my chicken thighs in batches as I don’t want to overcrowd the pan.

IMG_2642

You can cook the whole dish on the stove, however I often find it is easier to place in a preheated oven for around 30 minutes so that the chicken thighs are sufficiently cooked and moist and all the flavours have blended together to create the most delicious of dishes.

IMG_2643

I tend to serve with spiced rice or couscous with pomegranates, slithered almonds or pistachio nuts and fresh coriander or parsley. It is always best to cook more than you need as seconds is pretty much guaranteed or if you feeding a reserved bunch then at least you have lots of lovely leftovers for another day. It’s a win win.

IMG_2668

Moroccan Chicken with Olives and Lemons

Serves 6-8

2.7kg chicken thighs, skin removed

2 heaped tbsp garlic paste

2 tsp paprika

2 tsp of ground cumin

1 tsp of freshly ground black pepper

4 tbsp of olive oil

3 medium sized white onion, finely chopped

1 tsp of saffron threads

1 tsp of ground turmeric

370g green olives, stonned

1 fresh lemon

6 preserved lemons, quartered

1.  Remove excess skin from the chicken and place in a large mixing bowl.

2. Add the garlic paste, paprika (I love using this one), cumin, black pepper and half the olive oil. Smother the chicken completely with the paste and leave covered in the fridge for a few hours, or even overnight if you are being organised.

3. Heat the remaining oil in a casserole dish or shallow pan. Add the pieces of chicken so that they are golden on both sides – this may need to be done in stages. Remove from the pan with a slotted spoon and place on a plate with kitchen roll so as to soak up the oil.

4. Add the chopped onion to the oil, add more oil if you feel it is necessary. When the onion is golden, add the saffron, turmeric and olives and let it simmer for a few minutes.

5. Pour the juice of the fresh lemon over the pan along with 200ml/7 fl oz of cold water. Add the preserved lemons at this stage. Bring to the boil and then reduce the heat and let it simmer. If you find there is too much liquid then increase the heat again to reduce the liquid.

6. Preheat an oven to 180 degrees centigrade.

7. In a couple of ovenproof dishes spread out the chicken and pour over the onion, olive, preserved lemon and juice equally. Place in the oven for 30 minutes, by which time the chicken will be sufficiently cooked and ready to serve.

8. Serve with either couscous, pomegranates, almond slithers and fresh coriander or cinnamon rice with brown lentils – both work equally well.

You can cook the chicken ahead of time and then simply heat up gently in the oven for 10-15 minutes (add a little extra water to keep it juicy) then serve.


Crispy Savoury Donut known as Medu Vada

IMG_2627I want to introduce you to a new kid in town that will seriously impress you.

Step aside donut and cronut (croissant and donut pastry) and make way for the Indian savoury donut known as ‘medu vada’. These savoury delicacies look very similar to their saccharin cousins the donut, but are filled with lots of wonderful spices instead of sugar.

IMG_2620

They are really fun to make and you can add your own twists to make them your own. They are a little bit naughty in that they are fried, but hey a little bit of fried deliciousness now and again is absolutely fine in books. They are made of urad dal – the white dal you can easily find in any Asian grocers-  that is soaked for at least 3 hours and then blended to form a soft fluffy paste.

IMG_2635

My daughters find them equally irresistible so they really are a treat for the whole family. They are typically eaten in southern India and Sri Lanka either at breakfast time or as a snack with a coconut chutney or possibly a dal or sambal. I could quite happily eat them for my breakfast but more often then not I make them for an afternoon snack with a cup of warming tea.

They are crispy on the outside and have a soft texture on the interior.

IMG_2619

My recipe makes around 13 little donuts, but if you want to make more just double up on the ingredients. There are no set rules here other than not making the dough too wet.

Medu Vada – Indian Savoury Donuts

Makes 13

175g white urid dal

1/2 tsp salt

1 medium white onion, finely chopped

1/4 tsp asafoetida/hing

1 tsp cumin seeds

1 tsp fresh ground black pepper

1/4 tsp baking powder

1 handful of fresh coriander, roughly chopped

 12 fresh curry leaves, chopped (optional)

1 green/red fresh chilli finely chopped (optional)

  1. Soak the white urid dal in a bowl covered with water for at least 3 hours.
  2. Strain the dal and place into a blender. Blend and if needed add literally a tsp at a time of water to loosen it slightly. Do not over water. You want it to have the same consistency as a fluffy light dough.
  3. Place the lentil dough into a large bowl and with your hand lift the dough, folding it over so that it gets air into it about 15 times.
  4. Add all the ingredients and mix well with your hands or a spoon.
  5. Heat a pan with cooking oil and when it is hot wet one of your hands and create a small ball (a little larger than a golf ball) and then place your thumb in the centre to create a hole through the dough. Then gently loosen the dough off your hand and place into the hot oil. Be careful when doing this as the movement from placing the dough into the pan and removing your hand needs to be super quick.
  6. Place a few donuts in the pan at once and leave them to bronze on one side for a couple of minutes, before turning them over with a slotted spoon for another couple of minutes.
  7. You are looking to get a yellowy bronze hue as opposed to brown, so be careful to watch them closely.
  8. Remove them from the pan and place on kitchen paper to soak up any excess oil.
  9. Continue to make the rest.
  10. If you are planning to serve them as a snack when friends come over simply place them in a preheated oven that has subsequently been turned off. They should stay warm for a good hour.

They are perfect to eat with a chutney, dal or sambal (see links in the body of my post).

Note: 

  • I often don’t add chilli so that all my family can comfortably eat them. For those who like the chilli kick, you can serve them with a hotter chutney, which keeps all parties happy.


Malaysian Inspired Street Food in the Heart of Soho – Sambal Shiok

IMG_1101

Soho, as a location, has always had a certain mystique and vibe completely unique to any other area in London. It’s bang central and could be described as the beating heart of touristy Piccadilly, Leicester Square, Regent Street and Oxford Street. The seediness that it had in the 70’s, 80’s and early 90’s has largely dissipated and now it is a magnet for those seeking to nourish their bellies and soul with memorable food, washed down with an ale or cocktail.

IMG_1104

Located on the corner of Beak Street and Great Pulteney Street – an intersection you’ll find at the end of London’s iconic Carnaby Street, you will find a pub by the name of ‘The Sun & 13 Cantons’. After a fire in late 1880’s, 13 Cantons was added to its name after its Swiss patrons who lived and worked as watch makers in the vicinity. Cantons, the Swiss word for counties, at the time had 12, but due to the Swiss community frequenting the pub it was charmingly given the name ’13 cantons’ as a tribute to it’s loyal customers.

The pub hosts culinary residencies, or extended pop-ups if you will, for 6 months plus, serving Indian/Asian inspired food at very affordable prices. Up until October they have ‘Sambal Shiok’ with chef Mandy Yin at the helm, tempting diners with addictively spicy Laksa Noodle Soups, Hainan Dumplings, Beef Rendang, Nasi Lemak or Malaysian Fried Chicken as well as a number of smaller starter dishes and sides. Yin grew up in Kuala Lumpur and after a two year stint feeding the masses at some of London’s markets, she made the transition to her own private residency at The Sun & 13 Cantons.

IMG_1105

I had been salivating over her Laksa noodle soups for quite some time, thanks to instagram, and with the interchangeable weather we have been having in the UK, I felt a strong need for something spicy and warming to give me that inner glow of happiness.

The pub itself was given a new lease of life in 2015 and today has Parisian inspired interiors with dark green leather banquette seating and different shades of green metro tiles and mirrors on the wall; all rather chic indeed. After deliberating on which laksa to choose I decided upon the spicy prawn and tofu. I am often suspicious when restaurants say something is spicy as they are invariably ‘Western spicy’ as opposed to properly spicy, but this laksa is dance about, super spicy. I loved it. My lunching companion, who I discovered whilst ordering is not so in favour of spice, opted for the Hainan dumplings and fried chicken with a tasty peanut satay on the side. Chicken portions were generous and more conservatively spiced, which appealed to my companion. It’s not often I get to eat fried chicken, although I do recall rather loving KFC as a child, but this fried chicken was lip-smackingly good.

Would I return, hell yes, I’ll be found slurping the laksa from time to time until the next residency starts in October.

Sambal Shiok
The Sun & 13 Cantons
21 Great Pulteney Street
London
W1F 9NG
Tel020 7734 0934

lunch 12pm to 3pm Tuesdays to Saturdays

dinner 5.30pm to 9pm Tuesdays, Wednesdays and Saturdays.

On Thursday and Friday evenings Sambal Shiok’s simpler street food menu will be available on a no reservations basis. Takeaways will be available at all times. Last orders will be at 2.30 and 9pm for each session.


Kolkata Style Mustard Mackerel Curry

IMG_2550

Bengalis love fish in a big way.  Mention ilish/hilsa or rui and their eyes will light up. In Kolkata the use of mustard seeds, mustard oil and mustard paste is used in a lot of their cooking. For this dish I have used mackerel as it is easy to source in the UK, is super tasty and is packed full of omega 3 fatty acids – the type of fats that are good for our health. For those who have been following my blog for quite a few years will recognise this recipe as I realise I posted a very similar one with bream back in 2013. You can see it here.

IMG_2539

This dish is something that can be rustled up in no time at all – from start to finish is max 15 minutes and unlike many mackerel curries, the fish is not fried. My mother-in-law cooks it fairly frequently so it has naturally become one of my staple dishes too.

IMG_2557

There is no need for onion or garlic in this dish, the ingredients are very simple: turmeric, nigella seeds, fresh chillies, chilli powder, wholegrain and English mustard and fresh coriander/cilantro. Give it a whirl and let me know what you think.

IMG_2547

Kolkata Style Mustard Mackerel Curry

Serves 4

3 mackerel, cut into 4 pieces (you can keep the head if you wish, which would make 5 pieces)

4 tbsp oil

1 tsp nigella seeds

1/4 tsp turmeric powder

4 fresh chillies, slit at the top to release some seeds

3 heaped tsp of wholegrain mustard

2-3 heaped tsp English or Dijon mustard

pinch of chilli powder – optional

75ml water

1/4 tsp salt

  1. Heat the oil and when it is hot add the nigella seeds, turmeric, chilli powder followed by both mustard pastes and the fresh chilli. Move around the pan for up to a minute.
  2. Add approximately 25ml of water, salt and then add the fish. Be careful not to move them around too much as you do not want them to break and fall apart. Place a lid on the pan.
  3. After a few minutes cooking add a further 50ml water and gently turn the fish over and replace the lid on the pan.
  4. Cook for 12 minutes and then take off the heat.
  5. Before serving sprinkle fresh coriander leaves. If cooking ahead of time gently reheat the fish adding a little more water and then add the coriander leaves.

Serve with rice or Indian breads.

As a side note: this dish is fabulous to eat as leftovers the next day. I like to add a little more water, a heap of fresh spinach and a couple of tomatoes quartered. It tastes delicious.


Bengali Vegetable Curry with Lentil Kisses

IMG_2531

Lentil kisses, known as bori, are little sun dried lentil nuggets that have often been handmade and left to dry in the hot, warming Indian sun. My mother-in-law often brings me back a jar upon visiting her beloved  home city of Kolkata. They remind me of a lentil version of Hershey’s chocolate kisses – the type that visitors from the US often used to bring me and my siblings when we were young. Making bori yourself is not too tricky – there is a lovely recipe here if you are keen – if you live in a country where you can rely on warm, glowing hot sun, but as the weather in the UK is at best erratic when it comes to sunshine, it would probably be rather tricky.

IMG_2509


Whilst I realise not everyone has a Benglai mother-law-in who can magic up bori at a whim, you can get hold of bori in London at any good Asian grocers. In Kolkata, bori is also cooked with fish dishes or with greens, but today I wanted to show you a simple recipe that uses up vegetables that you are likely to have in your fridge. It makes for a very satisfying and enjoyable vegetable meal that is perfect eaten on it’s own or accompanied with some dal, rice or flat breads.

IMG_2512

Good luck in your quest for lentil kisses. They are seriously not that hard to seek out. Let me know how you get on.

IMG_2530

Vegetable Curry with Lentil Kisses

1 large handful of bori (lentil kisses)

2 tbsp groundnut oil

2 small dried red chillies

1 tsp panch phoron

1/2 tsp turmeric

1/2 tsp chilli powder, optional

2 carrots, cut into bite sized chunks

3 medium sized potatoes, quartered

1/4 of an aubergine, cut into bite sized chunks

2 tomatoes, finely diced

1 tsp salt

to serve

1 handful of fresh coriander

  1. Heat a tablespoon of oil (or thereabouts) in a pan and when it is hot add the dried chillies and allow them to blacken a little, this will take no longer than a minute, but may make you cough a little so beware!
  2. Add the panch phoron which will begin to fizzle almost instantly. Then add the turmeric and chilli powder (if using the latter) and add the chopped carrots and potatoes. Move around the pan, lower the heat add a couple of tablespoons of water and place a lid on the pan and leave for 15 minutes, stirring at intervals.
  3. Meanwhile in a separate pan add another tablespoon of oil and when it is hot add the bori/lentil kisses so that they bronze slightly in colour. This will only take a few minutes, if you keep moving them around the pan. Remove them from the pan with a slotted spoon and place on a plate with kitchen roll.
  4. In the main pan now add the aubergine, salt and fresh tomatoes and stir into the other ingredients. Add a little more water to help soften the ingredients, but not too much as you do not want the sauce to become too runny. Place a lid on the pan and leave for another 10 minutes.
  5. After 5 minutes check to see if the potatoes and carrots are softening. Add the bronzed bori and gently stir into the vegetables. Place the lid on the pan and leave for a further 5 minutes or until the potatoes and carrots have softened sufficiently.
  6. To serve add freshly chopped coriander.

It is wonderful to accompany with some dal and rice or Indian flat breads.

IMG_2517


Coconut, Coriander and Mint Cod and an exciting competition

IMG_9515Being an island nation we tend to be more conscious of our seas and the fish within them than perhaps landlocked countries. That said I have always wondered why, like the Japanese, we don’t eat more fish in our diet. Growing up my parents would always have fish on Friday, which was pretty typical of Christian families of their generation. Today however, I don’t wait for Friday to have fish and on average we probably eat seafood a couple of times a week.

IMG_9511

I try to be as innovative as possible (see here for my post on foraging for cockles)  in the way that I prepare and cook it. Grilled or baked fish with a squeeze of lemon or fish pie is all very delicious but there are so many other ways to cook seafood that I hope the recipe that I will show you today will encourage you to give it a try and that it will become part of your culinary repertoire.

Recently I was contacted by LOAF App, (short for ‘love of all food’),  to come up with an exciting recipe focusing on the theme of ‘fusion’ that will go onto the app and be part of a competition (more about that in a moment). For those of you who have not yet heard of LOAF, it is a fabulous new recipe app, that is free to download, that has a wide range of recipes from bloggers and chefs, in a standardised format that is easy to follow and replicate at home. You can even add your own recipes and share them with other users. (Write ups on the app here and here).

IMG_9495

LOAF is working in partnership with the MSC Fisheries Standard (Marine Stewardship Council) on an exciting campaign, which gets the public cooking whilst being more informed on which seafood we should be buying. As part of the competition I have focused on fish that has the MSC Fisheries Standard blue label (see photo above). My recipe is now live on the LOAF app site for you to cook at home. You then need to photograph your efforts of my recipe, put them up on the LOAF site and I will then judge the winner of who I think made my dish best. The winner will be awarded £75 worth of free food shopping from either Sainsburys (UK), Wholefoods (US) and Coles (Australia).

IMG_9498

85% of the worlds’ seafood are either at capacity or over fished. Buying seafood therefore that has the MSC blue label sticker on it is something that we all need consciously to do if we are to protect our oceans for future generations. The label tells the consumer that the seafood product you are buying is ‘certified sustainable seafood’. Fisheries are assessed to check if they are well-managed and sustainable. I urge you to look at the following Youtube video explaining the Fisheries Standard’s principles and scoring.

The standard has been developed in consultation with scientists, the fishing industry and conservation groups. Today we are all more conscious of food origin and therefore by buying MSC blue label food is a no brainer as it is fully traceable to a sustainable source. The MSC Fisheries Standard have also put together a product finder so that you can find sustainable fish and seafood wherever you are in the world. Take a look here to see how it works.

IMG_9502

So the recipe that I have come up with takes 15 minutes max to prepare and half of that is making the paste. It’s origin is from Kerala and I recently watched a similar recipe being made. I have been doing something similar for years, albeit without the coconut addition. It is steamed as opposed to baked, grilled or fried. If you want to be truly authentic you can source a banana leaf to wrap it in, failing that baking parchment works just fine. Rice would be perfect to accompany this dish. So what are you waiting for? Give it a try and post your photograph up on the LOAF app site. EASY.

Coconut, Coriander and Mint Cod 

Paste ingredients

2 large handful of fresh mint leaves, stems removed

1 large handful of fresh coriander leaves, stems can remain intact

1 tsp of fresh grated ginger

1 tsp of grated garlic

1 green chilli, finely chopped

50g either freshly grated coconut or desiccated coconut

 1 limes, juice only

salt, to taste

******

1kg cod loins (MSC blue label)

baking parchment

  1. Put all the paste ingredients together in a blender to make a fine paste. Add salt to taste at the end.
  2. Cut the baking parchment so that it wraps over the cod loin completely.
  3. Place the paste all over the top of the fish and lay it in the centre of the baking parchment.
  4. Carefully wrap the fish so that the ends are completely enclosed.
  5. Warm a frying pan (or Indian tawa if you have one) and when it is hot lay the cod parcel onto the pan. It will cook by the steam that will be created within the parcel. After 4 minutes turn the fish parcel over for another 4 minutes. If it looks as if it needs a little longer leave it for another minute and it should be ready.

Note: You can also use banana leaf instead of baking parchment. If using a banana leaf you need to hold the leaf carefully over a gas flame in a sweeping motion so that it softens. Do this on both sides and then cut it down to size so that the fish can be completely covered by the leaf.

You can bake the fish in the oven (180 degrees) for 15 minutes if you prefer but I suggest wrapping the fish in baking parchment papillote style – see here so that it does not dry out and steams itself whilst cooking.


Greek Stifado and Broth by Vicki Edgson and Heather Thomas part 2

IMG_9570


Continuing from lasts week’s post where I told you all about the book ‘Broth’ by Vicki Edgson and Heather Thomas and then made a fusion of their classic beef bone broth and rich bone marrow broth I wanted to show you a recipe from their book that used the broth as the foundation to another dish. There were so many options from ‘gulyas’ to ‘osso bucco with gremolata’ to ‘Chinese braised oxtail’ making the decision on what to cook really hard. In the end I opted for ‘stifado’.

IMG_9568It was a stew that was very similar to ones that I had eaten as a child at my maternal grandmothers, but this version was Greek and had some interesting twists that appealed to me. I liked the fact that cinnamon, allspice berries and raisins were added alongside rosemary, bay leaf and shallots. The beef broth that I had laboured over the few days previously also made the dish somewhat delicious. I also found that there was lots of broth left to freeze and use in the future. Result.

IMG_9566

In Greece, Stifado is eaten all year round and is, according to Edgson and Thomas, often a permanent fixture on the menu of most tavernas. It is often made with rabbit or veal, but since we now have rabbits as pets, rabbit on the menu at home has become strictly off limits (understandably) and I wanted to follow the recipe that was in ‘Broth’. I loved the fact that other than a brief amount of cooking on the hob, the rest can be slow cooked in the oven, freeing me up to get on with other things.

The result was a really hearty and delicious stew, where the meat was tender and flaking and the sauce rich and delicately spiced from the herbs and spices. I chose to accompany the dish with Italian orzo, which is similar, albeit slightly larger, to rice in appearance, and found in Puglia in southern Italy. Equally a crusty loaf would work well with this dish, allowing for lots of dunking of the delicious juices.

IMG_9564


Greek Stifado

Adapted from ‘Broth by Vicki Edgson and Heather Thomas, published by Jacqui Small’

4 tbsp olive oil

600g round shallots, peeled

1.5kg lean stewing/chuck steak

4 garlic cloves, halved

125ml of red wine

500ml of beef bone broth

3 tbsp red wine vinegar

3 medium sized tomatoes chopped

1 tbsp tomato puree

1 bay leaf

2 sprigs of rosemary

1 cinnamon stick

3 allspice berries

2 tbsp raisins

salt and fresh ground black pepper, to taste

orzo pasta to serve – optional

  1. Heat the oil in a casserole pan – my Le Creuset is my trusted friend – and on a low heat cook the shallots for 10-15 minutes so that they begin to bronze. Remove from the pan and set aside.
  2. Using the same pan, turn up the heat and add the beef  so that it browns all over.
  3. Then add the garlic and red wine and allow it to bubble away for a few minutes.
  4. Add the beef bone broth, wine vinegar, tomatoes, tomato puree, herbs and spices. Stir all the ingredients together well and then simmer for 1 hour OR place in a preheated oven at 140 degrees (I did the latter)
  5. Add the raisins and shallots and then continue cooking for a further 45-60 mins until the meat is tender and the sauce rich and reduced. Season to taste.

Edgerson and Thomas suggest serving with orzo pasta, which is a great idea. All in all it makes for a really wonderful, hearty dish that feeds the whole family.


IMG_9560


Keralan Chicken Stew

IMG_2208

Recently my family and I spent the day with a local Keralan family in Cochin: Lt. Col. Mathens, Moly and Philip. The intention was to spend the day with them cooking and eating so you can imagine how excited I was about this. After a good hours drive from our hotel we arrived at their house, still in Cochin but away from the old centre.

Before the cooking began we were given a guided tour of their garden, which grew all manner of spices, vegetables and fruit. They had planted this magnificent oasis themselves when they had bought the property some years before. It had been shrub land, but with such fertile soil, sunny weather and good rains in the monsoon, the vegetable garden had thrived beyond belief. There was no reason to go to the market to buy fresh produce as they had such a bounty waiting for them in the garden.

How many of the above can you recognise? Let me know in the comments box below.

We were showed at least thirty different vegetables, fruit and spices and to see them growing in their natural habitat was hugely memorable – although looking back through my photographs I cannot be certain about a couple of the plants. A return trip is necessary perhaps to further my education? Any excuse really!

After our garden tour we made our way to the kitchen where Moly explained the different dishes we would be cooking and the others she had prepared earlier that would accompany our feast.

IMG_2193

One of the dishes she showed us was her Keralan chicken stew. A couple of things that stood out with the way that she actually prepared the stew.

Firstly it was cooked on the bone, like all authentic curries should. Secondly she add the coconut milk in two stages. To begin with she added the thin coconut milk and at the very end she added the thicker, creamer coconut. The third point was that she added the thin coconut milk when some of the chicken was still pink. She did not measure anything as such, so I frantically took notes as to the approximate amount she was adding into her stew.

It does have a chilli kick to it with pepper, cardamom and clove notes resonating through the dish. By all means reduce the amount of chillies to suit your palate. I added a teaspoon of Kashmiri chilli powder, but this is not necessary and looking back in my notes I don’t believe Moly added it so for the recipe below I have omitted it although when I was testing the recipe I did add it, hence the photos have a red/orange hue to the dish. Yours will not have this in quite the same way if you follow the recipe below.

She did not measure out the coconut milk, but as it generously covered the chicken I think she must have used the equivalent of two tins of coconut milk or thereabouts. I find some brands of coconut milk have a thick creamy coconut milk at the top and a more water milk at the bottom. If you can try and get hold of these types of coconut milk.

Keralan Chicken Stew

serves 6

2 tbsp coconut oil

1 tsp mustard seeds

2 red onions , finely diced

3 garlic cloves, finely diced

7 Kashmiri chillies

2 potatoes cubed

1 whole chicken (approx 1.2kg) skinned and chopped into 10-12 pieces

1tsp cardamom seeds

4 little pieces of cinnamon bark

1 1/2tsp fresh ground black pepper

10 cloves

2 tsp salt

1 tsp ginger powder

400ml tin of coconut milk

160ml tin of coconut cream

  1. In a deep pan – I find my Le creuset casserole works well – add the coconut oil. When it is hot add the mustard seeds and move around the pan for 10 seconds before adding the onion, garlic and dried chillies. Leave to cook in the pan for 3 minutes. Keep on a medium low heat.
  2. Now add the cubed potatoes and stir into the other ingredients and allow to cook away for a further 3 minutes.
  3. Add the chicken and stir before placing the lid on the pan for 5 minutes. Some of the chicken will have whitened but do not be alarmed if some of the chicken is still a little pink at this stage.
  4. Add the cardamom, cloves, cinnamon bark, ginger powder and black pepper.
  5. Add the coconut milk and the salt. Put the lid back on the pan and allow to simmer for 30 minutes, stirring at intervals.
  6. Test to see that the potato is soft and the chicken is cooked. Add more salt if necessary.
  7. At the very end turn the heat down very low and add the coconut cream and stir into the stew. It is important that you do not let it boil as the coconut cream will split.

Serve with rice, luchi, chapati or the traditional Keralan appam.

IMG_2190