Happy New Year and Toor Dal with Fresh Coconut and White Poppy Seeds

Happy New Year and a warm welcome to my new (and old of course!) followers who have recently signed up to this blog.

January is a funny old month. The revelries from Christmas and the New Year are well and truly over and we all look forward to making a fresh start in the new year. With goals, aims, hopes and plans whirling away in our heads, it’s like shedding a skin and growing a new one. Veganuary has gained a lot of momentum over the last few years, with increasing numbers introducing more vegan recipes into their diets and some even making the transition to become fully vegan. Whilst I have no plans to ‘do’ veganuary, I naturally eat a number of vegan meals throughout the year without even really thinking about it. Indian food is heavily focused on vegetables with the large majority in India having a vegetarian diet. On this blog I have a number of recipes which would work really well if you want to bring more vegetarian or vegan meals into your culinary repertoire. Here are just a few.

Upma (a savoury breakfast semolina eaten in India)

Dale Bora (a delicious street snack from Kolkata)

Indian sprout and carrot curry

Beetroot curry

Cauliflower with dried fenugreek/methi

Black pepper tofu

Aubergine, peanut and tomato curry

Indian corn on the cob

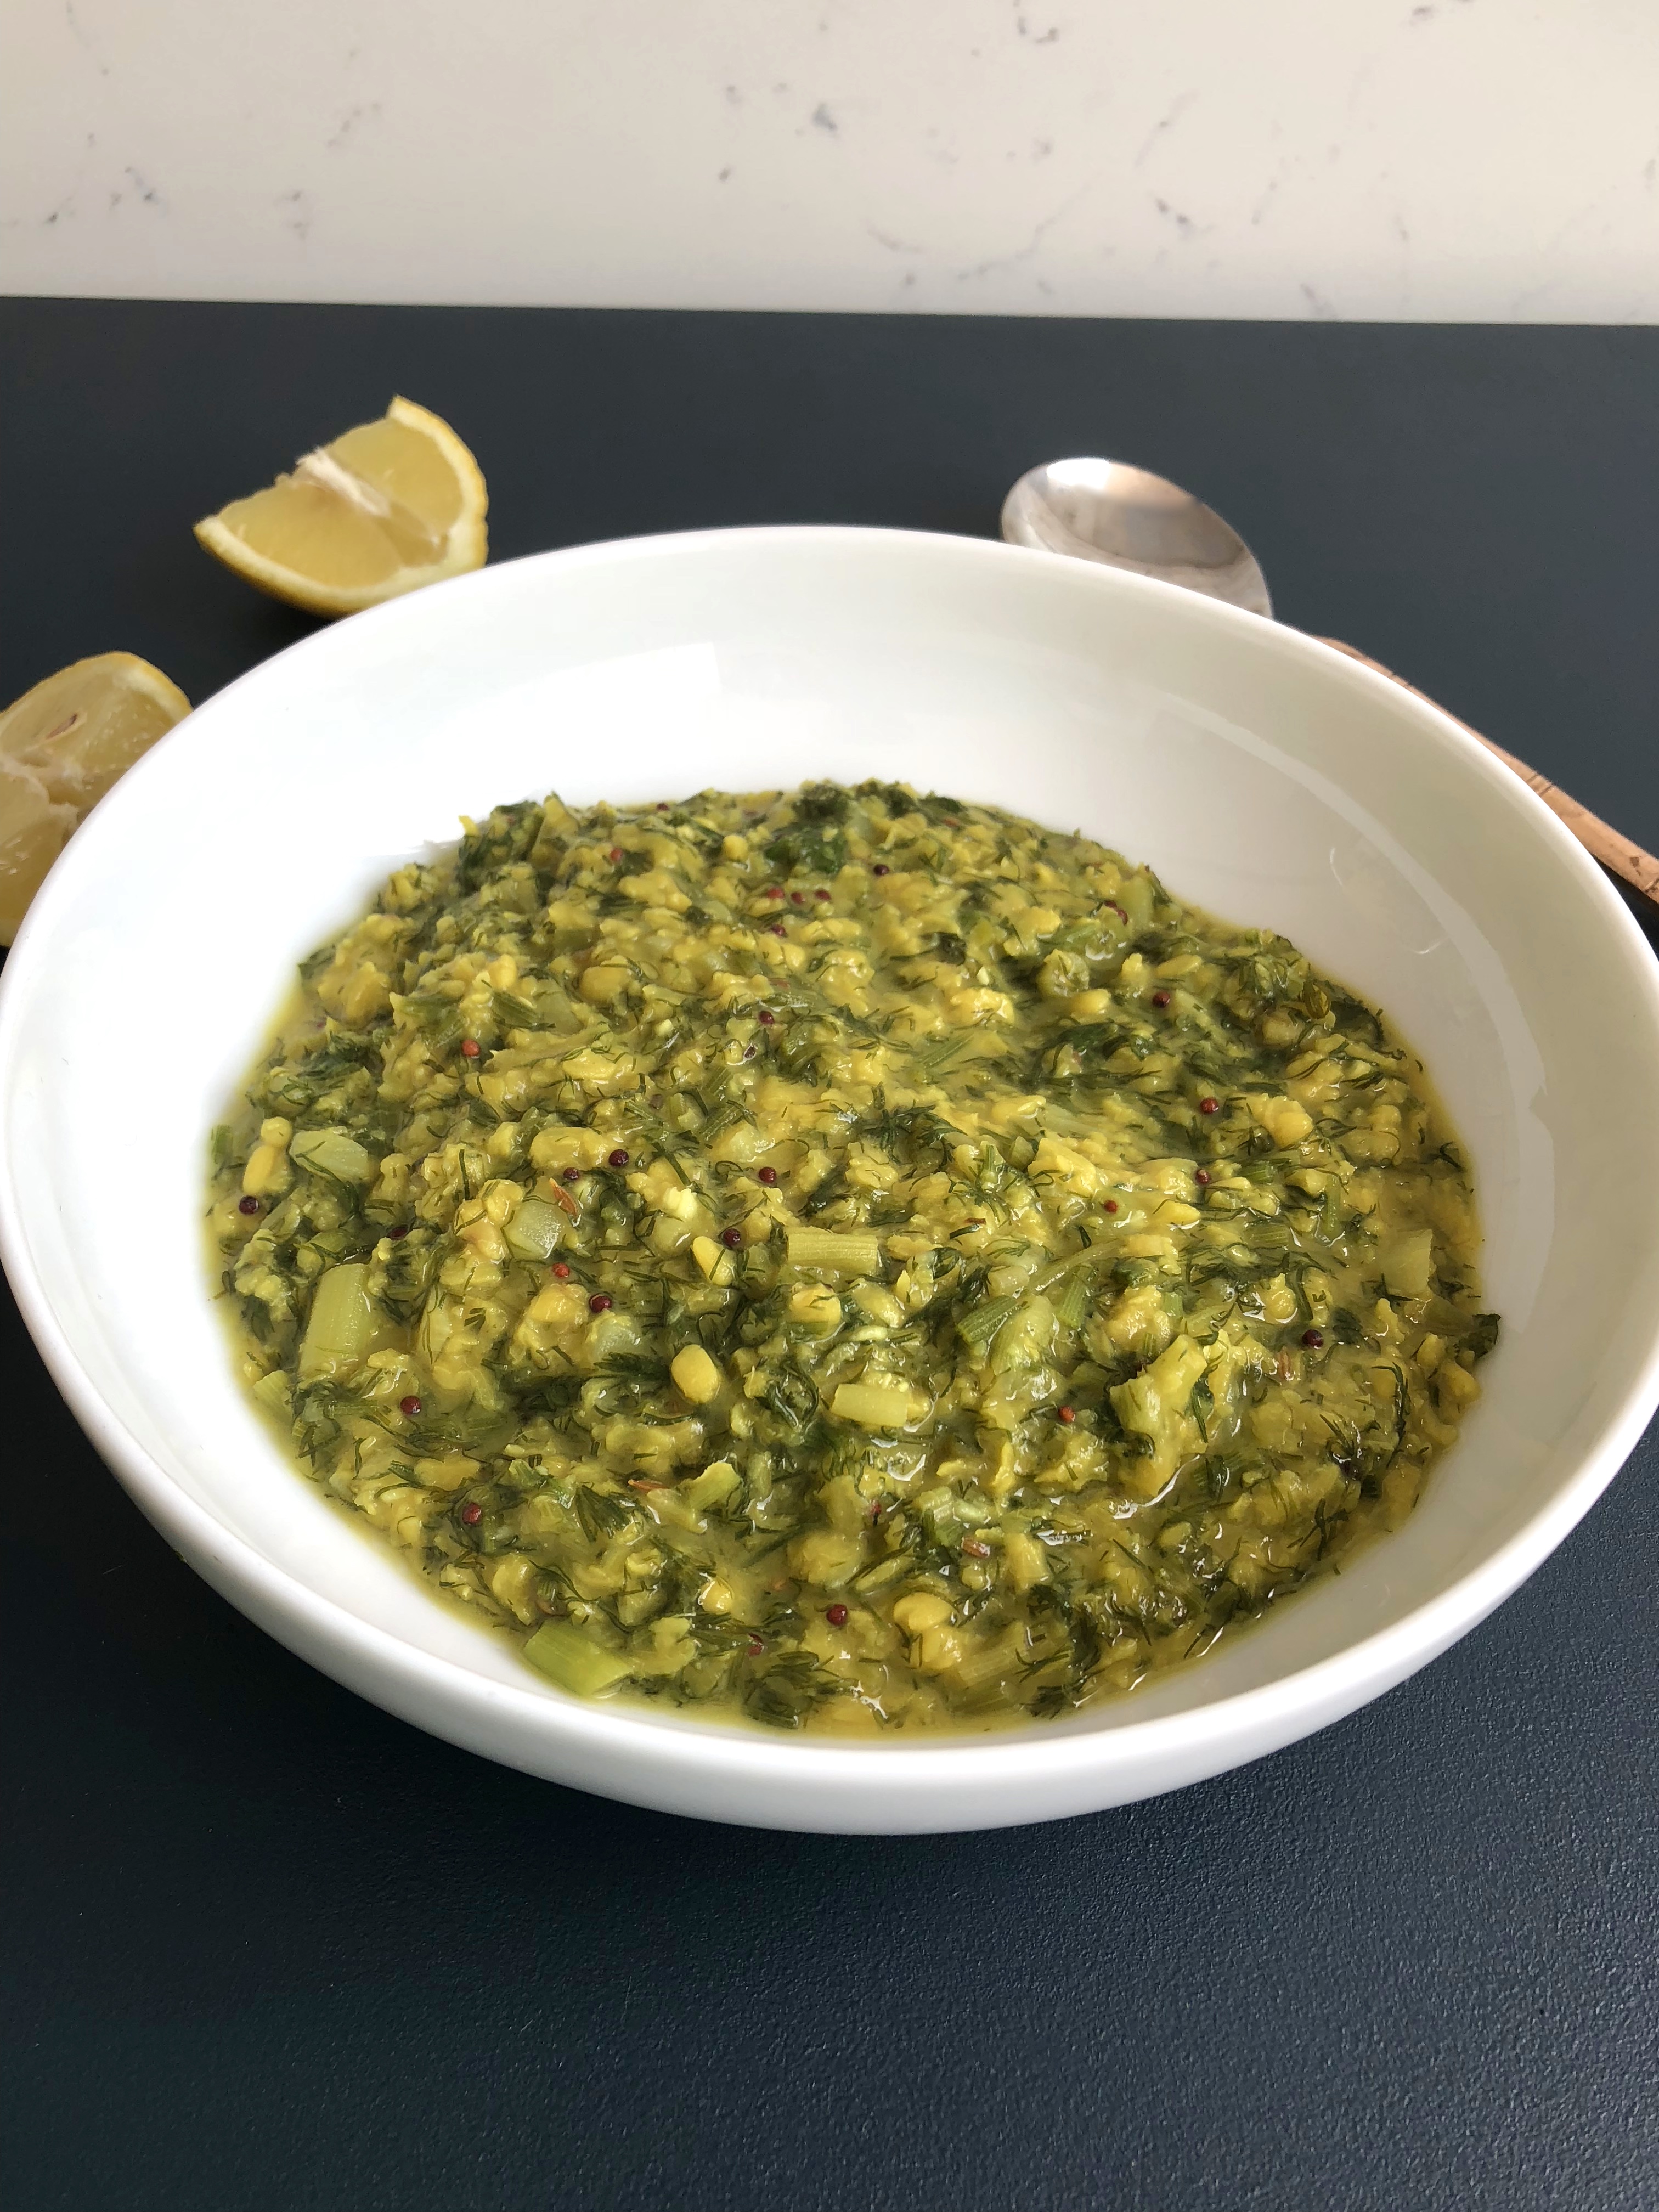
Butternut, lemongrass, coconut and spinach curry

For my first recipe for 2020 however I thought I would show you a new dal recipe, which just happens to be vegan. I have loads on my blog – just pop the word ‘dal’ in the search box on the right when you go to my blog. Dals all taste so different that I could make a different one each day of the week and they would be completely unique.

This one uses the toor dal, which is also known as ‘pigeon pea’. It looks similar to the chana dal, which is a split chickpea. You don’t need to soak it but it does take around 50 minutes to soften sufficiently if you are using the stove top. When it is gently boiling away you will need to remove, with a spoon, the scum that will form whilst cooking. You may also need to add more water if it looks to become too dry. I never measure out the water and instead go more from sight and add a little more here and there when required.

Excuse the rather dark muted photos of the dal – I cooked it in the afternoon and when I was ready to photograph the light had gone so had to use the lights from my kitchen which give it a pretty awful glow. Anyway you get the gist. I ate it along with a butternut squash curry I made and a cabbage curry mopped up with some homemade luchi – which are also known as poori. Most delicious and all coincidentally vegan.

 Toor Dal with Poppy Seeds and Fresh Coconut

250g toor dal, washed through a couple of times with cold water

900ml water

2 tbsp rapeseed/sunflower oil

1 white onion, finely chopped

30g grated fresh coconut (or desiccated)

a small handful of fresh coriander

100ml water

1 tsp cumin seeds

1 tsp brown mustard seeds

2 tsp white poppy seeds

10 fresh curry leaves (you can freeze them – much better than dried which have lost their taste)

1 heaped tsp ginger-garlic paste

1 tomato, finely chopped

1 green chilli, finely chopped

1 tsp turmeric powder

1 tsp coriander powder

1/2 tsp Kashmiri chilli powder

1/2 fresh lemon, juice only

salt to taste

  1. First rinse the toor dal and then place it in a pan and cover completely with water. Start by adding 900ml water and you can add more later once the water has soaked up. It will take around 50 minutes to soften. Scum will form on the top so just remove this with a spoon and discard. You know the dal has softened when you can easily pinch one toor dal between your thumb and forefinger. Continue to add a little more water if it has all been soaked up.
  2. Meanwhile in a frying pan, add a tablespoon of oil and gently fry the onion and the fresh coconut so that they begin to lightly bronze. Remove from the pan and then blitz in a blender with some fresh coriander and then leave to one side.
  3. Using the same pan add the rest of the oil and add the cumin, mustard and poppy seeds. They will begin to sizzle almost immediately. Be careful of the spluttering.
  4. Add the fresh curry leaves and the ginger-garlic paste – fresh or store bought. Move around the pan and then add the tomato and fresh chilli.
  5. Return the blitzed onion-coconut-fresh coriander to the pan and stir so that all the ingredients are nicely mixed together.
  6. Now add the turmeric, coriander, Kashmiri chilli powder, lemon juice and salt.
  7. Once the dal has softened turn the contents of the frying pan into the dal and mix together. Check the salt levels.
  8. Leave to simmer for a few more minutes, then you are ready to serve.


Snap Shot of India and a delicious Indian breakfast recipe – Pongal

Happy New Year to you all. I have just returned from three glorious weeks in colourful, warm-spirited India (hence my lack of blog posts). I have seen and experienced so much that it feels that I have been away for far longer. I feel uplifted and invigorated and have returned to cold chilly London with a positive outlook and excitement for the year ahead.

If you’ve never been to India then I urge you to go. It’s incredible and, like Africa, seeps into your soul and never leaves you. It’s frenetic, chaotic and providing you leave your Western ways and customs at home, you can acclimatise to the way of life there pretty quickly. It’s crowded, intoxicating and full on, but remember to breath and relax and you will begin to enjoy everything about this magical country. I was pretty active on Instagram so if you are keen to see some of the Indian street life, food and people, then please follow me over there as well. Here are few snaps to whet your appetite.

We spent 9 days in beautiful Kolkata, visiting family and generally relaxing and seeing more of the city. Followed by a two week tour of Rajasthan. I have lots of tips and suggestions on the food front, but I am presently writing an article that I hope to get into one of the magazines or newspapers – so watch this space. The photo of ‘papri chat’ below gives you an idea of how epic the street food is in Kolkata. It is commonly thought of as the street food capital of India.

The best way to get under the skin of any city is to pound the pavements on foot and see everything up close. It’s an overload of the senses and truly engaging. In Kolkata one day, we walked 10km along the Hooghly River – a distributary of the Ganges River – and saw everything from the Mullick Ghat Flower Market, people bathing in the river, a wedding couple, the cremation ghats (I particularly wanted to show my children this, as death is dealt with in very different way in India and it is nothing to be afraid of), the district of Kumortuli Pally – Kolkata’s Potter’s community, to the Marble Palace.

Rajasthan was the second part of our trip and whilst, on paper, the trip sounded rather exhausting, it was in fact not the case. We combined culture and sights with relaxing in beautiful surroundings and meeting the local people. Staying in the Aravalli Hills, in a stunning heritage hotel in a small rural village, was a highlight. It you are planning a trip to Rajasthan, make sure you book a night or two at Rawla Narlai – where you will get to meet this fine gentleman, who I think without doubt has the best attire of any hotel staff I have ever met.

Without overloading you on my first blog post back, let me introduce the recipe that I wanted to show you today. To give you a brief back story, I was poorly for a few days with Delhi belly (not from street food but from a ‘smart’ hotel dinner). After eating next to nothing for a few days I wanted to eat comforting food that would ease me back. At our hotel in Delhi ‘pongal’ was on the breakfast menu. It’s actually a south Indian breakfast originating, I believe from Tamil Nadu. It is often referred to as ven/ghee/kara or milagu pongal but the one in the hotel simple said pongal, so I will go with that. It is made with rice and a small yellow lentil called moong dal – which you can order online from Asian Dukan in the UK. It didn’t look dreadfully appetising, but my goodness it tasted wonderful. A cross between a savoury porridge and dal – not dissimilar to Chinese congee, but in my mind – better.

I have a couple of other tasty Indian breakfast recipes on this blog – Upma  and Hoppers or Appam so thought this might be a good one to add to the list. You can make it the night before then leave it in the fridge until morning. Simply add a little boiling water to bring it back to life, and hey presto you have a deliciously subtle and tasty Indian breakfast. It’s also perfectly tasty to eat for lunch too so you can make a batch and eat it as you want over a couple of days.


Pongal

serves 4-6

120g basmati rice

120g yellow moong dal

900ml cold water

1 tbsp ghee (clarified butter)

10 approx cashew nuts

1/2 tsp cumin seeds

1/2 tsp mustard seeds

1/2 tsp roughly broken up black peppercorns

1 tsp grated/chopped fresh ginger

1 stem of fresh curry leaves (Sainsburys now sell them)

1 fresh green chilli, finely chopped, optional

pinch of asafoetida/hing

pinch of turmeric powder, optional

1tsp salt, to taste

handful of freshly chopped coriander, leaves and stems

  1. This first part is optional, but it gives the dish a slightly more smokey flavour. Dry roast the dal until it begins to bronze slightly. It will take a couple of minutes, but use a wooden spoon to move it around the pan so that it does not burn. You can omit this part and simply go to 2. should you wish.
  2. Add the rice to the same pan as the dal and place some water in the pan. Move the spoon around the pan then discard the water by gently pouring it out – you don’t need to use a sieve. Repeat twice and then add 900ml cold water.
  3. Leave to simmer for around 20-25 minutes, by which time the rice and dal will be soft and the water soaked up. If it becomes too dry simply add in a little more water.
  4. Using a potato masher, mash the rice and dal so that it gets broken up and more ‘mash’ like in appearance. Place to one side whilst you do the next steps.
  5. Using a frying pan, add the ghee. Once it has melted add the cashew nuts and gently move around the pan for 30 seconds before adding the cumin and mustard seeds, black pepper. They will begin to pop, so make sure that your heat is on low.
  6. Now add the fresh ginger, turmeric (optional), asafoetida, curry leaves and green chilli (optional). Move around the pan for 20 seconds or so and then add the contents of the pan into the rice and dal mixture.
  7. Move around the pan and add salt to taste. Add more water if necessary. Check to taste and heat up again if necessary. Add some freshly chopped coriander and serve.

With these cold, dark mornings we are having in the UK, what better way to start the day than with some delicate spices in a comforting bowl of Indian pongal.

More exciting Indian recipes and photos next week. Have a good weekend in the meantime.


‘Masala Mamas’ Dill Stew

I feel it’s been a while since I posted any Indian recipes. That is not to say I’ve not been cooking any Indian food at home. For those who have been following me for a while, or have read my bio, will know my husband is Indian so cooking Indian food is part of our regular diet – but some of the recipes I’ve been cooking are already on my blog. These are always family favourites that I have been cooking:

DalsBengali red split lentil dal, channa dal, toor dal

CurriesBengali chicken, speedy salmon, Bengali prawn, Laal Maas (when I want a seriously hot one!) or Chettinad Chicken, 

Sri Lankan tuna curry, mild cod curry

Vegetarian curries  – cauliflower with fenugreek, ginger and turmeric okra, chickpea curry, butternut squash and lemongrass (more Asian influenced than Indian, but a great recipe)

Not so long I was contacted by a Elana Sztokman, an anthropologist and award-winning writer specialising in women from traditional societies. She has written an Indian cookbook, which tells the inspiring story of a group of sixteen Indian women from the Kalwa slum in Mumbai, changing their communities through food and love. The slum is home to over 200,000 people where clean water and electricity are hard to find. These harsh conditions often prevent children going to school, with many being sent out to work to make a few rupees so that they will have something to eat.

These women are changing all this by making sure the children eat and learn, and consequently changing their otherwise inevitable destiny. Each morning the women rise early to prepare a host of delicious, nutritious vegetarian food for the children. In one year alone they cook 257,400 meals. They deliver the food to the Love2Learn school, run by the the NGO Gabriel Project Mumbai, where the children know that if they show up to learn, they will eat. It’s a win win. The children learn, have nutritious food and thus begin to end the cycle of poverty they are trapped in. The women feel inspired and thrive and thus the children and communities thrive around them.

The book that Elana has sent to me – ‘Masala Mamas’ incorporates recipes and stories from all these Indian women. It’s a joy to read, hearing about the rural villages the women have originally come from and how they came to the sprawling metropolis of Mumbai in the hope of giving their children an education, which most of them lacked. The group has provided kinship, connections and a purpose, which is motivating them every day. All the proceeds from the sale of the cookbook go directly to the women of the Masala Mamas cooperative. You can order a copy for yourself here.

I thought it would be interesting for you to see a typical menu for the children:

On Mondays the children eat poha – rice flakes with vegetables.
On Tuesdays –  dal khichdi – lentil and rice stew.
On Wednesdays – chana dal – black bean curry.
On Thursdays – veg pulav – a pilaf made with mixed vegetables.
On Fridays – soya pulav – a stew made from soya chunks, an affordable and simple source of protein.

And on Saturdays, as a special treat, the children eat sheet – a kind of sweet semolina pudding that they particularly love.
And for special occasions and holidays, the women prepare special holiday fare like shankarpali and modaks.

After a lot of pondering on which recipe to show you  I ended up gravitating towards the ‘Dill Stew’ or ‘Shepu Bhaju’ by Jayshree Chavdry. It’s basically a dal, and you know how much I adore dals and could quite happily eat a different one every day. I also liked the fact that it contained dill, a herb that I do not usually associate with Indian food. It’s also super straightforward, requires no unfamiliar ingredients and is perfect for a light meal on a summers day. The result – it tasted really really good and I will now be including it in my Indian culinary arsenal for sure. Give it a go and if you are on instagram, don’t forget to tag me #chilliandmint so that I can see how you got on.


Dill Stew

1 cup/240ml yellow moong dahl (lentils)

1 tbsp/15ml oil

1 tsp/5ml mustard seeds

1/2 (half) tsp/2.5ml cumin seeds

1 medium onion, finely chopped

3 small green chillies, finely chopped

1 tsp/5ml turmeric powder

2 cups/1/2 litre water

1 cup/240ml finely chopped dill

3 cloves garlic, crushed

salt to taste

  1. Soak the dahl in water for 20-30 minutes. Then rinse well.
  2. Heat the oil in a pan on a medium heat and add the mustard seeds. They will begin to crackle almost immediately. Add the cumin seeds followed by the onions. Mix well and let them cook for 2 minutes before adding the chillies and cooking for a further 2 minutes.
  3. Drain and rinse the presoaked moong dal and add to the pan along with the turmeric powder. Add the water and mix well together. Cover and allow the dal to cook for 10-15 minutes or until it is fully cooked and softened. Be careful not to burn the dal and add more water if necessary.
  4. Add the dill, garlic and salt to taste. Cook covered for another 5-10 minutes
  5. Serve hot with rice or puris/lunchi or simple in a bowl on its own. Divine.

If you are making it earlier in the day to eat later you may find you need to add a little water when reheating it. 


SaveSave

SaveSave

SaveSave

SaveSave

SaveSave

SaveSave

SaveSave

SaveSave

SaveSave

SaveSave


Indian Chana Dal – Sweet and Salty

As some of you may know I am a BIG dal fan. Huge in fact, I love the stuff, and I am always trying to convert the uninitiated. Dal is an Indian lentil soup, or porridge of sorts, that can vary in consistency depending on personal preference. There are so many varieties, using a wide range of lentils, that there is at least one to appeal to every palate. For the most part (some need soaking) they are quick and very easy to make. Once you have bought a few staple ingredients for your pantry, you will find that cooking dal is a very economical meal to cook and, for many in the Indian subcontinent, an essential source of inexpensive protein.

Chana dal, also known as cholar or yellow split lentil, is one of my personal favourites. It is absolutely delicious with delicate sweet undertones coming from the coconut and sultanas. I use desiccated coconut, however in India as coconuts are more readily available, they often use shavings of freshly fried coconut. I eat it for lunch or dinner, although out in India it is even served up for breakfast!

Unlike the red split lentil dal, which I spoke about in an earlier blog, you need to think a little ahead for this dal as the yellow split lentils need to soak for a number of hours. I always soak them over night, but if you check on the packet you will probably find that you can soak them in the morning and they will be ready to cook by the afternoon/evening.

Chana Dal

Serves 4-6

300g of chana dal, soak overnight

1 tbsp of oil

1 tsp panch phoron

3 bay leaves

1/2 tsp turmeric

1/2 tsp chilli powder (more if you prefer it hot)

sultanas, handful

1 tsp of ghee/butter (optional)

1 tsp of sugar

1 tsp salt

2 tsp of desiccated coconut

  1. Before cooking soak the lentils overnight ideally or at least for a few hours.
  2. After soaking, remove the water and refresh with more water. Boil on a low heat, until soft, approx. 20 mins (45mins + if not soaked). You will know they are soft when you are able to squeeze them easily between your fore finger and thumb. If they are still a little hard, leave them to boil for longer.
  3. In a new pan heat a tablespoon of oil on a low heat. Add the panch phoron, bay leaves, turmeric, chilli powder, sultanas, salt and sugar.
  4. Move around the pan for 20 seconds max, so that it does not burn, and add a couple of spoonfuls of chana dal and stir into the pan. Then transfer all of the contents of the pan into the original pan. Add more salt if necessary.
  5. Add the ghee/butter if using. Sprinkle the desiccated coconut over the top of the dal and let it simmer for a few minutes.

Other additions to this dal is to add fresh green or dried red chillies instead of chilli powder. If you have fresh coconut to hand then thinly slice it into pieces (no more than a handful) and bronze initially in a little ghee, remove and place to one side. Scatter on top at the end instead of the desiccated coconut.

SaveSave

SaveSave

SaveSave

SaveSave

SaveSave

SaveSave

SaveSave


How to Make Sri Lankan/ Southern Indian Sambar

So how have you been getting on with making ‘hoppers/appam’ at home? Has anyone been brave enough to give them a whirl? I would love to hear how you got on. You do need a special pan mind you, but they are easy to source on the web – I think this is the one that I bought. Perfect christmas gift for anyone with a keen interest in cooking? If you do give them a go PLEASE can you post it up on Instagram and tag me @chilliandmint and #chilliandminthoppers. Thank you.

As promised todays post is all about the sambar. Sambar is very similar to a dal, the main difference is that it is more of a lentil based vegetable stew, whereas dals tend to be more of a lentil soup with maybe one of two vegetables incorporated within it. Sambar often has a tamarind broth as its base note, which can also be found in dal – for example toor dal – but not exclusively. It is eaten in both Southern Indian and Sri Lanka and once you have made the spice blend you can keep making it in a relatively short space of time. I hosted a Sri Lankan lunch recently where I basically fed my pals a typical Sri Lankan breakfast…but I gave it to them for lunch (they weren’t to know). Egg hoppers, sambar, pol sambol (similar to a dry coconut chutney) and an onion relish. I think it was a hit.

When you make sambar you can use any vegetable that needs using up. Unless you live near an Asian grocers you are unlikely to come across ‘drumstick’ which is fairly typical to see in a sambar. Don’t worry, just pop in marrow, courgette, pumpkin, squash, green beans – anything that needs using up will work a treat.

Sambar Powder

50g chana dal (split husked Bengal gram)

50g urid dal (split husked black gram)

30g coriander seeds

2 tbsp cumin seeds

1 tsp fenugreek seeds

1 tsp black peppercorns

10 dry red chillies

12 fresh curry leaves

1/2 tsp turmeric powder

1/2 tsp asafoetida/hing powder

1 tbsp desiccated coconut (or fresh of course!)

  1. Heat a dry frying pan over a low heat and dry roast both dals until they turn bronze slightly – a couple of minutes max. Place in a bowl to one side.
  2. Using the same pan add the coriander, cumin, fenugreek, black peppercorns and dried chillies and move them around the pan for 30 seconds. A wonderful aroma will be released.
  3. Add the fresh curry leaves, asafoetida, turmeric and desiccated coconut and mix it all around the pan for another 20 seconds and then place in the bowl with the dals.
  4. Let it all cool and then whizz it up in a spice grinder. I have this one and it works a treat.
  5. Store in an airtight container and use as and when you need it.


Sambar

You can make it with a range of different lentils but I find that red lentils work really well as they take the least amount of time to cook.

200g red split lentils, washed under cold water for a couple of rinses

water to cover the lentils about an inch above (you can always add more if it dries out)

2 green chillies, sliced lengthways and seeds kept in

1/2 tsp turmeric powder

******

250ml tamarind water (use a walnut size piece of tamarind – see notes below)

2 tbsp oil (rapeseed/vegetable)

1 tsp mustard seeds

1 tsp cumin seeds

7 fresh curry leaves

2 dried chillies (split in two)

1 medium onion, finely chopped

4 garlic cloves, finely chopped

80g of pumpkin/squash, cut into 1 cm pieces

80g carrots, cut into 1 cm pieces

80g aubergine/green/runner beans, cut into 1 cm pieces

1 large drum stick, washed and part of the outer green skin removed, chopped into 1 inch pieces, optional

250ml tamarind water (use a walnut size piece of tamarind – see notes below)

1 tbsp sambar powder

salt to taste

  1. In a deep pan add the lentils, chillies and turmeric powder and cover with water. Simmer gently, removing any scum that may form, for 10-15 minutes, by which time the lentils will have completely softened. Do not drain, instead leave to one side whilst you work through the following steps.
  2. Take a generous walnut size piece of tamarind and place in a bowl and add boiling water to cover it. Leave to rest for 20-30 minutes then strain. Using the back of a spoon push through any of the tamarind pulp. Discard the stones. Place the liquid in a measuring jug and leave to one side.
  3. In a large frying pan/skillet heat the oil and then add the mustard seeds and allow them to gently pop before adding the cumin seeds, curry leaves and dried chillies. Move around the pan for 10 seconds and then add the onion and garlic. Leave to soften, stirring occasionally for around 7 minutes.
  4. Add all the vegetable pieces (they should all be around the same size, other than the drumstick) and mix in with the spices and onions.
  5. Add the sambar powder, salt and tamarind water and bring to the boil.
  6. Lower the heat and place a lid on the pan and allow the vegetables to soften completely – this will take  around 12 minutes. Check that they have softened completely before adding the lentils.
  7. Add the lentils and stir in well to the spices and vegetables. Add more salt if necessary and allow to simmer further for another 5 minutes.

It makes a wonderful ‘soup/stew’ as the days get shorter and the weather colder. If you are living in a warmer climate then sambar is equally good for you all year around.

Have a good week folks.


SaveSave

SaveSave

SaveSave

SaveSave


Sri Lanka’s Cultural Triangle and Sri Lankan Dal

Sri Lanka’s temperature can change dramatically depending where you are in the country. The cultural triangle is in the interior dry lands, also known as the northern plains (and traditionally known as Rajarata, or “The King’s Land”). Earthy scrub mingles with dense jungle and this is in turn is punctuated by  small mountainous boulders – such as Sigiriya (below) and Pidurangala.

We climbed the less touristy Pidurangala, which is a few feet shorter than Sigiriya and far less crowded, we probably saw no more than 15 people there and back. It offered us the same views, at a fraction of the cost apparently, and a good view of Sigiriya itself. It does not have the same ruins that Sigiriya has at the top,  although it does have it’s own temple and buddha, but if it is the view you are after then you have the same experience on either rock.  I will say however that the final part of the climb is precarious – a case of heaving yourself up onto a giant boulder – so makes it tricky for children or those not sure on their feet!

For three days we did some serious cultural touring in the heat, travelling a good distance on some days. The main sites that draw locals and tourists alike are the ancient kingdoms of Anuradhapura, Polonnaruwa, Sigiriya and to a lesser extent on Pidurangala and Daumbulla cave temple (below).

However for those keen on wildlife, Minneriya National Park is also within the cultural triangle and an absolute must. The park forms part of the elephant corridor, allowing elephants to migrate between the protected areas of Kaudulla National Park in the north and Wasgomuwa National Park in the south. Hiring a jeep we spent a few hours in the park viewing all the wildlife (over 200 elephants) as well as wild buffaloes, land monitors, a vast array of birds and even a crocodile. There were a number of other jeeps with other tourists, so it did feel a little bit like feeding time at the zoo, but that said I would recommend a few hours scoping out the place.

The largest site to see is Anuradhapura, which was founded in the 4th century BC and was one of Sri Lanka’s greatest centres of religious and political power. The ancient city is sprawling with numerous temples, massive dagobas – which are the Sinhalese name for the Buddhist stupa, a mound-like structure with relics, used by Buddhist monks to meditate (see below).

You can also see remains of ancient palaces, pools and auspicious trees.

Local pilgrims far out numbered tourists and with the heat blazing down my one piece of advice is take a pair of socks to slip on when you visit the temples and dagobas. You have to remove your shoes and the stone is scorching hot. I learned the hard way on the first day.

Outside all the temples there are flower and incense sellers selling stunning purple lotus flowers to passing pilgrims, which in turn buy them in order to offer them to buddha within the temples.

Stone elephants stand proudly guarding the boundaries to the temple complexes.

Polonnaruwa is not as sprawling as Anuradhapura and less busy, but offers the traveller as rich an experience. During the 12th century the kingdom went through a golden age where monasteries and  temples where built on a massive scale. The prosperity was not to last and by 1293 the city was abandoned and the jungle quickly consumed it. It wasn’t until the 20th century that excavation and restoration began and in 1982 it was a declared a UNESCO World Heritage Site. Our driver kindly drove us from ruin to ruin, but if you are feeling up to it you can also hire bikes, which looked a fun, albeit hot, way to move around the city.

With all this touring we parked ourselves at the Water Gardens Sigiriya (a few hours away from these ancient kingdoms) which had a rather impressive view upon arrival.

It opened at the end of last year (2016) and offers incredibly spacious rooms (I think a villa would be more apt), with plunge pools in some. Although when you have the main pool like this –

then your plunge pool becomes pretty redundant. The hotel is beautiful and has been thoughtfully created in the natural habitat. Peacocks roam around the grounds – apparently eating up the snakes (Sri Lankan has more venomous snakes than any other country), although they have a cry similar to a young child, which is a little disarming to begin with but after a while you don’t even notice it. Golf buggies are on hand to  ferry guests from their rooms to the restaurant, bar or pool.

The restaurant had both Western and Sri Lankan fare, although I personally wish they had had more of the latter and less of the former. Eating Western lamb shanks in Sri Lanka just isn’t my thang! The Sri Lankan food was very good, but after three days I was craving more variety.   We were on half board and the menu for supper included starters, soups, then the main event – the Sri Lankan food, followed by dessert. The starters and soup were more Western in flavour and to be honest I would have preferred more continuity of Sri Lankan food throughout…….but maybe that’s just me.

This week I wanted to show you how to cook a delicious dal I was fed on numerous occasions in Sri Lanka. It is very different from my Bengali dal but equally as moreish.

Sri Lankan Dal

Serves 4-6 if served with other dishes

300g red split lentil dal

1 red onion, roughly chopped

3 garlic cloves, roughly chopped

2 pandan leaves *

10 fresh curry leaves **

1/2 large tomato, diced

1 tsp salt

1/2 tsp ground turmeric

1 heaped tsp Sri Lankan curry powder ***

1/2 tsp freshly ground black pepper

1/2 tsp chilli powder

1 fresh green chilli, sliced in two

400ml coconut milk

400ml water

1. Wash the red split lentils and then place all the ingredients on top along with the coconut milk and water.

2. Simmer gently for 15 -20 minutes. Check to taste the salt levels are correct and add a little more water as required.

In Sri Lanka two varieties of coconut milk were added and no water. First they added the less thick variety and then only at the end, on a low simmer, did they add the thicker coconut milk. 

*pandan leaves – you can pick these up from your local Asian or Sri Lankan grocers or equally you can order online here.

*** fresh curry leaves you can pick up easily at Asian grocers or online.

***There are two types of curry powder in Sri Lanka – roasted which is redder in colour and unroasted, which is browner in colour. You need to use the unroasted in this dal. I bought back both varieties from my trip but if you want to make your own simply unroasted then blend 2 tbsp coriander seeds with 1 tsp of cumin seeds and 1 tsp of fennel seeds. Very easy.

If you want to make the roasted curry powder: Warm a frying pan and then add 2 tbsp of coriander seeds, followed by 1/2 tsp black peppercorns, 5 cloves, 5 cardamom pods (seeds only), 6 dried chillies, 3 stalks of fresh curry leaves, 1 tbsp cumin seeds and 1/2 tbsp fennel seeds. Move around the pan continuously for 5 minutes so that they do not burn and then place in a spice grinder.

SaveSave

SaveSave

SaveSave


Spinach with Shallots, Green Raisins and Red Peanuts

IMG_2055

My latest addiction is spinach.

I know I know how crazy do I sound? I’ve always liked it mind you, but of late it’s gone up a notch or two. It’s probably my body screaming at me that ‘I NEED MORE IRON‘.

 I’m happy to eat it in all its incarnations for breakfast, lunch or dinner. It’s super versatile and is cooked quicker than the time it takes to get your bowl/plate and cutlery together.

IMG_2046

Recently I visit a local eatery called ‘The Little Taperia‘ in Tooting in the strip, which is fast becoming increasingly hip and cool. Sitting next to Soho House’s ‘Chicken Shop’ and virtually opposite the newly established the ‘Trafalgar Arms’, ‘The Little Taperia’ offers Spanish tapas at it’s best; I could literally eat the whole menu. It was packed on my visit with a wonderful buzz to the place. The decor (love the floor tiles) and general vibe was conducive to a relaxed, memorable evening, so if you have not yet been I urge you to get down there and experience it for yourself.

IMG_2046

Back to the spinach. You are probably wondering where spinach and ‘The Little Taperia’ fit together.  Well it was there that I ate a delicious spinach dish that inspired me to create my own version of the dish for you today. They used pine nuts and I can’t recall if they added raisins but I’m thinking they did as the dish had a subtle sweetness, which I don’t think was coming from the onions alone – but may well have been. Needless to say the dish was utterly delicious and I think the one that I have created for you equally hits the spot.

I’ve eaten it on a few occasions since and this time I accompanied it with my Indian dal with butternut squash. I don’t actually have that recipe up on my blog but a very similar one using marrow can be found here.

IMG_2049

I add a dollop of ghee – clarified butter – on the top but if you are off diary or watching your waist line then just omit that part.

Spinach with Shallots, Green Raisins and Red Peanuts

2 tbsp light olive oil

2 banana shallots, finely sliced

pinch of salt

35g red peanuts (works out to be a handful)

35g green raisins (works out to be a handful)

240g fresh spinach

1 tbsp ghee

  1. Heat a pan with the oil and when it is medium hot add the banana shallots and pinch of salt and leave to soften and begin to bronze, which will take around 5 minutes.
  2. Add the green raisins and red peanuts and move around the pan. After a minute add the spinach.
  3. Place a lid the pan so that the spinach wilts. After a minute give a stir and then add the ghee. Let it melt and then serve immediately.

It is perfect with meat or fish but in this instance I ate it with some of my butternut squash dal, which was hit the spot for a delicious vegetarian supper. My butternut squash dal is similar to my marrow dal but uses butternut squash instead of marrow. Check it out here.

IMG_2041


Tomato and Garlic Red Lentil Dal

IMG_0701


This recipe is for all of you lovely people out there who claim you don’t have time to cook. It is super quick, satisfying and great for cold winter nights. It literally takes no longer than 15 minutes to cook from beginning to end. To be fair it is very similar to this dal of mine although it differs in that it has a tin of tomatoes in it, loads of fresh whole garlic (great for ridding those horrible colds and coughs we pick up in winter), and a sprinkling of cumin powder.

IMG_0702

I had a bunch of friends over for lunch the other day and as well as cooking some tasty winter salads had a huge pot of this on the stove. It seemed to go down a treat as there was very little left over once they had gone, another sign that it’s worth giving it a go.

IMG_0700

I like to add a splash of lemon juice liberally at the end, but it’s up to you. Like with all dals they can be made more soupy or firmer depending on personal choice. For this dal I like to make it more soupy so that I can spoon it out of a bowl. If you are cooking it with rice and another dish then maybe you want to add less water. I never really measure the water that goes into it. I always go on how it looks, so my advice is to put in enough water so that it covers the dal by half an inch and then keep adding more boiling water once  the water has soaked up. It’s a winner and so simple. Give it a go and leave me a comment below.

IMG_0697


Tomato and Garlic Red Lentil Dal

Serves 4-6 (4 as a main 6 as a side dish)

300g red split lentil

water, enough to cover the red lentil

1 tbsp groundnut oil

5 (or more) garlic cloves, gently crushed but kept whole

1 tsp panch phoron

1 tsp turmeric powder

1/2 tsp cumin powder

1 tsp salt (to taste)

400g tin of tomatoes

1 lemon, quartered – optional to serve

1. In a deep pan place the red lentils and cover with cold water. Gently wash the lentils using your hand and pour out the murky water. Repeat three times.

2. Add boiling water to the red lentils and cover so that all the lentils are submerged by 1/2 inch. You can add more boiling water once this has soaked up if need be. Boil on a gently heat, skimming off any white residue that comes to the surface. Stir at intervals so that all the lentils cook through and turn from orange to a more yellow colour. Add more boiling water if you prefer it to have a more soupy consistency.

3. In a separate pan heat up the oil and then add the panch phoron. Once they start sizzling add the garlic and move around the pan. After a minute add the turmeric and cumin powder. Keep on a low heat, making sure the garlic and spices do not burn.

4. Add a spoonful of the now yellow lentils to the panch phoron and stir into the spices. Pour the contents of this pan into the pan with lentils and stir in thoroughly. Add a little water to the saucepan to make sure the spices pan is now clear of spices.

5. Add salt to taste and the tin of tomatoes and cook on a low heat for 5 minutes, or until the garlic has softened.

Voila. That simple. Enjoy.


Gujarati Kadhi – a delicately spiced yogurt soup

IMG_9991

It is bucketing down outside this afternoon and I am feeling rather cosy inside out of the rain. After taking the photos for this blog post I had a bowl full of this hot, delicately spiced warming soup. Seriously delicious and quite filling, owing to the yogurt, potatoes and mooli.  Now that Autumn is well and truly here this soup comes into its own and I urge you to try making yourself some.

IMG_0006

It was Durga Puja last weekend – you can read up what goes on exactly at this Indian celebration in my posts from last year and the year before  see here and here. During the festivities at the Hindu temple prasad is often taken. Prasad is literally a religious offering or gift that comes in the form of a meal. Always vegetarian and gently spiced it allows families and friends to come together to share a meal that is blessed during this auspicious occasion. One of the curries we were served was this Gujarati Kadhi. I adored the delicately spiced yogurt soup so much so I was allowed to venture into the kitchens to see how it was being prepared. Huge caldrons of the soup were being constantly stirred over hot stoves before being taken out to hungry worshippers.

IMG_9990

I’ve made my own additions and twists but the taste is pretty similar to the one that I had last weekend. It is so different from any soup or dal I have tried before that it immediately appealed. All the ingredients are pretty easy to pick up at your local supermarket. I have seen gram flour in the big supermarkets here in the UK and I noticed that Waitrose was even selling fresh curry leaves the other day. Times are changing!  Mooli is harder to track down if you don’t live near an Asian grocers so just omit that part if you can’t find it. As with most of my recipes it is quick and easy so if you are feeling adventurous then give this fabulous dish a try.


Gujarati Kadhi

Serves 4-6

500g natural yogurt

2 tbsp gram flour (chickpea flour)

1/2 tsp green chilli paste

1/2 tsp ginger paste

700ml water

1 tsp salt

•••••••••••

1 tbsp ghee/butter

1/2 tsp black mustard seeds

1/2 tsp cumin seeds

3 cloves

2 small cinnamon sticks

2 dried red chillies, broken into pieces

10 fresh curry leaves

pinch of asafoetida

75g mooli (also known as daikon or white radish)/, cut into thin matchsticks

1 small potato, cut into thin matchsticks

1 tsp jaggery/sugar

1. In a large bowl mix the yogurt, gram flour, green chilli and ginger paste, salt and water using a hand whisk.

2. In a deep saucepan add the ghee and when it is melted add the mustard and cumin seeds and after 30 seconds add the cloves, cinnamon sticks, dried red chillies, fresh curry leaves and asafoetida. This is known as tempering.

3. Add the mooli and potato matchsticks and stir into the spices for one minute.

4. Gently pour in the yogurt/gram flour mixture over the potato, mooli and tempering spices and stir continuously to prevent the yogurt from separating.

5. If you find the mixture too thick simply add a little more water.

6. Add the jaggery or sugar if you don’t have any jaggery to hand. Stir into the soup. Simmer for  around 15 minutes or until the potato and mooli matchsticks are softened.

Serve with basmati rice or simply on its own in a bowl.


IMG_0002


Decadent Dal Makhani

IMG_9781

This gloriously decadent dal originates from the Punjab region of North India where black urid beans, also known as black gram, are eaten in abundance. It happens to be my husband’s absolute favourite king of dals. Creamy and rich from the butter, ghee (or oil) and double cream (oh don’t let that put you off!) and yet zings of ginger, garlic and tomato accompanied with a delicious spicy masala.

IMG_9792

Whilst we are lucky to still have some warm days, soon the weather will be turning and this dal is definitely one to bookmark for when there is a chill in the air.

IMG_9785

In the Punjab this dal is eaten on special occasions, such as weddings and religious ceremonies. When all the pomp and glory happens you can guarantee that dal makhani will be offered to guests. Do try it and let me know how you get on.

IMG_9808

Hope you all have a lovely weekend.


Dal Makhani

Serves 4-6

250g black urid beans (also known as black gram)

20g fresh ginger, peeled and grated

3 garlic cloves, grated

2 green chillies, finely sliced

241g tin of red kidney beans (this was the amount once drained)

1 tsp salt

*********************

tadka 

2 tbsp sunflower oil or ghee

1 tsp cumin seeds

1/2 tsp fenugreek seeds

pinch of asafoetida/hing

2 garlic cloves, grated

2 tbsp tomato puree

*********************

Just before serving

1 tbsp butter

40ml double cream

1/2 tsp Kashmiri chilli powder

1/2 tsp garam masala

salt to taste

1. Ideally soak the urid beans overnight submerged in a bowl of water. Equally if you plan on eating them in the evening you can soak them in the morning for around 6 hours.

2. Once the lentils have soaked (see above) drain them and then wash them with clean water and drain 3 times so as to get rid of any impurities.

3. Place them in a large deep pan and completely cover so that the water is just above the beans. You can always add more water during the cooking process if it all gets soaked up. Add the finely grated ginger and garlic as well as the green chilli and salt. Bring to the boil and then simmer for 20 minutes. The scum that comes to the top when cooking can be removed with a spoon and discarded.

4. After about 20 minutes the dal should have softened and much of the water reduced. Press a bean between your thumb and forefinger and it should easily be squashed. If it needs to soften a bit more leave it simmering for a further 5 minutes.

5. Strain the lentils and then place them back in the pan along with the drained tinned red kidney beans. Add 100ml of water and simmer for a couple of minutes.

6. In a separate small frying pan add the oil (or ghee if you are feeling a little bit naughty) and when it is hot gently add the cumin and fenugreek seeds. They will begin to pop after about 30 seconds so proceed to add the garlic, asafoetida and then after a minute add the tomato puree and stir in together. Simmer on a low heat for a further minute.

7. Place the contents of the frying pan into the large pan with the urid and red kidney beans and give a good stir. If it is too thick add a little more water. It is very much down to personal taste on how thick or soupy you wish your dal to be. Simmer together for 10 minutes.

8. A few minutes before serving add the butter, double cream, Kashmiri chilli powder and garam masala. Give a good stir and add more salt as required.

Oh so delicious. I hope you agree.

Do leave a comment below. I love to hear from my readers.